


在Kubernetes集群中,要实现数据库高可用性,具有很多方案,而operator作为一种通用方式,已经广泛使用在Mysql Innodb Cluster(MySQL Group Replication)、PostgreSQL、TiDB、OceanBase、Oracle Database(官方提供使用OKE部署在ORALE云上)中,本文通过ob-operator分分钟部署一套具有容灾功能OceanBase社区版集群。

0.1 基础环境
Kubernetes 1.23.8(多主多从/一主两从,至少3个pod负载节点);
ob-operator 1.0.20;
OceanBase-ce 3.1.3;
obagent 0.2;
obproxy-ce 3.2.3
prometheus 2.32.1/Grafana v8.3.3(监控OceanBase将在后续文档中体现)。
Kubernetes集群需要连接互联网,部署3个OceanBase zone,为满足高可用,每个zone使用Kubernetes中node的目录空间存储数据,至少3个node节点提供pod负载,存储目录为/opt/local-path-provisioner,如果目录为固态盘,IO性能将会得到较好体现。
0.2 ob-operator介绍
ob-operator可以让OceanBase以容器的方式,无缝运行在公有云或私有部署的 Kubernetes 集群上。
ob-operator现已支持OceanBase集群的创建、删除,完整的节点生命周期管理,并通过Service的形式暴露给用户使用。后续会支持租户管理、ob-proxy管理、多Kubernetes集群等功能。
目前支持通过YAML、Kustomize来部署ob-operator。后续会支持Helm形式部署。
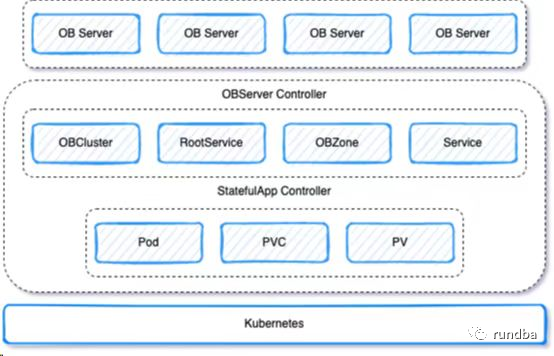
Kubernetes上OceanBase-ce架构图
下面步骤通过ob-operator在Kubernetes集群上部署OceanBase高可用数据库,其中OceanBase存储使用了node节点的本地存储,使用rancher的local-path-provisioner实现。
1) rancher local-path-provisioner说明
Local Path Provisioner为Kubernetes用户提供了一种利用每个节点中的本地存储的方法。根据用户配置,Local Path Provisioner 将hostPath自动在节点上创建基于持久化卷。它利用了 Kubernetes Local Persistent Volume特性引入的特性,但使其成为比localKubernetes 中内置的卷特性更简单的解决方案。
2) 下载rancher最新稳定版local-path-provisioner
wget https://raw.githubusercontent.com/rancher/local-path-provisioner/v0.0.22/deploy/local-path-storage.yaml
3) 创建存储相关的namespace、StorageClass等
[root@k8s3-master ~]# kubectl apply -f local-path-storage.yamlnamespace/local-path-storage createdserviceaccount/local-path-provisioner-service-account createdclusterrole.rbac.authorization.k8s.io/local-path-provisioner-role createdclusterrolebinding.rbac.authorization.k8s.io/local-path-provisioner-bind createddeployment.apps/local-path-provisioner createdstorageclass.storage.k8s.io/local-path createdconfigmap/local-path-config created
4) 查看已创建的StorageClass
[root@k8s3-master ~]# kubectl get scNAME PROVISIONER RECLAIMPOLICY VOLUMEBINDINGMODE ALLOWVOLUMEEXPANSION AGElocal-path rancher.io/local-path Delete WaitForFirstConsumer false 22s
5) OceanBase数据存储
后续OceanBase相关的四个目录:data-file、data-log、log、obagent-conf-file,默认均会存储到指定的Kubernetes的3个node节点的/opt/local-path-provisioner目录下。
local-path-provisioner不支持卷容量限制,将忽略容量限制。
1) ob-operator下载
在https://github.com/oceanbase/ob-operator页面,点击绿色“Code”按钮 > 点击“Download ZIP”,下载ob-operator-master.zip包。
也可直接下载:
wget https://codeload.github.com/oceanbase/ob-operator/zip/refs/heads/master -O ob-operator-master.zip
2) 解压ob-operator-master.zip(只需在K8s其中一个节点执行)
[root@k8s3-master ~]# unzip ob-operator-master.zipArchive: ob-operator-master.zipbdb553da16d4a96101360fa79233aa7539c91ef3creating: ob-operator-master/inflating: ob-operator-master/.dockerignoreinflating: ob-operator-master/.gitignoreinflating: ob-operator-master/Dockerfileextracting: ob-operator-master/LEGAL.md...
进入安装目录:
[root@k8s3-master ~]# cd ob-operator-master/
部署CRD(custom resource definitions-自定义资源类型):
[root@k8s3-master ob-operator-master]# kubectl apply -f ./deploy/crd.yamlcustomresourcedefinition.apiextensions.k8s.io/obclusters.cloud.oceanbase.com createdcustomresourcedefinition.apiextensions.k8s.io/obzones.cloud.oceanbase.com createdcustomresourcedefinition.apiextensions.k8s.io/rootservices.cloud.oceanbase.com createdcustomresourcedefinition.apiextensions.k8s.io/statefulapps.cloud.oceanbase.com created
4.1 修改operator.yaml配置
在operator.yaml中添加启动参数--cluster-name,该参数需要与 obcluster 中的cluster 配置一致。
该配置的含义为ob-operator只会处理cluster值与自身启动参数--cluster-name的值相同的CRD。
vim ./deploy/operator.yaml #更改396行的cluster-name为自己的obcluster集群名称,如rundba,默认值为cn,此处更改后,需更改下文obcluster.yaml中cluster值,两者需要保持一致...392 - args:393 - --health-probe-bind-address=:8081394 - --metrics-bind-address=127.0.0.1:8080395 - --leader-elect396 - --cluster-name=rundba397 command:398 - manager399 image: oceanbasedev/ob-operator:1.0.20...
4.2 部署ob-operator
[root@k8s3-master ob-operator-master]# kubectl apply -f ./deploy/operator.yamlnamespace/oceanbase-system createdserviceaccount/ob-operator-controller-manager createdrole.rbac.authorization.k8s.io/ob-operator-leader-election-role createdclusterrole.rbac.authorization.k8s.io/ob-operator-manager-role createdclusterrole.rbac.authorization.k8s.io/ob-operator-metrics-reader createdclusterrole.rbac.authorization.k8s.io/ob-operator-proxy-role createdrolebinding.rbac.authorization.k8s.io/ob-operator-leader-election-rolebinding createdclusterrolebinding.rbac.authorization.k8s.io/ob-operator-manager-rolebinding createdclusterrolebinding.rbac.authorization.k8s.io/ob-operator-proxy-rolebinding createdconfigmap/ob-operator-manager-config createdservice/ob-operator-controller-manager-metrics-service createddeployment.apps/ob-operator-controller-manager created
稍等片刻,OceanBase相关的namespace等对象已经创建:
[root@k8s3-node1 ~]# kubectl get pod,svc -n oceanbase-systemNAME READY STATUS RESTARTS AGEpod/ob-operator-controller-manager-5bfc659fbb-cprlf 2/2 Running 0 3m16s #状态为RunningNAME TYPE CLUSTER-IP EXTERNAL-IP PORT(S) AGEservice/ob-operator-controller-manager-metrics-service ClusterIP 10.97.149.253 <none> 8443/TCP 3m16s
4.3 配置节点label
需将Kubernetes节点打label,label需要与obcluster.yaml中的nodeSelector配置相匹配。ob-operator会将Pod调度到具有相应label的节点上。
推荐配置label的key为topology.kubernetes.io/zone。不同Zone推荐配置不同的label以做容灾。
示例命令:kubectl label node nodename topology.kubernetes.io/zone=zonename
使用label标记,结合Kubernetes的亲和性,将OceanBase的zone分布到不同kubernetes节点上便于容灾,此处在3个kubernetes node上分别标记zone:
查看当前Kubernetes集群主机分布,共3个主机,其中master以去掉Noscheduce调度,可充当node节点,提供pod负载
[root@k8s3-master ~]# kubectl get nodeNAME STATUS ROLES AGE VERSIONk8s3-master Ready control-plane,master 48d v1.23.8k8s3-node1 Ready <none> 48d v1.23.8k8s3-node2 Ready <none> 48d v1.23.8
参考上述示例,设置3个node label,k8s3-node1运行zone1,k8s3-node2运行zone2,k8s3-master运行zone3
kubectl label node k8s3-node1 topology.kubernetes.io/zone=zone1kubectl label node k8s3-node2 topology.kubernetes.io/zone=zone2kubectl label node k8s3-master topology.kubernetes.io/zone=zone3
5.1 修改observer部署配置文件
结合章节4.1,同样在obcluster.yaml中修改12行的cluster为rundba,本次其它配置保留默认。其它配置可根据自己的环境结合下面“配置介绍”适当调整、调大。
[root@k8s3-master ob-operator-master]# vim ./deploy/obcluster.yaml1 apiVersion: cloud.oceanbase.com/v12 kind: OBCluster3 metadata:4 name: ob-test5 namespace: obcluster6 spec:7 imageRepo: oceanbasedev/oceanbase-cn8 tag: v3.1.3-101000420220518219 imageObagent: oceanbasedev/obagent:0.110 clusterID: 111 topology:12 - cluster: rundba #cn更改为rundba13 zone:14 - name: zone115 region: region116 nodeSelector:17 topology.kubernetes.io/zone: zone118 replicas: 119 - name: zone220 region: region121 nodeSelector:22 topology.kubernetes.io/zone: zone223 replicas: 124 - name: zone325 region: region126 nodeSelector:27 topology.kubernetes.io/zone: zone328 replicas: 129 parameters:30 - name: freeze_trigger_percentage31 value: "30"32 resources:33 cpu: 234 memory: 10Gi35 storage:36 - name: data-file37 storageClassName: "local-path"38 size: 50Gi39 - name: data-log40 storageClassName: "local-path"41 size: 50Gi42 - name: log43 storageClassName: "local-path"44 size: 30Gi45 - name: obagent-conf-file46 storageClassName: "local-path"47 size: 20Gi
配置介绍:
version:OceanBase 集群的版本。
cluster:按需配置,如果需要在该 Kubernetes 集群中部署OceanBase集群,请将cluster配置为与ob-operator启动参数 --cluster-name相同的配置,前述更改cn为rundba,此处也做更改。
cpu:建议配置为大于2的整数,小于2会引发系统异常。
memory:建议配置为大于10Gi的整数,小于10Gi会引发系统异常。
data-file:该部分为 OBServer 系统配置项 datafile_size 的大小,建议为 memory 的 3 倍以上。用户可以自行按需配置 storageClassName。
data-log:该部分为 OBServer 系统配置项 data_dir 的大小,建议为 memory 的 5 倍以上。用户可以自行按需配置 storageClassName。
log:该部分为 OBServer 系统日志的大小,建议为 30Gi 以上。用户可以自行按需配置 storageClassName。
5.2 部署obcluster
# 先创建集群使用的namesapce,否则apply时会提示obcluster不存在
[root@k8s3-master ob-operator-master]# kubectl create ns obclusternamespace/obcluster created
# 部署OceanBase集群
[root@k8s3-master ob-operator-master]# kubectl apply -f ./deploy/obcluster.yamlobcluster.cloud.oceanbase.com/ob-test created
# 等待约数分钟后,obcluster集群已经创建完成,zone1、zone2、zone3分别按label标记分布。
[root@k8s3-master ~]# kubectl get pod -n obcluster -o wideNAME READY STATUS RESTARTS AGE IP NODE NOMINATED NODE READINESS GATESsapp-ob-test-rundba-zone1-0 2/2 Running 0 6m59s 10.244.203.208 k8s3-node1 <none> <none>sapp-ob-test-rundba-zone2-0 2/2 Running 0 6m59s 10.244.41.13 k8s3-node2 <none> <none>sapp-ob-test-rundba-zone3-0 2/2 Running 0 6m59s 10.244.219.138 k8s3-master <none> <none>
5.3 访问observer
1) 集群部署成功后可以使用 Service 的 ClusterIP 连接 OceanBase 集群
查看obcluster服务:
[root@k8s3-master ~]# kubectl get svc -n obclusterNAME TYPE CLUSTER-IP EXTERNAL-IP PORT(S) AGEsvc-monitor-ob-test NodePort 10.100.6.172 <none> 8088:31684/TCP 110ssvc-ob-test NodePort 10.110.229.121 <none> 2881:32014/TCP 110s
2) 内部通过CLUSTER-IP登录
[root@k8s3-master ~]# mysql -h 10.110.229.121 -A -c -P 2881Welcome to the MySQL monitor. Commands end with ; or \g.Your MySQL connection id is 3221749862Server version: 5.7.25 OceanBase 3.1.3 (r10100042022051821-a09d3134c10665f03fd56d7f8bdd413b2b771977) (Built May 18 2022 21:42:24)Copyright (c) 2000, 2018, Oracle and/or its affiliates. All rights reserved.Oracle is a registered trademark of Oracle Corporation and/or itsaffiliates. Other names may be trademarks of their respectiveowners.Type 'help;' or '\h' for help. Type '\c' to clear the current input statement.mysql> show databases;+--------------------+| Database |+--------------------+| oceanbase || information_schema || mysql || SYS || LBACSYS || ORAAUDITOR || test |+--------------------+7 rows in set (0.02 sec)
3) 集群外通过Kubernetes集群内的主机IP,以及2881对外暴露端口进行访问
[root@k8s3-master local-path-provisioner]# hostname -i192.168.80.125[root@k8s3-master local-path-provisioner]# mysql -h 192.168.80.125 -A -c -P 32014Welcome to the MySQL monitor. Commands end with ; or \g.Your MySQL connection id is 3222047673Server version: 5.7.25 OceanBase 3.1.3 (r10100042022051821-a09d3134c10665f03fd56d7f8bdd413b2b771977) (Built May 18 2022 21:42:24)Copyright (c) 2000, 2018, Oracle and/or its affiliates. All rights reserved.Oracle is a registered trademark of Oracle Corporation and/or itsaffiliates. Other names may be trademarks of their respectiveowners.Type 'help;' or '\h' for help. Type '\c' to clear the current input statement.mysql> exit
6.1 部署obproxy
[root@k8s3-master ob-operator-master]# kubectl apply -f ./deploy/obproxy.yamldeployment.apps/obproxy createdservice/obproxy-service created
6.2 查看obproxy服务
稍等数分钟,3个obproxy相关的pod(pod/obproxy-xxxxx)均为Running状态,且service/obproxy-service也已创建
[root@k8s3-master ~]# kubectl get pod,svc -n obclusterNAME READY STATUS RESTARTS AGEpod/obproxy-69d8b69f55-4prnv 1/1 Running 0 71spod/obproxy-69d8b69f55-bjbbm 1/1 Running 0 71spod/obproxy-69d8b69f55-j6f9m 1/1 Running 0 71spod/sapp-ob-test-rundba-zone1-0 2/2 Running 0 16mpod/sapp-ob-test-rundba-zone2-0 2/2 Running 0 16mpod/sapp-ob-test-rundba-zone3-0 2/2 Running 0 16mNAME TYPE CLUSTER-IP EXTERNAL-IP PORT(S) AGEservice/obproxy-service NodePort 10.97.213.212 <none> 2883:30083/TCP 71sservice/svc-monitor-ob-test NodePort 10.100.6.172 <none> 8088:31684/TCP 9m42sservice/svc-ob-test NodePort 10.110.229.121 <none> 2881:32014/TCP 9m42s
6.3 通过obproxy访问OceanBase集群
1) 使用mysql命令行登录
在Kubernetes节点登录:
[root@k8s3-master ob-operator-master]# mysql -h 192.168.80.125 -A -c -P 30083Welcome to the MySQL monitor. Commands end with ; or \g.Your MySQL connection id is 1Server version: 5.6.25 OceanBase 3.1.3 (r10100042022051821-a09d3134c10665f03fd56d7f8bdd413b2b771977) (Built May 18 2022 21:42:24)Copyright (c) 2000, 2018, Oracle and/or its affiliates. All rights reserved.Oracle is a registered trademark of Oracle Corporation and/or itsaffiliates. Other names may be trademarks of their respectiveowners.Type 'help;' or '\h' for help. Type '\c' to clear the current input statement.mysql>
远程登录:
mysql -h 192.168.80.125 -uroot@sys#ob-test -A -c -P 30083 test -p
2) 使用ODC客户端连接
可以使用官方ODC(Oceanbase Developer Center)连接OceanBase。
查看集群名称
mysql> show parameters like 'cluster%';+-------+----------+----------------+----------+------------+-----------+---------+---------------------+----------+---------+---------+-------------------+| zone | svr_type | svr_ip | svr_port | name | data_type | value | info | section | scope | source | edit_level |+-------+----------+----------------+----------+------------+-----------+---------+---------------------+----------+---------+---------+-------------------+| zone3 | observer | 10.244.219.148 | 2882 | cluster_id | NULL | 1 | ID of the cluster | OBSERVER | CLUSTER | DEFAULT | DYNAMIC_EFFECTIVE || zone3 | observer | 10.244.219.148 | 2882 | cluster | NULL | ob-test | Name of the cluster | OBSERVER | CLUSTER | DEFAULT | DYNAMIC_EFFECTIVE || zone2 | observer | 10.244.41.23 | 2882 | cluster_id | NULL | 1 | ID of the cluster | OBSERVER | CLUSTER | DEFAULT | DYNAMIC_EFFECTIVE || zone2 | observer | 10.244.41.23 | 2882 | cluster | NULL | ob-test | Name of the cluster | OBSERVER | CLUSTER | DEFAULT | DYNAMIC_EFFECTIVE || zone1 | observer | 10.244.203.218 | 2882 | cluster_id | NULL | 1 | ID of the cluster | OBSERVER | CLUSTER | DEFAULT | DYNAMIC_EFFECTIVE || zone1 | observer | 10.244.203.218 | 2882 | cluster | NULL | ob-test | Name of the cluster | OBSERVER | CLUSTER | DEFAULT | DYNAMIC_EFFECTIVE |+-------+----------+----------------+----------+------------+-----------+---------+---------------------+----------+---------+---------+-------------------+6 rows in set (0.08 sec)
ODC连接参考:
数据库类型:√物理库 逻辑库
所属区域:√独立部署/专有云 公有云
连接模式:Oracle √MySQL
连接名称:K8s125-ob
主机名:192.168.80.125
端口:30083
集群:ob-test
租户:sys
数据库用户名:root
测试连接,保存。
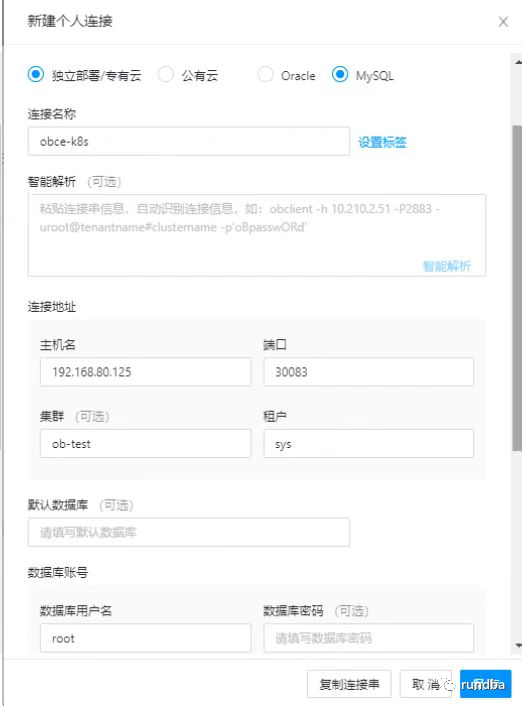
ODC连接OceanBase参考
3) 其它工具登录(略)
Navicat、Oracle SQL Developer等工具也可连接OceanBase数据库。
https://www.oceanbase.com/docs/community/observer-cn/V3.1.3/0000000000160093https://github.com/oceanbase/ob-operatorhttps://gitee.com/oceanbase/ob-operatorhttps://github.com/rancher/local-path-provisionerhttps://docs.pingcap.com/zh/tidb-in-kubernetes/stablehttps://dev.mysql.com/doc/mysql-operator/en/https://www.postgresql.org/download/products/3/https://blogs.oracle.com/database/post/the-oracle-database-goes-kubernetes-nativehttps://github.com/oracle/db-sharding/tree/master/oke-based-sharding-deploymenthttps://docs.oracle.com/en/database/oracle/oracle-database/21/shard/using-oracle-database-sharding-oracle-cloud-infrastructure1.html#GUID-E77A60FC-410B-447B-9855-FC6788A02154
-- 完 --
更多精彩,敬请期待
不足之处,还望抛转。
作者:王坤,微信公众号:rundba,欢迎转载,转载请注明出处。
如需公众号转发,请联系wx:landnow。


往期推荐
