IP | 端口 | Mgr端口 | Server_id | Mysql版本 |
192.168.3.3 | 3306 | 33061 | 1 | 8.0.22 |
192.168.3.4 | 3306 | 33061 | 2 | 8.0.22 |
192.168.3.5 | 3306 | 33061 | 3 | 8.0.22 |
1.MGR之单主模式
一.MySQL8.0安装(三台机器安装mysql)
1.#解压mysql
tar -xvf mysql-8.0.22-1.el7.x86_64.rpm-bundle.tar
2.#安装common
rpm -ivh mysql-community-common-8.0.22-1.el7.x86_64.rpm --nodeps --force
3.#安装libs
rpm -ivh mysql-community-libs-8.0.22-1.el7.x86_64.rpm --nodeps --force
4.#安装client
rpm -ivh mysql-community-client-8.0.22-1.el7.x86_64.rpm --nodeps --force
5.#安装server
rpm -ivh mysql-community-server-8.0.22-1.el7.x86_64.rpm --nodeps --force
6.修改配置文件
vim /etc/my.cnf
datadir=/home/mysql/data #修改默认的数据目录
socket=/var/lib/mysql/mysql.sock
sql_mode =
STRICT_TRANS_TABLES,NO_ZERO_IN_DATE,NO_ZERO_DATE,ERROR_FOR_DIVISION_BY_ZERO,NO_ENGINE_SUBSTITUTION
group_concat_max_len=102400
max_connections=1000
log-error=/home/mysql/log/mysqld.log
pid-file=/var/run/mysqld/mysqld.pid
7.创建目录,并给目录权限
mkdir -p /home/mysql/data
mkdir -p /home/mysql/log
chown -R mysql.mysql /home/mysql/data
chown -R mysql.mysql /home/mysql/log
8.初始化mysql
mysqld --initialize --user=mysql --datadir=/home/mysql/data
9 .启动mysql
systemctl start mysqld
10.查看数据库默认密码
cat /var/log/mysqld.log | grep password
11.进入数据库里面修改密码,并给root用户远程连接权限
ALTER USER 'root'@'localhost' IDENTIFIED WITH mysql_native_password BY '123456';
use mysql;
update user set host='%' where user='root';
flush privileges;
##修改配置文件
##192.168.3.3的my.cnf配置
server_id = 1
log-bin = binlog
log_slave_updates=ON
binlog_checksum=NONE
binlog_format=ROW
binlog_transaction_dependency_tracking=WRITESET_SESSION
binlog_expire_logs_seconds=86400
log_slave_updates = 1
gtid_mode = ON
enforce_gtid_consistency = ON
master_info_repository=TABLE
relay_log_info_repository=TABLE
disabled_storage_engines="MyISAM,BLACKHOLE,FEDERATED,ARCHIVE,MEMORY"
transaction_isolation =READ-COMMITTED
transaction_write_set_extraction=XXHASH64
##slave
slave_parallel_type=LOGICAL_CLOCK
slave_parallel_workers=4
slave_preserve_commit_order=on
##MGR
###实例启动时会将组复制插件加载到插件列表中
loose-plugin_load_add='group_replication.so'
###决定插件在服务启动时是否自启
loose-group_replication_start_on_boot=off
###在数据库中使用 SELECT UUID() 命令生成;(三台都一样)
loose-group_replication_group_name='022bf419-1497-11ed-af3d-000c290dec90'
###内部通讯端口,推荐使用 33061
loose-group_replication_local_address= "192.168.3.3:33061"
loose-group_replication_group_seeds= "192.168.3.3:33061,192.168.3.4:33061,192.168.3.5:33061"
###在首个实例联机后,需要设置为 off。如果多次引导组则人为触发裂脑,产生两个具有相同名称的不同组
loose-group_replication_bootstrap_group=off
report-host=192.168.3.3
##192.168.3.4的my.cnf配置
server_id = 2
log-bin = binlog
log_slave_updates=ON
binlog_checksum=NONE
binlog_format=ROW
binlog_transaction_dependency_tracking=WRITESET_SESSION
binlog_expire_logs_seconds=86400
log_slave_updates = 1
enforce_gtid_consistency = ON
master_info_repository=TABLE
relay_log_info_repository=TABLE
disabled_storage_engines="MyISAM,BLACKHOLE,FEDERATED,ARCHIVE,MEMORY"
transaction_isolation =READ-COMMITTED
transaction_write_set_extraction=XXHASH64
##slave
slave_parallel_type=LOGICAL_CLOCK
slave_parallel_workers=4
slave_preserve_commit_order=on
##MGR
###实例启动时会将组复制插件加载到插件列表中
loose-plugin_load_add='group_replication.so'
###决定插件在服务启动时是否自启
loose-group_replication_start_on_boot=off
###在数据库中使用 SELECT UUID() 命令生成;
loose-group_replication_group_name='022bf419-1497-11ed-af3d-000c290dec90'
###内部通讯端口,推荐使用 33061
loose-group_replication_local_address= "192.168.3.4:33061"
loose-group_replication_group_seeds= "192.168.3.3:33061,192.168.3.4:33061,192.168.3.5:33061"
###在首个实例联机后,需要设置为 off。如果多次引导组则人为触发裂脑,产生两个具有相同名称的不同组
loose-group_replication_bootstrap_group=off
report-host=192.168.3.4
##192.168.3.5的my.cnf配置
server_id = 3
log-bin = binlog
log_slave_updates=ON
binlog_checksum=NONE
binlog_format=ROW
binlog_transaction_dependency_tracking=WRITESET_SESSION
binlog_expire_logs_seconds=86400
log_slave_updates = 1
gtid_mode = ON
enforce_gtid_consistency = ON
master_info_repository=TABLE
relay_log_info_repository=TABLE
disabled_storage_engines="MyISAM,BLACKHOLE,FEDERATED,ARCHIVE,MEMORY"
transaction_isolation =READ-COMMITTED
transaction_write_set_extraction=XXHASH64
##slave
slave_parallel_type=LOGICAL_CLOCK
slave_parallel_workers=4
slave_preserve_commit_order=on
##MGR
###实例启动时会将组复制插件加载到插件列表中
loose-plugin_load_add='group_replication.so'
###决定插件在服务启动时是否自启
loose-group_replication_start_on_boot=off
###在数据库中使用 SELECT UUID() 命令生成;
loose-group_replication_group_name='022bf419-1497-11ed-af3d-000c290dec90'
###内部通讯端口,推荐使用 33061
loose-group_replication_local_address= "192.168.3.5:33061"
loose-group_replication_group_seeds= "192.168.3.3:33061,192.168.3.4:33061,192.168.3.5:33061"
###在首个实例联机后,需要设置为 off。如果多次引导组则人为触发裂脑,产生两个具有相同名称的不同组
loose-group_replication_bootstrap_group=off
report-host=192.168.3.5
##重启数据库(三台都执行)
systemctl restart mysqld
##查看数据库插件是否加载进来
##创建复制用户(192.168.3.3)
mysql> set sql_log_bin=0;
Query OK, 0 rows affected (0.00 sec)
mysql> CREATE USER rpl_user@'%' IDENTIFIED WITH mysql_native_password BY 'root';
Query OK, 0 rows affected (0.00 sec)
mysql> GRANT REPLICATION SLAVE ON *.* TO rpl_user@'%';
Query OK, 0 rows affected (0.00 sec)
mysql> GRANT BACKUP_ADMIN ON *.* TO rpl_user@'%';
Query OK, 0 rows affected (0.00 sec)
mysql> FLUSH PRIVILEGES;
Query OK, 0 rows affected (0.00 sec)
mysql> set sql_log_bin=1;
Query OK, 0 rows affected (0.00 sec)
mysql> CHANGE MASTER TO MASTER_USER='repl_user', MASTER_PASSWORD='root' FOR CHANNEL 'group_replication_recovery';
Query OK, 0 rows affected, 2 warnings (0.02 sec)
##引导(只在主上运行)
mysql> SET GLOBAL group_replication_bootstrap_group=ON;
Query OK, 0 rows affected (0.00 sec)
mysql> START GROUP_REPLICATION USER='rpl_user', PASSWORD='root';
Query OK, 0 rows affected (2.15 sec)
mysql> SET GLOBAL group_replication_bootstrap_group=OFF;
Query OK, 0 rows affected (0.00 sec)
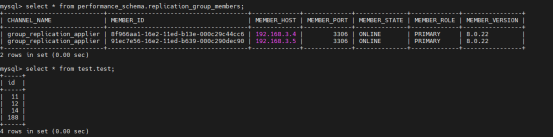
mysql> select * from performance_schema.replication_group_members;

##创建复制用户(192.168.3.4)
mysql> set sql_log_bin=0;
Query OK, 0 rows affected (0.00 sec)
mysql> CREATE USER rpl_user@'%' IDENTIFIED WITH mysql_native_password BY 'root';
Query OK, 0 rows affected (0.00 sec)
mysql> GRANT REPLICATION SLAVE ON *.* TO rpl_user@'%';
Query OK, 0 rows affected (0.01 sec)
mysql> GRANT BACKUP_ADMIN ON *.* TO rpl_user@'%';
Query OK, 0 rows affected (0.00 sec)
mysql> FLUSH PRIVILEGES;
Query OK, 0 rows affected (0.00 sec)
mysql> set sql_log_bin=1;
Query OK, 0 rows affected (0.00 sec)
mysql> START GROUP_REPLICATION USER='rpl_user', PASSWORD='root';
Query OK, 0 rows affected (2.34 sec)
mysql> select * from performance_schema.replication_group_members;

##创建复制用户(192.168.3.5)
mysql> set sql_log_bin=0;
Query OK, 0 rows affected (0.00 sec)
mysql> CREATE USER rpl_user@'%' IDENTIFIED WITH mysql_native_password BY 'root';
Query OK, 0 rows affected (0.01 sec)
mysql> GRANT REPLICATION SLAVE ON *.* TO rpl_user@'%';
Query OK, 0 rows affected (0.01 sec)
mysql> GRANT BACKUP_ADMIN ON *.* TO rpl_user@'%';
Query OK, 0 rows affected (0.00 sec)
mysql> FLUSH PRIVILEGES;
Query OK, 0 rows affected (0.00 sec)
mysql> set sql_log_bin=1;
Query OK, 0 rows affected (0.00 sec)
mysql> START GROUP_REPLICATION USER='rpl_user', PASSWORD='root';
Query OK, 0 rows affected (3.27 sec)
mysql> select * from performance_schema.replication_group_members;

看到上面这个集群共有3个节点处于ONLINE状态,其中 192.168.3.3是 PRIMARY 节点,其余两个都是 SECONDARY 节点,也就是说当前这个集群采用 单主 模式。
##测试数据同步
限制一:仅支持innodb存储引擎
限制二:表必须有主见或者非NULL的唯一值
在192.168.3.3操作:
mysql> create database test;
Query OK, 1 row affected (0.01 sec)
mysql> use test
Database changed
mysql> create table test(id bigint primary key);
Query OK, 0 rows affected (0.04 sec)
mysql> insert into test values(11);
Query OK, 1 row affected (0.01 sec)
mysql> select * from test.test;
+----+
| id |
+----+
| 11 |
+----+
1 row in set (0.00 sec)
在192.168.3.4操作:
mysql> select * from test.test;
+----+
| id |
+----+
| 11 |
+----+
1 row in set (0.00 sec)
在192.168.3.5操作:
mysql> select * from test.test;
+----+
| id |
+----+
| 11 |
+----+
1 row in set (0.00 sec)
数据测试是同步的。
##测试主备切换
停止192.168.3.3,查看192.168.3.4上查看
mysql> select * from performance_schema.replication_group_members;

192.168.3.4被选为主,在192.168.3.4添加数据
mysql> insert into test.test values(12);
mysql> select * from test.test;
+----+
| id |
+----+
| 11 |
| 12 |
+----+
2 rows in set (0.00 sec)
在192.168.3.5查看
mysql> select * from test.test;
+----+
| id |
+----+
| 11 |
| 12 |
+----+
2 rows in set (0.00 sec)
重新启动192.168.3.3,必须开启组复制
mysql> START GROUP_REPLICATION USER='rpl_user', PASSWORD='root';
Query OK, 0 rows affected (3.27 sec)

开启组复制以后,192.168.3.3自动加入到这个组当中.
在192.168.3.3查看数据,会自动同步过来
mysql> select * from test.test;
+----+
| id |
+----+
| 11 |
| 12 |
+----+
2 rows in set (0.00 sec)
2. MGR之多主模式
多主模式:
在mysql多主模式下,在组复制中通过Group Replication Protocol协议及Paxos协议,形成的整体高可用解决方案 同时增加
了certify的概念,负责检查事务是否允许提交,是否与其它事务存在冲突,Group Replication是由多个节点共同组成一个
数据库集群,每个节点都可以单独执行事务,但是read-write(rw)的操作只有在组内验证后才可以commit,Read-only
(RO)事务是不需要验证可以立即执行,当一个事务在一个节点上提交之前,会在组内自动进行原子性的广播,告知其他节点
变更了什么内容/执行了什么事务,然后为该事物建立一个全局的排序,最终,这意味着所有的服务器都以相同的顺序接收
相同的事务集。因此,所有服务器都按照相同的顺序应用相同的变更集,因此它们在组中保持一致。 在多主模式下,该组
的所有成员都设置为读写模式,在多主模式下,不支持SERIALIZABLE事务隔离级别,且不能完全支持级联外键约束
部署步骤:
在/etc/my.cnf加入参数(三台都执行)
# 关闭单主模式
loose-group_replication_single_primary_mode=OFF
# 开启多主一致性检查
loose-group_replication_enforce_update_everywhere_checks= ON
##关闭组复制(三台都执行)
mysql> stop GROUP_REPLICATION;
Query OK, 0 rows affected (4.56 sec)
mysql> set global group_replication_single_primary_mode=off;
Query OK, 0 rows affected (0.00 sec)
mysql> set global group_replication_enforce_update_everywhere_checks=ON;
Query OK, 0 rows affected (0.00 sec)
##开启引导(192.168.3.3)
mysql> set global group_replication_bootstrap_group=on;
Query OK, 0 rows affected (0.00 sec)
mysql> START GROUP_REPLICATION USER='rpl_user', PASSWORD='root';
Query OK, 0 rows affected (2.14 sec)
mysql> set global group_replication_bootstrap_group=off;
Query OK, 0 rows affected (0.00 sec)
mysql> select * from performance_schema.replication_group_members;

##另外两台加入组
##在192.168.3.4上执行
mysql> START GROUP_REPLICATION USER='rpl_user', PASSWORD='root';
Query OK, 0 rows affected (2.42 sec)
mysql> select * from performance_schema.replication_group_members;

##在192.368.3.5上执行
mysql> START GROUP_REPLICATION USER='rpl_user', PASSWORD='root';
Query OK, 0 rows affected (2.51 sec)
mysql> select * from performance_schema.replication_group_members;

如果采用多主模式,则所有节点的角色都是 PRIMARY。
测试:
添加数据:
在192.168.3.3上执行
mysql> insert into test.test values(14);
Query OK, 1 row affected (0.00 sec)
mysql> select * from test.test;
+----+
| id |
+----+
| 11 |
| 12 |
| 14 |
+----+
3 rows in set (0.00 sec)
在192.168.3.4上查看:
在192.168.3.5上查看:
##模拟服务器宕机
在192.168.3.3执行
[root@localhost ~]# systemctl stop mysqld
在192.168.3.4查看,并插入数据
mysql> select * from performance_schema.replication_group_members;

mysql> insert into test.test values(188);
Query OK, 1 row affected (0.00 sec)
mysql> select * from test.test;
+-----+
| id |
+-----+
| 11 |
| 12 |
| 14 |
| 188 |
+-----+
4 rows in set (0.00 sec)
在192.168.3.5上查看
在192.168.3.3上执行
启动数据库
[root@localhost ~]# systemctl start mysqld
# 关闭单主模式
mysql> set global group_replication_single_primary_mode=off;
Query OK, 0 rows affected (0.00 sec)
# 开启多主一致性检查
mysql> set global group_replication_enforce_update_everywhere_checks=ON;
Query OK, 0 rows affected (0.00 sec)
#开启组复制
mysql> START GROUP_REPLICATION USER='rpl_user', PASSWORD='root';
Query OK, 0 rows affected (3.30 sec)
##可以查看到数据自动同步过来
mysql> select * from performance_schema.replication_group_members;