


前言
最近遇到一个问题,就是当MySQL的一主两从环境,数据量有几百G甚至是上TB的时候,当从库出现异常宕机无法恢复,如何快速重建主从。
使用xtrabackup进行流式搭建主从
我参考了Percona Xtrabackup Best Practices
这篇文档。它采用了流式备份的方式,可以在本地不落地实现远程备份和恢复。这样可以帮助我们节省很大的空间。而且它的流式备份可以进行并行和压缩,这能够更进一步节省主从重建的时间。

举个例子:假设你的数据库2个TB,你现在先要在本地备份,你没有个>1TB的空间,根本就玩不转的。那么流式备份的好处就是它直接通过网络传输到远端,只要你在远端的空间足够就行了。
根据最佳实践搭建主从
既然有了最佳实践的文档,那么就开始正式进行从库的恢复了。
1.从库停止数据库,删除目录
我这里直接是通过kill -9杀掉了mysql_safe和mysqld这两个进程。然后进入到mysql的数据目录,执行清空。
kill -9 4233kill -9 31336cd /app/mysql_datarm -rf *
2.从库开启端口
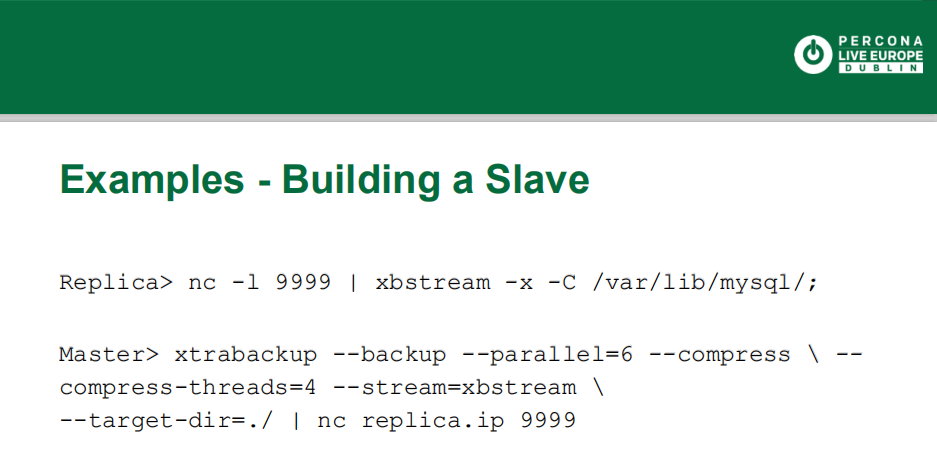
现在从库目录已经清空,可以使用Linux的nc命令打开一个端口,进行流式备份的接收。
[bd@test2 data]$ nc -l -p 2112 | xbstream -x -C /app/mysql_data
3.主库执行备份传输到远端
从库的nc命令设置好后,进入到主库的数据目录,执行xtrabackup进行备份。备份的时候使用管道|符号,进行nc传输,这里指定从库的ip地址和上面开通的端口号。
xtrabackup --defaults-file=/app/mysql_soft/my.cnf \--user=root --password='Sqlite!23' \--socket=/app/mysql_soft/mysql_3306.sock \--backup --parallel=4 --compress --compress-threads=4 --stream=xbstream --target-dir=./ | nc 192.168.56.170 2112
备份成功会输出日志。
210407 12:54:25 Executing FLUSH NO_WRITE_TO_BINLOG ENGINE LOGS...xtrabackup: The latest check point (for incremental): '767180569401'xtrabackup: Stopping log copying thread.210407 12:54:25 >> log scanned up to (767180569410)210407 12:54:26 Executing UNLOCK TABLES210407 12:54:26 All tables unlocked210407 12:54:26 [00] Compressing and streaming ib_buffer_pool to <STDOUT>210407 12:54:26 [00] ...done210407 12:54:26 Backup created in directory '/app/teledb/'MySQL binlog position: filename 'mysql-bin.000800', position '583410098', GTID of the last change '6c608491-8d36-11eb-a46d-00505698d239:1-3752022'210407 12:54:26 [00] Compressing and streaming <STDOUT>210407 12:54:26 [00] ...done210407 12:54:26 [00] Compressing and streaming <STDOUT>210407 12:54:26 [00] ...donextrabackup: Transaction log of lsn (767180569401) to (767180569410) was copied.210407 12:54:26 completed OK!
此时查看远端的数据目录。文件已经传输过来了。
[bd@test2 data]$ ls -lrttotal 407632-rw-r----- 1 mysql mysql 53095782 Apr 7 12:52 undo001.qp-rw-r----- 1 mysql mysql 53965621 Apr 7 12:52 undo003.qp-rw-r----- 1 mysql mysql 182805792 Apr 7 12:52 undo002.qp-rw-r----- 1 mysql mysql 127262470 Apr 7 12:52 ibdata1.qpdrwxr-x--- 2 mysql mysql 4096 Apr 7 12:54 mysqldrwxr-x--- 2 mysql mysql 8192 Apr 7 12:54 performance_schemadrwxr-x--- 2 mysql mysql 8192 Apr 7 12:54 sysdrwxr-x--- 2 mysql mysql 159 Apr 7 12:54 sysdbdrwxr-x--- 2 mysql mysql 55 Apr 7 12:54 a1-rw-r----- 1 mysql mysql 157 Apr 7 12:54 xtrabackup_binlog_info.qpdrwxr-x--- 2 mysql mysql 79 Apr 7 12:54 test_db-rw-r----- 1 mysql mysql 516 Apr 7 12:54 xtrabackup_logfile.qp-rw-r----- 1 mysql mysql 123 Apr 7 12:54 xtrabackup_checkpoints-rw-r----- 1 mysql mysql 227631 Apr 7 12:54 ib_buffer_pool.qp-rw-r----- 1 mysql mysql 695 Apr 7 12:54 xtrabackup_info.qp-rw-r----- 1 mysql mysql 484 Apr 7 12:54 backup-my.cnf.qp
4.在远端进行解压
此时传输过来的文件还是.qp的格式,这种格式是源自于安装了qpress
这种压缩软件。使用decompress指令就能进行解压。
xtrabackup --decompress --remove-original --parallel=4 --target-dir=/app/mysql_data210407 14:03:44 [04] removing ./performance_schema/global_status.frm.qp210407 14:03:44 [04] decompressing ./performance_schema/session_status.frm.qp210407 14:03:44 [04] removing ./performance_schema/session_status.frm.qp210407 14:03:44 [04] decompressing ./xtrabackup_binlog_info.qp210407 14:03:44 [04] removing ./xtrabackup_binlog_info.qp210407 14:03:44 [04] decompressing ./xtrabackup_logfile.qp210407 14:03:44 [04] removing ./xtrabackup_logfile.qp210407 14:03:44 [04] decompressing ./ib_buffer_pool.qp210407 14:03:44 [04] removing ./ib_buffer_pool.qp210407 14:03:44 [04] decompressing ./backup-my.cnf.qp210407 14:03:44 [04] removing ./backup-my.cnf.qp210407 14:03:44 [04] decompressing ./xtrabackup_info.qp210407 14:03:44 [04] removing ./xtrabackup_info.qp210407 14:03:45 [02] removing ./undo002.qp210407 14:03:45 [03] removing ./ibdata1.qp210407 14:04:34 [01] removing ./test_db/prod_inst_his.ibd.qp210407 14:04:35 completed OK!
查看从库解压后的文件,此时目录文件已经恢复。
[bd@test2 data] $ ls -lrttotal 1786608-rw-r----- 1 mysql mysql 123 Apr 7 12:54 xtrabackup_checkpoints-rw-rw-r-- 1 mysql mysql 176160768 Apr 7 14:03 undo003-rw-rw-r-- 1 mysql mysql 176160768 Apr 7 14:03 undo001drwxr-x--- 2 mysql mysql 4096 Apr 7 14:03 mysqldrwxr-x--- 2 mysql mysql 8192 Apr 7 14:03 sysdrwxr-x--- 2 mysql mysql 46 Apr 7 14:03 a1drwxr-x--- 2 mysql mysql 141 Apr 7 14:03 sysdbdrwxr-x--- 2 mysql mysql 8192 Apr 7 14:03 performance_schema-rw-rw-r-- 1 mysql mysql 74 Apr 7 14:03 xtrabackup_binlog_info-rw-rw-r-- 1 mysql mysql 2560 Apr 7 14:03 xtrabackup_logfile-rw-rw-r-- 1 mysql mysql 720778 Apr 7 14:03 ib_buffer_pool-rw-rw-r-- 1 mysql mysql 497 Apr 7 14:03 backup-my.cnf-rw-rw-r-- 1 mysql mysql 813 Apr 7 14:03 xtrabackup_info-rw-rw-r-- 1 mysql mysql 591396864 Apr 7 14:03 undo002-rw-rw-r-- 1 mysql mysql 884998144 Apr 7 14:03 ibdata1drwxr-x--- 2 mysql mysql 70 Apr 7 14:04 test_db
5.在远端执行prepare操作
xtrabackup要求在备份完成后执行prepare,以便应用任何未完成的日志并准备好启动数据库。建议在目标服务器上使用尽可能多的内存,以免导致内存耗尽。
[bd@test2 data] $ xtrabackup --prepare --use-memory=4G --target-dir=/app/mysql_dataInnoDB: Opened 3 undo tablespacesInnoDB: 3 undo tablespaces made activeInnoDB: Highest supported file format is Barracuda.InnoDB: Log scan progressed past the checkpoint lsn 767180569612InnoDB: Doing recovery: scanned up to log sequence number 767180569621 (0%)InnoDB: Database was not shutdown normally!InnoDB: Starting crash recovery.InnoDB: xtrabackup: Last MySQL binlog file position 549537759, file name mysql-bin.000800InnoDB: Removed temporary tablespace data file: "ibtmp1"InnoDB: Creating shared tablespace for temporary tablesInnoDB: Setting file './ibtmp1' size to 12 MB. Physically writing the file full; Please wait ...InnoDB: File './ibtmp1' size is now 12 MB.InnoDB: 96 redo rollback segment(s) found. 1 redo rollback segment(s) are active.InnoDB: 32 non-redo rollback segment(s) are active.InnoDB: 5.7.19 started; log sequence number 767180569621xtrabackup: starting shutdown with innodb_fast_shutdown = 1InnoDB: FTS optimize thread exiting.InnoDB: Starting shutdown...InnoDB: Shutdown completed; log sequence number 767180569640210407 14:18:50 completed OK!
6.修改远端的目录权限
[bd@test2 data] $chown -R mysql:mysql data
7.启动数据库并配置主从关系
最后一步是启动从库,并重新配置主从关系。
nohup mysqld --defaults-file=--defaults-file=/app/mysql_soft/my.cnf \ --user=mysql &
配置主从关系有两种方法,一种是使用新的模式,直接设置MASTER_AUTO_POSITION=1
。而还有一种是传统模式,需要指定Master_Log_File
和Master_Log_Pos
。
传统模式的这两个数据可以从文件xtrabackup_binlog_info
中获取。
[bd@test2 data]$ more xtrabackup_binlog_info mysql-bin.000800 583410098 6c608491-8d36-11eb-a46d-00505698d239:1-3752022
这里我们直接使用新的模式。
[bd@test2 data]$ mysql -uroot -h192.168.56.170 -P3306 -p Enter password: Welcome to the MySQL monitor. Commands end with ; or \g.Your MySQL connection id is 357Server version: 5.7.36-log MySQL Community Server (GPL)Copyright (c) 2000, 2020, Oracle and/or its affiliates. All rights reserved.Oracle is a registered trademark of Oracle Corporation and/or itsaffiliates. Other names may be trademarks of their respectiveowners.Type 'help;' or '\h' for help. Type '\c' to clear the current input statement.mysql> CHANGE MASTER TO MASTER_HOST ='192.168.56.120',MASTER_PORT =3306,MASTER_USER='replication',MASTER_PASSWORD='******' ,MASTER_AUTO_POSITION=1;Query OK, 0 rows affected, 2 warnings (0.00 sec)mysql> start slave;Query OK, 0 rows affected, 1 warning (0.00 sec)mysql> show slave status \G;*************************** 1. row *************************** Slave_IO_State: Waiting for master to send event Master_Host: 133.0.148.34 Master_User: RDS_sla Master_Port: 8803 Connect_Retry: 60 Master_Log_File: mysql-bin.000800 Read_Master_Log_Pos: 583944870 Relay_Log_File: relay-bin.000002 Relay_Log_Pos: 1059332 Relay_Master_Log_File: mysql-bin.000800 Slave_IO_Running: Yes Slave_SQL_Running: Yes Replicate_Do_DB: Replicate_Ignore_DB: Replicate_Do_Table: Replicate_Ignore_Table: Replicate_Wild_Do_Table: Replicate_Wild_Ignore_Table: Last_Errno: 0 Last_Error: Skip_Counter: 0 Exec_Master_Log_Pos: 583944870 Relay_Log_Space: 1059533 Until_Condition: None Until_Log_File: Until_Log_Pos: 0 Master_SSL_Allowed: No Master_SSL_CA_File: Master_SSL_CA_Path: Master_SSL_Cert: Master_SSL_Cipher: Master_SSL_Key: Seconds_Behind_Master: 0Master_SSL_Verify_Server_Cert: No Last_IO_Errno: 0 Last_IO_Error: Last_SQL_Errno: 0 Last_SQL_Error: Replicate_Ignore_Server_Ids: Master_Server_Id: 148348803 Master_UUID: 6c608491-8d36-11eb-a46d-00505698d239 Master_Info_File: mysql.slave_master_info SQL_Delay: 0 SQL_Remaining_Delay: NULL Slave_SQL_Running_State: Slave has read all relay log; waiting for more updates Master_Retry_Count: 86400 Master_Bind: Last_IO_Error_Timestamp: Last_SQL_Error_Timestamp: Master_SSL_Crl: Master_SSL_Crlpath: Retrieved_Gtid_Set: 6c608491-8d36-11eb-a46d-00505698d239:3750732-3753340 Executed_Gtid_Set: 6c608491-8d36-11eb-a46d-00505698d239:1-3753340,6cdc622f-8d36-11eb-983d-005056981319:1 Auto_Position: 1 Replicate_Rewrite_DB: Channel_Name: Master_TLS_Version:
配置成功后,主从恢复正常。至此整个恢复过程完毕。
后记
在我实际的恢复过程中,我的数据库容量大概是300GB,压缩和传输非常的快。大概是每秒380MB/S。整个备份和传输不到15分钟就完成了。


励志成为PostgreSQL大神
长按关注吧
