


相关概念
LVM 的全名是 Logical Volume Manager ,它可以弹性调整文件系统的容量。LVM 的做法是将几个实体的 partitions (或 disk ) 通过软件组合成为一块看起来是独立的大磁盘 ( VG ) ,然后将这块大磁盘再经过分区成为可使用分区 ( LV ), 最终就能够挂载使用了。
其流程如下:
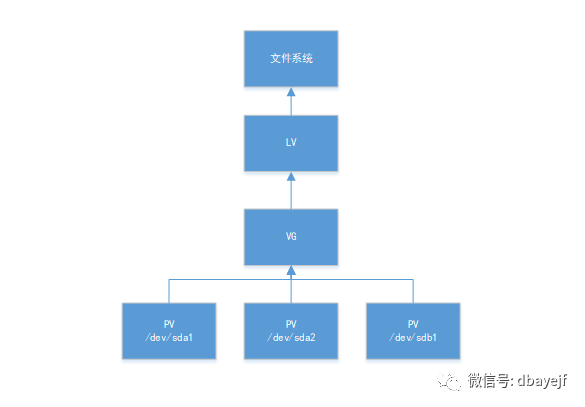
PV, 实体卷轴
实际的 partition (或 Disk ) 需要调整系统识别码 ( system ID ) 成为 8e ( LVM 的识别码),然后再经过pvcreate 的指令将他转成 LVM 最底层的实体卷轴 ( PV )。
VG, 卷轴群组
多个PV的整合,变成一块大磁盘。
LV, 逻辑卷轴
在VG中划出的一个逻辑概念,是VG的一个子集,在LV之上可以格式化出不同的文件系统。
增容过程
创建PV
查看当前磁盘情况
[root@sdw3]~# fdisk -l
磁盘 /dev/sda:21.5 GB, 21474836480 字节,41943040 个扇区
Units = 扇区 of 1 * 512 = 512 bytes
扇区大小(逻辑/物理):512 字节 / 512 字节
I/O 大小(最小/最佳):512 字节 / 512 字节
磁盘标签类型:dos
磁盘标识符:0x000ce84f

   设备 Boot      Start         End      Blocks   Id  System
/dev/sda1   *        2048     2099199     1048576   83  Linux
/dev/sda2         2099200    40951807    19426304   8e  Linux LVM
可以看到目前磁盘/dev/sda只有21.5GB,现关闭系统,在虚拟机上对这个系统扩展磁盘容量到100G,模拟增加的磁盘,完成再启动系统查看,已经变成107.4G了
[root@sdw3]~# fdisk -l
磁盘 /dev/sda:107.4 GB, 107374182400 字节,209715200 个扇区
Units = 扇区 of 1 * 512 = 512 bytes
扇区大小(逻辑/物理):512 字节 / 512 字节
I/O 大小(最小/最佳):512 字节 / 512 字节
磁盘标签类型:dos
磁盘标识符:0x000ce84f
查看当前文件系统容量情况,现在打算增加20G容量到根目录
[root@sdw3]~# df -h
文件系统                     容量  已用  可用 已用% 挂载点
/dev/mapper/centos_mdw-root   10G  7.9G  2.2G   79% /
devtmpfs                     899M     0  899M    0% /dev
tmpfs                        911M     0  911M    0% /dev/shm
tmpfs                        911M  9.6M  902M    2% /run
tmpfs                        911M     0  911M    0% /sys/fs/cgroup
/dev/sda1                   1014M  142M  873M   14% /boot
/dev/mapper/centos_mdw-data  6.6G  3.4G  3.2G   53% /data
tmpfs                        183M     0  183M    0% /run/user/0
使用Linux的fdisk分区工具给磁盘/dev/sda分区,增加20G的分区/dev/sda3
[root@sdw3]~# fdisk /dev/sda
欢迎使用 fdisk (util-linux 2.23.2)。

更改将停留在内存中,直到您决定将更改写入磁盘。
使用写入命令前请三思。


命令(输入 m 获取帮助):n
Partition type:
   p   primary (2 primary, 0 extended, 2 free)
   e   extended
Select (default p): p
分区号 (3,4,默认 3):3
起始 扇区 (40951808-209715199,默认为 40951808):
将使用默认值 40951808
Last 扇区, +扇区 or +size{K,M,G} (40951808-209715199,默认为 209715199):+20G
分区 3 已设置为 Linux 类型,大小设为 20 GiB

命令(输入 m 获取帮助):w
The partition table has been altered!

Calling ioctl() to re-read partition table.

WARNING: Re-reading the partition table failed with error 16: 设备或资源忙.
The kernel still uses the old table. The new table will be used at
the next reboot or after you run partprobe(8) or kpartx(8)
正在同步磁盘。
转换/dev/sda3的system ID为8e
查看当前的system ID
[root@sdw3]~# fdisk -l|grep sda3
/dev/sda3        40951808    82894847    20971520   83  Linux LVM
转换过程
[root@sdw3]~# fdisk /dev/sda
欢迎使用 fdisk (util-linux 2.23.2)。

更改将停留在内存中,直到您决定将更改写入磁盘。
使用写入命令前请三思。


命令(输入 m 获取帮助):t
分区号 (1-3,默认 3):3
Hex 代码(输入 L 列出所有代码):8e
已将分区“Linux”的类型更改为“Linux LVM”

命令(输入 m 获取帮助):w
The partition table has been altered!

Calling ioctl() to re-read partition table.

WARNING: Re-reading the partition table failed with error 16: 设备或资源忙.
The kernel still uses the old table. The new table will be used at
the next reboot or after you run partprobe(8) or kpartx(8)
正在同步磁盘。
转换结果
[root@sdw3]~# fdisk -l|grep sda3
/dev/sda3        40951808    82894847    20971520   8e  Linux LVM
重启机器
reboot
格式化新增的分区,因为根目录磁盘格式是xfs,要格式化成对应的格式
[root@sdw3]~# mkfs.xfs /dev/sda3
meta-data=/dev/sda3              isize=512    agcount=4, agsize=1310720 blks
         =                       sectsz=512   attr=2, projid32bit=1
         =                       crc=1        finobt=0, sparse=0
data     =                       bsize=4096   blocks=5242880, imaxpct=25
         =                       sunit=0      swidth=0 blks
naming   =version 2              bsize=4096   ascii-ci=0 ftype=1
log      =internal log           bsize=4096   blocks=2560, version=2
         =                       sectsz=512   sunit=0 blks, lazy-count=1
realtime =none                   extsz=4096   blocks=0, rtextents=0
生成pv
[root@sdw3]~# pvcreate /dev/sda3
WARNING: xfs signature detected on /dev/sda3 at offset 0. Wipe it? [y/n]: y
  Wiping xfs signature on /dev/sda3.
  Physical volume "/dev/sda3" successfully created.
PV添加到VG
查看vg,名称是centos_mdw
[root@sdw3]~# vgs
  VG         #PV #LV #SN Attr   VSize  VFree
  centos_mdw   1   3   0 wz--n- 18.52g 4.00m
扩展vg
[root@sdw3]~# vgextend centos_mdw  /dev/sda3
  Volume group "centos_mdw" successfully extended
再次查看vg,看到已经扩展了20G了
[root@sdw3]~# vgs
  VG         #PV #LV #SN Attr   VSize   VFree
  centos_mdw   2   3   0 wz--n- <38.52g 20.00g
lv增容
查看根目录挂载在centos_mdw-root上
[root@sdw3]~# df -h
文件系统                     容量  已用  可用 已用% 挂载点
/dev/mapper/centos_mdw-root   10G  7.9G  2.2G   79% /
查看lv
[root@sdw3]~# lvdisplay
  --- Logical volume ---
  LV Path                /dev/centos_mdw/root
  LV Name                root
  VG Name                centos_mdw
  LV UUID                0qJeTb-vgCr-nhZj-6J6n-PRKK-i2PB-7Jf6Hc
  LV Write Access        read/write
  LV Creation host, time localhost.localdomain, 2019-01-04 14:08:02 +0800
  LV Status              available
  # open                 1
  LV Size                10.00 GiB
  Current LE             2560
  Segments               1
  Allocation             inherit
  Read ahead sectors     auto
  - currently set to     8192
  Block device           253:0
扩展lv,扩容的空间要略小于VG的free空间
[root@sdw3]~# lvextend -L+19.8G /dev/mapper/centos_mdw-root /dev/sda3
  Rounding size to boundary between physical extents: 19.80 GiB.
  Size of logical volume centos_mdw/root changed from 10.00 GiB (2560 extents) to 29.80 GiB (7629 extents).
  Logical volume centos_mdw/root successfully resized.
此时文件系统并没有显示已经扩容的空间
[root@sdw3]~# lvs|grep root
  root centos_mdw -wi-ao---- 29.80g
[root@sdw3]~# df -h|grep root
/dev/mapper/centos_mdw-root   10G  7.9G  2.2G   79% /
使用xfs_growfs命令,用于扩大或者缩小未挂载的xfs文件系统
[root@sdw3]~# xfs_growfs /dev/mapper/centos_mdw-root
meta-data=/dev/mapper/centos_mdw-root isize=512    agcount=4, agsize=655360 blks
         =                       sectsz=512   attr=2, projid32bit=1
         =                       crc=1        finobt=0 spinodes=0
data     =                       bsize=4096   blocks=2621440, imaxpct=25
         =                       sunit=0      swidth=0 blks
naming   =version 2              bsize=4096   ascii-ci=0 ftype=1
log      =internal               bsize=4096   blocks=2560, version=2
         =                       sectsz=512   sunit=0 blks, lazy-count=1
realtime =none                   extsz=4096   blocks=0, rtextents=0
data blocks changed from 2621440 to 7812096
如果是ext2,ext3或者是ext4文件系统,可使用resize2fs命令
再次查看文件系统已经扩容成功
[root@sdw3]~# df -h|grep root
/dev/mapper/centos_mdw-root   30G  7.9G   22G   27% /
小结
这种增量的场景在云服务器应用比较多,而大型的服务器通过使用多块磁盘做raid,直接格式化挂载使用
这种增容模式是线性模式,即当 dev/sda1 的容量用完之后, /dev/sda2 的硬盘才会被使用到,如果都放到同一个vg里,对于分布式数据库的话磁盘利用不高
