


作者:马顺华
从事运维管理工作多年,目前就职于某科技有限公司,熟悉运维自动化、OceanBase部署运维、MySQL 运维以及各种云平台技术和产品。
前言
最近在墨天轮学习时,看到了【我和openGauss的故事】第五届openGauss技术文章征集活动来啦!,我就开始在网上查看各位前辈大佬位各样的openGuass安装教程,还有openGuasss官网的安装教程。于是我也开始本人尝试着在CentOS 7 上进行安装。openGauss分为经量版、极简版和企业版,可根据需要安装相应版本。我是第一次体验,就从轻量版开始安装学习,本次测试安装的是轻量版。我是通过openGauss的官方文档,一步步跟着官方安装文档进行学习操作,很快就可以跑起来了。

安装概述
openGauss轻量版在各台机器上分别执行安装操作,因为轻量版版本没有OM,CM等组件,所以安装,卸载,升级等OM功能需要分别在各个节点上手动操作。
说明: 通过openGauss轻量版提供的脚本安装时,如果需要安装单机模式,只能使用单机安装方式,不可以使用主备节点安装方式安装单机,且无论何种模式,卸载以后,需要手动校验是否有相关环境变量需要清理。
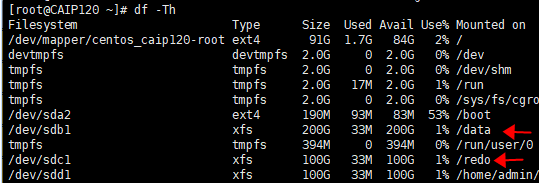
测试环镜资源信息
| 机器类型 | 主机配置 | 备注 |
|---|---|---|
| OS | Centos 7.4 | |
| 资源 | CPU:8C 内存:16G | |
| 系统盘 / | dev/vda 100G | LVS分区、文件系统:EXT4 |
| 数据盘 /data/openGauss | dev/vdb 200G | GPT分区、文件系统:xfs |
| 安装方式 | openGauss-Lite-3.1.0-CentOS-x86_64.tar.gz | tar.gz安装包安装 |
一、准备软硬件安装环境
1、准备Linux服务器
在部署 openGauss 之前,建议按官方openGauss轻量版安装的环境准备和配置,包括单节点安装和一主一备节点安装,请在安装之前仔细阅读本章的内容。如果已完成本章节的配置,请忽略。本次测试操作系统是CentOS 7,关于操作系统可以在官网查看适配的操作系统。
2、软硬件环境要求
介绍openGauss轻量版的软硬件环境要求。建议部署openGauss轻量版的各服务器具有等价的软硬件配置。
1)硬件环境要求
[表1]列出了openGauss轻量版服务器应具备的最低硬件要求。在实际产品中,硬件配置的规划需考虑数据规模及所期望的数据库响应速度。请根据实际情况进行规划。
表 1 硬件环境要求

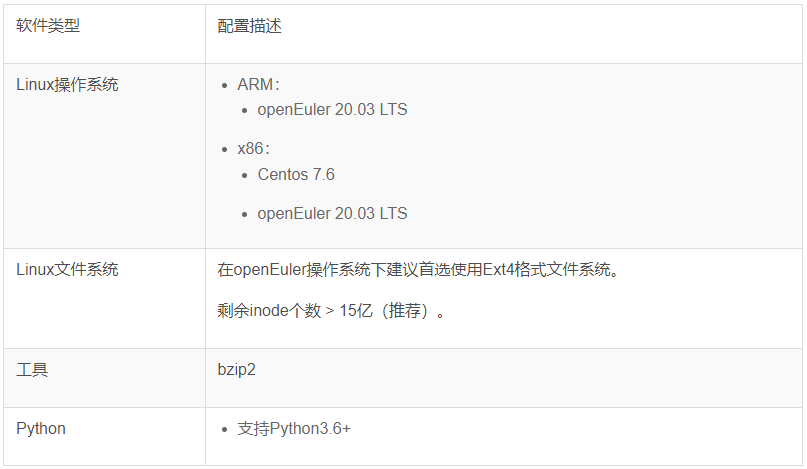
2)软件环境要求
表 2 软件环境要求
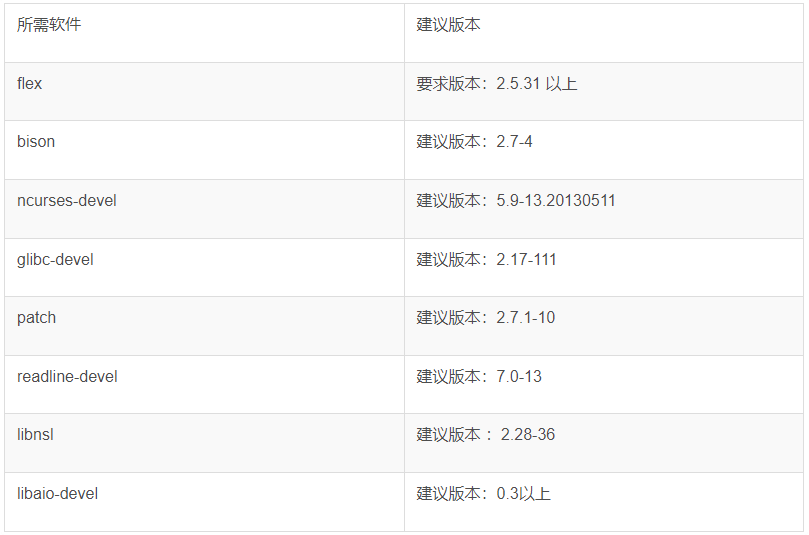
3)软件依赖要求
openGauss轻量版的软件依赖要求如[表3]所示。
建议使用上述操作系统安装光盘或者源中,下列依赖软件的默认安装包,若不存在下列软件,可参看软件对应的建议版本。
表 3 软件依赖要求
3、查看官方文档安装指南
在部署 openGauss 之前,建议先仔细查看官方文档,在按文档操作实践,很快就可以上手。
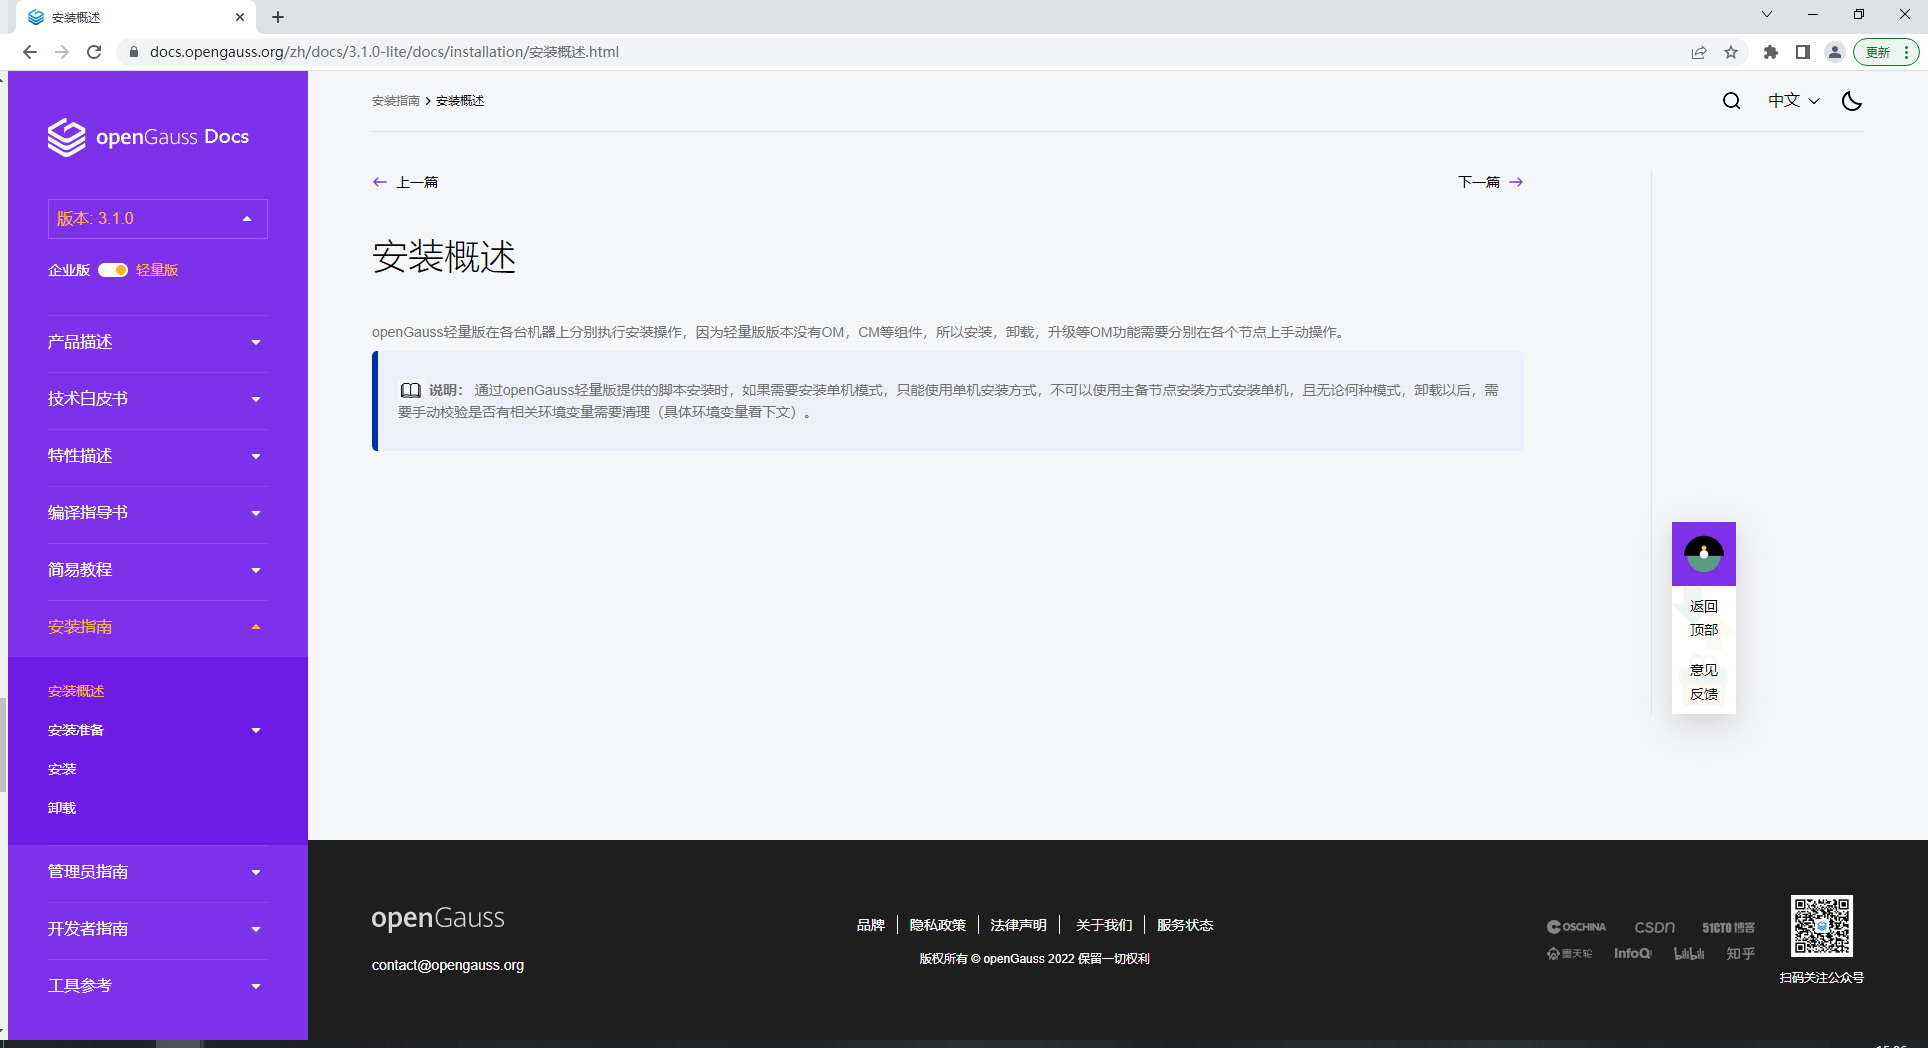
本次安装的是轻量版 安装指南链接
https://opengauss.org/zh/docs/3.1.0-lite/docs/installation/%E5%AE%89%E8%A3%85%E6%A6%82%E8%BF%B0.html
4、下载openGauss数据库
openGauss开源社区上提供了安装包的获取方式,openGauss分经量版、极简版和企业版,可根据需要安装相应版本,本次测试安装的是轻量版。
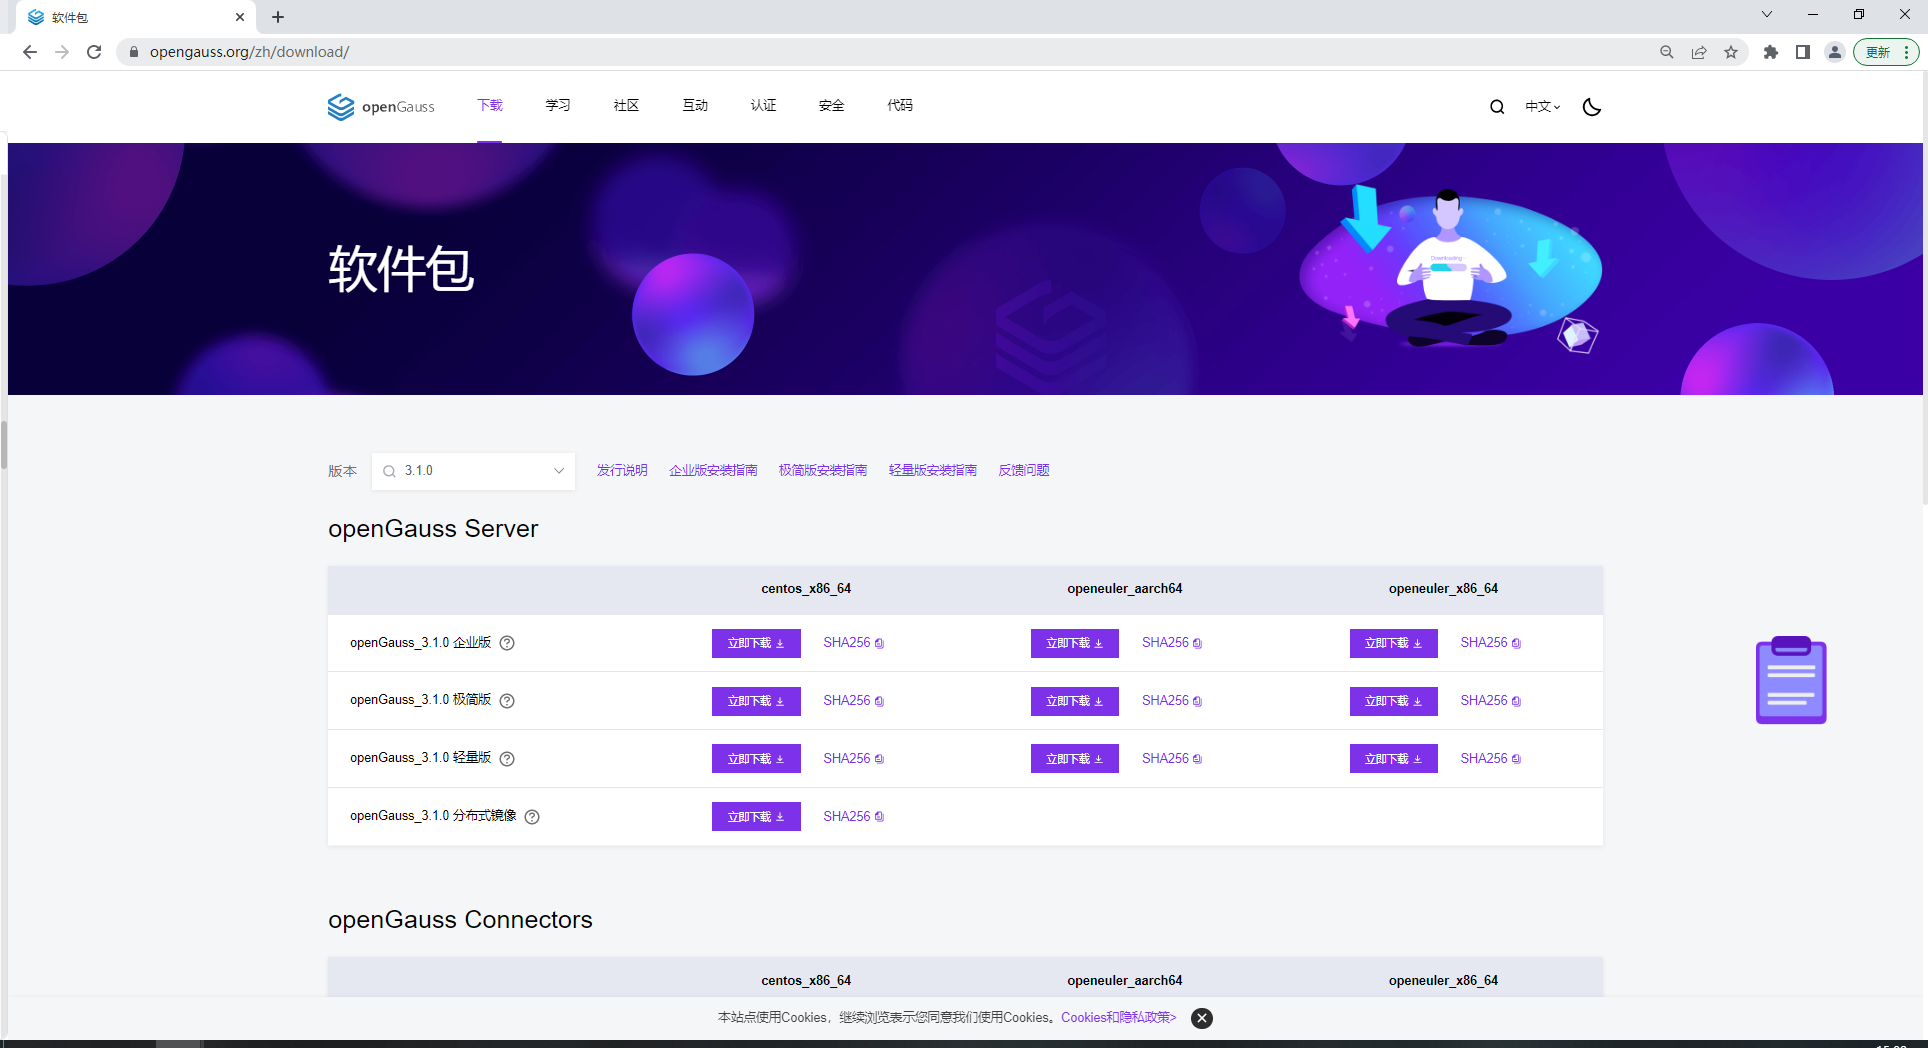
从openGauss开源社区下载对应平台的安装包,官方下载地址:https://opengauss.org/zh/download.html
二、修改操作系统配置
1、安装依赖包
yum install libaio-devel flex bison ncurses-devel glibc-devel patch redhat-lsb-core readline-devel libnsl python3
2、关闭操作系统防火墙
为了在防火墙开启的状态下,确保openGauss轻量版的正常使用。用户需要将轻量版相关的服务、协议、IP以及端口添加到主机的防火墙白名单中。
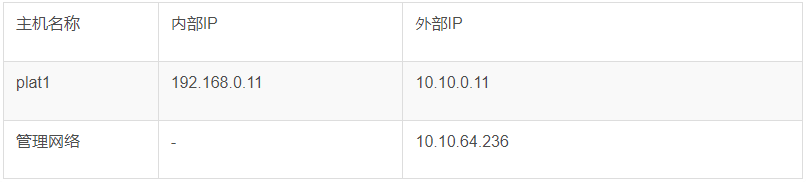
以openEuler操作系统为例,假设openGauss轻量版信息如[表4]表 4 openGauss信息
目前仅支持在防火墙关闭的状态下进行安装。
1)检查防火墙是否关闭。
[root@CAIP120 ~]# systemctl status firewalld
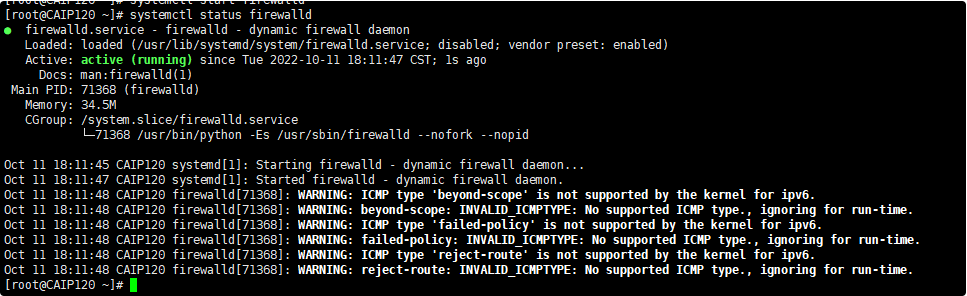
若防火墙状态显示为active (running),则表示防火墙未关闭,请执行4;
若防火墙状态显示为inactive (dead),则无需再关闭防火墙。
2)关闭防火墙。
systemctl disable firewalld.service
systemctl stop firewalld.service

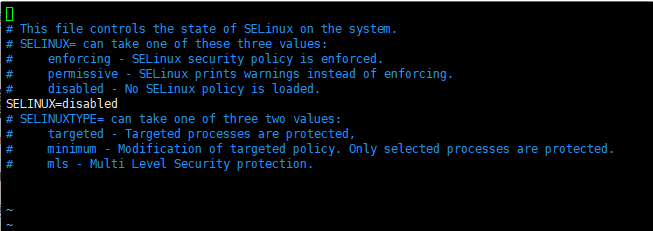
3、禁用selinux
修改/etc/selinux/config文件中的“SELINUX“值为“disabled“。
a. 使用VIM打开config文件。
[root@CAIP120 ~]# vim /etc/selinux/config<br />#修改“SELINUX”的值“disabled”
修改“SELINUX“的值“disabled“,执行**:wq**保存并退出修改。
SELINUX=disabled
重新启动操作系统,需要重启生效。
reboot
4、设置时区和时间
在各数据库节点上,确保时区和时间一致。
执行如下命令检查各数据库节点时间和时区是否一致。
[root@CAIP120 ~]# date

使用如下命令将各数据库节点/usr/share/zoneinfo/目录下的时区文件拷贝为/etc/localtime文件。
cp /usr/share/zoneinfo/$地区/$时区 /etc/localtime
例: cp /usr/share/zoneinfo/Asia/Shanghai /etc/localtime

说明:** 地区/时区为需要设置时区的信息,例如:Asia/Shanghai。
5、关闭RemoveIPC
在各数据库节点上,关闭RemoveIPC。
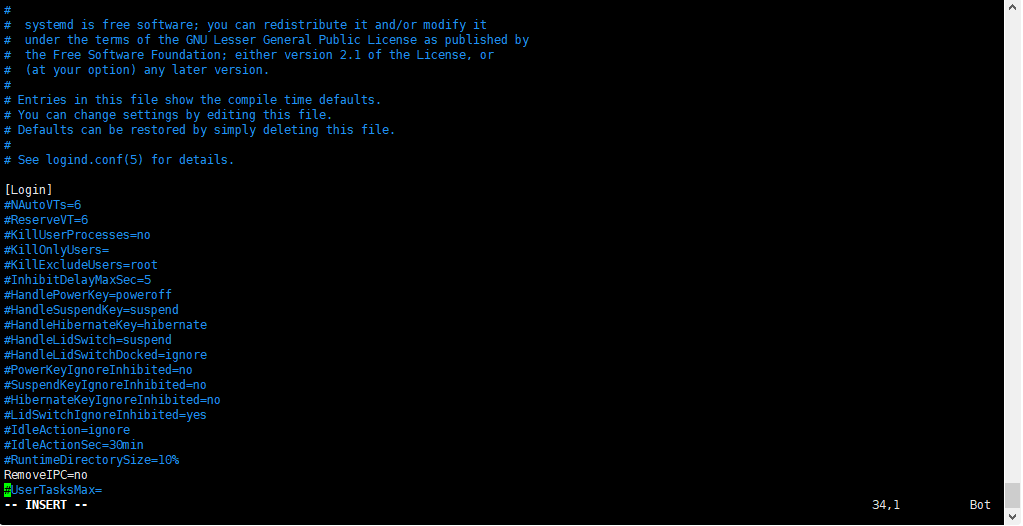
- 修改/etc/systemd/logind.conf文件中的“RemoveIPC“值为“no“。
a. 使用VIM打开logind.conf文件。
[root@CAIP120 ~]# vim /etc/systemd/logind.conf

修改“RemoveIPC“的值“no“。
RemoveIPC=no
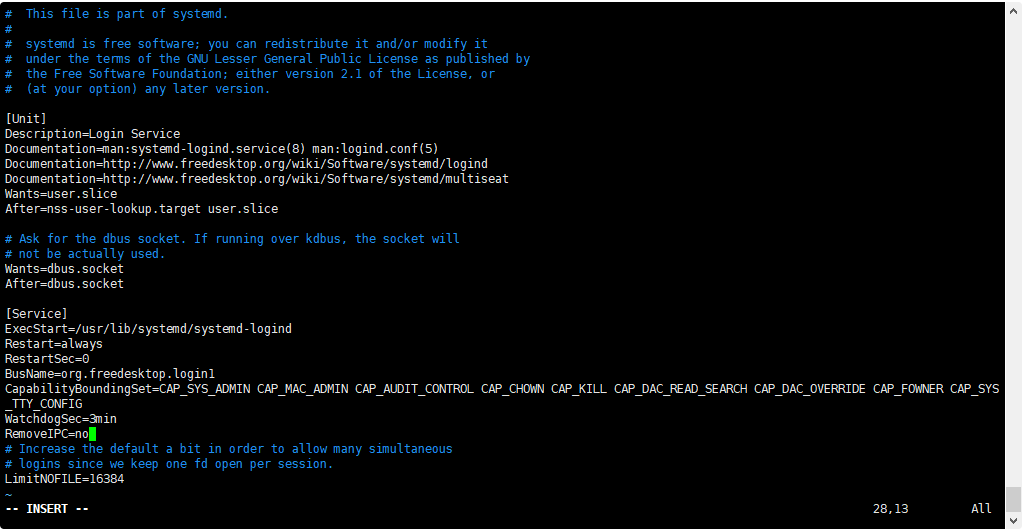
- 修改/usr/lib/systemd/system/systemd-logind.service文件中的“RemoveIPC“值为“no“。
a. 使用VIM打开systemd-logind.service文件。
[root@CAIP120 ~]# vim /usr/lib/systemd/system/systemd-logind.service

b.修改“RemoveIPC“的值“no“。
RemoveIPC=no
重新加载配置参数。
[root@CAIP120 ~]# systemctl daemon-reload
[root@CAIP120 ~]# systemctl restart systemd-logind

检查修改是否生效。
loginctl show-session | grep RemoveIPC
systemctl show systemd-logind | grep RemoveIPC
6、用户规划
不建议在 root 用户下直接部署。建议安装部署在omm普通用户下,此次测试均以用户 omm 为例。
创建 omm 用户并设置密码:
[root@CAIP120 /]# useradd -U omm -d /home/omm -s /bin/bash && echo "OpenGauss1010" |passwd --stdin omm

2、用户 omm 授予 sudo 权限配置:
[root@CAIP120 /]# vim /etc/sudoers
## Allow root to run any commands anywhere
omm    ALL=(ALL)       ALL
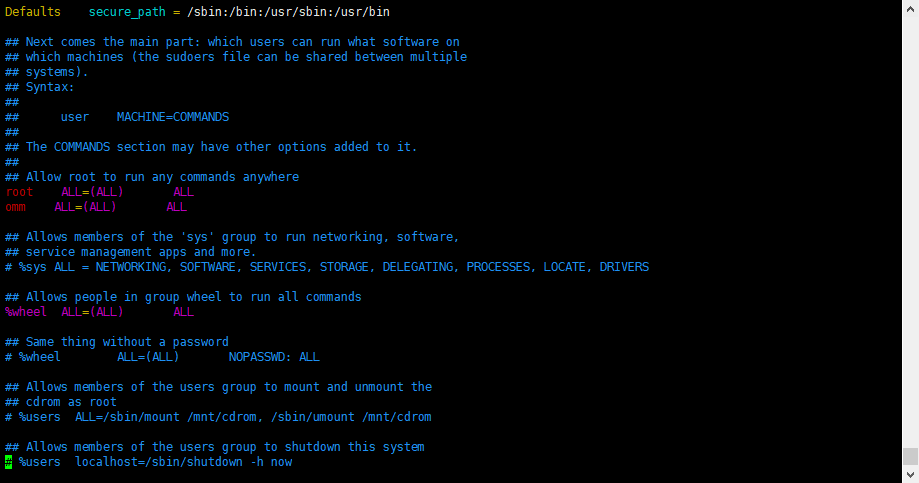
注意: sudoers拒绝所有用户读写,root用户也无权限,需增加权限后更改 #chmod u+w /etc/sudoers
7、目录规划:
如果只是测试可使用root,生产环境不建议使用root用户,需要提前创建好普通用户omm ,软件包安装目录 : /data/openGauss (可自定义),更改目录权限:
[root@CAIP120 ~]# mkdir /data/openGauss
[root@CAIP120 ~]# chown -R omm.omm /data/openGauss && chown -R omm.omm /home/omm


三、安装openGauss轻量版
1、上传包到服务器
使用普通用户登录到openGauss轻量版包安装的主机,解压轻量版安装包到安装目录。
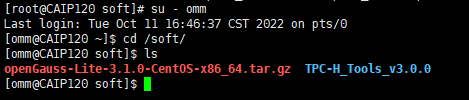
[root@CAIP120 soft]# su - omm
Last login: Tue Oct 11 16:46:37 CST 2022 on pts/0
[omm@CAIP120 ~]$ cd /soft/
[omm@CAIP120 soft]$ ls
openGauss-Lite-3.1.0-CentOS-x86_64.tar.gz  TPC-H_Tools_v3.0.0
解压安装包
[omm@CAIP120 soft]$ sudo tar -zxf openGauss-Lite-3.1.0-CentOS-x86_64.tar.gz -C /data/openGauss

- 普通用户必须有数据库安装包解压目录、安装目录、数据目录的读、写和执行权限,并且安装目录,数据目录必须为空,且安装目录和数据目录以及配置的日志目录不能存在交叉。
- 普通用户对下载的openGauss轻量版压缩包有执行权限。
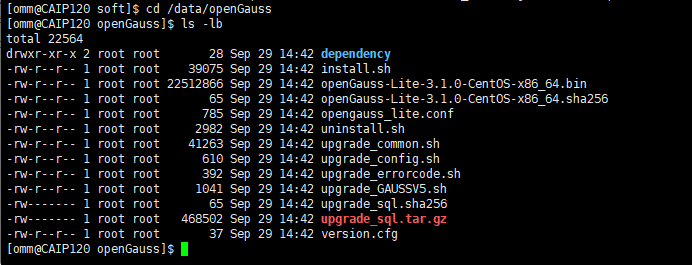
2、检查安装包
进入解压后目录。检查安装目录及文件是否齐全。执行ls命令,显示类似如下信息:
[omm@CAIP120 soft]$ cd /data/openGauss
[omm@CAIP120 openGauss]$ ls -lb
total 22564
drwxr-xr-x 2 root root       28 Sep 29 14:42 dependency
-rw-r--r-- 1 root root    39075 Sep 29 14:42 install.sh
-rw-r--r-- 1 root root 22512866 Sep 29 14:42 openGauss-Lite-3.1.0-CentOS-x86_64.bin
-rw-r--r-- 1 root root       65 Sep 29 14:42 openGauss-Lite-3.1.0-CentOS-x86_64.sha256
-rw-r--r-- 1 root root      785 Sep 29 14:42 opengauss_lite.conf
-rw-r--r-- 1 root root     2982 Sep 29 14:42 uninstall.sh
-rw-r--r-- 1 root root    41263 Sep 29 14:42 upgrade_common.sh
-rw-r--r-- 1 root root      610 Sep 29 14:42 upgrade_config.sh
-rw-r--r-- 1 root root      392 Sep 29 14:42 upgrade_errorcode.sh
-rw-r--r-- 1 root root     1041 Sep 29 14:42 upgrade_GAUSSV5.sh
-rw------- 1 root root       65 Sep 29 14:42 upgrade_sql.sha256
-rw------- 1 root root   468502 Sep 29 14:42 upgrade_sql.tar.gz
-rw-r--r-- 1 root root       37 Sep 29 14:42 version.cfg
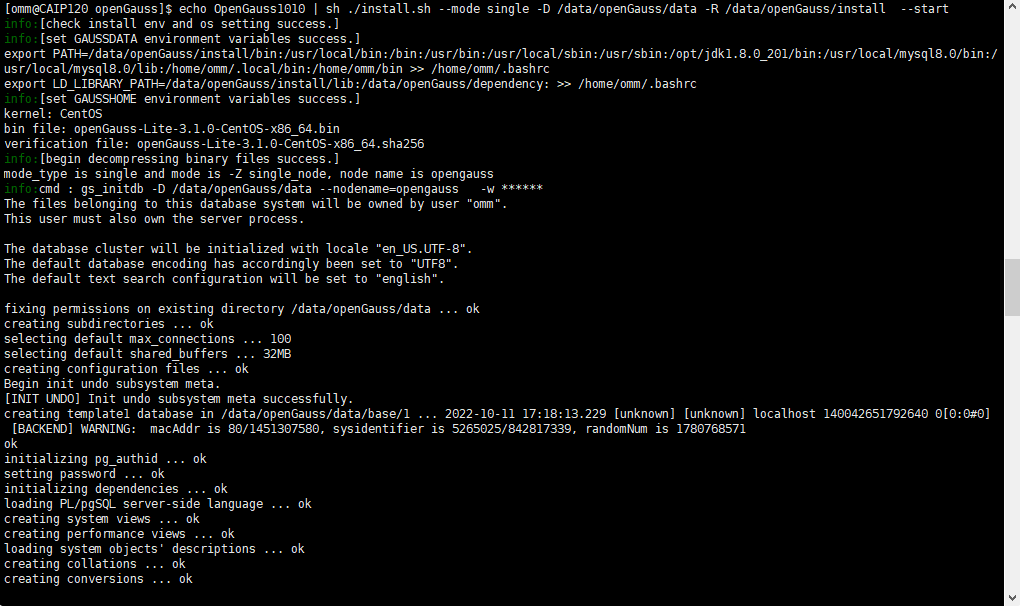
3、执行install.sh脚本安装openGauss轻量版安装包。
单机:echo OpenGauss1010 | sh ./install.sh --mode single -D /data/openGauss/data -R /data/openGauss/install --start
主备:
1、主节点:echo password | sh ./install.sh --mode primary -D ~/openGauss/data -R ~/openGauss/install -C "replconninfo1='localhost=ip1 localport=port1 remotehost=ip2 remoteport=port2'" --start
2、备节点:echo password | sh ./install.sh --mode standby -D ~/openGauss/data -R ~/openGauss/install -C "replconninfo1='localhost=ip1 localport=port1 remotehost=ip2 remoteport=port2'" --start
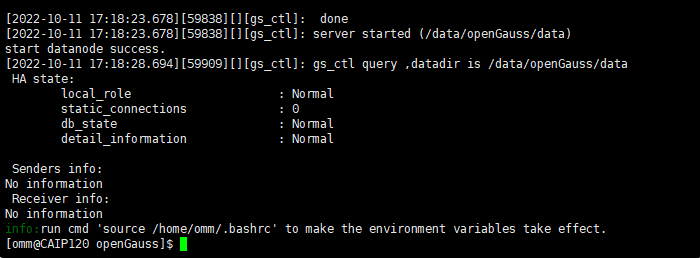
[omm@CAIP120 openGauss]$ echo OpenGauss1010 | sh ./install.sh --mode single -D /data/openGauss/data -R /data/openGauss/install --start
[2022-10-11 17:18:23.678][59838][][gs_ctl]: done
[2022-10-11 17:18:23.678][59838][][gs_ctl]: server started (/data/openGauss/data)
start datanode success.
[2022-10-11 17:18:28.694][59909][][gs_ctl]: gs_ctl query ,datadir is /data/openGauss/data
HA state:
local_role : Normal
static_connections : 0
db_state : Normal
detail_information : Normal
Senders info:
No information
Receiver info:
No information
info:run cmd 'source /home/omm/.bashrc' to make the environment variables take effect.
说明:
- -D|–data-path:数据库数据路径, 不可和安装目录交叉,必须为空。
- -R|–app-path:数据库安装路径,不可和数据目录交叉。
- -l|–log-path:日志保存路径。
- -f|–guc-file:guc配置文件,批量进行guc参数设置,默认为安装脚本同级文件opengauss_lite.conf,可指定。
- -m|–mode:节点类型,默认single,支持primary(主节点),standby(备节点),single(单机)。
- -n|–nodename:实例名称,主节点默认master,备节点默认slave,单机默认single。
- -P|–gsinit-parameter:初始化参数,具体详见文档《工具参考》中的“系统内部使用的工具 > gs_initdb”章节,出于安全考虑,不建议使用该接口传递密码。建议使用echo和pipe方式来传递密码,如果主备密码设置的不一致,最终会使用主节点设置的密码,同时密码长度为8-32位。
- -C|–dn_guc:数据库配置参数,具体详见文档《工具参考》中的“服务端工具 > gs_guc”章节。
- –env-sep-file:分离环境变量文件,会将使用过程中需要的环境变量写到该文件中,默认为用户的bashrc文件,注意不要传递目录。
- –start:安装完成是否启动集群,默认不启动。
- –ulimit:是否进行最大文件数配置(配置数为1000000),默认不设置。
- –cert-path:ssl证书路径,传递了该参数,ssl会被设置为on,同时会把该路径下证书拷贝到数据目录。
- –ssl-client-ip:客户端ip,只有在–cert-path参数启用的时候生效,会把客户端ip添加到白名单里面。
- -h|–help:打印使用说明。
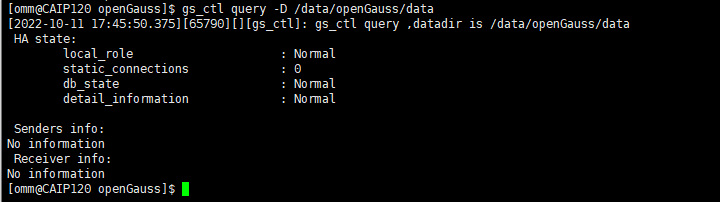
4、查看进程
安装执行完成后,使用ps和gs_ctl查看进程是否正常。
ps ux | grep gaussdb
gs_ctl query -D /data/openGauss/data
执行ps命令,显示类似如下信息:
[omm@CAIP120 openGauss]$ ps ux | grep gaussdb
omm       59842  0.2  0.5 2528772 173780 ?      Ssl  17:18   0:04 /data/openGauss/install/bin/gaussdb -D /data/openGauss/data
omm       65540  0.0  0.0 112816   984 pts/0    S+   17:44   0:00 grep --color=auto gaussdb

执行gs_ctl命令,显示类似如下信息:
[omm@CAIP120 openGauss]$ gs_ctl query -D /data/openGauss/data
[2022-10-11 17:45:50.375][65790][][gs_ctl]: gs_ctl query ,datadir is /data/openGauss/data
 HA state:
	local_role                     : Normal
	static_connections             : 0
	db_state                       : Normal
	detail_information             : Normal

 Senders info:
No information
 Receiver info:
No information
5、gsql连接openGaus
openGauss提供了在命令行下运行的数据库连接工具gsql。此工具除了具备操作数据库的基本功能,还提供了若干高级特性,便于用户使用。本节主要介绍如何使用gsql本地连接数据库。您需要提供数据库的名称以及数据库主节点的端口号。
- 以操作系统用户omm登录数据库主节点。
- 连接数据库。数据库安装完成后,默认生成名称为postgres的数据库。第一次连接数据库时可以连接到此数据库。执行如下命令连接数据库。
[omm@CAIP120 openGauss]$ gsql -d postgres -p 5432
其中postgres为需要连接的数据库名称,5432 为数据库主节点的端口号,默认8000,请根据实际情况替换。
连接成功后,系统显示类似如下信息:
[omm@CAIP120 openGauss]$ gsql -d postgres -p 5432
gsql ((openGauss 3.1.0 build 4e931f9a) compiled at 2022-09-29 14:37:11 commit 0 last mr  release)
Non-SSL connection (SSL connection is recommended when requiring high-security)
Type "help" for help.

openGauss=#

首次登录建议设置密码以提高安全性。命令如下。
openGauss=# ALTER ROLE omm IDENTIFIED BY 'Gauss@123456' REPLACE 'XXXXXXXX';
例: openGauss=# ALTER USER omm WITH PASSWORD 'Gauss@123456';
openGauss=# ALTER ROLE omm IDENTIFIED BY 'XXXXXXXX' REPLACE 'XXXXXXXX';
gsql提供了高级功能方便您使用数据库。
gsql程序有一些不属于SQL命令的内部命令。它们以反斜线开头“\”。例如:
- 您可以用下面的命令查询openGauss的版本和版权信息。
openGauss=# \copyright
GaussDB Kernel Database Management System
Copyright (c) Huawei Technologies Co., Ltd. 2018. All rights reserved.

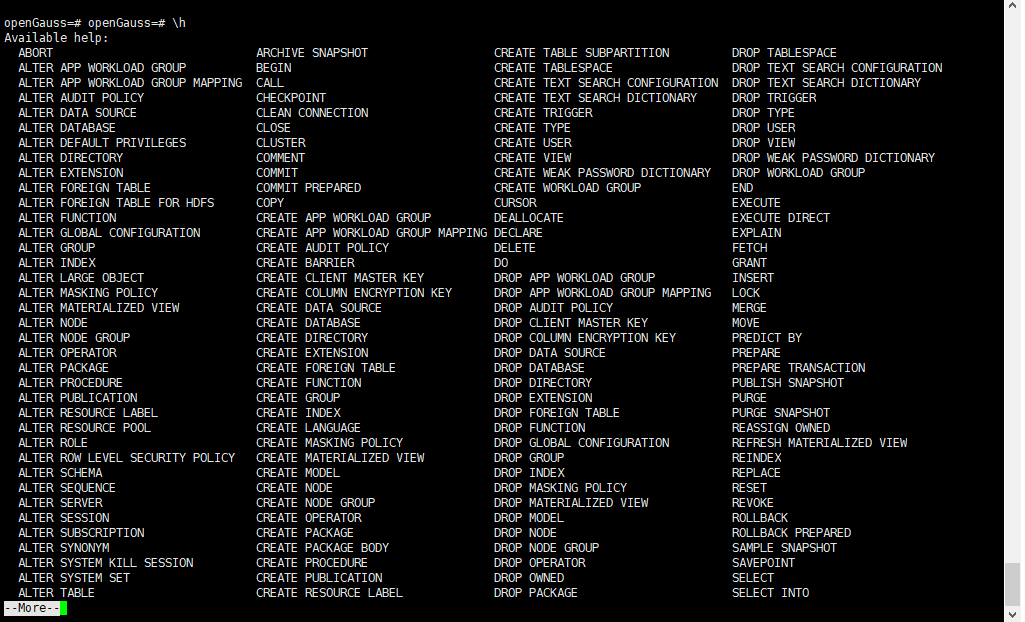
您可以用下面的命令获取各种openGauss的SQL命令的帮助语法。
openGauss=# openGauss=# \h
Available help:
  ABORT                             ARCHIVE SNAPSHOT                  CREATE TABLE SUBPARTITION         DROP TABLESPACE
  ALTER APP WORKLOAD GROUP          BEGIN                             CREATE TABLESPACE                 DROP TEXT SEARCH CONFIGURATION
  ALTER APP WORKLOAD GROUP MAPPING  CALL                              CREATE TEXT SEARCH CONFIGURATION  DROP TEXT SEARCH DICTIONARY
  ALTER AUDIT POLICY                CHECKPOINT                        CREATE TEXT SEARCH DICTIONARY     DROP TRIGGER
  ALTER DATA SOURCE                 CLEAN CONNECTION                  CREATE TRIGGER                    DROP TYPE
  ALTER DATABASE                    CLOSE                             CREATE TYPE                       DROP USER
  ALTER DEFAULT PRIVILEGES          CLUSTER                           CREATE USER                       DROP VIEW
  ALTER DIRECTORY                   COMMENT                           CREATE VIEW                       DROP WEAK PASSWORD DICTIONARY
  ALTER EXTENSION                   COMMIT                            CREATE WEAK PASSWORD DICTIONARY   DROP WORKLOAD GROUP
  ALTER FOREIGN TABLE               COMMIT PREPARED                   CREATE WORKLOAD GROUP             END
  ALTER FOREIGN TABLE FOR HDFS      COPY                              CURSOR                            EXECUTE
  ALTER FUNCTION                    CREATE APP WORKLOAD GROUP         DEALLOCATE                        EXECUTE DIRECT
  ALTER GLOBAL CONFIGURATION        CREATE APP WORKLOAD GROUP MAPPING DECLARE                           EXPLAIN
  ALTER GROUP                       CREATE AUDIT POLICY               DELETE                            FETCH
  ALTER INDEX                       CREATE BARRIER                    DO                                GRANT
  ALTER LARGE OBJECT                CREATE CLIENT MASTER KEY          DROP APP WORKLOAD GROUP           INSERT
  ALTER MASKING POLICY              CREATE COLUMN ENCRYPTION KEY      DROP APP WORKLOAD GROUP MAPPING   LOCK
  ALTER MATERIALIZED VIEW           CREATE DATA SOURCE                DROP AUDIT POLICY                 MERGE
  ALTER NODE                        CREATE DATABASE                   DROP CLIENT MASTER KEY            MOVE
  ALTER NODE GROUP                  CREATE DIRECTORY                  DROP COLUMN ENCRYPTION KEY        PREDICT BY
  ALTER OPERATOR                    CREATE EXTENSION                  DROP DATA SOURCE                  PREPARE
  ALTER PACKAGE                     CREATE FOREIGN TABLE              DROP DATABASE                     PREPARE TRANSACTION
  ALTER PROCEDURE                   CREATE FUNCTION                   DROP DIRECTORY                    PUBLISH SNAPSHOT
  ALTER PUBLICATION                 CREATE GROUP                      DROP EXTENSION                    PURGE
  ALTER RESOURCE LABEL              CREATE INDEX                      DROP FOREIGN TABLE                PURGE SNAPSHOT
  ALTER RESOURCE POOL               CREATE LANGUAGE                   DROP FUNCTION                     REASSIGN OWNED
  ALTER ROLE                        CREATE MASKING POLICY             DROP GLOBAL CONFIGURATION         REFRESH MATERIALIZED VIEW
  ALTER ROW LEVEL SECURITY POLICY   CREATE MATERIALIZED VIEW          DROP GROUP                        REINDEX
  ALTER SCHEMA                      CREATE MODEL                      DROP INDEX                        REPLACE
  ALTER SEQUENCE                    CREATE NODE                       DROP MASKING POLICY               RESET
  ALTER SERVER                      CREATE NODE GROUP                 DROP MATERIALIZED VIEW            REVOKE
  ALTER SESSION                     CREATE OPERATOR                   DROP MODEL                        ROLLBACK
  ALTER SUBSCRIPTION                CREATE PACKAGE                    DROP NODE                         ROLLBACK PREPARED
  ALTER SYNONYM                     CREATE PACKAGE BODY               DROP NODE GROUP                   SAMPLE SNAPSHOT
  ALTER SYSTEM KILL SESSION         CREATE PROCEDURE                  DROP OPERATOR                     SAVEPOINT
  ALTER SYSTEM SET                  CREATE PUBLICATION                DROP OWNED                        SELECT
  ALTER TABLE                       CREATE RESOURCE LABEL             DROP PACKAGE                      SELECT INTO
--More--
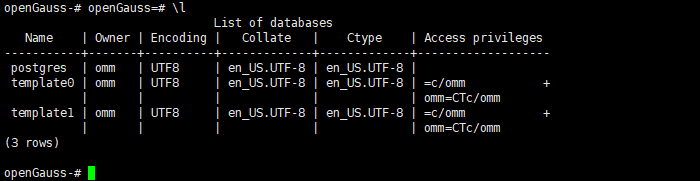
您可以用下面的命令查询openGauss中所有的数据库和描述信息。
openGauss-# openGauss=# \l
                              List of databases
   Name    | Owner | Encoding |   Collate   |    Ctype    | Access privileges
-----------+-------+----------+-------------+-------------+-------------------
 postgres  | omm   | UTF8     | en_US.UTF-8 | en_US.UTF-8 |
 template0 | omm   | UTF8     | en_US.UTF-8 | en_US.UTF-8 | =c/omm           +
           |       |          |             |             | omm=CTc/omm
 template1 | omm   | UTF8     | en_US.UTF-8 | en_US.UTF-8 | =c/omm           +
           |       |          |             |             | omm=CTc/omm
(3 rows)
退出数据库。
openGauss=# \q

缺省情况下,客户端连接数据库后处于空闲状态时间超过参数session_timeout的默认值(10min)时会自动断开连接。
四、安装遇到的问题
问题一、运行启动报错,密码无效
[omm@CAIP120 openGauss]$ echo password | sh ./install.sh --mode single -D /data/openGauss/data -R /data/openGauss/install  --start
the password can contain only 8 to 32 characters
         and at least three types of the following characters: uppercase letters, lowercase letters, digits, and special characters..

问题二、运行启动脚本报错,omm用户创建目录无权限
[omm@CAIP120 openGauss]$ echo OpenGauss1010 | sh ./install.sh --mode single -D /data/openGauss/data -R /data/openGauss/install  --start
touch: cannot touch ‘/data/openGauss/install.log’: Permission denied
error: failed to create the log file.
[omm@CAIP120 openGauss]$

解决办法:
规划目录和用户时更改目录权限:**/data/openGauss** (可自定义)**
[root@CAIP120 ~]# chown -R omm.omm /data/openGauss && chown -R omm.omm /home/omm

问题三、运行启动脚本报错,kernel.sem 值太小
[omm@CAIP120 openGauss]$ echo OpenGauss1010 | sh ./install.sh --mode single -D /data/openGauss/data -R /data/openGauss/install  --start
the maximum number of SEMMNI is not correct, please change it (/proc/sys/kernel/sem)), ensure that the value of fourth sem is greater than 320.
[omm@CAIP120 openGauss]$

解决办法:**
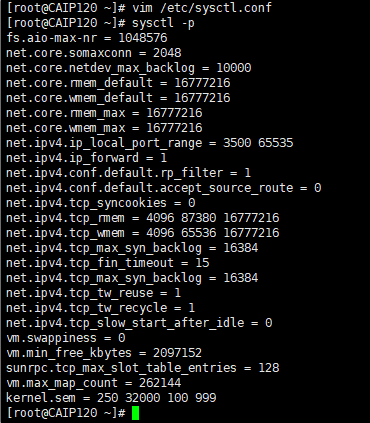
在/etc/sysctl.conf中加入语句kernel.sem = 250 32000 100 999
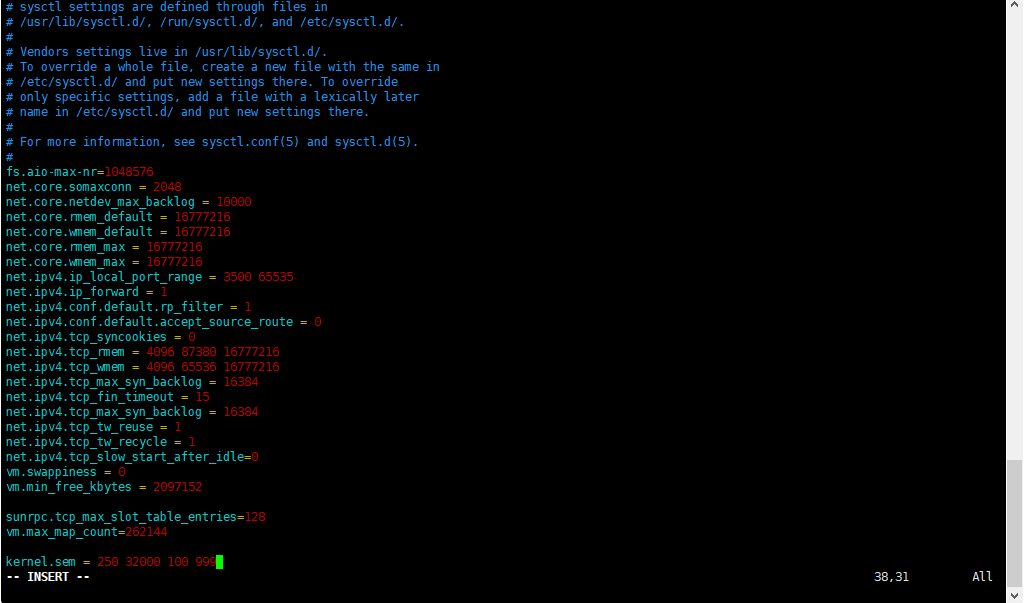
然后执行sysctl -p
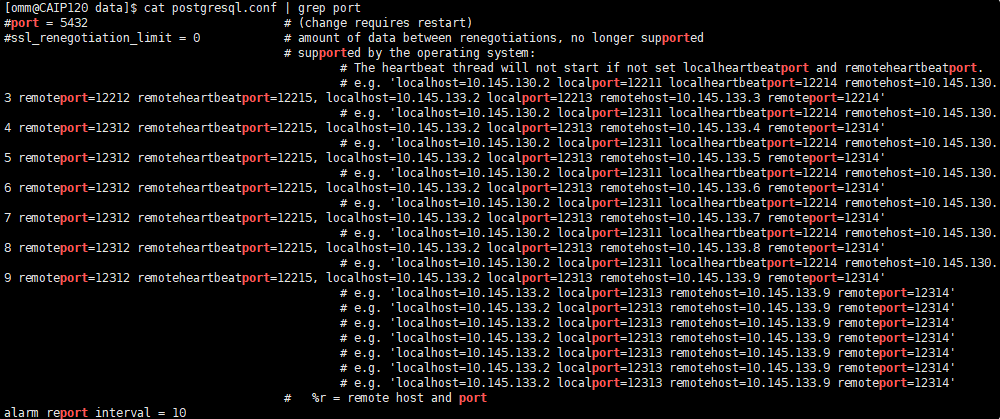
问题四、gsql 连接openGauss 报错,无相应端口
[omm@CAIP120 openGauss]$ gsql -d postgres -p 8000
failed to connect Unknown:8000.

解决办法:**
查找正确的端口,通过 cat 命令查看 postgresql.conf配置文件,就可以知道端口信息了
[omm@CAIP120 data]$ cat postgresql.conf | grep port
#port = 5432				# (change requires restart)
#ssl_renegotiation_limit = 0		# amount of data between renegotiations, no longer supported
					# supported by the operating system:
						# The heartbeat thread will not start if not set localheartbeatport and remoteheartbeatport.
						# e.g. 'localhost=10.145.130.2 localport=12211 localheartbeatport=12214 remotehost=10.145.130.3 remoteport=12212 remoteheartbeatport=12215, localhost=10.145.133.2 localport=12213 remotehost=10.145.133.3 remoteport=12214'
						# e.g. 'localhost=10.145.130.2 localport=12311 localheartbeatport=12214 remotehost=10.145.130.4 remoteport=12312 remoteheartbeatport=12215, localhost=10.145.133.2 localport=12313 remotehost=10.145.133.4 remoteport=12314'
                                                # e.g. 'localhost=10.145.130.2 localport=12311 localheartbeatport=12214 remotehost=10.145.130.5 remoteport=12312 remoteheartbeatport=12215, localhost=10.145.133.2 localport=12313 remotehost=10.145.133.5 remoteport=12314'
                                                # e.g. 'localhost=10.145.130.2 localport=12311 localheartbeatport=12214 remotehost=10.145.130.6 remoteport=12312 remoteheartbeatport=12215, localhost=10.145.133.2 localport=12313 remotehost=10.145.133.6 remoteport=12314'
                                                # e.g. 'localhost=10.145.130.2 localport=12311 localheartbeatport=12214 remotehost=10.145.130.7 remoteport=12312 remoteheartbeatport=12215, localhost=10.145.133.2 localport=12313 remotehost=10.145.133.7 remoteport=12314'
                                                # e.g. 'localhost=10.145.130.2 localport=12311 localheartbeatport=12214 remotehost=10.145.130.8 remoteport=12312 remoteheartbeatport=12215, localhost=10.145.133.2 localport=12313 remotehost=10.145.133.8 remoteport=12314'
                                                # e.g. 'localhost=10.145.130.2 localport=12311 localheartbeatport=12214 remotehost=10.145.130.9 remoteport=12312 remoteheartbeatport=12215, localhost=10.145.133.2 localport=12313 remotehost=10.145.133.9 remoteport=12314'
                                                # e.g. 'localhost=10.145.133.2 localport=12313 remotehost=10.145.133.9 remoteport=12314'
                                                # e.g. 'localhost=10.145.133.2 localport=12313 remotehost=10.145.133.9 remoteport=12314'
                                                # e.g. 'localhost=10.145.133.2 localport=12313 remotehost=10.145.133.9 remoteport=12314'
                                                # e.g. 'localhost=10.145.133.2 localport=12313 remotehost=10.145.133.9 remoteport=12314'
                                                # e.g. 'localhost=10.145.133.2 localport=12313 remotehost=10.145.133.9 remoteport=12314'
                                                # e.g. 'localhost=10.145.133.2 localport=12313 remotehost=10.145.133.9 remoteport=12314'
                                                # e.g. 'localhost=10.145.133.2 localport=12313 remotehost=10.145.133.9 remoteport=12314'
					#   %r = remote host and port
alarm_report_interval = 10
总结:
1、openGauss 轻量版单机版安装还是比较简单,直接脚本执行就可以初始化完成安装,可以说是几分钟搞定部署。
2、虽然很快完成了部署,由于第一次部署,还是遇到了很多菜鸟级的问题,通过查找学习都解决了。在不断的测试和摸索中,已经成功部署了 openGauss 轻量版数据库。以上是用本人初次体验 openGauss 国产数据库的学习和记录分享,想学习了解 openGauss 国产数据库的同学也可先 openGauss 轻量版单机版安装测试体验。多看官方文档并实际操作更能加深理解,对学习来说事半功倍。
