一、安装WSL 二、apt安装ClickHouse 三、修改相关配置文件 四、安装Zookeeper
一、安装WSL
使用WSL之前需要准备一台Windows主机,1903以上版本。并且需要按照如下配置开启虚拟化。
进入控制面板->启动和关闭Windows功能 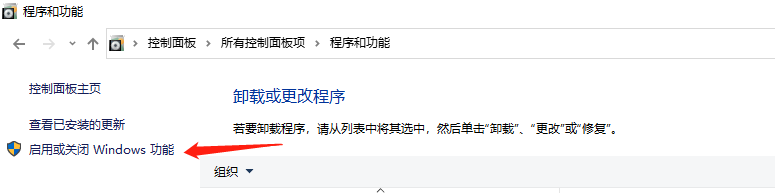
勾选适用于Linux的Windows子系统,然后安装更新之后重启电脑。 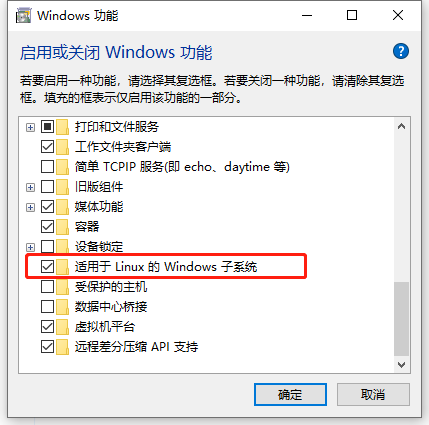
重启电脑之后在Microsoft Store搜索Ubuntu,推荐Ubuntu 18.04。20.04也可以,在apt安装java时需要特殊处理一下。 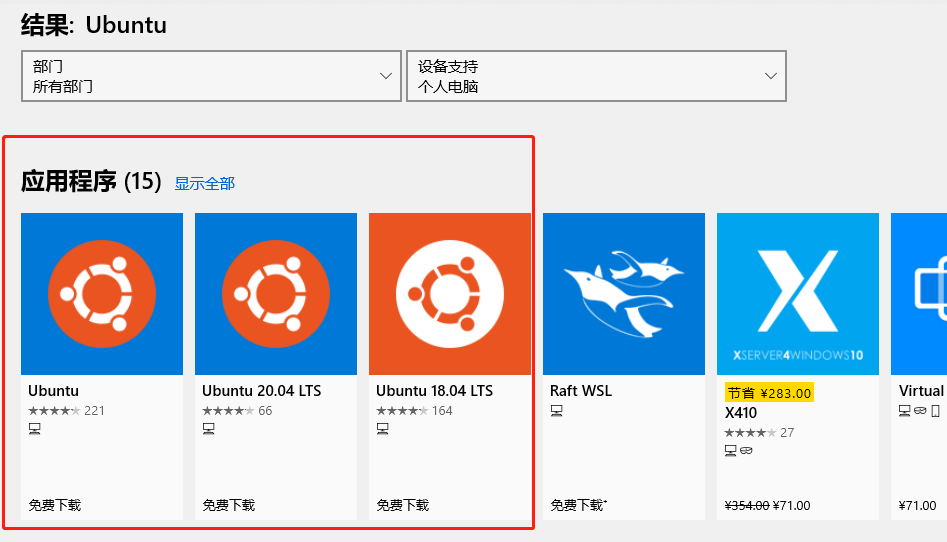
安装之后加载完成输入user和password之后就可以使用了
二、apt安装ClickHouse
新安装的wsl使用的是ubuntu,在国内使用的话,更新软件源会下载更快一些。安装方法参考官方文档:https://clickhouse.tech/docs/en/getting-started/install/确认是否CPU支持SSE 4.2
~$ grep -q sse4_2 /proc/cpuinfo && echo "SSE 4.2 supported" || echo "SSE 4.2 not supported"
使用clickhouse官方的安装源,因为外网会比较慢,这里参考清华源提供的ClickHouse的镜像源https://mirror.tuna.tsinghua.edu.cn/help/clickhouse/新建 /etc/apt/sources.list.d/clickhouse.list,内容为
deb https://mirrors.tuna.tsinghua.edu.cn/clickhouse/deb/stable/ main/
执行
~$ sudo apt-key adv --keyserver hkp://keyserver.ubuntu.com:80 --recv E0C56BD4~$ sudo apt-get update
查看可安装版本
~$ apt-cache show clickhouse-server |grep Version
这里安装最新的稳定版本,如果是生产环境推荐安装LTS版本。
~$ sudo apt-get install clickhouse-server=21.2.2.8 clickhouse-common-static=21.2.2.8 clickhouse-client=21.2.2.8
通过apt安装clickHouse完成,但是还需要改一些内容
三、修改相关配置文件
wsl可以访问windows系统中的路径和文件,所以可以将一个主机文件路径通过软链挂载到wsl中的某个路径下,可以看到文件具体的存储内容和格式,便于理解和使用。因为wsl默认使用c盘作为存储空间,我这里的C盘为NVME盘,所以数据就继续放在wsl的路径下了。电脑中有NVME盘、有SATA的SSD,还有HDD,后续可以通过挂载到不同的WSL路径去实现冷热备的磁盘策略。便于整合数据,我创建了一个/data路径去存储clickhouse的日志和元数据,还会存储一些后续新增的其他包。
/data├── clickhouse│ ├── clickhouse-server│ │ ├── user_files│ │ ├── access│ │ ├── log│ │ ├── data│ │ │ ├── cores│ │ │ ├── data│ │ │ ├── dictionaries_lib│ │ │ ├── flags│ │ │ ├── metadata│ │ │ ├── metadata_dropped│ │ │ ├── preprocessed_configs│ │ │ └── store│ │ ├── tmp├── scripts└── zookeeper-3.5.8 ├── bin ├── conf ├── data │ └── version-2 ├── docs │ ├── apidocs │ ├── images │ └── skin ├── lib └── logs └── version-2
具体操作为(vc是user))
~$ sudo mkdir /data~$ sudo chown -R vc:vc /data/~$ mkdir -p /data/clickhouse/clickhouse-server/log /data/clickhouse/clickhouse-server/data /data/clickhouse/clickhouse-server/tmp /data/clickhouse/clickhouse-server/user_files /data/clickhouse/clickhouse-server/access
先启动生成默认配置文件,默认生成文件在/etc/clickhouse-server/下
~$ sudo service clickhouse-server start~$ sudo service clickhouse-server stop~$ sudo cp /etc/clickhouse-server/config.xml /etc/clickhouse-server/config.xml.bak20210313~$ sudo cp /etc/clickhouse-server/users.xml /etc/clickhouse-server/users.xml.bak20210313
然后修改配置文件。我修改了以下的内容,也修改了一些默认端口号,供参考,主机内存16G 修改config.xml以下内容
<log> /data/clickhouse/clickhouse-server/log/clickhouse-server.log</log> <errorlog> /data/clickhouse/clickhouse-server/log/clickhouse-server.err.log</errorlog> <http_port>28123</http_port> <tcp_port>29000</tcp_port> <mysql_port>29004</mysql_port> <max_server_memory_usage>6000000000</max_server_memory_usage> <!-- Path to data directory, with trailing slash. --> <path>/data/clickhouse/clickhouse-server/data/</path> <!-- Path to temporary data for processing hard queries. --> <tmp_path>/data/clickhouse/clickhouse-server/tmp/</tmp_path> <!-- Directory with user provided files that are accessible by 'file' table function. --> <user_files_path>/data/clickhouse/clickhouse-server/user_files/</user_files_path> <user_directories> <users_xml> <!-- Path to configuration file with predefined users. --> <path>/data/clickhouse/clickhouse-server/config/users.xml</path> </users_xml> <local_directory> <!-- Path to folder where users created by SQL commands are stored. --> <path>/data/clickhouse/clickhouse-server/access/</path> </local_directory> </user_directories> <remote_servers><vccluster><shard><internal_replication>true</internal_replication><replica> <host>127.0.0.1</host> <port>29000</port> <user>vc</user> <password>123123</password> </replica></shard></vccluster><remote_servers><zookeeper> <node> <host>localhost</host> <port>22181</port> </node></zookeeper><macros> <shard>01</shard> <replica>ck01-1</replica></macros><clickhouse_compression><case><min_part_size>1000000000</min_part_size><min_part_size_ratio>0.01</min_part_size_ratio><method>lz4</method></case></clickhouse_compression>
users.xml中新增,vc为我的user,注意:本地学习使用了简单密码123123,生产环境应使用复杂密码
<yandex> <users> <vc> <password_sha256_hex>96cae35ce8a9b0244178bf28e4966c2ce1b8385723a96a6b838858cdd6ca0a1e</password_sha256_hex> <networks> <ip>::/0</ip> </networks> <!-- Settings profile for user. --> <profile>default</profile> <!-- Quota for user. --> <quota>default</quota> </vc> </users></yandex>
目前安装完成之后还需要处理下文件权限的问题 默认clickhouse通过sudo启动,产生的文件都是clickhouse组下的,当前用户没有权限读取
~$ sudo usermod -a -G vc clickhouse~$ sudo chmod -R 775 /data
启动clickhouse-server
~$ sudo clickhouse start
通过clickhouse-client连接
~$ clickhouse-client --port 29000 --user vc --password 123123 -m -n
目前没有zk是可以使用MergeTree表的。
create database local_test;use local_test;create table local_test.test( id String) Engine=MergeTree()Partition by tuple()order by id;insert into table local_test.test values ('1'),('2'),('1'),('3'),('100'),('200'),('300');select uniqExact(id) as uv,sum(1) as pv from local_test.test;--┌─uv─┬─pv─┐--│ 6 │ 7 │--└────┴────┘
然后在路径/data/clickhouse/clickhouse-server/data/data/local_test/test/
会看到生成一个分区all_1_1_0 bin文件内后几位为写入的数据,按照字符串顺序升序排列
 primary.idx文件存了这个文件块的最小值和最大值(因为是没有分区的)
如果要使用Replicated*系列和分布式表,需要安装zk。
四、安装Zookeeper
从清华源下载编译好的bin包。
~$ cd /data~$ wget https://mirrors.tuna.tsinghua.edu.cn/apache/zookeeper/zookeeper-3.5.9/apache-zookeeper-3.5.9-bin.tar.gz~$ tar zxf apache-zookeeper-3.5.9-bin.tar.gz && rm apache-zookeeper-3.5.9-bin.tar.gz~$ mv apache-zookeeper-3.5.9-bin/ zookeeper-3.5.9
因为wsl下ubuntu没有默认安装java环境,通过apt安装java
~$ sudo apt-get install openjdk-8-jdk
如果遇到以下这个问题,需要特殊处理一下,参考https://blog.csdn.net/weixin_44144528/article/details/107095843
~$ sudo add-apt-repository ppa:linuxuprising/libpng12~$ sudo apt update~$ sudo apt-get --fix-broken install
在conf/下新增文件zoo.cfg
# The number of milliseconds of each ticktickTime=2000# The number of ticks that the initial # synchronization phase can takeinitLimit=100# The number of ticks that can pass between # sending a request and getting an acknowledgementsyncLimit=10globalOutstandingLimit=200# the directory where the snapshot is stored.# do not use /tmp for storage, /tmp here is just # example sakes.dataDir=/data/zookeeper-3.5.9/datadataLogDir=/data/zookeeper-3.5.9/logs# the port at which the clients will connectclientPort=22181# the maximum number of client connections.# increase this if you need to handle more clientsmaxClientCnxns=100preAllocSize=131072snapCount=100000## Be sure to read the maintenance section of the # administrator guide before turning on autopurge.## http://zookeeper.apache.org/doc/current/zookeeperAdmin.html#sc_maintenance## The number of snapshots to retain in dataDirautopurge.snapRetainCount=3# Purge task interval in hours# Set to "0" to disable auto purge featureautopurge.purgeInterval=1
因为只是wsl的学习环境,单节点就足够了 启动zk
~$ /data/zookeeper-3.5.9/bin/zkServer.sh start~$ /data/zookeeper-3.5.9/bin/zkServer.sh status
通过clickhouse-client连接
~$ clickhouse-client --port 29000 --user vc --password 123123 -m -n
执行下面sql
CREATE TABLE IF NOT EXISTS local_test.replicated_test ON CLUSTER vccluster
(
  id String
) Engine=ReplicatedMergeTree('/clickhouse/tables/{shard}/local_test.replicated_test', '{replica}') Partition by tuple() order by id;

CREATE TABLE IF NOT EXISTS local_test.dis_test ON CLUSTER vccluster AS local_test.replicated_test
ENGINE = Distributed(vccluster, local_test, replicated_test, rand())

insert into table local_test.replicated_test values ('1'),('2'),('1'),('3'),('100'),('200'),('300');

select uniqExact(id) as uv,sum(1) as pv from  local_test.replicated_test;
--┌─uv─┬─pv─┐
--│  6 │  7 │
--└────┴────┘

select uniqExact(id) as uv,sum(1) as pv from  local_test.dis_test;
--┌─uv─┬─pv─┐
--│  6 │  7 │
--└────┴────┘
到这里,WSL安装Clickhouse就结束了,接下来我会写一些py代码去生成一些测试数据,通过这些测试数据去做一些进一步的应用case。