


今天是国庆节,终于有空能写点东西。corosync+pacemaker是linux平台上优秀的高可用解决方案之一,虽没有官方RHCS套件的简单和直观,却一样的稳定和高效,在互联网企业中广泛使用。本篇将介绍在7.1中如何对其进行安装和配置。
安装2015年9月15日刚出的CentOS 7.1 rolling media(1508),这样只要使用local ISO做yum源即可安装最新版本的软件,无需联网。
--由于使用最小化安装,还要安装如下基本软件(7的最小化安装连vim默认都不装的):vim, net-tools, vsftpd, bind, bind-utils
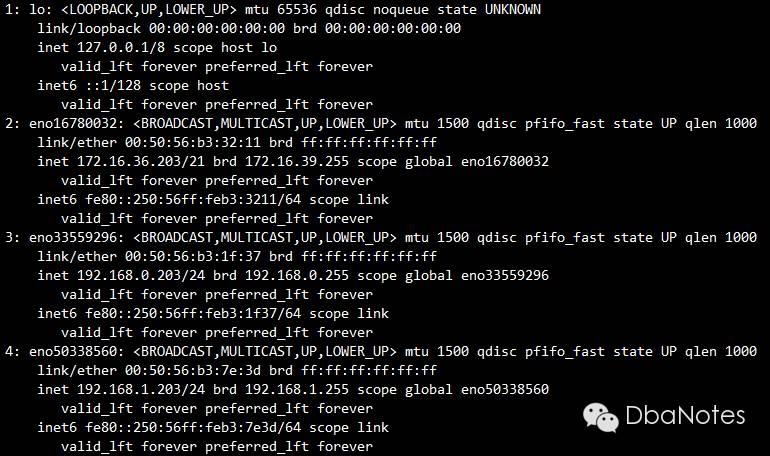
--由于本实验安装的是两节点的集群(在VMware vsphere 5.5环境中),每个虚拟机配备3块网卡:一块public IP、一块private IP、一块storage IP;除了public IP网卡接默认的虚拟交换机(端口组:VM network,上联物理网卡)外,其他2块虚拟网卡都接各自新建的虚拟交换机(3块网卡隶属三个不同网段)。
一、初始环境准备
1. 关闭防火墙、关闭selinux:
systemctl stop firewalld
systemctl disable firewalld
setenforce 0
vim etc/selinux/config 将 SELINUX=enforcing 改成 SELINUX=disabled
2. 分配3块网卡的IP地址,并禁用NetworkManager服务:
(1) ip ad (linux 7版本开始默认使用biosdevname的方式进行设备名称匹配,有的人不习惯仍然将其改回eth0\1\2...方式;我个人觉得还挺喜欢的,何况这种情况下如果硬件损坏,修复后重新插回服务器上,设备名称还是一致的):
(2) nmcli con (将UUID添加到对应网卡的配置文件:/etc/sysconfig/network-scripts/ifcfg-enoXXXXXXXX中,biosdevname能辨识到正确的网卡设置并通过配置文件中的"NAME="设置设备名称):

(3) 禁用NetworkManager服务:
systemctl list-unit-files | grep Network

systemctl status NetworkManager
systemctl disable NetworkManager
2. 配置NTP client:
--提供NTP SERVER的是vCenter,配置虚拟机的NTP client与其同步。
(1) 修改 etc/ntp.conf 配置文件(添加):
restrict 172.16.36.135
server 172.16.36.135
(2) 启动NTP服务并设成开机自启动:
systemctl start ntpd
systemctl enable ntpd
systemctl status ntpd
注:linux 7在安装过程中默认使用UTC时间,关掉的地方比较隐晦(不像linux 6很明显),这点需要注意;如果没有关掉UTC,系统时钟会快8小时,需要使用 timedatectl 命令改时间。
3. 配置DNS服务:
vim etc/named.conf:
listen-on port 53 { 127.0.0.1; 172.16.36.203; 192.168.0.203; 192.168.1.203; };
--注释掉 listen-on-v6 port 53
recursion no
allow-query { localhost; 172.16.32.0/21; 192.168.0.0/24; 192.168.1.0/24; };
zone "example.com" IN {
type master;
file "forward.example";
allow-update { none; };
};
zone "36.16.172.in-addr.arpa" IN {
type master;
file "reverse.example";
allow-update { none; };
};
vim var/named/forward.example:
$TTL 86400
@ IN SOA postgresql1.example.com. root.example.com. (
2011071001 ;Serial
3600 ;Refresh
1800 ;Retry
604800 ;Expire
86400 ;Minimum TTL
)
@ IN NS postgresql1.example.com.
@ IN A 172.16.36.203
@ IN A 192.168.0.203
@ IN A 192.168.1.203
@ IN A 172.16.36.204
@ IN A 192.168.0.204
@ IN A 192.168.1.204
postgresql1 IN A 172.16.36.203
postgresql2 IN A 172.16.36.204
postgresql1-priv IN A 192.168.0.203
postgresql2-priv IN A 192.168.0.204
postgresql1-stor IN A 192.168.1.203
postgresql2-stor IN A 192.168.1.204
vim var/named/reverse.example:
$TTL 86400
@ IN SOA postgresql1.example.com. root.example.com. (
2011071001 ;Serial
3600 ;Refresh
1800 ;Retry
604800 ;Expire
86400 ;Minimum TTL
)
@ IN NS postgresql1.example.com.
@ IN PTR example.com.
postgresql1 IN A 172.16.36.203
postgresql2 IN A 172.16.36.204
203 IN PTR postgresql1.example.com.
204 IN PTR postgresql2.example.com.
vim etc/resolv.conf:
search example.com
nameserver postgresql1.example.com
--启动DNS服务并设为开机自启动
systemctl enable named
systemctl start named
4. 修改/etc/hosts文件:
127.0.0.1 localhost.localdomain localhost
172.16.36.203 postgresql1.example.com postgresql1
172.16.36.204 postgresql2.example.com postgresql2
192.168.0.203 postgresql1-priv.example.com postgresql1-priv
192.168.0.204 postgresql2-priv.example.com postgresql2-priv
192.168.1.203 postgresql1-stor.example.com postgresql1-stor
192.168.1.204 postgresql2-stor.example.com postgresql2-stor
二、安装配置corosync
安装corosync:
yum -y install corosync
2. 获得公私钥key pair(加密通讯):
corosync-keygen
注意:在要求生成随机字节的地方,非常慢……另外一个窗口执行 rngd -r dev/urandom ,结果就一下出来了!
3. 创建corosync配置文件:
--拷一个sample配置文件并在其之上进行修改
cp etc/corosync/corosync.conf.example etc/corosync/corosync.conf
--去除所有#开头的注释:
sed -i '/#/d' etc/corosync/corosync.conf
vim etc/corosync/corosync.conf (红色为修改或新增部分):
totem {
version: 2
crypto_cipher: aes256
crypto_hash: sha256
interface {
ringnumber: 0
bindnetaddr: postgresql1-priv.example.com
mcastaddr: 239.255.1.1
mcastport: 5405
ttl: 1
}
}
logging {
fileline: off
to_stderr: no
to_logfile: yes
logfile: var/log/cluster/corosync.log
to_syslog: no
debug: off
timestamp: on
logger_subsys {
subsys: QUORUM
debug: off
}
}
quorum {
provider: corosync_votequorum
two_node: 1
}
nodelist {
node {
ring0_addr: postgresql1-priv.example.com
nodeid: 1
}
node {
ring0_addr: postgresql2-priv.example.com
nodeid: 2
}
}
注1:至此配置的都是节点1的虚拟机,此时将虚拟机关闭并克隆,新的虚拟机就是节点2(节省安装和配置的时间);需要注意的就是修改节点2的主机名、IP地址,以及corosync.conf中的bindnetaddr字段。
4. 两个节点分别启动corosync服务:
systemctl start corosync -- on both node
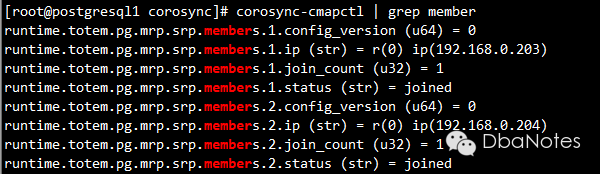
5. 检查membership:
corosync-cmapctl | grep member
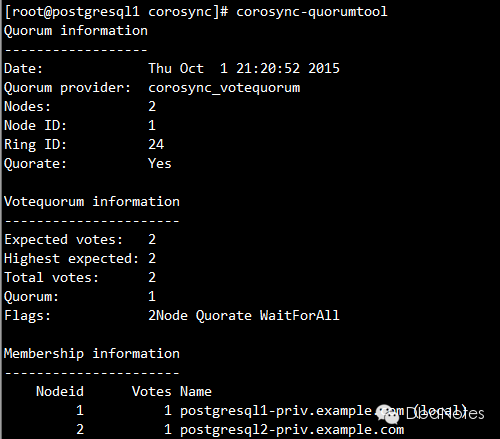
6. 检查votequorum:
corosync-quorumtool
7. 备份corosync配置文件(在安装配置pacemaker的时候会用到):
cp etc/corosync/corosync.conf etc/corosync/corosync.conf.WORKING
三、安装配置pacemaker
安装corosync:
yum -y install pacemaker
2. 启动pcsd服务:
systemctl start pcsd -- on both node
3 配置用户hacluster的密码(本实验设定其密码为redhat,请按实际需求更改):
echo "redhat" | passwd --stdin hacluster -- on both node
注意:安装pacemaker会默认创建hacluster用户,需为其指定密码,用于同步corosync配置文件及在各节点启停集群。
4. 验证各节点的pcs daemon:
pcs cluster auth postgresql1-priv.example.com postgresql2-priv.example.com

5. 配置集群:
pcs cluster setup --name hacluster postgresql1-priv.example.com postgresql2-priv.example.com --force

注:cluster setup 会生成新的corosync配置文件并分发到各个节点,需将之前备份好的corosync.conf.WORKING还原回来,另外要注意修改每个节点配置文件中的bindnetaddr字段。
6. 还原corosync配置文件:
上一步的注意事项中已经提到,此步省略。
7. 启动集群:
pcs cluster start --all

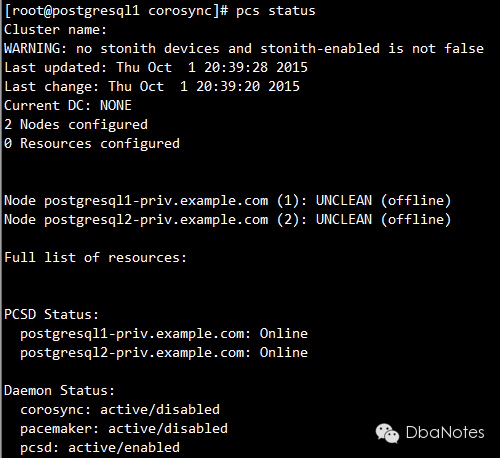
8. 检查集群状态:
pcs status
9. 将服务设置为开机自启动:
从上一步查看集群状态的结果中,我们发现pacemaker和corosync的状态都是disabled,将其设为开机自启动(所有节点都要查看并执行)
systemctl enable corosync
systemctl enable pacemaker
