作者:马顺华
从事运维管理工作多年,目前就职于六棱镜(杭州)科技有限公司,熟悉运维自动化、OceanBase部署运维、MySQL 运维以及各种云平台技术和产品。并已获得OceanBase认证OBCA、OBCP证书。
运维 OceanBase 涉及到很多相关的变量和参数。实际生产中,如果只靠单一的黑屏工具查看这些参数的话,不仅会流程繁琐,而且查看结果也不够直观,这就降低了我们的工作效率。此外,如果想查询一些表达式,也不是很方便。基于这种背景,OceanBase 监控工具 OBAgent 应运而生。完全自动化安装Prometheus+Grafana监控,多维的数据可视化监控。
一、准备部署单机环境资源
使用 obd demo 快速部署单机体验环境
使用该命令可在不传入配置文件的情况下直接在本机部署并启动指定的组件。固定部署名为 demo。部署完成后,可以通过命令 obd cluster list 查看该集群,也可以通过其他的集群命令进行管理,比如 obd cluster display demo 等。
1、执行 obd demo 前您需要确认以下信息:
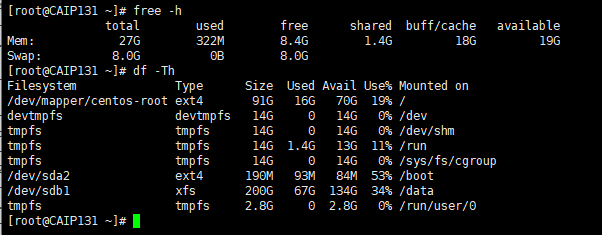
2881 和 2882 端口没有被占用。
机器可用内存不低于 6 G。
机器 CPU 数目不低于 2。
机器可用磁盘空间不小于 54 G。
[root@CAIP131 ~]# free -h
              total        used        free      shared  buff/cache   available
Mem:            27G        322M        8.4G        1.4G         18G         19G
Swap:          8.0G          0B        8.0G
[root@CAIP131 ~]#
[root@CAIP131 ~]# df -Th
Filesystem              Type      Size  Used Avail Use% Mounted on
/dev/mapper/centos-root ext4       91G   16G   70G  19% /
devtmpfs                devtmpfs   14G     0   14G   0% /dev
tmpfs                   tmpfs      14G     0   14G   0% /dev/shm
tmpfs                   tmpfs      14G  1.4G   13G  11% /run
tmpfs                   tmpfs      14G     0   14G   0% /sys/fs/cgroup
/dev/sda2               ext4      190M   93M   84M  53% /boot
/dev/sdb1               xfs       200G   67G  134G  34% /data
tmpfs                   tmpfs     2.8G     0  2.8G   0% /run/user/0
2、obd demo 部署方式采用最小规格部署
部署的组件版本默认为最新版本,默认部署的组件包含 oceanbase-ce、obproxy-ce、obagent、grafana、prometheus。
注意
obd demo 部署仅适用于快速上手体验,不适用于生产环境。
二、部署并启动 OceanBase 数据库
1、obd demo 快速部署命令说明
使用该命令可在不传入配置文件的情况下直接在本机部署并启动指定的组件,固定部署名 demo,部署后使用命令 obd cluster list 查看集群列表时可以查看到该集群,也可以通过其他的集群命令进行管理,比如 obd cluster display demo 等。
obd demo [-c/--components]

该命令默认在当前用户的家目录下进行最小规格部署,部署的组件版本默认为最新版本。当前支持组件为:oceanbase-ce、obproxy-ce、obagent、grafana、Prometheus。
使用时可以通过选择控制部署版本和配置,比如:
# 部署指定组件版本
obd demo -c oceanbase-ce,obproxy-ce --oceanbase-ce.version=3.1.3
# 指定部署特定组件——hash
obd demo -c oceanbase-ce,obproxy-ce --oceanbase-ce.package_hash=f38723204d49057d3e062ffad778edc1552a7c114622bf2a86fea769fbd202ea
# 指定部署全部组件的安装路径
## 将 oceanbase-ce 和 obproxy-ce 部署到 /data/demo 下并根据组件建立对应的工作目录
obd demo -c oceanbase-ce,obproxy-ce --home_path=/data/demo
# 指定部署全部组件的安装路径
obd demo --home_path=/path
# 指定部署特定组件的安装路径
## 将 oceanbase-ce 部署到家目录下并根据组件建立对应的工作目录,而 obproxy-ce 部署到 /data/demo/obproxy-ce
obd demo -c oceanbase-ce,obproxy-ce --obproxy-ce.home_path=/data/demo/
# 指定自定义组件配置
## 指定 oceanbase-ce 组件的 mysql_port
obd demo --oceanbase-ce.mysql_port=3881
注意
该命令只支持通过选项传入一级配置(即 global 下第一级配置)。
2、使用 obd demo 部署规划
指定部署全部组件的安装路径,将 oceanbase-ce 和 obproxy-ce 部署到 /data/demo 下并根据组件建立对应的工作目录
obd demo -c oceanbase-ce,obproxy-ce --home_path=/data/demo
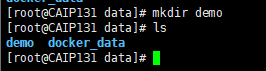
由于我的/目录空间不足,此处不安装在根目录,重新在data目录下新建demo
[root@CAIP131 data]# mkdir demo
[root@CAIP131 data]# ls
demo  docker_data
[root@CAIP131 data]#
3、obd demo 部署 4.0 Oceanbase-ce
oceanbase-ce,obproxy-ce,obagent,prometheus,grafana
组件列表,使用英文逗号(,)间隔。用于指定需要部署的组件。
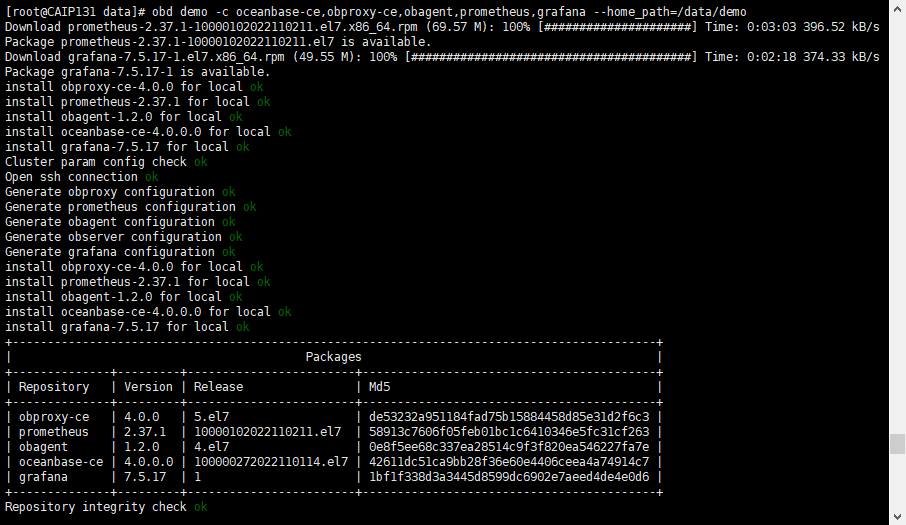
[root@CAIP131 data]# obd demo -c oceanbase-ce,obproxy-ce,obagent,prometheus,grafana --home_path=/data/demo
Download prometheus-2.37.1-10000102022110211.el7.x86_64.rpm (69.57 M): 100% [#####################] Time: 0:03:03 396.52 kB/s
Package prometheus-2.37.1-10000102022110211.el7 is available.
Download grafana-7.5.17-1.el7.x86_64.rpm (49.55 M): 100% [########################################] Time: 0:02:18 374.33 kB/s
Package grafana-7.5.17-1 is available.
install obproxy-ce-4.0.0 for local ok
install prometheus-2.37.1 for local ok
install obagent-1.2.0 for local ok
install oceanbase-ce-4.0.0.0 for local ok
install grafana-7.5.17 for local ok
Cluster param config check ok
Open ssh connection ok
Generate obproxy configuration ok
Generate prometheus configuration ok
Generate obagent configuration ok
Generate observer configuration ok
Generate grafana configuration ok
install obproxy-ce-4.0.0 for local ok
install prometheus-2.37.1 for local ok
install obagent-1.2.0 for local ok
install oceanbase-ce-4.0.0.0 for local ok
install grafana-7.5.17 for local ok
+--------------------------------------------------------------------------------------------+
|                                          Packages                                          |
+--------------+---------+------------------------+------------------------------------------+
| Repository   | Version | Release                | Md5                                      |
+--------------+---------+------------------------+------------------------------------------+
| obproxy-ce   | 4.0.0   | 5.el7                  | de53232a951184fad75b15884458d85e31d2f6c3 |
| prometheus   | 2.37.1  | 10000102022110211.el7  | 58913c7606f05feb01bc1c6410346e5fc31cf263 |
| obagent      | 1.2.0   | 4.el7                  | 0e8f5ee68c337ea28514c9f3f820ea546227fa7e |
| oceanbase-ce | 4.0.0.0 | 100000272022110114.el7 | 42611dc51ca9bb28f36e60e4406ceea4a74914c7 |
| grafana      | 7.5.17  | 1                      | 1bf1f338d3a3445d8599dc6902e7aeed4de4e0d6 |
+--------------+---------+------------------------+------------------------------------------+
Do you want to use it? [y/n]:
提示 Do you want to use it? 确定要使用它吗?
按 y 确认
Do you want to use it? [y/n]: y
Package oceanbase-ce-4.0.0.0-100000272022110114.el7 is available.

Wait for observer init ok
+---------------------------------------------+
|                   observer                  |
+-----------+---------+------+-------+--------+
| ip        | version | port | zone  | status |
+-----------+---------+------+-------+--------+
| 127.0.0.1 | 4.0.0.0 | 2881 | zone1 | ACTIVE |
+-----------+---------+------+-------+--------+
obclient -h127.0.0.1 -P2881 -uroot -Doceanbase

+---------------------------------------------+
|                   obproxy                   |
+-----------+------+-----------------+--------+
| ip        | port | prometheus_port | status |
+-----------+------+-----------------+--------+
| 127.0.0.1 | 2883 | 2884            | active |
+-----------+------+-----------------+--------+
obclient -h127.0.0.1 -P2883 -uroot -Doceanbase
+--------------------------------------------------+
|                     obagent                      |
+--------------+-------------+------------+--------+
| ip           | server_port | pprof_port | status |
+--------------+-------------+------------+--------+
| 172.20.2.131 | 8088        | 8089       | active |
+--------------+-------------+------------+--------+
+-----------------------------------------------------+
|                      prometheus                     |
+--------------------------+------+----------+--------+
| url                      | user | password | status |
+--------------------------+------+----------+--------+
| http://172.20.2.131:9090 |      |          | active |
+--------------------------+------+----------+--------+
+-------------------------------------------------------------------+
|                              grafana                              |
+--------------------------------------+-------+-----------+--------+
| url                                  | user  | password  | status |
+--------------------------------------+-------+-----------+--------+
| http://172.20.2.131:3000/d/oceanbase | admin | oceanbase | active |
+--------------------------------------+-------+-----------+--------+
demo running
[root@CAIP131 data]#
当安装 grafana 或 prometheus 时,会输出 grafana 或 prometheus 的访问地址,类似以下输出。在阿里云或其他云环境下,因为安装程序可能无法获取公网 IP,可能输出的是内网地址(例:为 192.168.1.1),此 IP 非公网地址,您需要使用正确的地址。
三、连接数据库
1、observer 连接数据库 2881 端口
不会 observer 连接数据库,没关系,OB 4.0 版本,在安装时已经贴心的把连接命令显示出来了。
obclient -h127.0.0.1 -P2881 -uroot -Doceanbase
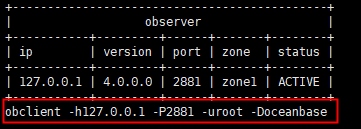
[root@CAIP131 data]# obclient -h127.0.0.1 -P2881 -uroot -Doceanbase
Reading table information for completion of table and column names
You can turn off this feature to get a quicker startup with -A

Welcome to the OceanBase.  Commands end with ; or \g.
Your MySQL connection id is 3221493928
Server version: 5.7.25 OceanBase_CE 4.0.0.0 (r100000272022110114-6af7f9ae79cd0ecbafd4b1b88e2886ccdba0c3be) (Built Nov  1 2022 14:57:18)

Copyright (c) 2000, 2018, Oracle, MariaDB Corporation Ab and others.

Type 'help;' or '\h' for help. Type '\c' to clear the current input statement.

MySQL [oceanbase]> show databases;
+--------------------+
| Database           |
+--------------------+
| information_schema |
| LBACSYS            |
| mysql              |
| oceanbase          |
| ORAAUDITOR         |
| SYS                |
| test               |
+--------------------+
7 rows in set (0.010 sec)

MySQL [oceanbase]>
2、obproxy 连接数据库 2883 端口
不会 obproxy 连接数据库,没关系,OB 4.0 版本,在安装时已经贴心的把连接命令显示出来了。
obclient -h127.0.0.1 -P2883 -uroot -Doceanbase
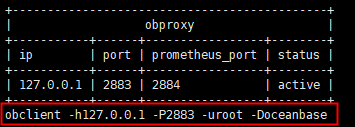
[root@CAIP131 data]# obclient -h127.0.0.1 -P2883 -uroot -Doceanbase
Reading table information for completion of table and column names
You can turn off this feature to get a quicker startup with -A

Welcome to the OceanBase.  Commands end with ; or \g.
Your MySQL connection id is 1
Server version: 5.6.25 OceanBase_CE 4.0.0.0 (r100000272022110114-6af7f9ae79cd0ecbafd4b1b88e2886ccdba0c3be) (Built Nov  1 2022 14:57:18)

Copyright (c) 2000, 2018, Oracle, MariaDB Corporation Ab and others.

Type 'help;' or '\h' for help. Type '\c' to clear the current input statement.

MySQL [oceanbase]>
3、obagent 连接数据库 8088 端口

部署 Prometheus 时需要用到
4、连接 prometheus 9090 端口
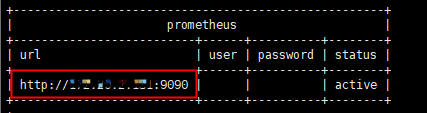
使用浏览器链接地址:http://IP:9090
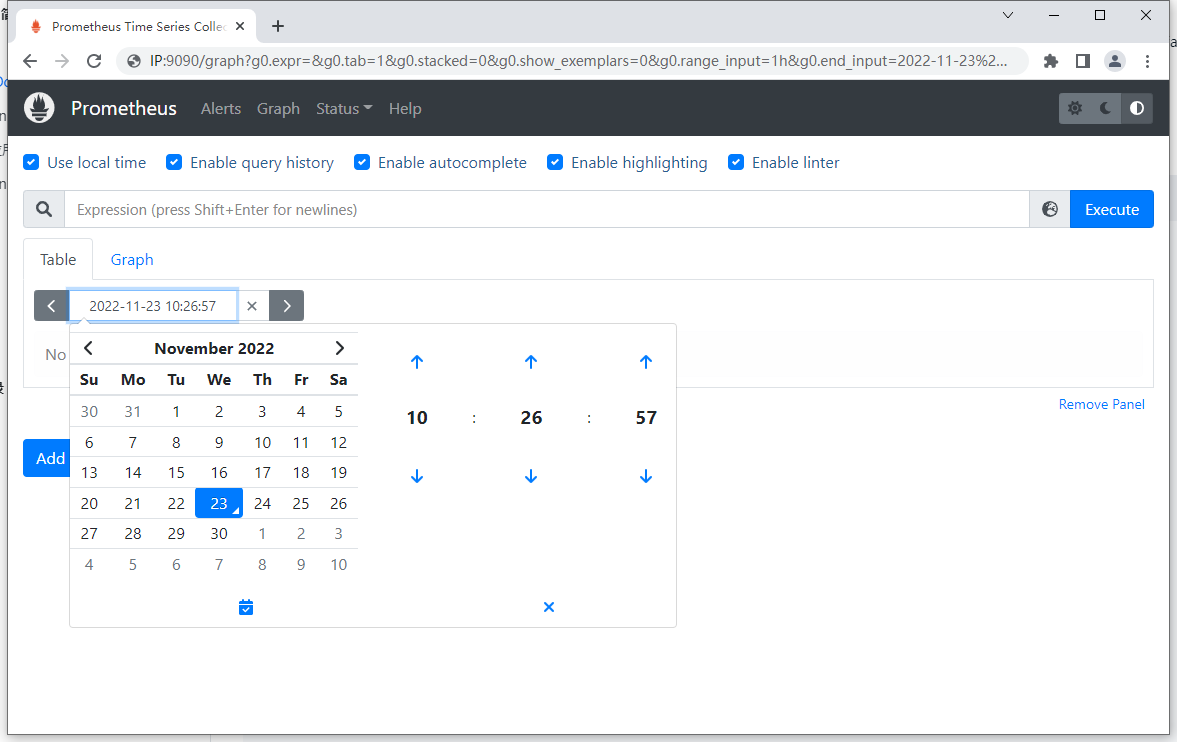
就可以用 Prometheus 查看 OceanBase 的指标了。alerts 告警,用来报告异常情况:
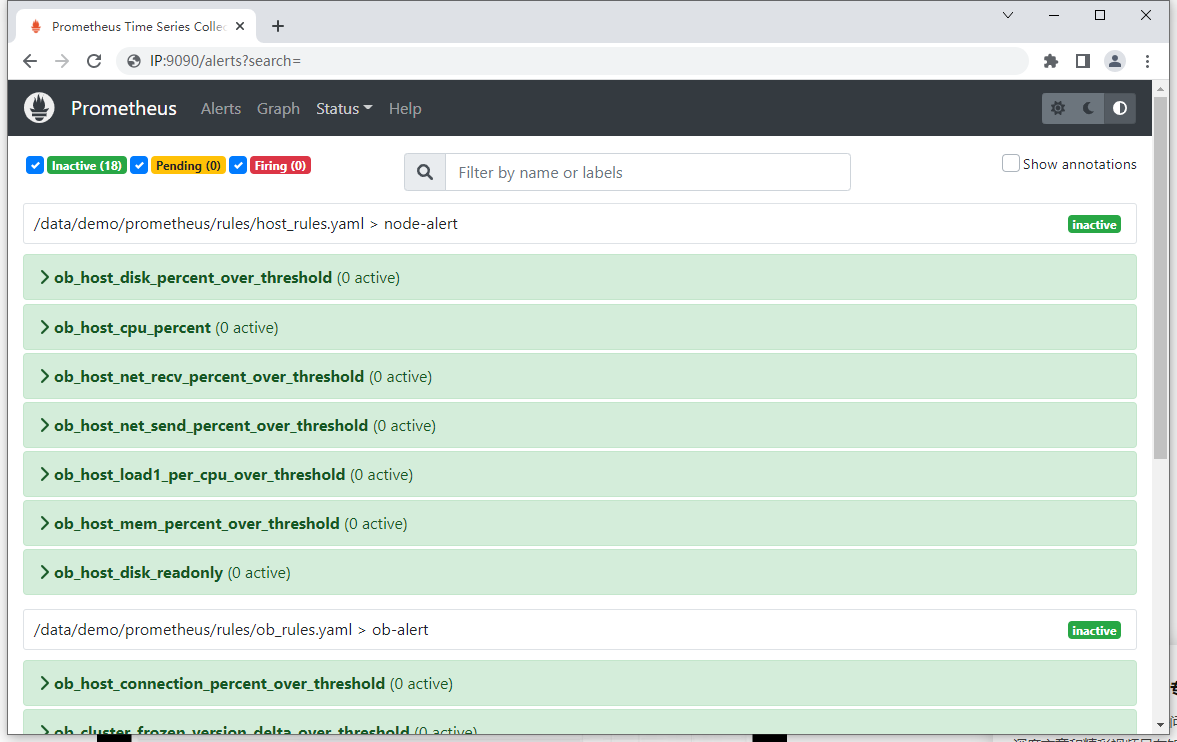
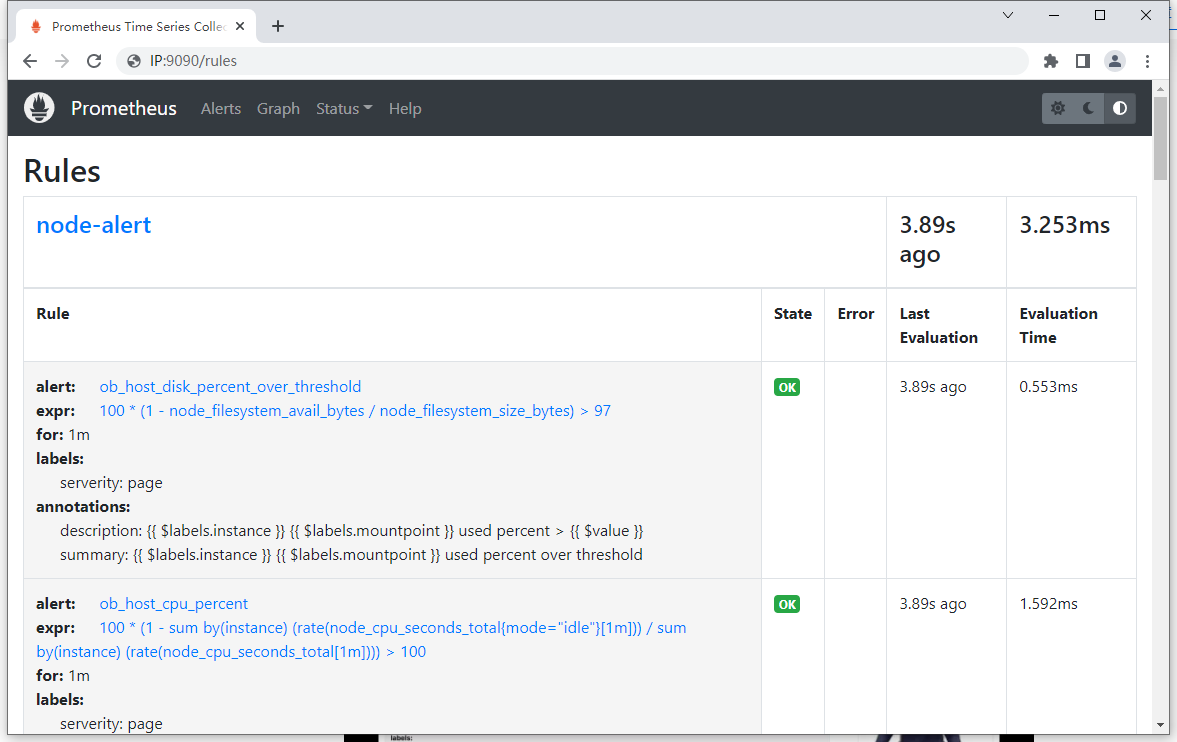
接下是 Status,可以看到 Rules 下面的配置规则,当指标超出规则时就会告警。
接下是 Status,可以看到 Targets 所有组件状态,当状态有 Error 时就会告警。

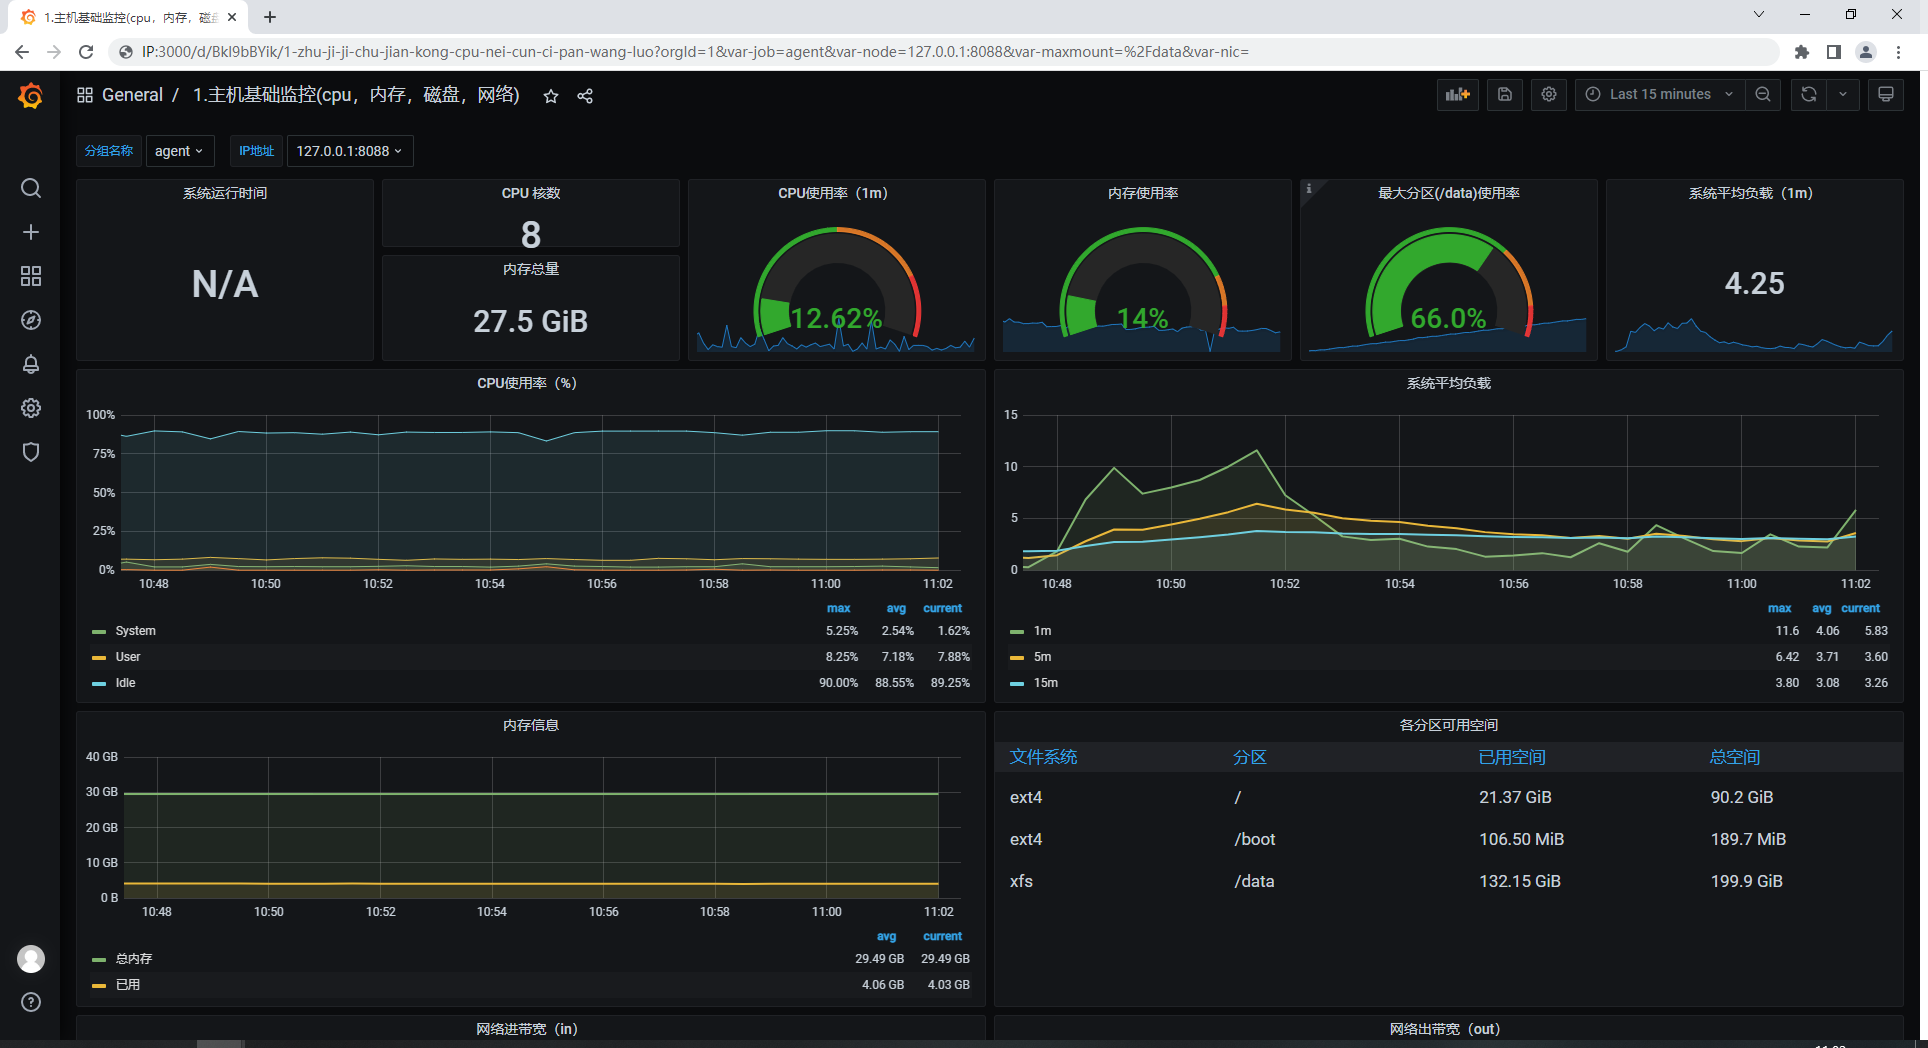
5、 连接 grafana 3000 端口
Grafana等图形工具获取到监控数据,并以图形化的方式进行展示。
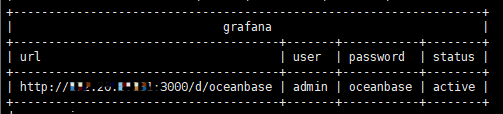
使用浏览器链接地址:http://IP:3000/d/oceanbase 默认用户名:admin 密码:oceanbase
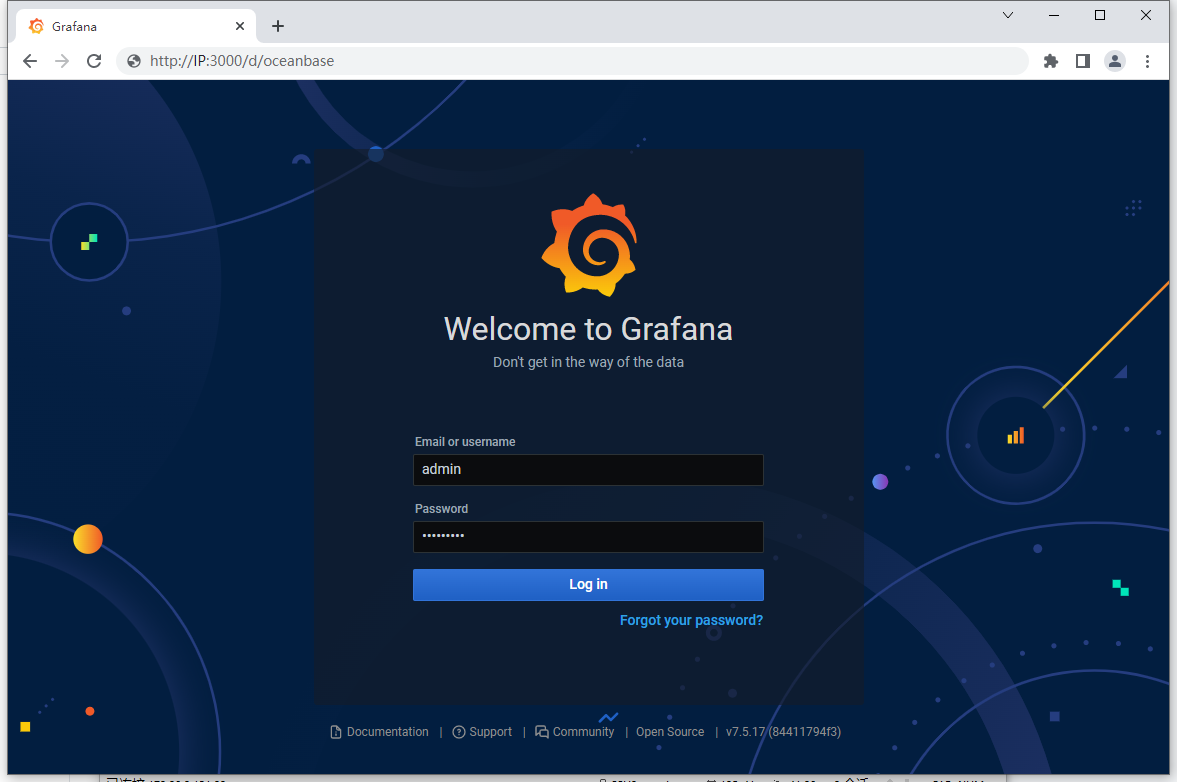
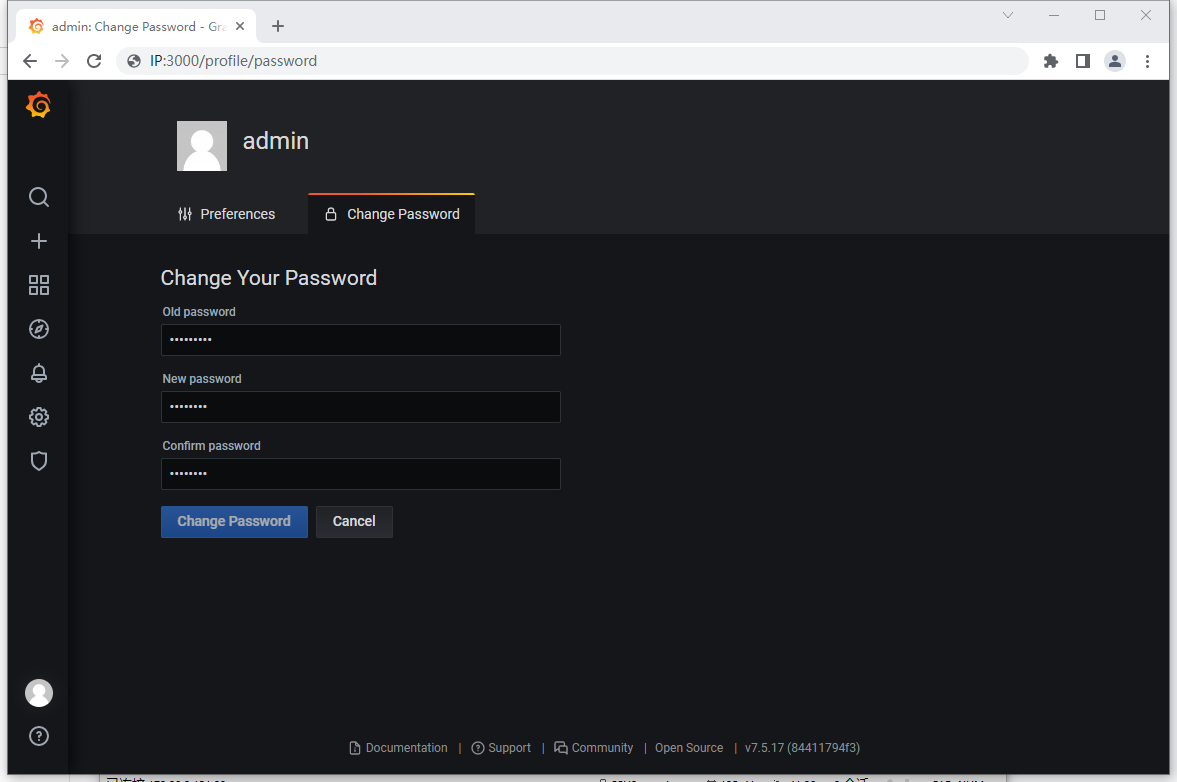
登录后需要及时修改密码
查看配置数据源
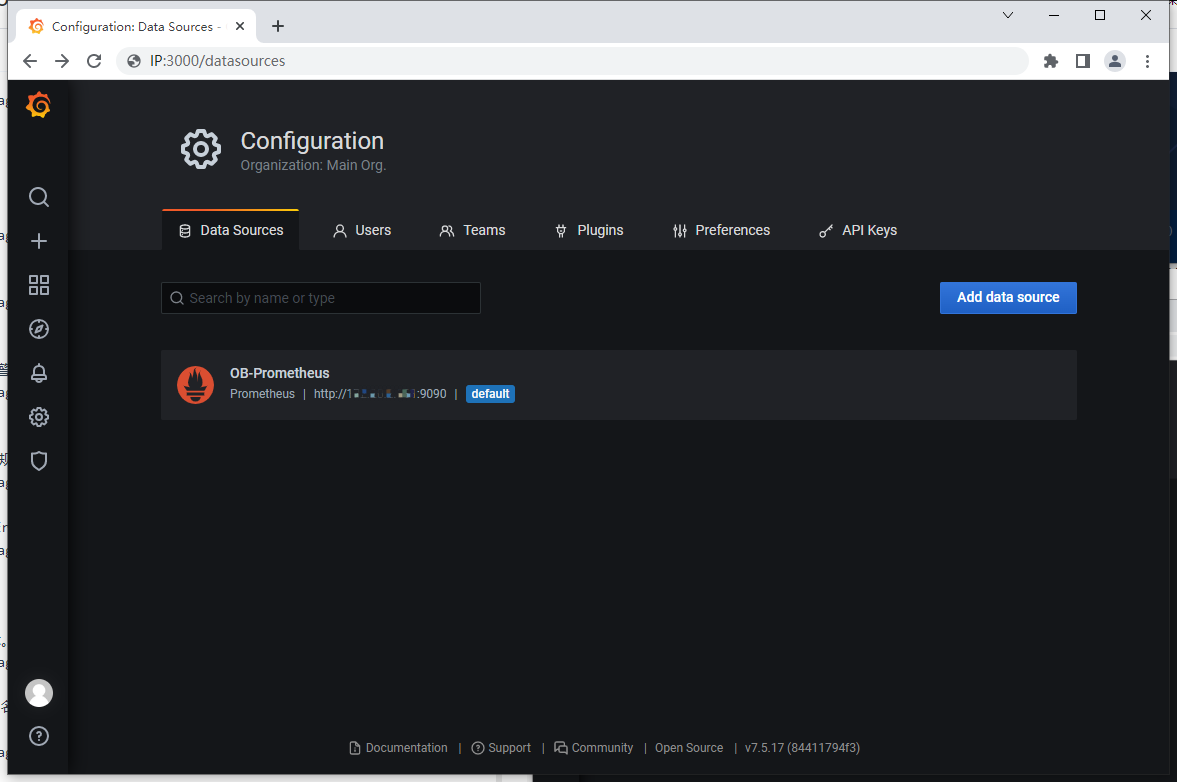
采集 Agent 8088 端口信息
四、OceanBase 数据库写入、修改和删除
创建表完成后,可以在表中写入、修改和删除数据。 本篇教程为您介绍如何使用 OceanBase 写入、修改、更新和删除表中的数据。
1、创建 student 表
以教学管理系统的学生对象为例,创建表名为 student 的学生表,其中包含学号、姓名、性别、出生日期、省份、城市、手机号和邮箱地址、记录创建时间和记录修改时间。
语法格式:
CREATE TABLE table_name (column_name column_type);
示例:
MySQL [oceanbase]> DROP TABLE IF EXISTS `student`;
ULL COMMENT '出生日期',
  `province` varchar(20) NOT NULL COMMENT '省份',
  `city` varchar(20) NULL COMMENT '城市',
  `mobile_phone` varchar(20) NULL COMMENT '手机号',
  `email` varchar(128) NULL COMMENT '邮箱地址',
  `create_time` datetime NOT NULL DEFAULT CURRENT_TIMESTAMP COMMENT '审计字段,记录创建时间',
  `update_time` datetime DEFAULT CURRENT_TIMESTAMP ON UPDATE CURRENT_TIMESTAMP COMMENT '审计字段,记录修改时间',
  PRIMARY KEY (`id`)
) COMMENT '学生';Query OK, 0 rows affected, 1 warning (0.110 sec)

MySQL [oceanbase]> CREATE TABLE `student` (
    ->   `id` int NOT NULL AUTO_INCREMENT COMMENT 'ID, 学号',
    ->   `name` varchar(20) NOT NULL COMMENT '姓名',
    ->   `sex` varchar(1) NOT NULL COMMENT '性别,可选值 m 男性,f 女性',
    ->   `birth` date NULL COMMENT '出生日期',
    ->   `province` varchar(20) NOT NULL COMMENT '省份',
    ->   `city` varchar(20) NULL COMMENT '城市',
    ->   `mobile_phone` varchar(20) NULL COMMENT '手机号',
    ->   `email` varchar(128) NULL COMMENT '邮箱地址',
    ->   `create_time` datetime NOT NULL DEFAULT CURRENT_TIMESTAMP COMMENT '审计字段,记录创建时间',
    ->   `update_time` datetime DEFAULT CURRENT_TIMESTAMP ON UPDATE CURRENT_TIMESTAMP COMMENT '审计字段,记录修改时间',
    ->   PRIMARY KEY (`id`)
    -> ) COMMENT '学生';
Query OK, 0 rows affected (0.239 sec)

MySQL [oceanbase]>
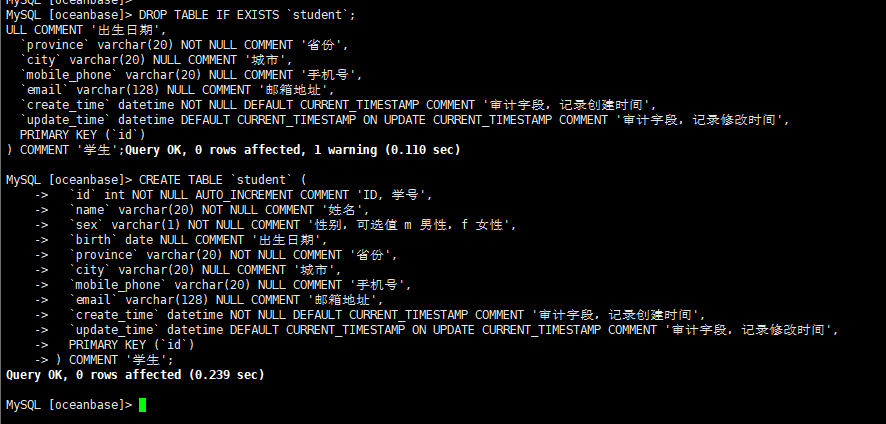
学生表创建完成后,可以对表及其中数据进行增删改查的操作。
2、写入单行数据
当一次添加一条新记录时,可以使用 INSERT 进行操作,按照列在 CREATE TABLE 语句中列出的顺序为每列提供值。
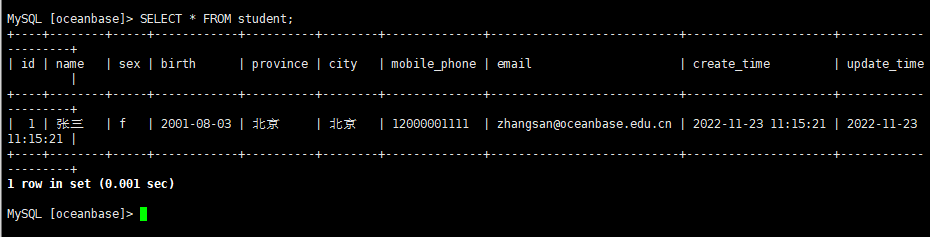
通过以下 SQL 语句在 student 表中添加一条记录。
语法格式:
INSERT INTO
 table_name ( field1, field2,...fieldN )
 VALUES
 ( value1, value2,...valueN );
示例:
– 指定列插入
MySQL [oceanbase]> INSERT INTO
    ->   `student` (`id`, `name`, `sex`, `birth`, `province`, `city`, `mobile_phone`, `email`)
    -> VALUES
    ->   (1, '张三', 'f', '2001-08-03', '北京', '北京', '12000001111', 'zhangsan@oceanbase.edu.cn');
Query OK, 1 row affected (0.113 sec)

查询插入的数据
MySQL [oceanbase]> SELECT * FROM student;
+----+--------+-----+------------+----------+--------+--------------+---------------------------+---------------------+---------------------+
| id | name   | sex | birth      | province | city   | mobile_phone | email                     | create_time         | update_time         |
+----+--------+-----+------------+----------+--------+--------------+---------------------------+---------------------+---------------------+
|  1 | 张三   | f   | 2001-08-03 | 北京     | 北京   | 12000001111  | zhangsan@oceanbase.edu.cn | 2022-11-23 11:15:21 | 2022-11-23 11:15:21 |
+----+--------+-----+------------+----------+--------+--------------+---------------------------+---------------------+---------------------+
1 row in set (0.001 sec)
3、数据删除
操作用于删除表中符合条件的行,包括单表删除及多表删除两种方式。 使用如下语句,进行单表删除,删除表中 id 列值为 1 的行数据。
MySQL [test]> DESCRIBE student;
+--------------+--------------+------+-----+-------------------+-----------------------------+
| Field        | Type         | Null | Key | Default           | Extra                       |
+--------------+--------------+------+-----+-------------------+-----------------------------+
| id           | int(11)      | NO   | PRI | NULL              | auto_increment              |
| name         | varchar(20)  | NO   |     | NULL              |                             |
| sex          | varchar(1)   | NO   |     | NULL              |                             |
| birth        | date         | YES  |     | NULL              |                             |
| province     | varchar(20)  | NO   |     | NULL              |                             |
| city         | varchar(20)  | YES  |     | NULL              |                             |
| mobile_phone | varchar(20)  | YES  |     | NULL              |                             |
| email        | varchar(128) | YES  |     | NULL              |                             |
| create_time  | datetime     | NO   |     | CURRENT_TIMESTAMP |                             |
| update_time  | datetime     | YES  |     | CURRENT_TIMESTAMP | ON UPDATE CURRENT_TIMESTAMP |
+--------------+--------------+------+-----+-------------------+-----------------------------+
10 rows in set (0.038 sec)
删除表中的普通列 sex 。
MySQL [test]> ALTER TABLE student DROP sex;
Query OK, 0 rows affected (1.022 sec)

MySQL [test]> DESCRIBE student;
+--------------+--------------+------+-----+-------------------+-----------------------------+
| Field        | Type         | Null | Key | Default           | Extra                       |
+--------------+--------------+------+-----+-------------------+-----------------------------+
| id           | int(11)      | NO   | PRI | NULL              | auto_increment              |
| name         | varchar(20)  | NO   |     | NULL              |                             |
| birth        | date         | YES  |     | NULL              |                             |
| province     | varchar(20)  | NO   |     | NULL              |                             |
| city         | varchar(20)  | YES  |     | NULL              |                             |
| mobile_phone | varchar(20)  | YES  |     | NULL              |                             |
| email        | varchar(128) | YES  |     | NULL              |                             |
| create_time  | datetime     | NO   |     | CURRENT_TIMESTAMP |                             |
| update_time  | datetime     | YES  |     | CURRENT_TIMESTAMP | ON UPDATE CURRENT_TIMESTAMP |
+--------------+--------------+------+-----+-------------------+-----------------------------+
9 rows in set (0.006 sec)

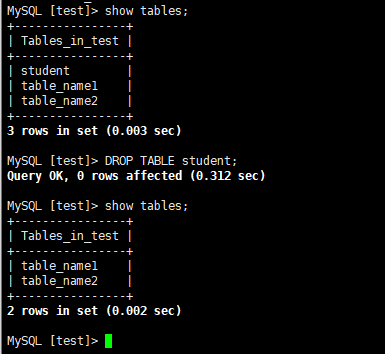
4、删除表
当一个表不再使用时,可以使用 DROP TABLE 语句将其删除。
MySQL [test]> show tables;
+----------------+
| Tables_in_test |
+----------------+
| student        |
| table_name1    |
| table_name2    |
+----------------+
3 rows in set (0.003 sec)

MySQL [test]> DROP TABLE student;
Query OK, 0 rows affected (0.312 sec)

MySQL [test]> show tables;
+----------------+
| Tables_in_test |
+----------------+
| table_name1    |
| table_name2    |
+----------------+
2 rows in set (0.002 sec)

MySQL [test]>