



Curve 是云原生计算基金会 (CNCF) Sandbox 项目,是网易主导自研和开源的高性能、易运维、云原生的分布式存储系统,由块存储 CurveBS 和文件系统 CurveFS 两部分组成。
背景
AWS S3 对外接口及使用示例
接口
// init 和 unint aws接口Aws::InitAPI(Aws::SDKOptions);Aws::ShutdownAPI(options);// 同步上传与下载接口PutObjectOutcome S3Client::PutObject(const PutObjectRequest& request);GetObjectOutcome S3Client::GetObject(const GetObjectRequest& request);// 异步上传与下载接口void S3Client::PutObjectAsync(const PutObjectRequest& request, const PutObjectResponseReceivedHandler& handler, const std::shared_ptr<const Aws::Client::AsyncCallerContext>& context);void S3Client::GetObjectAsync(const GetObjectRequest& request, const GetObjectResponseReceivedHandler& handler, const std::shared_ptr<const Aws::Client::AsyncCallerContext>& context)
显而易见,同步接口的意思就是业务调用该函数,一直等待直到收到服务端的relpy 为止;异步接口把请求丢到 AWS 底层的请求队列后就直接返回用户,当 AWS 底层收到服务端请求后,调用上层业务提供的回调。
同步接口很简单,就是阻塞直到服务端 reply 为止,因此这种模式使用得不多,所以本文以介绍异步为主。异步的话把请求丢到 AWS 底层的请求队列后可以立马返回用户,然后 AWS 底层的线程池从请求队列中取到请求进行处理。线程池的处理刚开始我们以为也是异步发送到服务端,然后等服务端 reply 后调用回调。
对外接口及使用示例
#include <aws/s3/S3Client.h>#include <aws/s3/model/PutObjectRequest.h>#include <aws/s3/model/GetObjectRequest.h>#include <aws/core/Aws.h>#include <aws/core/utils/memory/stl/AWSStringStream.h>using namespace Aws::S3;using namespace Aws::S3::Model;static const char* KEY = "s3_cpp_sample_key";static const char* BUCKET = "s3-cpp-sample-bucket";Aws::SDKOptions AWS_SDK_OPTIONS;int main(){// initAws::InitAPI(AWS_SDK_OPTIONS);// 设置aws的配置项ClientConfiguration config;config.connectTimeoutMs = 30000; // 与服务端连接超时时间config.requestTimeoutMs = 30000; // 上传下载请求超时时间option.maxConnections = 10; // 与一台服务器的最大链接数/ 设置异步执行器(aws本身又两种异步执行器,即DefaultExecutor 和PooledThreadExecutor)/ 关于这两种执行器,下文有介绍config->executor =Aws::MakeShared<Aws::Utils::Threading::PooledThreadExecutor>("S3Adapter.S3Client", 10); / 第二个参数表示异步处理线程池的数量/ 创建clientauto client = Aws::New<Aws::S3::S3Client>(ALLOCATION_TAG, config);{//first put an object into s3PutObjectRequest putObjectRequest;putObjectRequest.WithKey(KEY).WithBucket(BUCKET);/ 构建发送内容//this can be any arbitrary stream (e.g. fstream, stringstream etc...)auto requestStream = Aws::MakeShared<Aws::StringStream>("s3-sample");*requestStream << "Hello World!";//set the stream that will be put to s3putObjectRequest.SetBody(requestStream);/ aws的上传接口auto putObjectOutcome = client->PutObject(putObjectRequest);if(putObjectOutcome.IsSuccess()){std::cout << "Put object succeeded" << std::endl;}else{std::cout << "Error while putting Object " << putObjectOutcome.GetError().GetExceptionName() <<" " << putObjectOutcome.GetError().GetMessage() << std::endl;}//now get the object back out of s3. The response stream can be overridden here if you want it to go directly to// a file. In this case the default string buf is exactly what we want.GetObjectRequest getObjectRequest;getObjectRequest.WithBucket(BUCKET).WithKey(KEY);/ 下载对象auto getObjectOutcome = client->GetObject(getObjectRequest);if(getObjectOutcome.IsSuccess()){std::cout << "Successfully retrieved object from s3 with value: " << std::endl;std::cout << getObjectOutcome.GetResult().GetBody().rdbuf() << std::endl << std::endl;;}else{std::cout << "Error while getting object " << getObjectOutcome.GetError().GetExceptionName() <<" " << getObjectOutcome.GetError().GetMessage() << std::endl;}}// 关闭Aws::ShutdownAPI(options);return 0;}
AWS S3 底层逻辑分析
先放上一张整体图,来个直观点的概念:
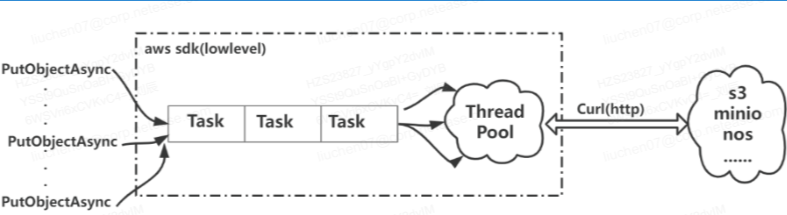
现在,让我们以上传对象接口(PutObjectAsync)为例一步步抽丝剥茧,看看 AWS S3 底层接口的逻辑吧~
void S3Client::PutObjectAsync(const PutObjectRequest& request, const PutObjectResponseReceivedHandler& handler, const std::shared_ptr<const Aws::Client::AsyncCallerContext>& context) const{// 从这里我们可以看到把PutObject()作为任务丢到了aws执行器的执行队列里m_executor->Submit( [this, request, handler, context](){ this->PutObjectAsyncHelper( request, handler, context ); } );}void S3Client::PutObjectAsyncHelper(const PutObjectRequest& request, const PutObjectResponseReceivedHandler& handler, const std::shared_ptr<const Aws::Client::AsyncCallerContext>& context) const{handler(this, request, PutObject(request), context);}
花开两朵,各表一支。我们分别看看 AWS 的底层执行器以及 PutObject 的底层调用逻辑。
AWS 执行器
namespace Aws{namespace Utils{namespace Threading{class ThreadTask;// 如果想实现一个新的执行器,继承该类,并实现SubmitToThread函数/*** Interface for implementing an Executor, to implement a custom thread execution strategy, inherit from this class* and override SubmitToThread().*/class AWS_CORE_API Executor{public:virtual ~Executor() = default;/*** Send function and its arguments to the SubmitToThread function.*/template<class Fn, class ... Args>bool Submit(Fn&& fn, Args&& ... args){std::function<void()> callable{ std::bind(std::forward<Fn>(fn), std::forward<Args>(args)...) };return SubmitToThread(std::move(callable));}protected:/*** To implement your own executor implementation, then simply subclass Executor and implement this method.*/virtual bool SubmitToThread(std::function<void()>&&) = 0;};/*** Default Executor implementation. Simply spawns a thread and detaches it.*/class AWS_CORE_API DefaultExecutor : public Executor{public:DefaultExecutor() : m_state(State::Free) {}~DefaultExecutor();protected:enum class State{Free, Locked, Shutdown};bool SubmitToThread(std::function<void()>&&) override;void Detach(std::thread::id id);std::atomic<State> m_state;Aws::UnorderedMap<std::thread::id, std::thread> m_threads;};enum class OverflowPolicy{QUEUE_TASKS_EVENLY_ACCROSS_THREADS,REJECT_IMMEDIATELY};/*** Thread Pool Executor implementation.*/class AWS_CORE_API PooledThreadExecutor : public Executor{public:PooledThreadExecutor(size_t poolSize, OverflowPolicy overflowPolicy = OverflowPolicy::QUEUE_TASKS_EVENLY_ACCROSS_THREADS);~PooledThreadExecutor();/*** Rule of 5 stuff.* Don't copy or move*/PooledThreadExecutor(const PooledThreadExecutor&) = delete;PooledThreadExecutor& operator =(const PooledThreadExecutor&) = delete;PooledThreadExecutor(PooledThreadExecutor&&) = delete;PooledThreadExecutor& operator =(PooledThreadExecutor&&) = delete;protected:bool SubmitToThread(std::function<void()>&&) override;private:Aws::Queue<std::function<void()>*> m_tasks;std::mutex m_queueLock;Aws::Utils::Threading::Semaphore m_sync;Aws::Vector<ThreadTask*> m_threadTaskHandles;size_t m_poolSize;OverflowPolicy m_overflowPolicy;/*** Once you call this, you are responsible for freeing the memory pointed to by task.*/std::function<void()>* PopTask();bool HasTasks();friend class ThreadTask;};} // namespace Threading} // namespace Utils} // namespace Aws
如上可知,AWS 当前有两种 executor:
DefaultExecutor
PooledThreadExecutor
我们使用的就是 PooledThreadExecutor。要想实现一个新的执行器很简单,只需要继承 Executor 虚基类,然后重载 SubmitToThread 函数就可以了。
DefaultExecutor
bool DefaultExecutor::SubmitToThread(std::function<void()>&& fx){auto main = [fx, this] {// 调用传进来的任务,如果是上面的调用,那么便是PutObjectfx();Detach(std::this_thread::get_id());};State expected;do{expected = State::Free;if(m_state.compare_exchange_strong(expected, State::Locked)){// 启动线程执行上面的main中内容std::thread t(main);const auto id = t.get_id(); // copy the id before we std::move the threadm_threads.emplace(id, std::move(t));m_state = State::Free;return true;}}while(expected != State::Shutdown);return false;}
从上面的代码可以看到,DefaultExecutor 不限制线程数量,也即来多少请求建立多少个线程,该线程调用传进来的函数(这里便是PutObject)
PooledThreadExecutor
bool PooledThreadExecutor::SubmitToThread(std::function<void()>&& fn){//avoid the need to do copies inside the lock. Instead lets do a pointer push.std::function<void()>* fnCpy = Aws::New<std::function<void()>>(POOLED_CLASS_TAG, std::forward<std::function<void()>>(fn));{std::lock_guard<std::mutex> locker(m_queueLock);/*当任务队列中的请求数量大于线程池中线程数量时,有两种策略:QUEUE_TASKS_EVENLY_ACROSS_THREADS:不管,一直丢就好(即使内存爆了也无所谓,所以如果使用这种策略,业务自己需 要保证内存的消耗控制)REJECT_IMMEDIATELY:直接拒绝该task- QUEUE_TASKS_EVENLY_ACROSS_THREADSwill allow you to push as many tasks as you want to the executor. It will make sure tasks are queued and pulled by each thread as quickly as possible. For most cases, QUEUE_TASKS_EVENLY_ACROSS_THREADS is the preferred option.- REJECT_IMMEDIATELYwill reject the task submission if the queued task length ever exceeds the size of the thread pool.*/if (m_overflowPolicy == OverflowPolicy::REJECT_IMMEDIATELY && m_tasks.size() >= m_poolSize){Aws::Delete(fnCpy);return false;}// 把任务丢进队列m_tasks.push(fnCpy);}m_sync.Release();return true;}// 从队列中取出一个任务std::function<void()>* PooledThreadExecutor::PopTask(){std::lock_guard<std::mutex> locker(m_queueLock);if (m_tasks.size() > 0){std::function<void()>* fn = m_tasks.front();if (fn){m_tasks.pop();return fn;}}return nullptr;}// 队列中是否有任务bool PooledThreadExecutor::HasTasks(){std::lock_guard<std::mutex> locker(m_queueLock);return m_tasks.size() > 0;}// 创建时根据传递进来的线程池数量poolSize创建对应数量的PooledThreadExecutor::PooledThreadExecutor(size_t poolSize, OverflowPolicy overflowPolicy) :m_sync(0, poolSize), m_poolSize(poolSize), m_overflowPolicy(overflowPolicy){for (size_t index = 0; index < m_poolSize; ++index){m_threadTaskHandles.push_back(Aws::New<ThreadTask>(POOLED_CLASS_TAG, *this));}}
从上面可以看到, PooledThreadExecutor 把任务丢进队列,然后接下来我们看看线程池的逻辑:
namespace Aws{namespace Utils{namespace Threading{class PooledThreadExecutor;class AWS_CORE_API ThreadTask{public:ThreadTask(PooledThreadExecutor& executor);~ThreadTask();/*** Rule of 5 stuff.* Don't copy or move*/ThreadTask(const ThreadTask&) = delete;ThreadTask& operator =(const ThreadTask&) = delete;ThreadTask(ThreadTask&&) = delete;ThreadTask& operator =(ThreadTask&&) = delete;void StopProcessingWork();protected:void MainTaskRunner();private:std::atomic<bool> m_continue;PooledThreadExecutor& m_executor;std::thread m_thread; // 该task对应的线程};}}}// 在构造函数中绑定线程处理函数MainTaskRunnerThreadTask::ThreadTask(PooledThreadExecutor& executor) : m_continue(true), m_executor(executor), m_thread(std::bind(&ThreadTask::MainTaskRunner, this)){}void ThreadTask::MainTaskRunner(){while (m_continue){// 对列中是否有任务while (m_continue && m_executor.HasTasks()){// 取出任务,执行taskauto fn = m_executor.PopTask();if(fn){(*fn)();Aws::Delete(fn);}}if(m_continue){m_executor.m_sync.WaitOne();}}}
PutObject底层调用逻辑
PutObjectOutcome S3Client::PutObject(const PutObjectRequest& request) const{Aws::Http::URI uri = computeEndpointOutcome.GetResult().first;Aws::StringStream ss;ss << "/";ss << request.GetKey();uri.SetPath(uri.GetPath() + ss.str());// 发送请求XmlOutcome outcome = MakeRequest(uri, request, Aws::Http::HttpMethod::HTTP_PUT, Aws::Auth::SIGV4_SIGNER, computeEndpointOutcome.GetResult().second.c_str() /*signerRegionOverride*/);// 构建返回值返给用户return PutObjectOutcome(PutObjectResult(outcome.GetResult()));}// 接下 MakeRequest的调用栈如下:MakeRequest(aws/aws-cpp-sdk-core/source/client/AWSClient.cpp)--> AttemptExhaustively--> AttemptOneRequest--> CurlHttpClient::MakeRequest (aws/aws-cpp-sdk-core/source/http/curl/CurlHttpClient.cpp)--> MakeRequestInternalvoid CurlHttpClient::MakeRequestInternal(HttpRequest& request,std::shared_ptr<StandardHttpResponse>& response,Aws::Utils::RateLimits::RateLimiterInterface* readLimiter,Aws::Utils::RateLimits::RateLimiterInterface* writeLimiter) const{URI uri = request.GetUri();Aws::String url = uri.GetURIString();// curl相关参数设置curl_easy_setopt(connectionHandle, CURLOPT_URL, url.c_str());curl_easy_setopt(connectionHandle, CURLOPT_WRITEFUNCTION, WriteData);curl_easy_setopt(connectionHandle, CURLOPT_WRITEDATA, &writeContext);curl_easy_setopt(connectionHandle, CURLOPT_HEADERFUNCTION, WriteHeader);curl_easy_setopt(connectionHandle, CURLOPT_HEADERDATA, response.get());......// 可以看到底层调用的是curl函数// curl_easy_perform是一个同步阻塞函数(阻塞直到收到curl的返回为止)CURLcode curlResponseCode = curl_easy_perform(connectionHandle);if (curlResponseCode != CURLE_OK && shouldContinueRequest){response->SetClientErrorType(CoreErrors::NETWORK_CONNECTION);} else {response->SetResponseCode(static_cast<HttpResponseCode>(responseCode));}}
由此可知,底层调用的是同步 curl 函数。
小结
PutObjetcAsync 把发送任务作为task丢到aws底层任务队列中;
AWS 底层线程池从任务队列中取出一个任务;
调用 curl 发送任务,同步阻塞直到收到 S3 服务端 reply 为止为了更显而易见,我们这里以我们默认的线程池中有32个线程为例(maxConnections>=32),我们发送的是128KB大小的对象,并且假设远端s3处理完每个4KB请求的时间是100ms,那么可以算出业务每秒理论最大带宽:
MaxBW = 线程池线程数量 * 一个线程每秒处理请求个数 * 请求大小MaxBW = 32 * (1000/100)* 128KB = 40MB
带宽能力优化
从上面可以看出,在我们默认线程池线程数量以及最大连接数 maxConnections 都为32,并且请求大小为128KB 时,业务获得的理论最大带宽也只有40MB,这个在很多场景下显然是不能满足要求的。
据此我们有两种办法来提高带宽能力:
提升线程池数量以及 maxConnections
我们假设两者都为200,那么理论获得的最大带宽为:200 * (1000/100)* 128KB = 250MB左右
使用真正的异步
上面说的异步其实是假异步。但是在 AWS SDK 的最新版本,也就是 V1.9版本中,已经使用了真正的异步,详情请见: Improving S3 Throughput with AWS SDK for CPP v1.9
配置
AWS 相关配置见:
https://github.com/aws/aws-sdk-cpp/blob/main/Docs/ClientConfiguration_Parameters.md
参考[1]:
Using a Thread Pool with the AWS SDK for C++ | AWS Developer Tools Blog (amazon.com)
参考[2]:
GitHub - aws/aws-sdk-cpp: AWS SDK for C++
参考[3]:
aws-sdk-cpp/Docs at main · aws/aws-sdk-cpp · GitHub
参考[4]:
Improving S3 Throughput with AWS SDK for CPP v1.9 · aws/aws-sdk-cpp Wiki · GitHub
参考[5]:
Improving S3 Throughput with AWS SDK for CPP v1.9 · aws/aws-sdk-cpp Wiki · GitHub


关于 Curve
Curve 亦可作为云存储中间件使用 S3 兼容的对象存储作为数据存储引擎,为公有云用户提供高性价比的共享文件存储。
GitHub:https://github.com/opencurve/curve 官网:https://opencurve.io/ 用户论坛:https://ask.opencurve.io/ 微信群:搜索群助手微信号 OpenCurve_bot
