


1. 引言
很多前端同学在开发 “后台管理系统” 时会遇到地图相关的业务需求,如在地图指定坐标点添加标记点、移动并实时获取标记点的经纬度、点击标记点展示信息窗口并渲染相关信息、在地图中绘制图形、POI搜索功能等等;对于第一次接触相关业务需求的同学来说可谓困难重重,所以小编在学习完高德地图常用的API并在项目中实践开发后,整理出了常见的地图业务的实现方案并附上源代码。
2. 准备工作
本次提供的方案是基于 Vue2 和 element-UI组件库 以及 高德地图 JS API 编写的,需要提前搭建好环境并注册高德地图开发者账号申请Key,具体操作步骤请查看 链接;
注册完毕后,在 inedex.html 中引入地图 JSAPI 脚本、补充插件(用于实现POI搜索功能、编辑矩形功能等等)、及 UI组件库(用于实现绘制覆盖物业务)。引入之前增加设置 JSAPI 安全密钥的脚本标签,并将「您申请的安全密钥」替换为您的安全密钥;(注意这个设置必须是在 JSAPI 的脚本加载之前进行设置,否则设置无效)。
  <script type="text/javascript">
      window._AMapSecurityConfig = {
        securityJsCode: "您申请的安全秘钥",
      };
    </script>
    <script src="https://webapi.amap.com/maps?v=1.4.15&key=您申请的key值&plugin=AMap.MouseTool&plugin=AMap.PolyEditor&plugin=AMap.RectangleEditor&plugin=AMap.Autocomplete,AMap.PlaceSearch"></script>
    <!-- UI组件库 -->
    <script src="//webapi.amap.com/ui/1.1/main.js?v=1.1.1"></script>
3. 功能实现
(1) 渲染地图区域
说明:因本次提供的代码仅用于测试功能,所以样式代码均写为了行内样式,实际项目中为便于维护不推荐这样写
<div id="container" style="width: 100%; height: 600px"></div>// 初始化地图
init () {
const that = this
// eslint-disable-next-line no-undef
that.map = new AMap.Map('container', {
resizeEnable: true,
expandZoomRange: true,
zoom: 15, // 地图默认缩放级别
center: [117.214538, 39.098301] // 中心点坐标
})
......
},
(2)在地图上添加 marker 标记点,添加鼠标松开事件修改坐标
init () {
    ......
    that.marker = new AMap.Marker({
    position: [117.214538, 39.098301], // 标记点位置
    icon: '', // 指定标记点为自定义图标,空着的话就是默认图标
    draggable: true, // 可拖拽移动
    raiseOnDrag: true // 给标记点添加弹跳动画
 })

    that.marker.on('mouseup', (e) => {
    // 找到事件对象中的经纬度并赋值
    that.marketPosition.lng = e.lnglat.getLng()
    that.marketPosition.lat = e.lnglat.getLat()
   })
    that.map.add(that.marker) // 把标记点添加到地图上
     ......
},
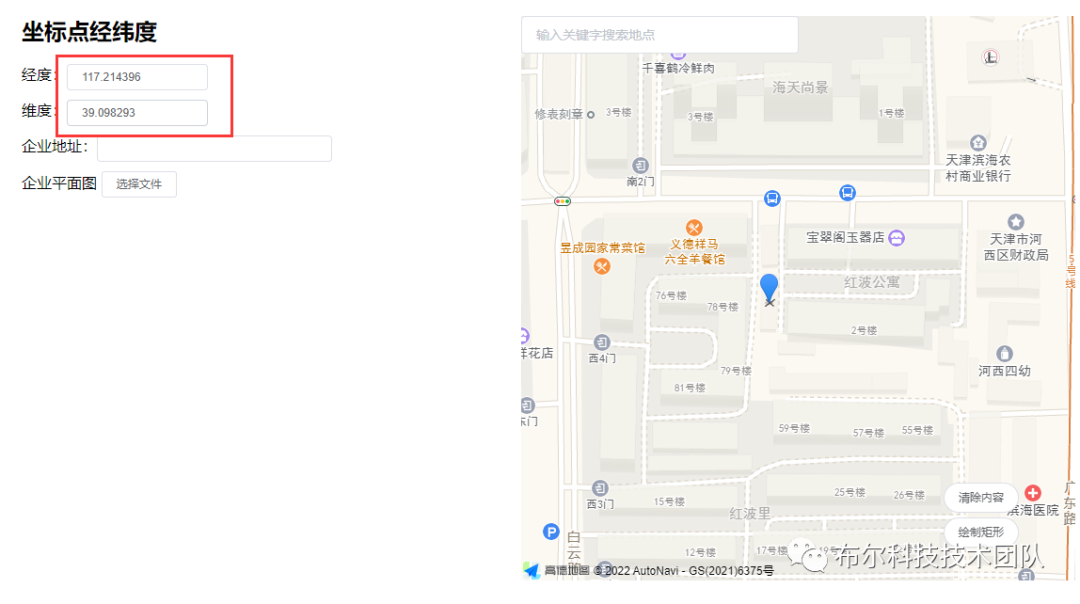
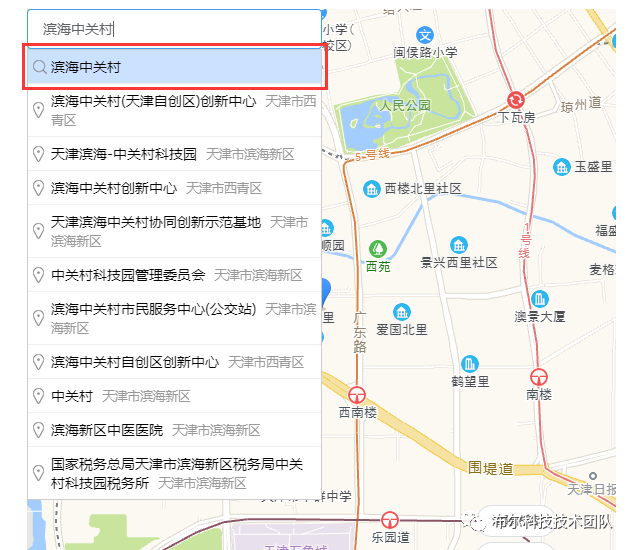
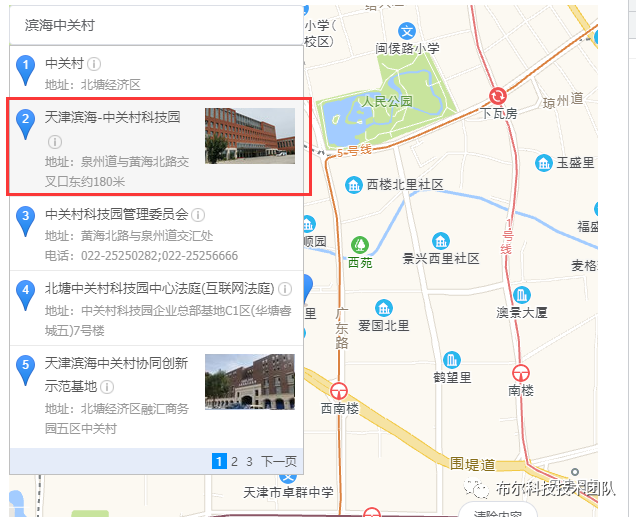
(3)地图 POI搜索 功能
<div
  class="searchBox"
  style="width: 50%; position: absolute; top: 0; left: 0"
>
   <div class="top">
      <el-input
        id="searchInput"
        placeholder="输入关键字搜索地点"
        v-model="aboard"
       />
   </div>
</div>
init () {
......
AMapUI.loadUI(['misc/PoiPicker'], function (PoiPicker) {
// 定义 PoiPicker 搜索对象
var poiPicker = new PoiPicker({
input: 'searchInput' // 通过id绑定dom元素
})
// 定义信息窗口对象
var infoWindow = new AMap.InfoWindow({
offset: new AMap.Pixel(0, -20)
})
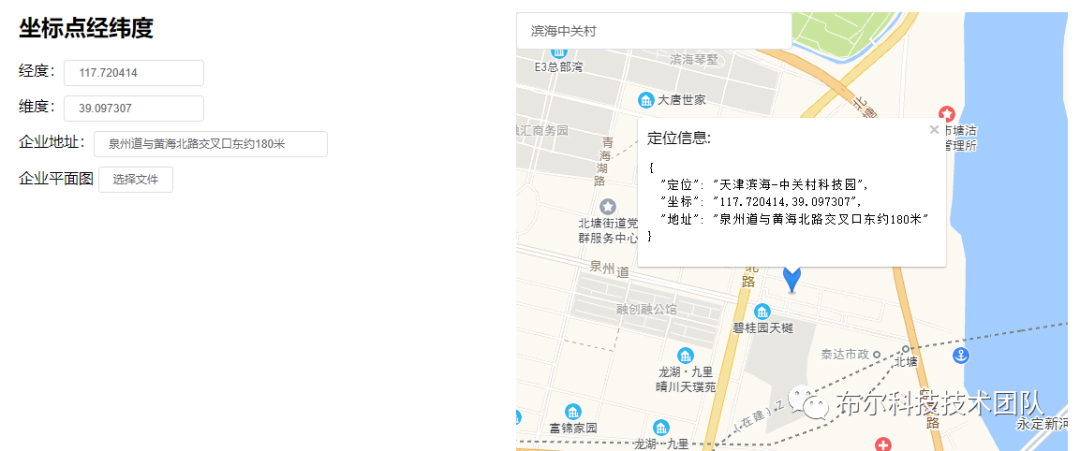
// 地址选择结束之后的回调函数
poiPicker.on('poiPicked', function (poiResult) {
// 接收查询的结果信息
var poi = poiResult.item
// 提示信息的内容
var info = {
定位: poi.name,
坐标: poi.location.toString(),
地址: poi.address
}
// 获取地址以后将地址信息赋值到表单中
that.address = poi.address
// 修改页面表单中坐标点经纬度
that.marketPosition.lng = poi.location.lng
that.marketPosition.lat = poi.location.lat
// 将信息窗口添加到地图上
infoWindow.setMap(that.map)
// 修改/设定标记点和信息窗口的位置
that.marker.setPosition(poi.location)
infoWindow.setPosition(poi.location)
// 指定标题
infoWindow.setContent(
'定位信息: <pre>' + JSON.stringify(info, null, 2) + '</pre>'
)
infoWindow.open(that.map, that.marker.getPosition())
// 修改标记点的位置
that.map.setCenter(that.marker.getPosition())
})
// 根据关键词搜索相关建议
poiPicker.onCityReady(function () {
poiPicker.suggest(that.aboard)
})
})
......
},
实现效果如下:
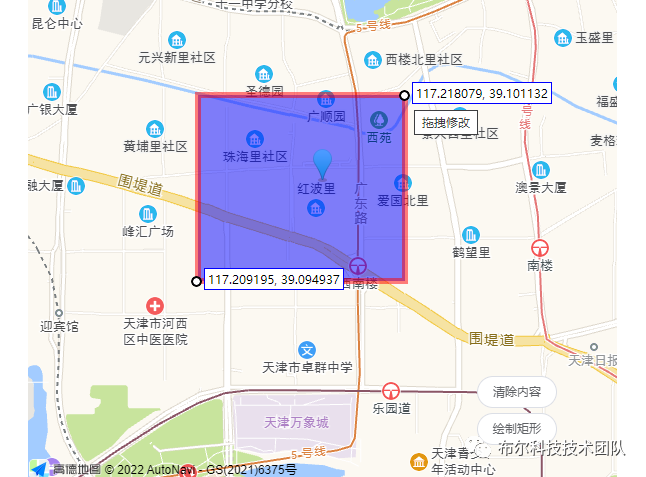
(4)在地图中绘制矩形
说明:由于使用高德地图API mouseTool 插件绘制的矩形只支持多边形编辑,无法控制某个角来实现等比例缩放矩形,故本次开发过程中采用了以下方法实现的等比例调整矩形的需求:用户绘制完矩形的一瞬间记录下其绘制的矩形的四个角的坐标点,然后将用户绘制的矩形删除,根据记录的坐标点,使用 AMap.Rectangle 来重新生成矩形覆盖物,这样便可以使用 AMap.RectangleEditor 来开启矩形的等比例缩放功能了。
<!-- 地图上控制矩形的按钮 -->
<div
  class="btns"
  style="position: absolute; bottom: 30px; right: 60px; z-index: 10"
>
  <el-button
     round
     type="default"
     style="width: 80px; margin-bottom: 5px"
     size="small"
     @click="clearAll(true)"
  >
      清除内容
  </el-button>
  <br />
  <el-button
     round
     type="default"
     style="width: 80px; margin-bottom: 5px"
     size="small"
     @click="draw"
  >
      绘制矩形
  </el-button>
     init () {
    ......
    // 定义绘制工具
      that.mouseTool = new AMap.MouseTool(that.map)
      // 监听draw事件可获取画好的覆盖物
      that.mouseTool.on('draw', function (e) {
        // 每次绘制之前把之前的清除掉
        that.clearAll()
        const temArr = e.obj.getPath() // 获取矩形的四个角坐标
        // 绘制结束以后关闭绘制功能并清除绘制的矩形
        that.mouseTool.close(true)
        // 清除绘制的矩形,自己重新画一个 => 为了可以编辑
        var southWest = new AMap.LngLat(temArr[3].lng, temArr[3].lat)
        var northEast = new AMap.LngLat(temArr[1].lng, temArr[1].lat)
        var bounds = new AMap.Bounds(southWest, northEast)
        // 指定可调整大小的矩形的位置和样式
        var rectangle = new AMap.Rectangle({
          bounds: bounds,
          strokeColor: 'red',
          strokeOpacity: 0.5,
          strokeWeight: 6,
          fillColor: 'blue',
          fillOpacity: 0.5,
          strokeStyle: 'solid'
        })
        // 将矩形传到地图上
        rectangle.setMap(that.map)
        // 将矩形对象添加到覆盖层数组中便于管理
        that.overlays.push(rectangle)

        // 允许编辑矩形
        that.rectangleEditor = new AMap.RectangleEditor(that.map, rectangle)
        that.rectangleEditor.open()
      })
},
    // 开启绘制矩形的模式,并设置绘制时的样式
    draw () {
      this.mouseTool.rectangle({
        strokeColor: 'red',
        strokeOpacity: 0.5,
        strokeWeight: 6,
        fillColor: 'blue',
        fillOpacity: 0.5,
        strokeStyle: 'solid'
      })
    },
    // 清除所有覆盖物
    clearAll (flag) {
      // 如果有编辑矩形的小点,那么就将其关闭
      if (this.rectangleEditor) {
        this.rectangleEditor.close()
      }
      if (flag) {
        // 参数为true的时候连图片一起清除,并且清空临时坐标点
        this.map.remove(this.groundImage)
        this.TopLeft = {}
        this.BottomRight = {}
      }
      this.map.remove(this.overlays)
      this.overlays = []
    }
实现效果如下:
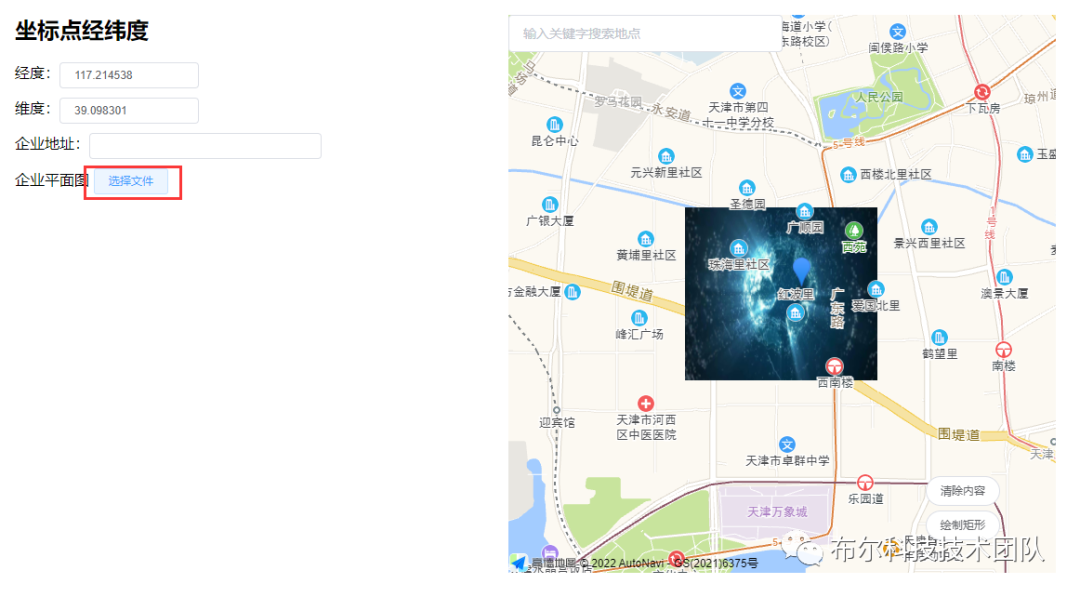
(5)上传图片替换矩形
说明:本次项目中有如下需求,在用户绘制完矩形后,用户可以从本地上传图片,添加到地图中作为企业平面图保存下来;本次提供的代码未包含将图片及坐标点通过接口传递给后端服务部分,实际开发时可以通过 formData 格式将文件及图片的中心点坐标、左上角及左下角坐标经纬度传递给后端。
 	<!-- 表单部分 -->
    <div class="form" style="width: 500px; margin: 20px">
      <h2>坐标点经纬度</h2>
      <div style="display: flex; margin-bottom: 10px">
        经度:
        <el-input style="width: 30%" :value="marketPosition.lng" size="mini" >
      </div>
      <div style="display: flex; margin-bottom: 10px">
        维度:
        <el-input style="width: 30%" :value="marketPosition.lat" size="mini" >
      </div>
      <div style="display: flex; margin-bottom: 10px">
        企业地址:
        <el-input style="width: 50%" :value="address" size="mini" >
      </div>
      <div>
        企业平面图
        <!-- 通过按钮来间接触发文件域的点击事件 -->
        <el-button size="mini" @click="pickFile">选择文件</el-button>
        <!-- 隐藏的文件域 -->
        <input
          ref="files"
          type="file"
          style="display: none"
          @change="getFileOthers"
        >
      </div>
    </div>
	// 间接触发隐藏的文件域的点击事件
    pickFile () {
      if (
        this.overlays.length === 0 &&
        JSON.stringify(this.BottomRight) === '{}'
      ) {
        return this.$message.warning('请先绘制矩形再上传图片!')
      }
      this.$refs.files.dispatchEvent(new MouseEvent('click'))
    },
     文件对象转换成url的方法
    getObjectURL (file) {
      var url = null
      if (window.createObjectURL !== undefined) {
        url = window.createObjectURL(file)
      } else if (window.URL !== undefined) {
        url = window.URL.createObjectURL(file)
      } else if (window.webkitURL !== undefined) {
        url = window.webkitURL.createObjectURL(file)
      }
      return url
    },
     上传图片发生变化
    getFileOthers (e) {
      const that = this
      if (that.TopLeft) {
         如果是替换图片,及图片对象不为空,则把上次上传的图像删除
        that.map.remove(that.groundImage)
      }

      var files = e.target.files[0]  通过事件对象来取到上传图片的文件对象
      that.srcOthers = this.getObjectURL(files)

      if (
         临时坐标点没有存坐标的时候才去通过覆盖物的getPath方法读取坐标点 => 因为直接替换图片的时候已经没有矩形覆盖物了,调用该方法会报错
        JSON.stringify(that.TopLeft) === '{}' &&
        JSON.stringify(that.BottomRight) === '{}'
      ) {
        that.TopLeft = that.overlays[0].getPath()[0]
        that.BottomRight = that.overlays[0].getPath()[2]
      }

       -------------开始添加上传的图片覆盖物----------------------
      var bounds = new AMap.Bounds(that.TopLeft, that.BottomRight)  传入 图片覆盖物 的 左上角和右下角坐标
      var groundImageOpts = {
         图片覆盖物配置项
        opacity: 1,  图片透明度
        clickable: true,  图片相应鼠标点击事件,默认:false
        map: that.map  图片叠加的地图对象,
      }

      that.groundImage = new AMap.GroundImage(  实例化一个图片覆盖物对象
        that.srcOthers,
        bounds,
        groundImageOpts
      )

      that.clearAll()  清除绘制的矩形
      that.map.setCenter(
         设置图片覆盖物的中心点位置
        new AMap.LngLat(
          (that.TopLeft.lng + that.BottomRight.lng)  2,
          (that.TopLeft.lat + that.BottomRight.lat)  2
        )
      )
    }
实现效果如下:
(6) 全部代码:
<template>
  <div id="app">
    <!-- 地图部分 -->
    <div
      id="allmap"
      style="width: 50%; position: fixed; right: 30px; top: 20px"
    >
      <!-- 渲染地图的区域 -->
      <div id="container" style="width: 100%; height: 600px"></div>
      <!-- 用于检索的盒子 -->
      <div
        class="searchBox"
        style="width: 50%; position: absolute; top: 0; left: 0"
      >
        <div class="top">
          <el-input
            id="searchInput"
            placeholder="输入关键字搜索地点"
            v-model="aboard"
          >
        </div>
      </div>
      <!-- 绘制、清除矩形的按钮 -->
      <div
        class="btns"
        style="position: absolute; bottom: 30px; right: 60px; z-index: 10"
      >
        <el-button
          round
          type="default"
          style="width: 80px; margin-bottom: 5px"
          size="small"
          @click="clearAll(true)"
          >清除内容</el-button
        >
        <br >
        <el-button
          round
          type="default"
          style="width: 80px; margin-bottom: 5px"
          size="small"
          @click="draw"
          >绘制矩形</el-button
        >
      </div>
    </div>

    <!-- 表单部分 -->
    <div class="form" style="width: 500px; margin: 20px">
      <h2>坐标点经纬度</h2>
      <div style="display: flex; margin-bottom: 10px">
        经度:
        <el-input style="width: 30%" :value="marketPosition.lng" size="mini" >
      </div>
      <div style="display: flex; margin-bottom: 10px">
        维度:
        <el-input style="width: 30%" :value="marketPosition.lat" size="mini" >
      </div>
      <div style="display: flex; margin-bottom: 10px">
        企业地址:
        <el-input style="width: 50%" :value="address" size="mini" >
      </div>
      <div>
        企业平面图
        <!-- 通过按钮来间接触发文件域的点击事件 -->
        <el-button size="mini" @click="pickFile">选择文件</el-button>
        <!-- 隐藏的文件域 -->
        <input
          ref="files"
          type="file"
          style="display: none"
          @change="getFileOthers"
        >
      </div>
    </div>
  </div>
</template>

<script>
export default {
   定义变量
  data () {
    return {
      map: null,
      market: null,
       企业坐标点的经纬度
      marketPosition: {
        lng: 117.214538,
        lat: 39.098301
      },
       企业地址
      address: '',
       覆盖物
      overlays: [],
       鼠标绘制工具
      mouseTool: {},
       上传图片的url地址
      srcOthers: '',
       编辑矩形的工具
      rectangleEditor: null,
       图片覆盖物
      groundImage: {},
       临时存放标记点坐标的变量
      TopLeft: {},
      BottomRight: {},
       地图中检索的关键词
      aboard: ''
    }
  },
  mounted () {
    this.init()
  },
   定义方法
  methods: {
     初始化地图
    init () {
      const that = this
       eslint-disable-next-line no-undef
      that.map = new AMap.Map('container', {
        resizeEnable: true,
        expandZoomRange: true,
        zoom: 15,  地图默认缩放级别
        center: [117.214538, 39.098301]  中心点坐标
      })

       添加标记点 => 用于展示企业位置的经纬度
       eslint-disable-next-line no-undef
      that.marker = new AMap.Marker({
        position: [117.214538, 39.098301],  位置
        icon: '',  指定标记点为自定义图标,空着的话就是默认的图标
        draggable: true,  可拖拽
        raiseOnDrag: true  给标记点添加弹跳动画
      })
       为覆盖物标记点添加鼠标抬起事件
      that.marker.on('mouseup', (e) => {
         console.log('事件对象:',e);
         找到事件对象中的经纬度并赋值
        that.marketPosition.lng = e.lnglat.getLng()
        that.marketPosition.lat = e.lnglat.getLat()
      })
      that.map.add(that.marker)  添加到地图

       地图级别自适应
      that.map.setFitView()

       ----------------地图 POI搜索 功能的实现--------------------------------------
       eslint-disable-next-line no-undef
      AMapUI.loadUI(['misc/PoiPicker'], function (PoiPicker) {
         定义 PoiPicker 搜索对象
        var poiPicker = new PoiPicker({
           city: '全国',  指定搜索的范围
          input: 'searchInput'  通过id绑定dom元素
        })

         定义信息窗口对象
         eslint-disable-next-line no-undef
        var infoWindow = new AMap.InfoWindow({
           eslint-disable-next-line no-undef
          offset: new AMap.Pixel(0, -20)
        })

         地址选择结束之后的回调函数
        poiPicker.on('poiPicked', function (poiResult) {
           console.log('搜索结果:', poiResult);

           批量定义变量
           接收查询的结果信息
          var poi = poiResult.item
           提示信息的内容
          var info = {
             source: source,   souece 有两种值,分别是 search 和 suggest,seach代表最终搜索的步骤
             id: poi.id,
            定位: poi.name,
            坐标: poi.location.toString(),
            地址: poi.address
          }
           获取地址以后将地址信息赋值到表单中
          that.address = poi.address

           修改页面表单中坐标点经纬度
          that.marketPosition.lng = poi.location.lng
          that.marketPosition.lat = poi.location.lat

           将信息窗口添加到地图上
          infoWindow.setMap(that.map)

           修改/设定标记点和信息窗口的位置
          that.marker.setPosition(poi.location)
          infoWindow.setPosition(poi.location)

           指定标题
          infoWindow.setContent(
            '定位信息: <pre>' + JSON.stringify(info, null, 2) + '</pre>'
          )
          infoWindow.open(that.map, that.marker.getPosition())
           修改标记点的位置
          that.map.setCenter(that.marker.getPosition())
        })

         根据关键词搜索相关建议
        poiPicker.onCityReady(function () {
          poiPicker.suggest(that.aboard)
        })
      })

      / 定义绘制工具
      // eslint-disable-next-line no-undef
      that.mouseTool = new AMap.MouseTool(that.map)
      // 监听draw事件可获取画好的覆盖物
      that.mouseTool.on('draw', function (e) {
        // 每次绘制之前都把之前的清除掉
        that.clearAll()

        // console.log(e.obj.getPath());
        const temArr = e.obj.getPath() // 获取矩形的四个角路径
        // 绘制结束以后关闭绘制功能并清除绘制的矩形
        that.mouseTool.close(true)

        // 清除绘制的矩形,自己重新画一个 => 为了可以编辑
        // eslint-disable-next-line no-undef
        var southWest = new AMap.LngLat(temArr[3].lng, temArr[3].lat)
        // eslint-disable-next-line no-undef
        var northEast = new AMap.LngLat(temArr[1].lng, temArr[1].lat)
        // eslint-disable-next-line no-undef
        var bounds = new AMap.Bounds(southWest, northEast)
        // 指定可调整大小的矩形的位置和样式
        // eslint-disable-next-line no-undef
        var rectangle = new AMap.Rectangle({
          bounds: bounds,
          strokeColor: 'red',
          strokeOpacity: 0.5,
          strokeWeight: 6,
          fillColor: 'blue',
          fillOpacity: 0.5,
          strokeStyle: 'solid'
        })
        // 将矩形传到地图上
        rectangle.setMap(that.map)
        // 将矩形对象添加到覆盖层数组中便于管理
        that.overlays.push(rectangle)

        // 开启编辑模式
        // eslint-disable-next-line no-undef
        that.rectangleEditor = new AMap.RectangleEditor(that.map, rectangle)
        that.rectangleEditor.open()
      })
    },
    // 开启绘制矩形的模式,并设置绘制时的样式
    draw () {
      this.mouseTool.rectangle({
        strokeColor: 'red',
        strokeOpacity: 0.5,
        strokeWeight: 6,
        fillColor: 'blue',
        fillOpacity: 0.5,
        strokeStyle: 'solid'
      })
    },
    // 清除所有覆盖物
    clearAll (flag) {
      // 如果有编辑矩形的小点,那么就将其关闭
      if (this.rectangleEditor) {
        this.rectangleEditor.close()
      }
      if (flag) {
        // 参数为true的时候连图片一起清除,并且清空临时坐标点
        this.map.remove(this.groundImage)
        this.TopLeft = {}
        this.BottomRight = {}
      }
      this.map.remove(this.overlays)
      this.overlays = []
    },
    // 间接触发隐藏的文件域的点击事件
    pickFile () {
      if (
        this.overlays.length === 0 &&
        JSON.stringify(this.BottomRight) === '{}'
      ) {
        return this.$message.warning('请先绘制矩形再上传图片!')
      }
      this.$refs.files.dispatchEvent(new MouseEvent('click'))
    },
    // 文件对象转换成url的方法
    getObjectURL (file) {
      var url = null
      if (window.createObjectURL !== undefined) {
        url = window.createObjectURL(file)
      } else if (window.URL !== undefined) {
        url = window.URL.createObjectURL(file)
      } else if (window.webkitURL !== undefined) {
        url = window.webkitURL.createObjectURL(file)
      }
      return url
    },
    // 上传图片发生变化
    getFileOthers (e) {
      const that = this
      if (that.TopLeft) {
        // 如果是替换图片,及图片对象不为空,则把上次上传的图像删除
        that.map.remove(that.groundImage)
      }

      var files = e.target.files[0] // 通过事件对象来取到上传图片的文件对象
      that.srcOthers = this.getObjectURL(files)

      if (
        // 临时坐标点没有存坐标的时候才去通过覆盖物的getPath方法读取坐标点 => 因为直接替换图片的时候已经没有矩形覆盖物了,调用该方法会报错
        JSON.stringify(that.TopLeft) === '{}' &&
        JSON.stringify(that.BottomRight) === '{}'
      ) {
        that.TopLeft = that.overlays[0].getPath()[0]
        that.BottomRight = that.overlays[0].getPath()[2]
      }

      // -------------开始添加上传的图片覆盖物----------------------
      // eslint-disable-next-line no-undef
      var bounds = new AMap.Bounds(that.TopLeft, that.BottomRight) // 传入 图片覆盖物 的 左上角和右下角坐标
      var groundImageOpts = {
        // 图片覆盖物配置项
        opacity: 1, // 图片透明度
        clickable: true, // 图片相应鼠标点击事件,默认:false
        map: that.map // 图片叠加的地图对象,
      }

      // eslint-disable-next-line no-undef
      that.groundImage = new AMap.GroundImage( // 实例化一个图片覆盖物对象
        that.srcOthers,
        bounds,
        groundImageOpts
      )

      that.clearAll() // 清除绘制的矩形
      that.map.setCenter(
        // 最后一步设置图片覆盖物的中心点位置
        // eslint-disable-next-line no-undef
        new AMap.LngLat(
          (that.TopLeft.lng + that.BottomRight.lng) / 2,
          (that.TopLeft.lat + that.BottomRight.lat) / 2
        )
      )
    }
  }
}
</script>
