


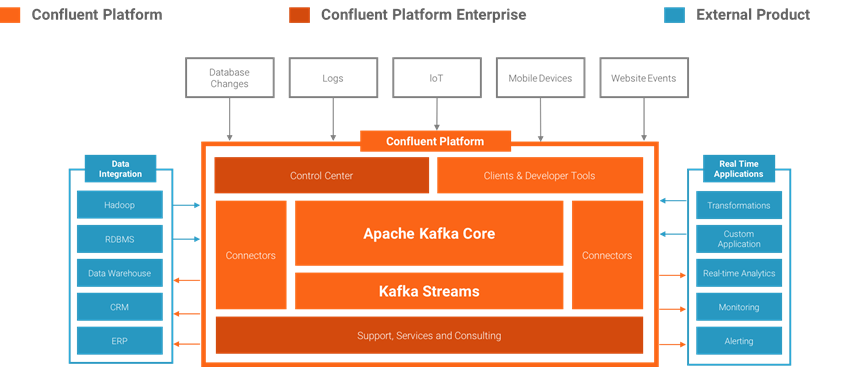
OCI上有专有的消息服务Streaming PaaS服务,但是对于Cloud Native架构的应用来说,在OCI上自建高可用Kafka集群更具有性价比,而为了兼顾方便使用与管控,很多厂商选择使用Confluent的企业版或者社区版。本文将介绍在OCI上通过Terraform脚本的方式快速部署Confluent社区版Kafka解决方案。
创建安装操作堡垒机,如这里创建了名称为frontend的主机IP地址为139.185.46.66

登录主机,运行如下脚本安装最新版Terraform
VERSION='1.1.9'
wget "https://releases.hashicorp.com/terraform/"$VERSION"/terraform_"$VERSION"_linux_amd64.zip"
unzip terraform_*_linux_amd64.zip
sudo mv terraform usr/local/bin/
sudo chown root:root usr/local/bin/terraform
unzip terraform_1.1.9_linux_amd64.zip
sudo mv terraform usr/local/bin/
sudo chown root:root usr/local/bin/terraform
生成本地秘钥
openssl rsa -pubout -outform DER -in ~/.oci/oci_api_key.pem | openssl md5 -c | awk '{print $2}' > ~/.oci/oci_api_key.fingerprint
cat ~/.oci/oci_api_key_public.pem | xclip -selection clipboard
cat ~/.oci/oci_api_key_public.pemcat ~/.oci/oci_api_key_public.pem
cat ~/.oci/oci_api_key_public.pem
ssh-keygen -t rsa -N "" -b 2048 -f ~/.ssh/oci
mkdir ~/.oci
openssl genrsa -out ~/.oci/oci_api_key.pem 2048
openssl rsa -pubout -in ~/.oci/oci_api_key.pem -out ~/.oci/oci_api_key_public.pem
openssl rsa -pubout -outform DER -in ~/.oci/oci_api_key.pem | openssl md5 -c | awk '{print $2}' > ~/.oci/oci_api_key.fingerprint
cat ~/.oci/oci_api_key_public.pem | xclip -selection clipboard
cat ~/.oci/oci_api_key_public.pem
将刚生成的oci_api_key_public.pem的内容复制在用户设置页的API Key设置页中

使用如下命令下载部署脚本
git clone https://github.com/oracle-quickstart/oci-confluent.git
使用企业版部署脚本
cd oci-confluent/community
ls
如果有企业版许可以可以使用企业版部署脚本
cd oci-confluent/enterprise
ls
注:上述版本为Oracle官方版本,小编也为大家准备了性价比比较高的AMD芯片 E3/E4 Flex 版本的部署脚本
Git clone https://github.com/iafboy/oci-confluent-Flex.git
cd oci-confluent/community
ls
修改部署变量脚本(请注意主机类型)
# Environmental variables
# You probably want to define these as environmental variables.
# Instructions on that are here: https://github.com/cloud-partners/oci-prerequisites
# -------------------------------------------------------------------
# Required by the OCI Provider
variable "tenancy_ocid" {
}
variable "compartment_ocid" {
}
variable "user_ocid" {
}
variable "fingerprint" {
}
variable "private_key_path" {
}
variable "region" {
}
# Key used to SSH to OCI VMs
variable "ssh_public_key" {
}
variable "ssh_private_key" {
}
# ------------------------------------------------------------------------------
# Optional variables
# The defaults here will give you a cluster. You can also modify these.
# ------------------------------------------------------------------------------
variable "availability_domain_name" {
default = ""
description = "Availability Domain name, if non-empty takes precedence over availability_domain_number"
}
variable "availability_domain_number" {
default = 1
description = "OCI Availability Domains: 1,2,3 (subject to region availability)"
}
variable "confluent" {
type = map(string)
default = {
edition = "Community"
version = "6.0.0"
}
}
variable "broker" {
type = map(any)
default = {
shape = "VM.Standard.E4.Flex", ocpus = 1, memory = 16, boot_volume_size = 100
node_count = 3
disk_count = 1
disk_size = 100
}
}
variable "zookeeper" {
type = map(any)
default = {
shape = "VM.Standard.E4.Flex", ocpus = 1, memory = 16, boot_volume_size = 50
node_count = 3
}
}
variable "connect" {
type = map(any)
default = {
shape = "VM.Standard.E4.Flex", ocpus = 1, memory = 16, boot_volume_size = 50
node_count = 2
}
}
variable "rest" {
type = map(any)
default = {
shape = "VM.Standard.E4.Flex", ocpus = 1, memory = 16, boot_volume_size = 50
node_count = 2
}
}
variable "schema_registry" {
type = map(any)
default = {
shape = "VM.Standard.E4.Flex", ocpus = 1, memory = 16, boot_volume_size = 50
node_count = 1
}
}
variable "ksql" {
type = map(any)
default = {
shape = "VM.Standard.E4.Flex", ocpus = 1, memory = 16, boot_volume_size = 50
node_count = 2
}
}
# ------------------------------------------------------------------------
# Constants
# You probably don't need to change these.
# ------------------------------------------------------------------------
// https://docs.oracle.com/en-us/iaas/images
// Oracle-Linux-7.9-2022.04.04-0
variable "images" {
type = map(string)
default = {
ap-singapore-1 = "ocid1.image.oc1.ap-singapore-1.aaaaaaaah6wihmqo7jfqpvfl7cd4fydr5dgruj4iuokm3essdutucdfiw6ra"
me-dubai-1 = "ocid1.image.oc1.me-dubai-1.aaaaaaaauhj6sdezwoucqoslxiabiajqyhxloabbtbrrum73lywmdkh2jdaa"
me-jeddah-1 = "ocid1.image.oc1.me-jeddah-1.aaaaaaaaperkuuxporyqgv7m2rwd4z7vx2yoq5zfydgm2a2ktl57mswhd3sa"
eu-frankfurt-1 = "ocid1.image.oc1.eu-frankfurt-1.aaaaaaaap6fedeihlynzoc4zbfqbdcha27ec7x2xbpg2a2edfarupjxn65wa"
sa-saopaulo-1 = "ocid1.image.oc1.sa-saopaulo-1.aaaaaaaaazgdqu6qyebkor2yhmzpk6kirqoxrpavmefklvuvmng3wj3f6v3a"
sa-vinhedo-1 = "ocid1.image.oc1.sa-vinhedo-1.aaaaaaaaibh76ur5hn24t6f4oxj5du3ev7lw2st5k5wasnq36gnymam5qrca"
af-johannesburg-1 ="ocid1.image.oc1.af-johannesburg-1.aaaaaaaaqhgw6c6a6rna4jtzhq4nhl5qpzntn5uohi3nryelcn43v6h6kpja"
}
}
variable "vpc-cidr" {
default = "10.0.0.0/16"
}
运行如下命令,初始化集群
Terraform init
运行命令开始校验脚本
Terraform plan
如果校验脚本没有报错,运行命令开始按照脚本部署应用
terraform apply
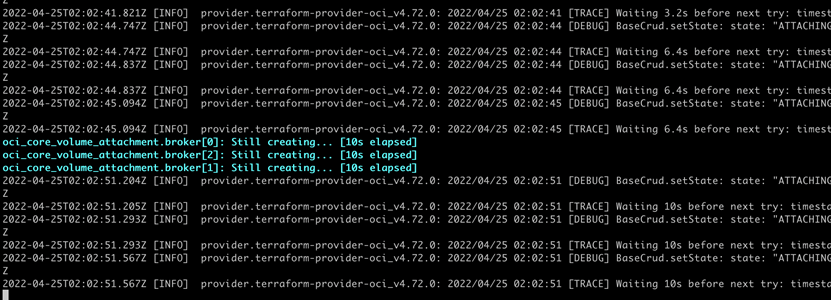
注:部署过程会比较长,部署开始时会需要手动敲入“yes”确认,然后会开始自动化脚本部署过程。
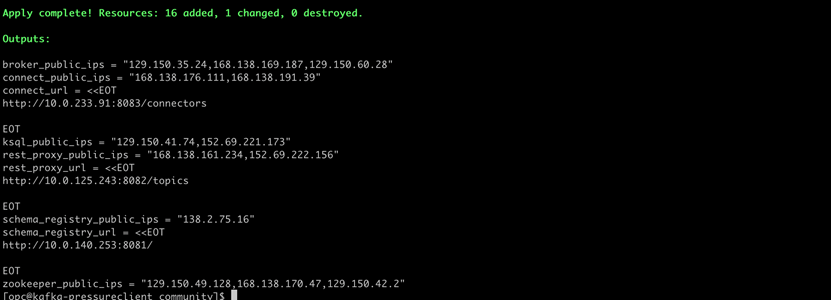
稍等一会就可以看到主机已经部署完成,并且也给出了发布的服务地址
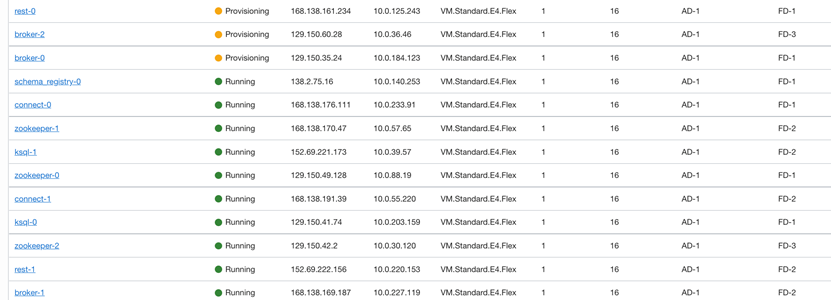
在OCI界面看到的主机运行状态
登录集群主机
ssh opc@<broker_instance_ip>
使用如下命令创建topic
/usr/bin/kafka-topics --zookeeper zookeeper-0:2181 --create --topic demo --partitions 1 --replication-factor 3
或者,如果安装了企业版,可以通过 Confluent 控制中心 Web 控制台创建主题。现在可以尝试向主题添加一些消息。例如,可以使用如下命令使用 REST API 发布 10 条消息。这条命令可以从任何可以访问 Kafka REST API 端点的机器上完成。例如:
export RPURL=http://rest-0:8082
curl -X POST -H "Content-Type: application/vnd.kafka.json.v1+json" --data '{"records":[{"value":{"foo":"bar"}}]}' $RPURL/topics/demo
可以使用如下命令消费已经发布的消息
curl -X POST -H "Content-Type: application/vnd.kafka.v1+json" --data '{"name": "ext_consumer_demo","format": "json", "auto.offset.reset": "smallest"}' $RPURL/consumers/c1
curl -X GET -H "Accept: application/vnd.kafka.json.v1+json" $RPURL/consumers/c1/instances/ext_consumer_demo/topics/demo
如果创建的过程出错,或者需要删除集群则运行如下脚本即可
terraform destory

作者简介
巨晓兵,甲骨文云平台资深技术顾问,拥有 10 年以上 IT 相关工作经验。目前主要负责甲骨文云平台产品在解决方案中的设计和实施。在加入甲骨文公司前,主要供职于 亚信,Gemalto,负责产品研发和项目实施等工作。具有多年系统架构设计经验,熟悉架构设计的理念与设计方法,且具有多年IOT系统工作经验。您可以通过xiaobing.ju@oracle.com与他联系。
