


PG菜鸟入门学习中,欢迎各位大佬留言技术指导。
目录
BG
前几日,群友在讨论 DBA 学习那种编程语言较好,当时老师给的回复是
这个视实际情况而定,
go, python, java, c(c++), js(nodejs), RUST, 最好能熟练使用其中的一到两种,然后其它的能看懂逻辑。
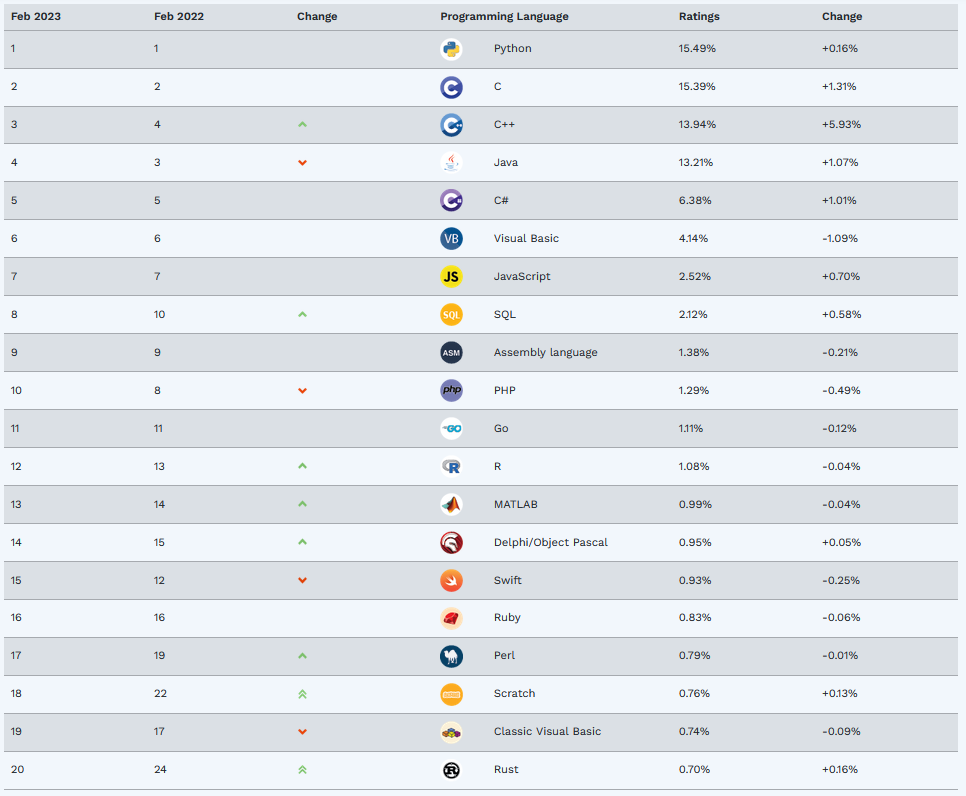
一时起兴翻了翻最新的开发语言排行榜,Go目前排在11位,Python依旧稳居第一。
对于 DBA 来说,语言也是工具,来实现一些日常所需的功能,或者测试一些没接触过的特性,再或者实现一些好玩的事情。
本文的核心是 “用python写了一个小脚本,定时执行某个job, 要求你定义一个服务文件”。
PG 15 源码编译,如何用 systemd 管理 postgresql 服务
本文以 CentOS 7 + PostgreSQL 15 为例
在生产环境,一般都会用 systemd 来管理服务,而非直接使用 pg_ctl 来进行数据库启停操作。
源码编译时,需要传递参数 --with-systemd 源码会对此进行一些优化处理,比如服务启动超时时间。
./configure --prefix=/opt/pgsql-152 --with-extra-version="-Yan" --with-systemd
但使用此参数需要先安装依赖 systemd-devel,否则会报错:
configure: error: header file <systemd/sd-daemon.h> is required for systemd support
具体编译过程快进。。。 》》》。。。
经过漫长的等待,可以看到编译后的源码已经安装到路径 /opt/pgsql-152 下。
初始化之后,我们可以安装 service 文件,如将准备好的 postgresql-15.service
[Unit]
Description=PostgreSQL 15 database server

[Service]
Type=notify
User=postgres
ExecStart=/usr/pgsql-15/bin/postmaster -D /data/pgdata-152/data
ExecReload=/bin/kill -HUP $MAINPID
KillMode=mixed
KillSignal=SIGINT
TimeoutSec=0

[Install]
WantedBy=multi-user.target
放到路径 /etc/systemd/system/postgresql-15.service 下,然后启动它。
[postgres@centos7 pgsql-15]$ systemctl status postgresql-15
● postgresql-15.service - PostgreSQL 15 database server
   Loaded: loaded (/etc/systemd/system/postgresql-15.service; disabled; vendor preset: disabled)
   Active: inactive (dead)
[postgres@centos7 pgsql-15]$ sudo systemctl start postgresql-15
[postgres@centos7 pgsql-15]$ systemctl status postgresql-15
● postgresql-15.service - PostgreSQL 15 database server
   Loaded: loaded (/etc/systemd/system/postgresql-15.service; disabled; vendor preset: disabled)
   Active: active (running) since Fri 2023-03-03 22:45:22 CST; 2s ago
 Main PID: 78550 (postmaster)
    Tasks: 6
   CGroup: /system.slice/postgresql-15.service
           ├─78550 /usr/pgsql-15/bin/postmaster -D /data/pgdata-152/data
           ├─78553 postgres: checkpointer
           ├─78554 postgres: background writer
           ├─78556 postgres: walwriter
           ├─78557 postgres: autovacuum launcher
           └─78558 postgres: logical replication launcher
[postgres@centos7 pgsql-15]$
[postgres@centos7 pgsql-15]$ psql

Welcome to PostgreSQL !
Your PostgreSQL connection id is 78575
Server version:15.2
---------------
Border style is 2.
Timing is on.
Null display is "[null]".
psql (15.2-Yan)
Type "help" for help.

(postgres@[local]) [postgres] 22:46:21# \l
                                                  List of databases
+-----------+----------+----------+-------------+-------------+------------+-----------------+-----------------------+
|   Name    |  Owner   | Encoding |   Collate   |    Ctype    | ICU Locale | Locale Provider |   Access privileges   |
+-----------+----------+----------+-------------+-------------+------------+-----------------+-----------------------+
| postgres  | postgres | UTF8     | en_US.UTF-8 | en_US.UTF-8 |            | libc            |                       |
| template0 | postgres | UTF8     | en_US.UTF-8 | en_US.UTF-8 |            | libc            | =c/postgres          +|
|           |          |          |             |             |            |                 | postgres=CTc/postgres |
| template1 | postgres | UTF8     | en_US.UTF-8 | en_US.UTF-8 |            | libc            | =c/postgres          +|
|           |          |          |             |             |            |                 | postgres=CTc/postgres |
+-----------+----------+----------+-------------+-------------+------------+-----------------+-----------------------+
(3 rows)
使用 Python 连接 PostgreSQL,并查看当前 txid
这里使用 psycopg 连接 PostgreSQL 数据库,
Psycopg 是用 Python 实现的最常用、最可靠、功能最丰富的 PostgreSQL适配器。
Psycopg 需要 Python 版本 3.7 到 3.11。支持 PostgreSQL 10 到 15。操作系统支持 Linux, macOS, Windows。
适配 PostgreSQL 15
从 psycopg 的 Release Notes 可以看到,是从 3.1.4 这个版本开始适配 PostgreSQL 15
https://www.psycopg.org/psycopg3/docs/news.html#psycopg-3-1-4
Include error classes defined in PostgreSQL 15.
Add support for Python 3.11 (ticket #305).
Build binary packages with libpq from PostgreSQL 15.0.
不过,本文只是最基础的使用场景,所以之前的版本也是可以用的,如我本地版本就是 psycopg (3.0.18)
[root@centos7 ~]# pip3 list --format=columns
Package             Version
------------------- -------
backports.zoneinfo  0.2.1
importlib-resources 5.4.0
pip                 9.0.3
psycopg             3.0.18
setuptools          39.2.0
typing-extensions   4.1.1
zipp                3.6.0
[root@centos7 ~]#
Demo
基础用法很简单,安装好 Psycopg 后,配置连接信息,然后就可以写 SQL 进行数据交互了。
比如,连接到本地 PostgreSQL,端口为 5555,dbname 为 mydb,就可以这样写配置信息:
# Connect to an existing database
with psycopg.connect("dbname=mydb user=postgres port=5555") as conn:
接下来就很简单了,实现题目要求,查看当前时间和 txid,并输出到 /tmp/pg_txid.log。
txid 是 PostgreSQL 的常规知识,用 SQL 语句查询即可。
select now(), txid_current();
实际演示效果如下,
[postgres@centos7 ~]$ python3 demo.py
[postgres@centos7 ~]$ cat /tmp/pg_txid.log
2023-03-03 23:03:06,736
[postgres@centos7 ~]$ python3 demo.py
[postgres@centos7 ~]$ cat /tmp/pg_txid.log
2023-03-03 23:03:06,736
2023-03-03 23:04:19,737
[postgres@centos7 ~]$ python3 demo.py
[postgres@centos7 ~]$ cat /tmp/pg_txid.log
2023-03-03 23:03:06,736
2023-03-03 23:04:19,737
2023-03-03 23:04:23,738
[postgres@centos7 ~]$
systemd 定时功能,定时调用 py 文件
systemd 有定时功能,但很少用,大多数情况仍然习惯使用 crontab 进行定时任务管理。
可以通过命令 systemctl list-timers 查看当前系统有哪些定时命令。
[postgres@centos7 ~]$ systemctl list-timers
NEXT                         LEFT       LAST                         PASSED       UNIT                         ACTIVATES
Sat 2023-03-04 00:00:00 CST  52min left Fri 2023-03-03 18:14:13 CST  4h 53min ago unbound-anchor.timer         unbound-an
Sat 2023-03-04 19:35:51 CST  20h left   Fri 2023-03-03 19:33:06 CST  3h 34min ago systemd-tmpfiles-clean.timer systemd-tm

2 timers listed.
Pass --all to see loaded but inactive timers, too.
[postgres@centos7 ~]$
[postgres@centos7 ~]$ systemctl list-timers --all
NEXT                         LEFT       LAST                         PASSED       UNIT                         ACTIVATES
Sat 2023-03-04 00:00:00 CST  52min left Fri 2023-03-03 18:14:13 CST  4h 53min ago unbound-anchor.timer         unbound-an
Sat 2023-03-04 19:35:51 CST  20h left   Fri 2023-03-03 19:33:06 CST  3h 34min ago systemd-tmpfiles-clean.timer systemd-tm
n/a                          n/a        n/a                          n/a          systemd-readahead-done.timer systemd-re

3 timers listed.
[postgres@centos7 ~]$
关于 timer 的更多信息,可以直接查阅 man 文档。
对于每个计时器文件,必须存在一个匹配的单元文件,描述当计时器失效时要激活的单元。
缺省情况下,与定时器同名(后缀不同)的服务被激活。
例如:定时器文件foo。定时器激活一个匹配的服务 foo.service。
任务继续,创建一个定时任务,每 5s 查询一次当前 txid。
思路有了,服务文件需要稍加测试一下,便可以呈现出最终效果。
- 服务文件
[Unit]
Description=Collect PG connections service

[Service]
Type=simple
ExecStart=/bin/python3 /home/postgres/demo.py

[Install]
WantedBy=multi-user.target
- 定时器
[Unit]
Description=Collect PG connections timer

[Timer]
Unit=pgcol.service
OnCalendar=*-*-* *:*:00/5
Persistent=true

[Install]
WantedBy=timers.target
- 安装并启用定时器
[postgres@centos7 ~]$ sudo vi /etc/systemd/system/pgcol.service
[postgres@centos7 ~]$ systemctl daemon-reload
==== AUTHENTICATING FOR org.freedesktop.systemd1.reload-daemon ===
Authentication is required to reload the systemd state.
Authenticating as: shawnyan
Password:
==== AUTHENTICATION COMPLETE ===
[postgres@centos7 ~]$ systemctl status pgcol.service
● pgcol.service - Collect PG connections service
   Loaded: loaded (/usr/lib/systemd/system/pgcol.service; disabled; vendor preset: disabled)
   Active: inactive (dead)
[postgres@centos7 ~]$ sudo vi /etc/systemd/system/pgcol.timer
[postgres@centos7 ~]$ sudo systemctl enable --now pgcol.timer
[postgres@centos7 ~]$ systemctl status pgcol.timer
● pgcol.timer - Collect PG connections timer
   Loaded: loaded (/etc/systemd/system/pgcol.timer; enabled; vendor preset: disabled)
   Active: active (waiting) since Fri 2023-03-03 23:21:49 CST; 9s ago
[postgres@centos7 ~]$
- 查看日志输出
[postgres@centos7 ~]$ tailf /tmp/pg_txid.log
2023-03-03 23:46:46,765
2023-03-03 23:47:46,766
2023-03-03 23:48:46,767
2023-03-03 23:49:46,768
2023-03-03 23:50:01,769
2023-03-03 23:50:46,770
2023-03-03 23:51:46,771
2023-03-03 23:52:46,772
2023-03-03 23:53:01,773
2023-03-03 23:53:46,775
^C
[postgres@centos7 ~]$
[postgres@centos7 ~]$ sudo journalctl -f
-- Logs begin at Sun 2023-02-26 22:03:41 CST. --
Mar 03 23:50:45 centos7.shawnyan.com systemd[1]: Started Collect PG connections service.
Mar 03 23:51:45 centos7.shawnyan.com systemd[1]: Started Collect PG connections service.
Mar 03 23:52:45 centos7.shawnyan.com systemd[1]: Started Collect PG connections service.
Mar 03 23:53:01 centos7.shawnyan.com systemd[1]: Started Collect PG connections service.
Mar 03 23:53:25 centos7.shawnyan.com systemd[1]: Started Collect PG connections service.
Mar 03 23:53:45 centos7.shawnyan.com systemd[1]: Started Collect PG connections service.
End
简要总结,本文结合了 CentOS 7 新特性 systemd 的定时器功能,PostgreSQL 基础知识如何查看当前 txid,以及 Python 开发的基础知识,并调用了 Python 开发的 PostgreSQL 适配器 psycopg,以简单实现一个小功能点。
每日进步一点点,积跬步以致千里。

