


前言
2022 年 8 月 10 日, OceanBase 在年度发布会上正式发布了 OceanBase 4.0(代号:小鱼),并在现场展区尝试做了一些有趣的事情,“小鱼”可以单机版部署在个人 PC 以及树莓派,让来到现场的开发者通过简单互动就能进行体验。这个名字代表着真正小型化的全面尝试,像鱼群一样可大可小,也意味着从“分布式”到“单机分布式一体化”的转变。
OceanBase 一直以“攻坚大型场景”被大家所熟知,我们可以把它想象成大海里航行的一艘巨轮。而 4.0 版本是业内首个单机分布式一体化架构,这意味着过去运行在数据中心一排排服务器上的分布式数据库,也能够以完整功能、单机部署到更低配置的服务器与个人 PC 上,甚至部署到世界最小电脑:树莓派上。
4.0 版本开启了 OceanBase 的小型化进程,也为支撑业务增长、陪伴开发者成长提供了广阔的想象空间,就像无垠的大海中一条自由游动的“小鱼”。另一方面,4.0 版本在内核能力、兼容性、性能、运维能力等方面都有大幅提升,因此,这也是一条能轻松应对各种恶劣环境的“小鱼”。
一年多前,OceanBase 正式宣布开源,来自世界各地的众多开发者参与到了数据库内核、生态工具的打磨完善中,与我们共同陪伴了“小鱼”的诞生与成长。同样的,“小鱼”也将在未来陪伴无数数据库开发者的成长。
简而言之,OceanBase推出轻量级的OceanBase4.0,更轻、更快、更容易布署,当前世界最轻量级的数据库产品是MySQL,所以本文是MySQL与OceanBase的较量对比。
MySQL版本家族中最具备代表性的是8.0,它是MySQL发展的里程碑,从此5.7版本正式过渡到8.0,无 论功能还是性能都有质的提升,除了对NOSQL功能和JSON数据支持更友好,另外它根据市场需求也增加了窗口函数,例如RANK和ROW_NUMBER等等。最难得可贵的是,8.0在优化器的智能处理得到了极大的提升,过去 MySQL与PostgreSQL比较,一直诟病MySQL的优化器做得不如PostgreSQL好,现在8.0可谓翻身鲤鱼龙门跃 。
本文对MySQL8.0与OceanBase4.0做了功能、性能、体验的对比,力争从开发者的角度 ,在单机上安装MySQL8.0和OceanBase4.0, 保留默认参数不做任何改变,然后在上面建立4个表,通过IDEA运行程序进行数据插入、数据查询体验感受两个产品,从本文可以有以下收获。
- 单节点安装MySQL8.0与单节点安装OceanBase4.0的安装操作步骤
- MySQL8.0与OceanBase4.0的整体认识
- MySQL8.0与OceanBase4.0的性能影响关键因素和重要参数
测试环境
| 操作系统 | CentOS Linux release 7.6.1810 |
|---|---|
| CPU | 8核 Intel® Xeon® |
| 内存 | 16 |
| MySQL | mysql 8.0.32 |
| OceanBase | OceanBase_CE-v4.0.0.0 |
安装篇
产品安装对比,LINUX下的软件安装,常用方式有RPM安装、二进制安装、源码安装三个方式。
- RPM安装操作简单,需要客户端、服务端、库包等,而且安装路径固定死板,默认位置不能更改。
- 二进制安装可以自定义选择路径修改,甚至基于不同的目录在一个系统安装多个,但是二进制本身经过编译,不能灵活定制编译参数,进行单方面的调较。
- 源码安装可以按需定制参数调优,也可以在不同的目录安装多个,但是安装花费时间多,过程复杂,容易出错。
MySQL和OceanBase的技术路径发展会支持以上三种安装方式,对于普通开发者来说,他们希望更简单,更关心拿来就用,所以又有docker安装,下面只介绍RPM安装。
mysql8.0 RPM安装
1.下载一个8.0的rpm文件,约25KB
wget http://repo.mysql.com/mysql80-community-release-el7-3.noarch.rpm

2.安装rpm文件
  yum -y install mysql80-community-release-el7-3.noarch.rpm

3.安装mysql服务,因为
yum -y install mysql-community-server  --nogpgcheck

4.启动mysql服务,查看运行状态

systemctl start  mysqld.service
systemctl status mysqld.service

5.从当前数据库的日志文件中找出初始随机密码
grep "password" /var/log/mysqld.log

6.初始随机密码登录mysql,并修改密码

[root@hdp2 ~]# mysql -uroot -p
Enter password:
Welcome to the MySQL monitor.  Commands end with ; or \g.
Your MySQL connection id is 8
Server version: 8.0.32 MySQL Community Server - GPL

Copyright (c) 2000, 2023, Oracle and/or its affiliates.

Oracle is a registered trademark of Oracle Corporation and/or its
affiliates. Other names may be trademarks of their respective
owners.

Type 'help;' or '\h' for help. Type '\c' to clear the current input statement.

mysql>

将密码修改为自己的密码 将下面 Mypassword 换成你自己定的密码
ALTER USER 'root'@'localhost' IDENTIFIED BY 'Mypassword';


7.建立应用访问的用户名和密码

mysql> create user henley  identified  by 'Mypassword';
Query OK, 0 rows affected (0.02 sec)
mysql> grant all privileges on *.*  to 'henley'@'%';
Query OK, 0 rows affected (0.04 sec)


8.查看MySQL的关键参数

show global status  like '%innodb_buffer_pool%';
show variables like '%Innodb_buffer%';
show variables like '%conn%';
show variables like '%log%';
OceanBase4.0 RPM安装
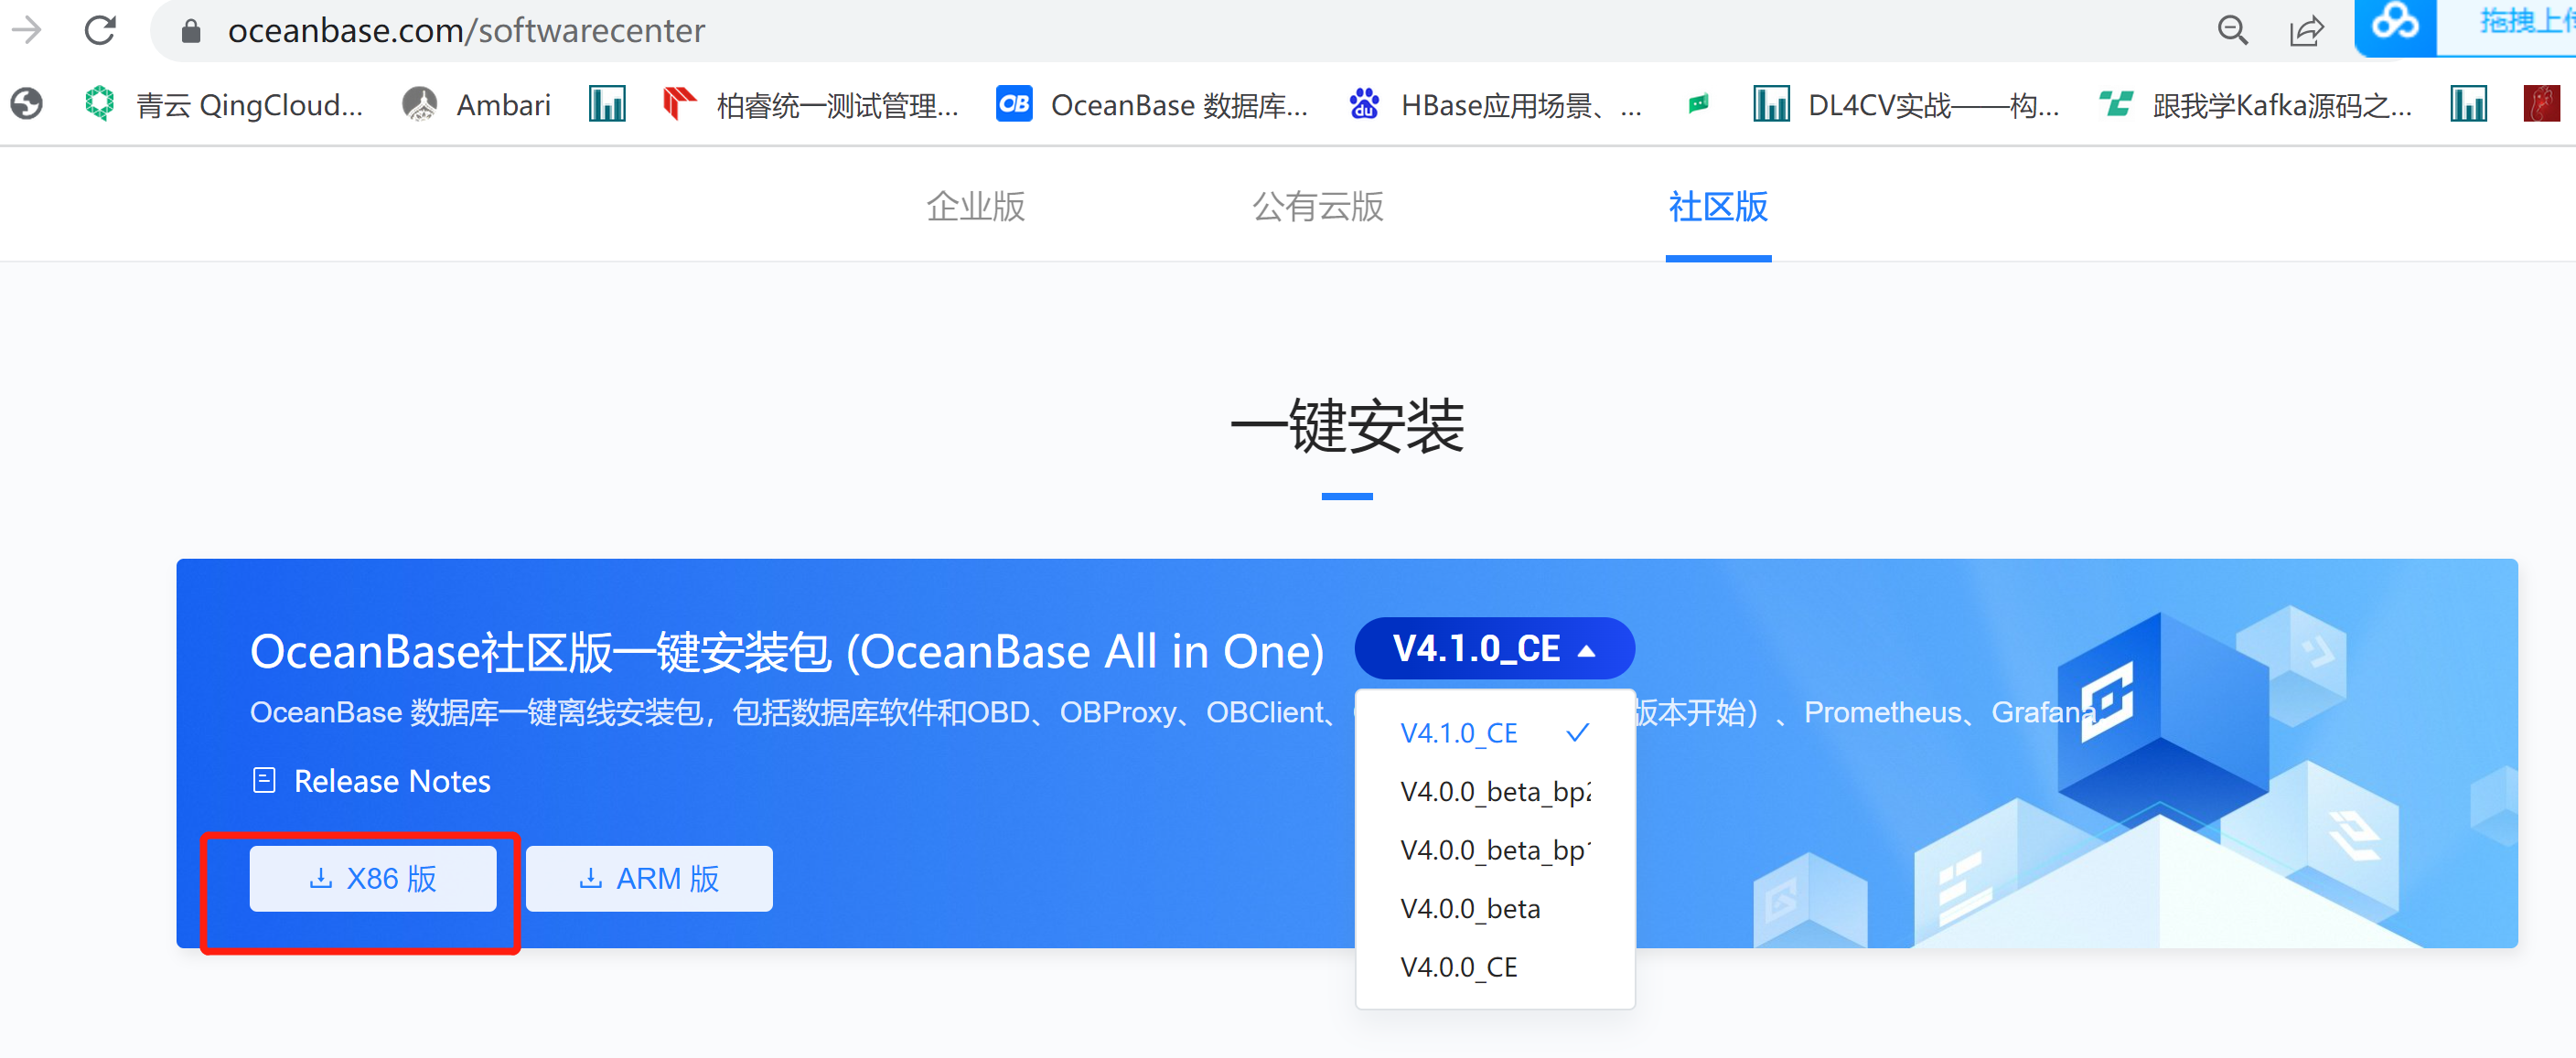
下载X86版本
1.下载一个all-in-one包,约330M


wget  https://obbusiness-private.oss-cn-shanghai.aliyuncs.com/download-center/opensource/oceanbase-all-in-one/7/x86_64/oceanbase-all-in-one-4.0.0.0-100120230113164218.el7.x86_64.tar.gz?Expires=1679311481&OSSAccessKeyId=LTAI5tGVLeRRycCRGerZJMNC&Signature=eBZoWUq8bsRExzF4Zx8ZBkcbnIM%3D

2.解压后目录结构如下,通过README.md文件可以指示你怎么快速展开安装。
[root@hdp2 ob_allinone]# du  -sh oceanbase-all-in-one/*
12K     oceanbase-all-in-one/bin
264K    oceanbase-all-in-one/conf
45M     oceanbase-all-in-one/obclient
85M     oceanbase-all-in-one/obd
4.0K    oceanbase-all-in-one/README.md
201M    oceanbase-all-in-one/rpms
4.0K    oceanbase-all-in-one/VERSION

3.安装obd布署工具

bin/install.sh

4.安装Oceanbase服务,
快速安装,直接运行obd demo就可以一键安装OB4

如果想个性化安装布署
obd cluster playground -c oceanbase-ce,obproxy-ce,obagent,prometheus,grafana


安装过程中,可能会提示内存不足或者空间不够,根据错误提醒调整后,重新运行obd  demo
+----------------------------+------+----------+--------+
| url                        | user | password | status |
+----------------------------+------+----------+--------+
| http://192.168.XX.XX:9090 |      |          | active |
+----------------------------+------+----------+--------+
+---------------------------------------------------------------------+
|                               grafana                               |
+----------------------------------------+-------+-----------+--------+
| url                                    | user  | password  | status |
+----------------------------------------+-------+-----------+--------+
| http://192.168.XX.XX:3000/d/oceanbase | admin | oceanbase | active |
+----------------------------------------+-------+-----------+--------+
demo running


5.登录OceanBase,建立资源单元unitfish绑定资源池poolfish,poolfish再与租户tenantfish完成映射。

[root@hdp2 oceanbase-all-in-one]# obclient  -h127.0.0.1  -P2881  -uroot
Welcome to the OceanBase.  Commands end with ; or \g.
Your OceanBase connection id is 3221664483
Server version: OceanBase_CE 4.0.0.0 (r103000022023011215-05bbad0279302d7274e1b5ab79323a2c915c1981) (Built Jan 12 2023 15:28:27)

Copyright (c) 2000, 2018, OceanBase and/or its affiliates. All rights reserved.

Type 'help;' or '\h' for help. Type '\c' to clear the current input statement.

obclient [(none)]> use oceanbase;
Reading table information for completion of table and column names
You can turn off this feature to get a quicker startup with -A

Database changed

创建15个CPU,3G内存的资源单位unitfish
obclient [oceanbase]> CREATE RESOURCE UNIT unitfish MAX_CPU 15, MEMORY_SIZE '3G', MAX_IOPS 1280,LOG_DISK_SIZE '10G', MIN_IOPS=1024;
Query OK, 0 rows affected (0.015 sec)

资源单位unitfish绑定资源池poolfish

obclient [oceanbase]> CREATE RESOURCE POOL poolfish UNIT = 'unitfish', UNIT_NUM = 1,ZONE_LIST = ('zone1');
Query OK, 0 rows affected (0.025 sec)

资源池poolfish绑定租户tenantfish
obclient [oceanbase]> create tenant tenantfish resource_pool_list=('poolfish'), charset=utf8mb4, replica_num=3, zone_list('zone1'), primary_zone=RANDOM, locality='F@zone1' set variables ob_compatibility_mode='mysql', ob_tcp_invited_nodes='%';
Query OK, 0 rows affected (24.164 sec)

obclient [oceanbase]> SELECT unit_config_id,name,max_cpu,min_cpu,memory_size/1024/1024/1024  FROM __all_unit_config;
+----------------+-----------------+---------+---------+----------------------------+
| unit_config_id | name            | max_cpu | min_cpu | memory_size/1024/1024/1024 |
+----------------+-----------------+---------+---------+----------------------------+
|              1 | sys_unit_config |       1 |       1 |             2.000000000000 |
|           1015 | unitfish        |      15 |      15 |             3.000000000000 |
+----------------+-----------------+---------+---------+----------------------------+
2 rows in set (0.003 sec)


6.以root的身份登录租户tenantfish,创建用户名和密码,并授权访问

[root@hdp2 oceanbase-all-in-one]# obclient -h192.168.30.221  -uroot@tenantfish -P2883 -c -A oceanbase
Welcome to the OceanBase.  Commands end with ; or \g.
Your OceanBase connection id is 13
Server version: OceanBase_CE 4.0.0.0 (r103000022023011215-05bbad0279302d7274e1b5ab79323a2c915c1981) (Built Jan 12 2023 15:28:27)

Copyright (c) 2000, 2018, OceanBase and/or its affiliates. All rights reserved.

Type 'help;' or '\h' for help. Type '\c' to clear the current input statement.

obclient [oceanbase]> create user henley  identified  by 'P@ssw0rd';
Query OK, 0 rows affected (0.111 sec)

obclient [oceanbase]> grant all privileges on *.*  to 'henley'@'%';
Query OK, 0 rows affected (0.045 sec)
安装总结
mysql8.0的rpm安装方式轻巧且灵活,必须保持联网,通过YUM源就可以进行安装,安装成功后服务端提供随机密码保障安全,root登录后要完成改密码,并进行用户、授权等操作。前段安装简单【安装YUM安装】,后段使用【创建授权】也方便,但是整体建设欠妥,工程师需要额外安装监控、报警等相关服务。
OceanBase4.0需要把安装介质下载到本地,再通过obd脚本自动化安装,安装成功后 需要root登录sys租户, 完成创建租户、创建用户、授权等操作。OceanBase4.0的安装考虑周全,不仅必需的observer,其它的生态工具promethous、grafna都会自动化安装完成。前段还算顺利【介质安装、执行脚本安装】,但是后段较麻烦,OB有多租户的概念,需要创建资源单元、绑定资源池、建立租户,最后才是创建用户以及授权。
另外OceanBase4.0需要的硬盘空间较多,提前下载安装介质 以及安装过程对硬盘的容量需求,相对来说需要比MySQL8.0要大,你必须有一定的大容量才能安装OceanBase4.0。
测试篇
基本性能
程序指定两个不同的用户,8.0要用8.0的驱动,OB的用户注意要加上租户信息。
// private static final String JDBC_CLASS_NAME = “com.mysql.cj.jdbc.Driver”;
// private static final String JDBC_URL = “jdbc:mysql://xxxx:3306/fish?useUnicode=true” +
// “&characterEncoding=UTF-8&useSSL=false&rewriteBatchedStatements=true” +
// “&allowPublicKeyRetrieval=true”;
// private static final String JDBC_USER = “henley”;
// private static final String JDBC_PWD = “xxxx”;
// private static final String JDBC_CLASS_NAME = “com.mysql.jdbc.Driver”;
// private static final String JDBC_URL = “jdbc:mysql://xxxx:2881/fish?useServerPrepStmts=true” +
// “&rewriteBatchedStatements=true” +
// “&allowMultiQueries=true” +
// “&useSSL=false”;
// private static final String JDBC_USER = “henley@tenantfish”;
// private static final String JDBC_PWD = “xxxx”;
建立4个表 用户表、订单表、产品表、仓库表 ,制定以下基本测试用例,代码层面上没有使用多线程并发,针对OB用的是5.1.46,而MySQL8用的是8.0.22驱动。
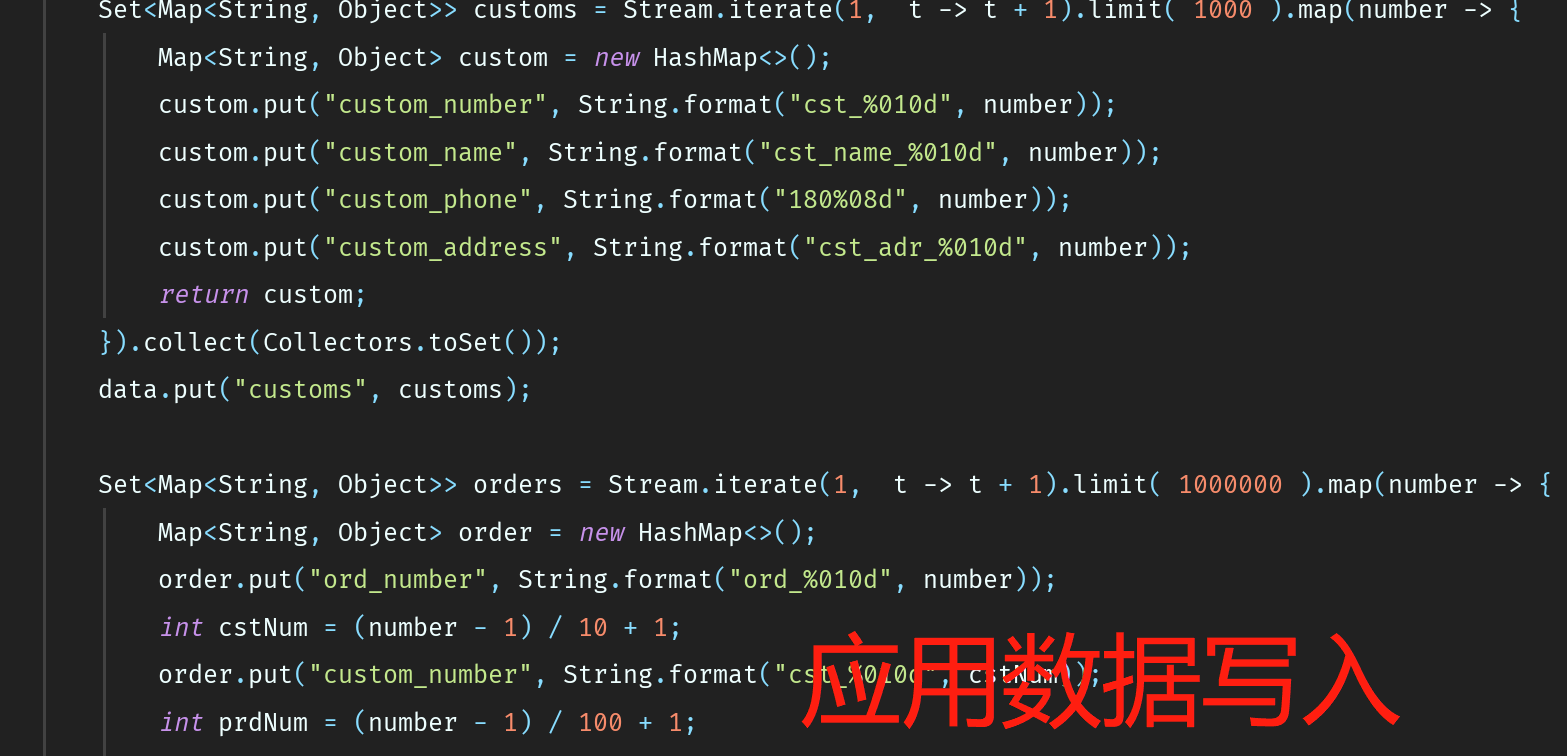
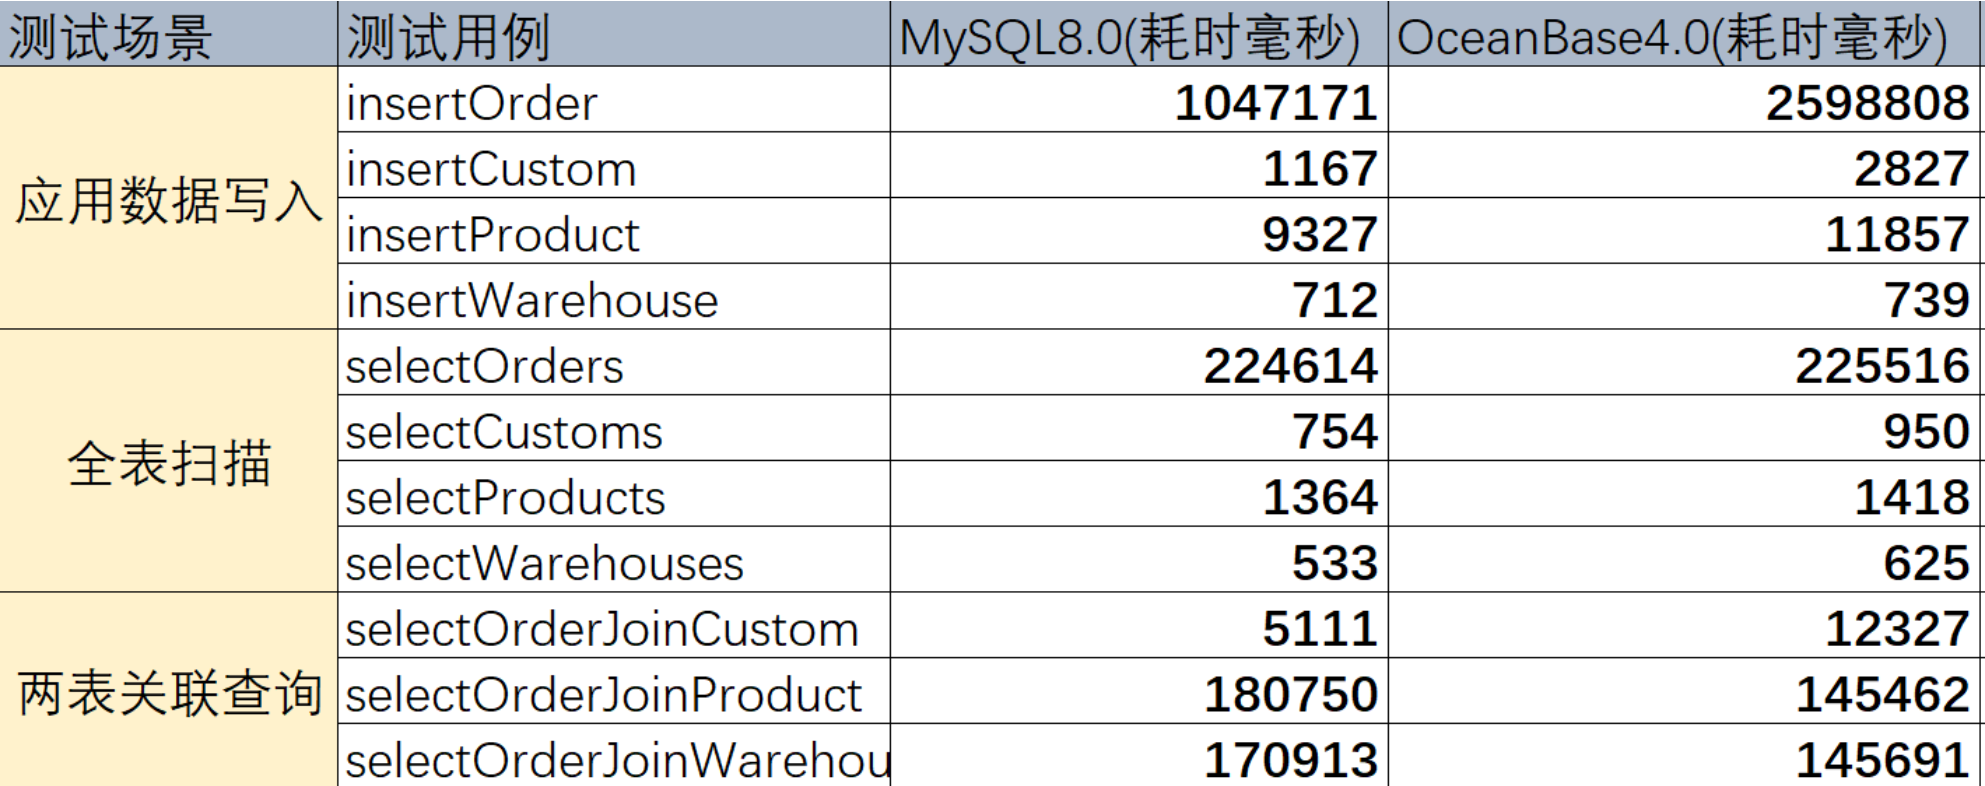
- 测试用例1. 应用数据写入 ,仓库表100条数据,用户表1000条数据,产品表10000条数据,订单表100万条数据。通过java流的方式生成数据,以1000的方式批量写入。记录时间,观察CPU使用消耗,查看数据
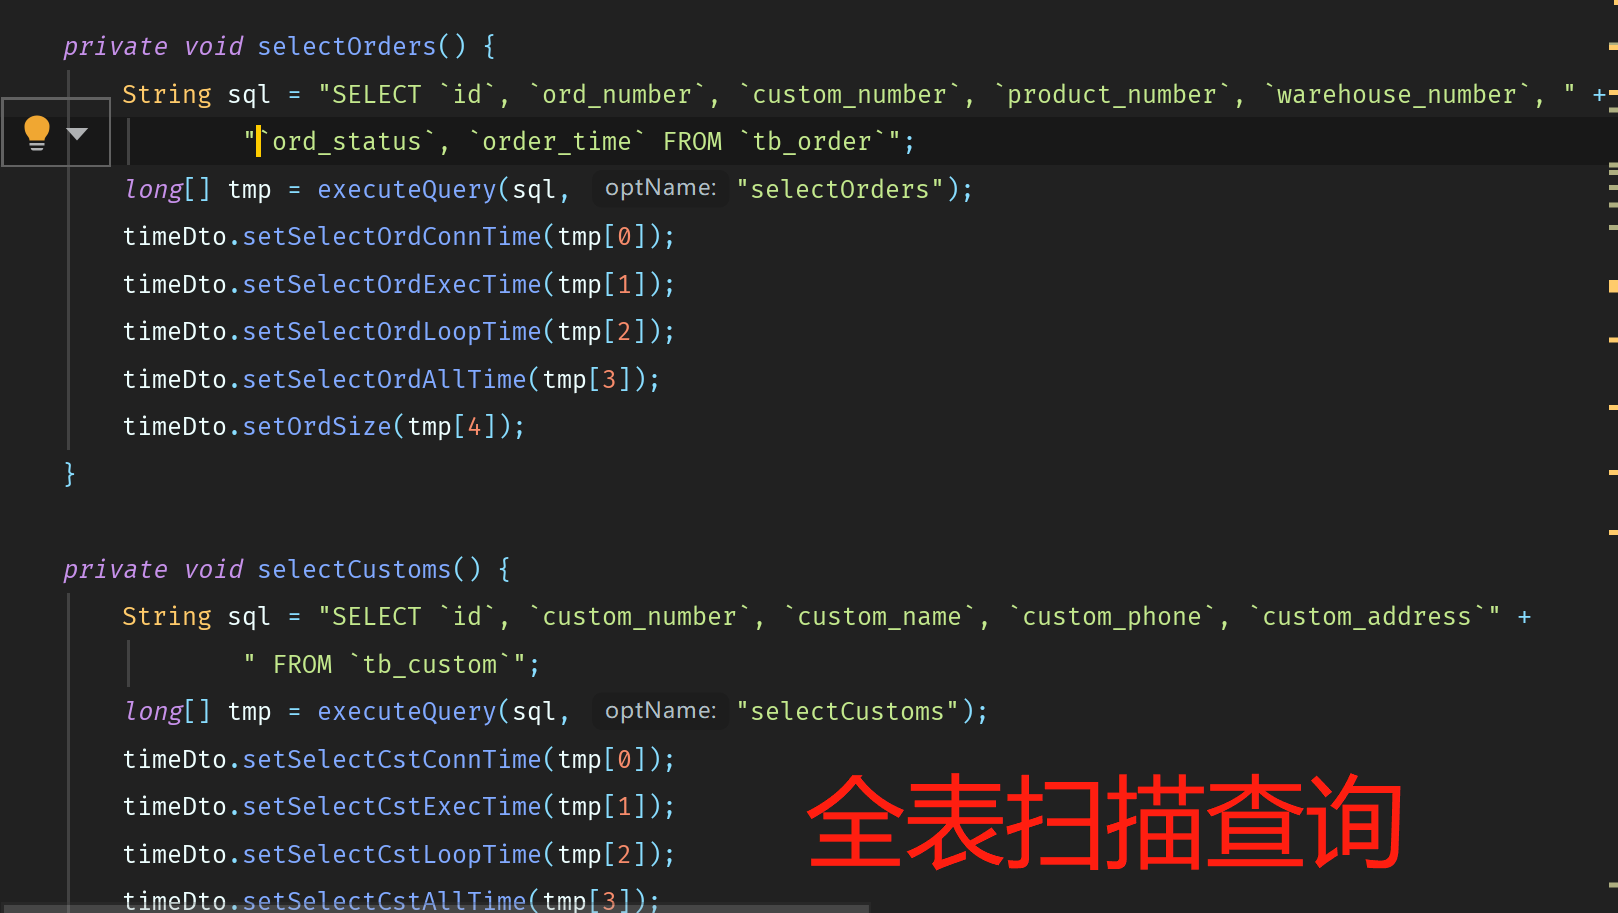
- 测试用例2. 全表扫描查询,对4个表进行select 字段1,字段2 from 表名,记录SQL查询消耗。
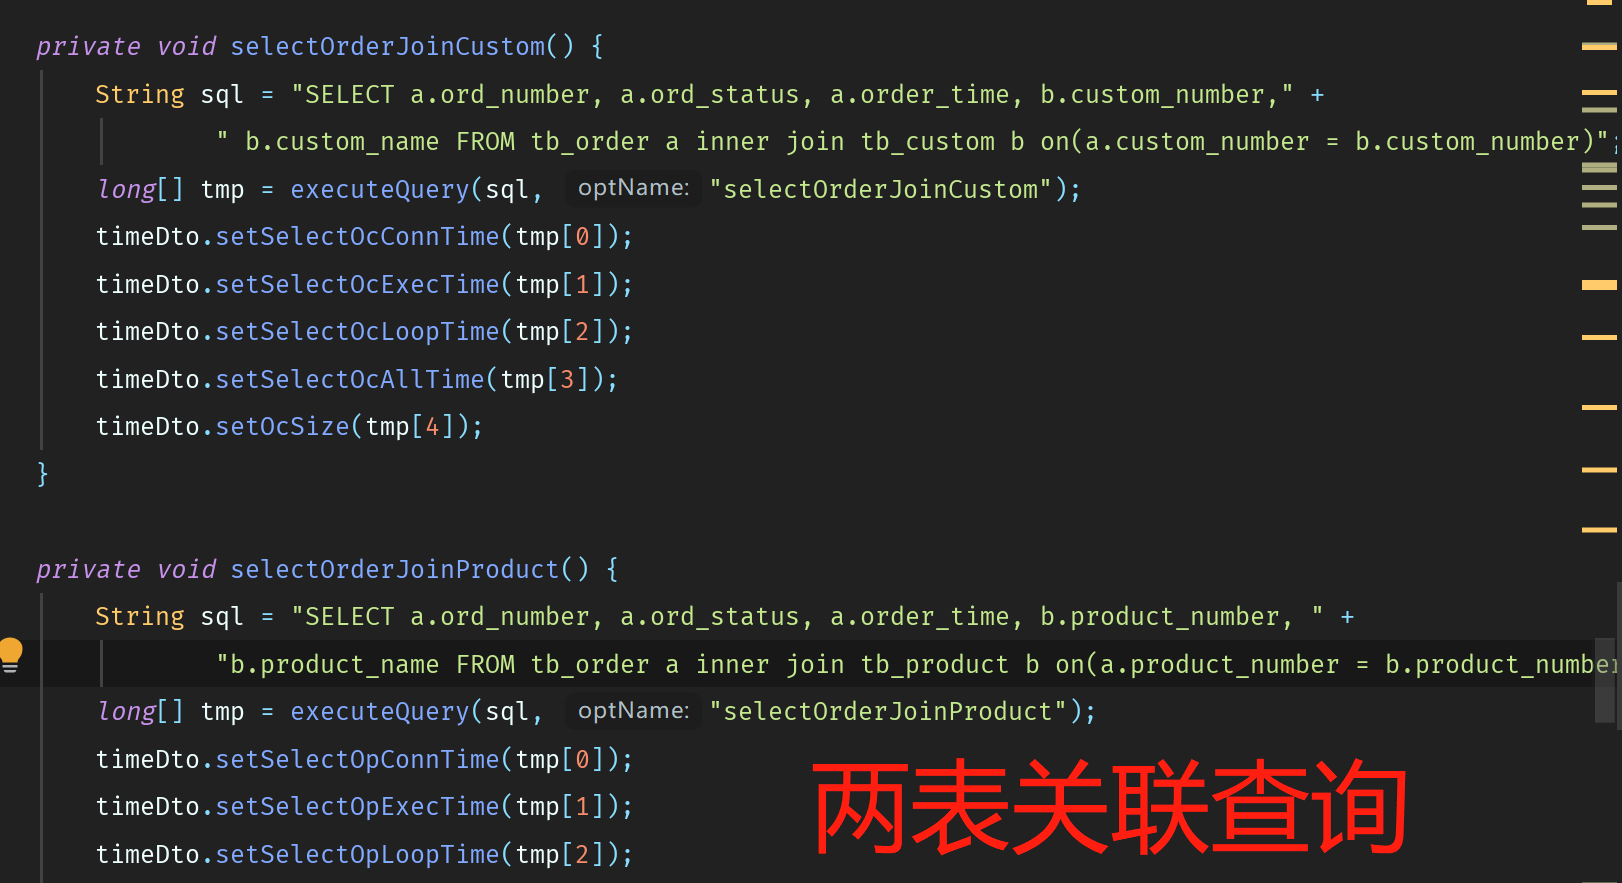
- 测试用例3,两表关联查询 ,订单表关联用户表, 订单表关联产品表,订单表关联仓库表,记录查询消耗。
三个测试用例采集的数据如下
索引功能
对订单进行索引过滤查询,记录未建索引前的查询时间,以及建立索引花费的时间,建立索引后的查询时间。
mysql建立索引前
mysql> explain  SELECT * FROM tb_order where warehouse_number = 'whs_0000000075';
+----+-------------+----------+------------+------+---------------+------+---------+------+--------+----------+-------------+
| id | select_type | table    | partitions | type | possible_keys | key  | key_len | ref  | rows   | filtered | Extra       |
+----+-------------+----------+------------+------+---------------+------+---------+------+--------+----------+-------------+
|  1 | SIMPLE      | tb_order | NULL       | ALL  | NULL          | NULL | NULL    | NULL | 994284 |    10.00 | Using where |
+----+-------------+----------+------------+------+---------------+------+---------+------+--------+----------+-------------+
1 row in set, 1 warning (0.00 sec)
mysql建立索引
mysql> CREATE INDEX `tb_order_idx02` ON  fish.`tb_order` (`warehouse_number`, `product_number`);
Query OK, 0 rows affected (18.98 sec)
Records: 0  Duplicates: 0  Warnings: 0
mysql建立索引后
mysql> explain  SELECT * FROM tb_order where warehouse_number = 'whs_0000000075';
+----+-------------+----------+------------+------+----------------+----------------+---------+-------+-------+----------+-------+
| id | select_type | table    | partitions | type | possible_keys  | key            | key_len | ref   | rows  | filtered | Extra |
+----+-------------+----------+------------+------+----------------+----------------+---------+-------+-------+----------+-------+
|  1 | SIMPLE      | tb_order | NULL       | ref  | tb_order_idx02 | tb_order_idx02 | 82      | const | 19526 |   100.00 | NULL  |
+----+-------------+----------+------------+------+----------------+----------------+---------+-------+-------+----------+-------+
1 row in set, 1 warning (0.00 sec)
oceanbase建立索引前
obclient [fish]> explain  SELECT * FROM tb_order where warehouse_number = 'whs_0000000075';

|ID|OPERATOR               |NAME    |EST. ROWS|COST  |
------------------------------------------------------

|0 |PX COORDINATOR         |        |10000    |106628|
|1 | EXCHANGE OUT DISTR    |:EX10000|10000    |93272 |
|2 |  PX PARTITION ITERATOR|        |10000    |63232 |

|3 |   TABLE SCAN          |tb_order|10000    |63232 |
======================================================

Outputs & filters:
-------------------------------------

  0 - output([INTERNAL_FUNCTION(tb_order.id, tb_order.ord_number, tb_order.custom_number, tb_order.product_number, tb_order.warehouse_number, tb_order.ord_status, tb_order.order_time)]), filter(nil), rowset=256
  1 - output([INTERNAL_FUNCTION(tb_order.id, tb_order.ord_number, tb_order.custom_number, tb_order.product_number, tb_order.warehouse_number, tb_order.ord_status, tb_order.order_time)]), filter(nil), rowset=256, dop=1
  2 - output([tb_order.id], [tb_order.warehouse_number], [tb_order.ord_number], [tb_order.custom_number], [tb_order.product_number], [tb_order.ord_status], [tb_order.order_time]), filter(nil), rowset=256
  3 - output([tb_order.id], [tb_order.warehouse_number], [tb_order.ord_number], [tb_order.custom_number], [tb_order.product_number], [tb_order.ord_status], [tb_order.order_time]), filter([tb_order.warehouse_number = 'whs_0000000075']), rowset=256,
      access([tb_order.id], [tb_order.warehouse_number], [tb_order.ord_number], [tb_order.custom_number], [tb_order.product_number], [tb_order.ord_status], [tb_order.order_time]), partitions(p[0-7])
oceanbase建立索引
obclient [fish]> CREATE INDEX `tb_order_idx02` ON  fish.`tb_order` (`warehouse_number`, `product_number`);
Query OK, 0 rows affected (44.654 sec)
oceanbase建立索引后
obclient [fish]> explain  SELECT * FROM tb_order where warehouse_number = 'whs_0000000075';

|ID|OPERATOR               |NAME                    |EST. ROWS|COST |
---------------------------------------------------------------------

|0 |PX COORDINATOR         |                        |10000    |86879|
|1 | EXCHANGE OUT DISTR    |:EX10000                |10000    |73523|
|2 |  PX PARTITION ITERATOR|                        |10000    |43482|

|3 |   TABLE SCAN          |tb_order(tb_order_idx02)|10000    |43482|
=====================================================================

Outputs & filters:
-------------------------------------

  0 - output([INTERNAL_FUNCTION(tb_order.id, tb_order.ord_number, tb_order.custom_number, tb_order.product_number, tb_order.warehouse_number, tb_order.ord_status, tb_order.order_time)]), filter(nil), rowset=256
  1 - output([INTERNAL_FUNCTION(tb_order.id, tb_order.ord_number, tb_order.custom_number, tb_order.product_number, tb_order.warehouse_number, tb_order.ord_status, tb_order.order_time)]), filter(nil), rowset=256, dop=1
  2 - output([tb_order.id], [tb_order.warehouse_number], [tb_order.ord_number], [tb_order.custom_number], [tb_order.product_number], [tb_order.ord_status], [tb_order.order_time]), filter(nil), rowset=256
  3 - output([tb_order.id], [tb_order.warehouse_number], [tb_order.ord_number], [tb_order.custom_number], [tb_order.product_number], [tb_order.ord_status], [tb_order.order_time]), filter(nil), rowset=256,
      access([tb_order.id], [tb_order.warehouse_number], [tb_order.ord_number], [tb_order.custom_number], [tb_order.product_number], [tb_order.ord_status], [tb_order.order_time]), partitions(p[0-7])
倒序索引
mysql8.0建立倒序索引后的查询时间,对比 OceanBase4.0的查询时间。
首先在mysql8.0和OceanBase4.0执行以下语句
SELECT custom_number, product_number from tb_order order by custom_number, product_number DESC ;
然后建立建立mysql的倒序索引
CREATE INDEX `tb_order_idx01` ON fish.`tb_order` (`custom_number`, `product_number` DESC);
再建立oceanbase的索引
CREATE INDEX `tb_order_idx01` ON fish.`tb_order` (`custom_number`, `product_number` );
未建倒序索引前mysql8.0花了2.56 sec,建立倒序索引后0.65 sec, 而OceanBase4.0花了9.340 sec,建立索引后花费时间11.771 sec。
测试总结
关于基本性能,发现批写入的JDBC连接串不同,OB进行应用数据写入时,jdbc连接串必须是useServerPrepStmts=true&rewriteBatchedStatements=true&allowMultiQueries=true&useSSL=false,否则不能批量提交,同样写入数据,mysql8可以自由select coun(*)查看写入状态,但是OB4会提示报错,需要提高ob_query_timeout的数值。大表写入,mysql8明显比OB4写入的速度快,笔者揣测这里与OB4的配置参数有关,obd demo生成的observer配置是 memory_limit=6G,system_memory=1G,cpu_count=16,实际上留给observer只有5G内存,在资源分配的时候,租户tennatfish实际只能得到3G内存。
全表扫描查询与关联两表查询,两者的距离不大,相差不是很远。
关于索引功能,mysql8与ob4未加索引前,两者的查询速都是差不多,查看查询计划发现都没有使用索引,注意mysql的查询计划面板与OB4不一样,mysql8与ob4加上索引后,两者的查询速度差不多,但是mysql8的索引创建花了18.98 sec,而ob4却花了44.654 sec。
关于倒序索引,据说倒序索引是mysql8的亮点,也是mysql8区别于5系列的标识,有关数据排序方面,OB4完全不如mysql8。未建倒序索引前mysql8.0花了2.56 sec,建立倒序索引后0.65 sec,而OceanBase4.0花了9.340 sec,建立常规索引后花费时间11.771 sec。
最后总结
我的判断是没有Mysql8比OB4快,同样OB4没有比Mysql8快,关键是什么样的司机,但是普通的司机【一般开发者】可能更喜欢开箱即用,一脚油门就能走,不关心发动机带不带T,具体是怎么工作的,也不关心底盘调校是什么参数,只希望汽车的默认参数直接能够支撑他走个10年。
mysql是单机系列数据库产品,Oceanbase4是分布式系列数据库产品,本来两者没有可比性的,但是Oceanbase要迈军轻量化,要技术布道深入广大开发者群众,所以有了比较衡量。
开发者的选择,到底是MySQL8好还是OceanBase4.0好,笔者说一个真实的事, 某家公司的内部系统开发,数据库选型长期以来一直是mysql,如果要迭代升级,最多升到5.7,怎么也愿往8上面升级, 原因是8会有更多的行为习惯改变,对团队来说有更多的学习成本。所以性能快不是最重要的,功能多也不是必要的,只有合适业务才是最好的。从用户需求的性质出发,数据库是长期的事业,Oceanbase以后的发展,必须坚持技术布道,逐步改变开发者的偏见和误解。
