


Tutorialspoint Java NIO 教程
来源:易百教程
Java NIO教程™
Java提供了一个叫作NIO(New I/O)的第二个I/O系统,NIO提供了与标准I/O API不同的I/O处理方式。它是Java用来替代传统I/O API(自Java 1.4以来)。
它支持面向缓冲的,基于通道的I/O操作方法。 随着JDK 7的推出,NIO系统得到了扩展,为文件系统功能和文件处理提供了增强的支持。 由于NIO文件类支持的这些新的功能,NIO被广泛应用于文件处理。
NIO为Java程序员实现高速I/O,而不使用自定义本机代码。 NIO将填充,排放缓冲区等的时间性I/O活动移回操作系统,从而大大提高了操作速度。
Java NIO基本组件如下:
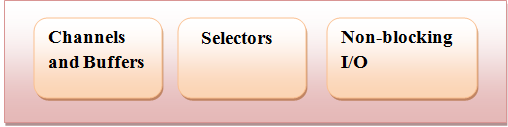
- 通道和缓冲区(Channels and Buffers):在标准I/O API中,使用字符流和字节流。 在NIO中,使用通道和缓冲区。数据总是从缓冲区写入通道,并从通道读取到缓冲区。
- 选择器(Selectors):Java NIO提供了“选择器”的概念。这是一个可以用于监视多个通道的对象,如数据到达,连接打开等。因此,单线程可以监视多个通道中的数据。
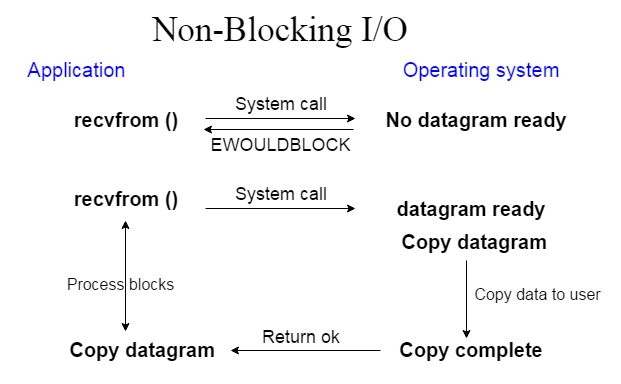
- 非阻塞I/O(Non-blocking I/O):Java NIO提供非阻塞I/O的功能。这里应用程序立即返回任何可用的数据,应用程序应该具有池化机制,以查明是否有更多数据准备就绪。
下面来看看非阻塞I/O的应用和操作系统接口:
读者
本教程是专为Java NIO初学者而准备的,通过简单的步骤帮助他们来了解和学习Java NIO基础知识。 完成本教程的学习后,您将发现自己在Java NIO编程方面具有一定的专业知识水平,进而能更容易地学习Java NIO编程中更深层次的技术和知识。
前提条件
Java NIO编程类基于Java编程,所以如果你知道或熟悉Java语法,那么将很容易学习Java NIO。 此外,如果您没有Java专业知识,但如果您有其它任何其他编程语言(如C语言,C++或Python)的基础,那么也将有助于快速掌握Java NIO编程技术。
问题反馈
我们不能保证您在学习此Java NIO教程的过程中不会遇到任何问题。本教程中的讲解,示例和代码等只是根据作者的理解来概括写出。由于作者水平和能力有限,因此不保正所有编写的文章都准确无误。但是如果有遇到任何错误或问题,请反馈给我们,我们会及时纠正以方便后续读者阅读。
易百教程移动端:请扫描本页面底部(右侧)二维码并关注微信公众号,回复:"教程" 选择相关教程阅读或直接访问:http://m.yiibai.com 。
开始学习 >> :Java NIO组件
Java NIO组件 - Java NIO教程™
在Java中,NIO读写是I/O的基本过程。 从通道读取:创建一个缓冲区,然后请求通道读取数据。通道写入:创建一个缓冲区,填充数据,并要求通道写入数据。
读写操作中使用的核心部件有:
- Channels
- Buffers
- Selectors
Java NIO还有其它更多的组件和类,但是Channel,Buffer和Selector用作API的核心。
通道和缓冲区
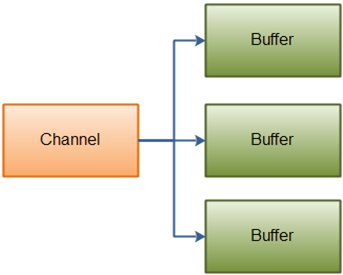
在标准I/O API中,使用字符流和字节流。 在NIO中使用通道和缓冲区。 NIO中的所有I/O都是通过一个通道开始的。数据总是从缓冲区写入通道,并从通道读取到缓冲区。
数据读取操作:
下面来看看将数据从通道读入缓冲区,如下图所示:

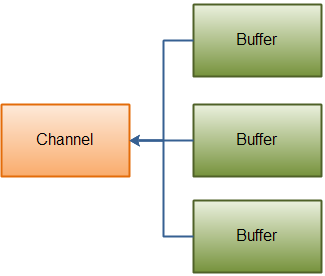
数据写入操作:
下面来看看从缓冲区将数据写入通道,如下图所示:

通道列表
在Java NIO中,主要使用的通道如下:
- DatagramChannel
- SocketChannel
- FileChannel
- ServerSocketChannel
上述通道涵盖UDP(用户数据报协议)+ TCP(传输控制协议)网络I/O和文件I/O。
缓冲列表
在Java NIO中使用的核心缓冲区如下:
- CharBuffer
- DoubleBuffer
- IntBuffer
- LongBuffer
- ByteBuffer
- ShortBuffer
- FloatBuffer
上述缓冲区覆盖了通过I/O发送的基本数据类型:characters,double,int,long,byte,short和float。
选择器
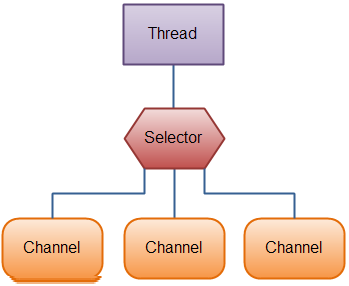
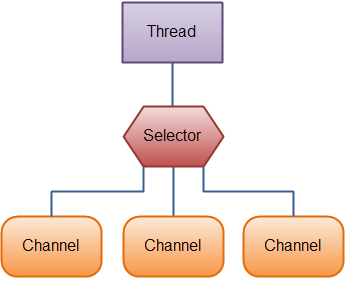
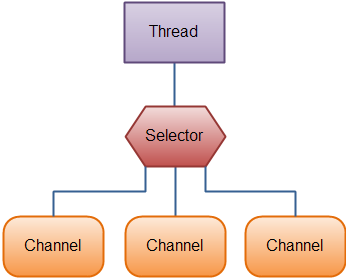
Java NIO提供了“选择器”的概念。这是一个可以用于监视多个通道的对象,如数据到达,连接打开等。因此,单线程可以监视多个通道中的数据。
如果应用程序有多个通道(连接)打开,但每个连接的流量都很低,则可考虑使用它。 例如:在聊天服务器中。
下面来看看线程使用选择器来处理3个通道,如下图所示:
易百教程移动端:请扫描本页面底部(右侧)二维码并关注微信公众号,回复:"教程" 选择相关教程阅读或直接访问:http://m.yiibai.com 。
下一篇:Java NIO包
Java NIO包 - Java NIO教程™
NIO类包含在一个叫作java.nio包的包中。要了解NIO子系统不会取代java.io包中可用的基于流的I/O类,如果有对java.io基于流的I/O的如何工作有所有了解,这有助于您学习和使用NIO中的知识内容。
按不同类别分组的一些NIO类,如下所示:
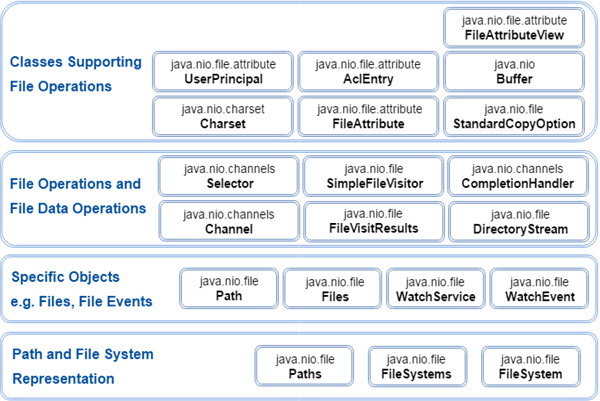
上述组是基于从开发人员的角度来看:NIO类使用来做什么。这种分组的目的是文件系统的表示或文件系统的交互级别。
NIO类包含在以下包中:
包名称 | 使用/目的 |
java.nio | 它是NIO系统的顶级包,NIO系统封装了各种类型的缓冲区。 |
java.nio.charset | 它封装了字符集,并且还支持分别将字符转换为字节和字节到编码器和解码器的操作。 |
java.nio.charset.spi | 它支持字符集服务提供者 |
java.nio.channels | 它支持通道,这些通道本质上是打开I/O连接。 |
java.nio.channels.spi | 它支持频道的服务提供者 |
java.nio.file | 它提供对文件的支持 |
java.nio.file.spi | 它支持文件系统的服务提供者 |
java.nio.file.attribute | 它提供对文件属性的支持 |
易百教程移动端:请扫描本页面底部(右侧)二维码并关注微信公众号,回复:"教程" 选择相关教程阅读或直接访问:http://m.yiibai.com 。
上一篇:Java NIO组件下一篇:Java IO与NIO比较
Java IO与NIO比较 - Java NIO教程™
在学习NIO之前,有必要将它与Java IO进行比较,以了解两个包之间的差别。
下面表格列出了Java IO和NIO之间的主要区别:
IO | NIO |
基于阻塞I/O操作 | 基于非阻塞I/O操作 |
面向流的 | 面向缓存的 |
通道不可用 | 通道可用于非阻塞I/O操作 |
选择器不可用 | 选择器可用于非阻塞I/O操作 |
阻塞与非阻塞I/O
阻塞I/O
阻塞IO等待数据写入或返回前的读取。Java IO的各种流是阻塞的。这意味着当线程调用write()或read()时,线程会被阻塞,直到有一些数据可用于读取或数据被完全写入。
非阻塞I/O
非阻塞IO不等待返回前读取或写入数据。 Java NIO非阻塞模式允许线程请求向通道写入数据,但不等待它被完全写入。允许线程继续进行,并做其他事情。
面向流与面向缓冲
面向流
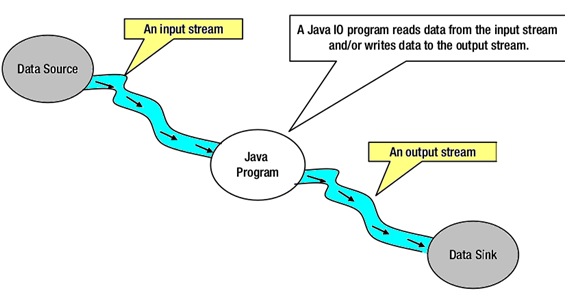
Java IO是面向流的I/O,这意味着我们需要从流中读取一个或多个字节。它使用流来在数据源/槽和java程序之间传输数据。使用此方法的I/O操作较慢。
下面来看看在Java程序中使用输入/输出流的数据流图:
面向缓冲
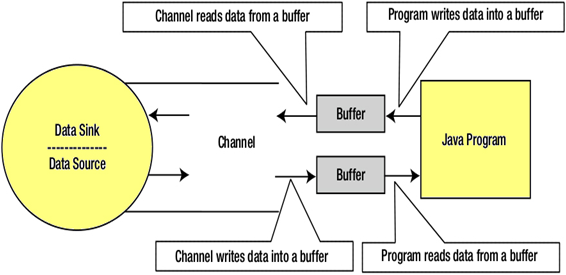
Java NIO是面向缓存的I/O方法。 将数据读入缓冲器,使用通道进一步处理数据。 在NIO中,使用通道和缓冲区来处理I/O操作。
通道和流之间的主要区别是:
- 流可以用于单向数据传输。
- 通道提供双向数据传输。
因此,通过在java NIO中引入通道,可以执行非阻塞I/O操作。
下面看看通道,缓冲区,java程序,数据源和数据接收器之间的相互作用 -
通道(Channels)
在Java NIO中,通道是在实体和字节缓冲区之间有效传输数据的媒介。 它从一个实体读取数据,并将其放在缓冲区块中以供消费。
通道作为Java NIO提供的网关来访问I/O机制。通常,通道与操作系统文件描述符具有一对一关系,用于提供平台独立操作功能。
NIO通道基础
通道使用本地代码执行实际工作。通道接口允许我们以便携和受控的方式访问低级I/O服务。
在层次结构的顶部,通道接口如下所示:
package java.nio.channels;
public interface Channel{
public boolean isclose();
public void Open() throws IOException;
}
正如在上述通道接口中看到的,所有通道中有常见的两个操作:
- 检查通道是否关闭(isclose())
- 打开关闭通道(close())
选择器(Selectors)
在Java NIO中,选择器是可选择通道的多路复用器,可用作可以进入非阻塞模式的特殊类型的通道。它可以检查一个或多个NIO通道,并确定哪个通道准备好进行通信,即读取或写入。
选择器(Selectors)的用途是什么?
选择器用于使用单个线程处理多个通道。因此,它需要较少的线程来处理这些通道。
线程之间的切换对于操作系统来说是昂贵的。 因此,为了提高系统效率选择器是有用的。
下面来看看使用选择器来处理3个通道的线程的示意图:
创建选择器
可以通过调用Selector.open()方法创建一个选择器,如下代码所示:
Selector selector = Selector.open();
易百教程移动端:请扫描本页面底部(右侧)二维码并关注微信公众号,回复:"教程" 选择相关教程阅读或直接访问:http://m.yiibai.com 。
上一篇:Java NIO包下一篇:Java NIO通道
Java NIO通道 - Java NIO教程™
在Java NIO中,通道是用于在实体和字节缓冲区之间有效传输数据的介质。它从一个实体读取数据,并将其放在缓冲区块中以供消费。
通道作为Java NIO提供的网关来访问I/O机制。 通常,通道与操作系统文件描述符具有一对一关系,用于提供平台独立操作功能。
让我们来看看java.nio.channels类的层次结构:

上述通道可以用于阻塞或非阻塞模式,但是我们主要关注在非阻塞模式下使用通道。
NIO通道基础
通道实现是使用本地代码执行实际工作。通道接口允许我们以便携和受控的方式访问低级I/O服务。
在层次结构的顶部,通道接口如下所示:
package java.nio.channels;
public interface Channel{
public boolean isclose();
public void Open() throws IOException;
}
正如在上述通道接口中看到的,所有通道只有两个常用操作:
- 检查通道是否关闭(isclose())
- 打开关闭通道(close())
通道实现
在Java NIO中,主要使用的通道如下:
- FileChannel:文件通道用于从文件读取数据。它只能通过调用getChannel()方法来创建对象。不能直接创建FileChannel对象。
下面是一个创建FileChannel对象的例子:
FileInputStream fis = new FileInputStream("D:\\file-read.txt"); // Path of Input text file
ReadableByteChannel rbc = fis.getChannel();
- DatagramChannel:数据报通道可以通过UDP(用户数据报协议)通过网络读取和写入数据。它使用工厂方法来创建新对象。
下面是打开DatagramChannel的语法:
DatagramChannel ch = DatagramChannel.open();
用于关闭DatagramChannel的语法:
DatagramChannel ch = DatagramChannel.close();
- SocketChannel:数据报通道可以通过TCP(传输控制协议)通过网络读取和写入数据。 它还使用工厂方法来创建新对象。
用于打开SocketChannel的语法:
SocketChannel ch = SocketChannel.open();
ch.connect(new InetSocketAddress("somehost", someport));
用于关闭SocketChannel的语法:
SocketChannel ch = SocketChannel.close();
ch.connect(new InetSocketAddress("somehost", someport));
- ServerSocketChannel:ServerSocketChannel允许用户监听传入的TCP连接,与Web服务器相同。对于每个传入连接,都会为连接创建一个SocketChannel。
下面是打开ServerSocketChannel的语法:
ServerSocketChannel ch = ServerSocketChannel.open();
ch.socket().bind (new InetSocketAddress (somelocalport));
下面是关闭ServerSocketChannel的语法:
ServerSocketChannel ch = ServerSocketChannel.close();
ch.socket().bind (new InetSocketAddress (somelocalport));
基本通道示例
下面来看看如何将数据从一个通道复制到另一个通道或从一个文件复制到另一个文件的示例:
package com.yiibai;
import java.io.FileInputStream;
import java.io.FileOutputStream;
import java.io.IOException;
import java.nio.ByteBuffer;
import java.nio.channels.ReadableByteChannel;
import java.nio.channels.WritableByteChannel;
public class ChannelDemo {
public static void main(String args[]) throws IOException {
String relativelyPath = System.getProperty("user.dir");
FileInputStream input = new FileInputStream(relativelyPath + "/testin.txt");
ReadableByteChannel source = input.getChannel();
FileOutputStream output = new FileOutputStream(relativelyPath + "/testout.txt");
WritableByteChannel destination = output.getChannel();
copyData(source, destination);
source.close();
destination.close();
System.out.println("Copy Data finished.");
}
private static void copyData(ReadableByteChannel src, WritableByteChannel dest) throws IOException {
ByteBuffer buffer = ByteBuffer.allocateDirect(20 * 1024);
while (src.read(buffer) != -1) {
// The buffer is used to drained
buffer.flip();
// keep sure that buffer was fully drained
while (buffer.hasRemaining()) {
dest.write(buffer);
}
buffer.clear(); // Now the buffer is empty, ready for the filling
}
}
}
执行上面示例代码,得到以下结果:
Copy Data finished.
上述程序将文本文件filein.txt的内容复制到另一个文本文件fileout.txt。
易百教程移动端:请扫描本页面底部(右侧)二维码并关注微信公众号,回复:"教程" 选择相关教程阅读或直接访问:http://m.yiibai.com 。
上一篇:Java IO与NIO比较下一篇:Java NIO缓冲区
Java NIO缓冲区 - Java NIO教程™
缓冲区(Buffers)在java.nio包中定义。 它定义了所有缓冲区通用的核心功能:限制,容量和当前位置。
Java NIO缓冲区用于与NIO通道进行交互。这是写入数据的内存块,以便在稍后再次进行读取。 内存块用NIO缓冲对象包装,这样可以提供更简单的方法来处理内存块。
缓冲区类型
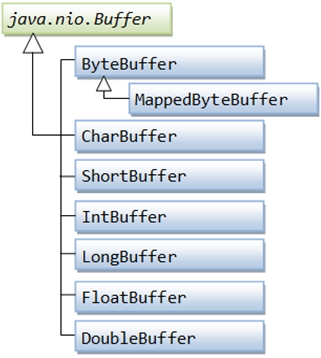
对于每个原始类型,都有一个缓冲区类型,所有缓冲区都可以实现缓冲区接口。 大多数使用的缓冲区类型是ByteBuffer。
在Java NIO中使用的核心缓冲区如下:
- CharBuffer
- DoubleBuffer
- IntBuffer
- LongBuffer
- ByteBuffer
- ShortBuffer
- FloatBuffer
上述缓冲区覆盖了我们可以通过I/O发送的基本数据类型:characters,double,int,long,byte,short和float。
在NIO中,使用java.nio.Buffer类中实现的缓冲区进行数据传输。它与数组相似,具有固定的容量大小。
分配缓冲区
为了获得缓冲区对象,我们必须首先分配一个缓冲区。在每个Buffer类中,allocate()方法用于分配缓冲区。
下面来看看ByteBuffer分配容量为28字节的例子:
ByteBuffer buf = ByteBuffer.allocate(28);
下面来看看另一个示例:CharBuffer分配空间大小为2048个字符。
CharBuffer buf = CharBuffer.allocate(2048);
从缓冲区读取数据
从缓冲区读取数据有两种方法:
- 通过使用get()方法之一读取Buffer中的数据。
- 将数据从缓冲区读入通道。
下面来看看使用get()方法从Buffer读取数据的例子:
byte aByte = buf.get();
下面来看看如何将Buffer中的数据读入通道的例子:
int bytesWritten = inChannel.write(buf);
将数据写入缓冲区
将数据写入缓冲区有两种方法:
- 使用put()方法将数据写入缓冲区。
- 将数据从Channel写入缓冲区。
基本缓冲区示例
下面来看看使用BufferedReader从testout.txt文件中读取行的简单示例:
package com.yiibai;
import java.io.BufferedReader;
import java.io.IOException;
import java.io.InputStream;
import java.io.InputStreamReader;
import java.nio.file.Files;
import java.nio.file.Path;
import java.nio.file.Paths;
public class BufferedReaderDemo {
public static void main(String[] args) {
Path file = null;
BufferedReader bufferedReader = null;
String relativelyPath = System.getProperty("user.dir");
try {
file = Paths.get(relativelyPath + "/testout.txt");
InputStream inputStream = Files.newInputStream(file);
bufferedReader = new BufferedReader(new InputStreamReader(inputStream));
System.out.println("Reading the Line of testout.txt file: \n" + bufferedReader.readLine());
} catch (IOException e) {
e.printStackTrace();
} finally {
try {
bufferedReader.close();
} catch (IOException ioe) {
ioe.printStackTrace();
}
}
}
}
执行上面示例代码,得到以下输出结果:
Reading the Line of testout.txt file:
易百教程定位为IT技术入门学习实例教程网站
上述程序读取testout.txt文件的第一行,然后在控制台上打印文件的第一行。
易百教程移动端:请扫描本页面底部(右侧)二维码并关注微信公众号,回复:"教程" 选择相关教程阅读或直接访问:http://m.yiibai.com 。
上一篇:Java NIO通道下一篇:Java NIO分散/聚集或向量I/O
Java NIO分散/聚集或向量I/O - Java NIO教程™
在Java NIO中,通道提供了称为分散/聚集或向量I/O的重要功能。 这是一种简单但功能强大的技术,通过这种技术,使用单个write()函数将字节从一组缓冲区写入流,并且可以使用单个read()函数将字节从流读取到一组缓冲区中。
Java NIO已经内置了分散/聚集支持。它可以用于从频道读取和写入频道。
分散读取
“分散读取”用于将数据从单个通道读取多个缓冲区中的数据。
下面来看看分散原理的说明:
下面是执行分射读取操作的代码示例:
public interface ScatteringByteChannel extends ReadableByteChannel
{
public long read (ByteBuffer [] argv) throws IOException;
public long read (ByteBuffer [] argv, int length, int offset) throws IOException;
}
聚集写入
“聚集写入”用于将数据从多个缓冲区写入单个通道。
下面来看看聚集原则的简单说明:
下面来看看看执行聚集写入操作的代码示例:
public interface GatheringByteChannel extends WritableByteChannel
{
public long write(ByteBuffer[] argv) throws IOException;
public long write(ByteBuffer[] argv, int length, int offset) throws IOException;
}
基本散点/聚集示例
下面来看看两个缓冲区的简单例子。 第一个缓冲区保存随机数,第二个缓冲区使用分散/聚集机制保存写入的数据:
package com.yiibai;
import java.io.FileOutputStream;
import java.io.FileInputStream;
import java.nio.ByteBuffer;
import java.nio.channels.FileChannel;
import java.nio.channels.ScatteringByteChannel;
import java.nio.channels.GatheringByteChannel;
public class ScatterGatherIO {
public static void main(String params[]) {
String data = "Scattering and Gathering example shown in yiibai.com";
gatherBytes(data);
scatterBytes();
}
/*
* gatherBytes() is used for reading the bytes from the buffers and write it
* to a file channel.
*/
public static void gatherBytes(String data) {
String relativelyPath = System.getProperty("user.dir");
// The First Buffer is used for holding a random number
ByteBuffer buffer1 = ByteBuffer.allocate(8);
// The Second Buffer is used for holding a data that we want to write
ByteBuffer buffer2 = ByteBuffer.allocate(400);
buffer1.asIntBuffer().put(420);
buffer2.asCharBuffer().put(data);
GatheringByteChannel gatherer = createChannelInstance(relativelyPath+"/testout.txt", true);
// Write the data into file
try {
gatherer.write(new ByteBuffer[] { buffer1, buffer2 });
} catch (Exception e) {
e.printStackTrace();
}
}
/*
* scatterBytes() is used for reading the bytes from a file channel into a
* set of buffers.
*/
public static void scatterBytes() {
String relativelyPath = System.getProperty("user.dir");
// The First Buffer is used for holding a random number
ByteBuffer buffer1 = ByteBuffer.allocate(8);
// The Second Buffer is used for holding a data that we want to write
ByteBuffer buffer2 = ByteBuffer.allocate(400);
ScatteringByteChannel scatter = createChannelInstance(relativelyPath+"/testout.txt", false);
// Reading a data from the channel
try {
scatter.read(new ByteBuffer[] { buffer1, buffer2 });
} catch (Exception e) {
e.printStackTrace();
}
// Read the two buffers seperately
buffer1.rewind();
buffer2.rewind();
int bufferOne = buffer1.asIntBuffer().get();
String bufferTwo = buffer2.asCharBuffer().toString();
// Verification of content
System.out.println(bufferOne);
System.out.println(bufferTwo);
}
public static FileChannel createChannelInstance(String file, boolean isOutput) {
FileChannel FChannel = null;
try {
if (isOutput) {
FChannel = new FileOutputStream(file).getChannel();
} else {
FChannel = new FileInputStream(file).getChannel();
}
} catch (Exception e) {
e.printStackTrace();
}
return FChannel;
}
}
在上述程序中,第一个缓冲区在控制台上打印随机输出,第二个缓冲区在控制台上打印“Scattering and Gathering example shown in yiibai.com”。
它还用“Scattering and Gathering example shown in yiibai.com”替换testout.txt文件的内容。
420
Scattering and Gathering example shown in yiibai.com
易百教程移动端:请扫描本页面底部(右侧)二维码并关注微信公众号,回复:"教程" 选择相关教程阅读或直接访问:http://m.yiibai.com 。
上一篇:Java NIO缓冲区下一篇:Java NIO通道之间的数据传输
Java NIO通道之间的数据传输 - Java NIO教程™
在Java NIO中,可以非常频繁地将数据从一个通道传输到另一个通道。批量传输文件数据是非常普遍的,因为几个优化方法已经添加到FileChannel类中,使其更有效率。
通道之间的数据传输在FileChannel类中的两种方法是:
- FileChannel.transferTo()方法
- FileChannel.transferFrom()方法
FileChannel.transferTo()方法
transferTo()方法用来从FileChannel到其他通道的数据传输。
下面来看一下transferTo()方法的例子:
public abstract class Channel extends AbstractChannel
{
public abstract long transferTo (long position, long count, WritableByteChannel target);
}
FileChannel.transferFrom()方法
transferFrom()方法允许从源通道到FileChannel的数据传输。
下面来看看transferFrom()方法的例子:
public abstract class Channel extends AbstractChannel
{
public abstract long transferFrom (ReadableByteChannel src, long position, long count);
}
基本通道到通道数据传输示例
下面来看看从4个不同文件读取文件内容的简单示例,并将它们的组合输出写入第五个文件:
package com.yiibai;
import java.io.File;
import java.io.FileOutputStream;
import java.io.FileInputStream;
import java.nio.channels.WritableByteChannel;
import java.nio.channels.FileChannel;
public class TransferDemo {
public static void main(String[] argv) throws Exception {
String relativelyPath = System.getProperty("user.dir");
// Path of Input files
String[] iF = new String[] { relativelyPath + "/input1.txt", relativelyPath + "/input2.txt",
relativelyPath + "/input3.txt", relativelyPath + "/input4.txt" };
// Path of Output file and contents will be written in this file
String oF = relativelyPath + "/combine_output.txt";
// Acquired the channel for output file
FileOutputStream output = new FileOutputStream(new File(oF));
WritableByteChannel targetChannel = output.getChannel();
for (int j = 0; j < iF.length; j++) {
// Get the channel for input files
FileInputStream input = new FileInputStream(iF[j]);
FileChannel inputChannel = input.getChannel();
// The data is tranfer from input channel to output channel
inputChannel.transferTo(0, inputChannel.size(), targetChannel);
// close an input channel
inputChannel.close();
input.close();
}
// close the target channel
targetChannel.close();
output.close();
System.out.println("All jobs done...");
}
}
在上述程序中,将4个不同的文件(即input1.txt,input2.txt,input3.txt和input4.txt)的内容读取并将其组合的输出写入第五个文件,即:combine_output.txt文件的中。combine_output.txt文件的内容如下 -
this is content from input1.txt
this is content from input2.txt
this is content from input3.txt
this is content from input4.txt
易百教程移动端:请扫描本页面底部(右侧)二维码并关注微信公众号,回复:"教程" 选择相关教程阅读或直接访问:http://m.yiibai.com 。
上一篇:Java NIO分散/聚集或向量I/O下一篇:Java NIO选择器
Java NIO选择器 - Java NIO教程™
在Java NIO中,选择器(Selector)是可选择通道的多路复用器,可用作可以进入非阻塞模式的特殊类型的通道。它可以检查一个或多个NIO通道,并确定哪个通道准备好了可以进行通信,即读取或写入。
选择器的用途是什么?
选择器(Selector)用于使用单个线程处理多个通道。 因此,它需要较少的线程来处理这些通道。 线程之间的切换对于操作系统来说是昂贵的。 因此,使用它可以提高系统效率。
下面来看看使用选择器来处理3个通道的线程的示意图:
下面是聚集原理的简单说明:
创建选择器
可以通过调用Selector.open()方法创建一个选择器,如下代码所示:
Selector selector = Selector.open();
打开服务器套接字通道
下面来看看打开服务器套接字通道的例子:
ServerSocketChannel serverSocket = ServerSocketChannel.open();
InetSocketAddress hostAddress = new InetSocketAddress("localhost", 8099);
serverSocket.bind(hostAddress);
使用选择器选择通道
在使用选择器注册一个或多个通道时,可以调用select()方法之一。 该方法返回一个准备好进行要执行事件的通道,即:连接,读取,写入或接受。
可用于选择通道的各种select()方法有:
- int select():由select()方法返回的整数值通知有多少个通道准备好进行通信。
- int select(long TS):方法与select()相同,除了阻塞最大TS(毫秒)时间的输出。
- int selectNow():它不阻止输出并立即返回任何准备好的通道。
- selectedKeys() - 当调用了任何一个select()方法后,它将返回一个值,表示一个或多个通道准备就绪,那么我们可以通过使用选择的键集合来访问就绪通道,通过调用选择器selectedkeys()方法如下:
Set<SelectionKey> selectedKeys = selector.selectedKeys();
可以迭代所选的键集合来访问准备好的信道,如下所示:
Set<SelectionKey> selectedKeys = selector.selectedKeys();
Iterator<SelectionKey> keyIterator = selectedKeys.iterator();
while(keyIterator.hasNext()) {
SelectionKey key = keyIterator.next();
if(key.isConnectable()) {
// The connection was established with a remote server.
} else if (key.isAcceptable()) {
// The connection was accepted by a ServerSocketChannel.
} else if (key.isWritable()) {
// The channel is ready for writing
} else if (key.isReadable()) {
// The channel is ready for reading
}
keyIterator.remove();
}
上述循环迭代所选择的键集合中的键,以确定使用所选通道执行的操作。
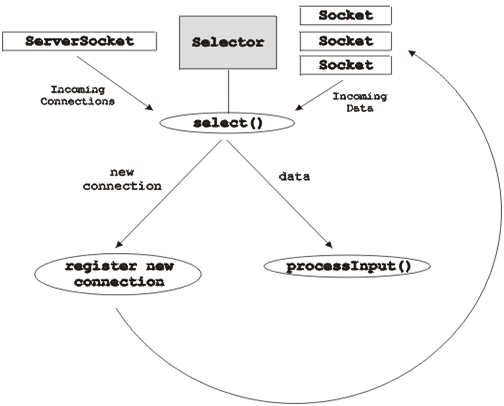
完整的选择循环示意图如下所示:
基本选择器示例
主程序:
package com.yiibai;
import java.nio.channels.ServerSocketChannel;
import java.nio.channels.SocketChannel;
import java.nio.channels.Selector;
import java.nio.channels.SelectionKey;
import java.nio.ByteBuffer;
import java.io.IOException;
import java.util.Set;
import java.util.Iterator;
import java.net.InetSocketAddress;
public class SelectorExample {
public static void main(String[] args) throws IOException {
// Get the selector
Selector selector = Selector.open();
System.out.println("Selector is open for making connection: " + selector.isOpen());
// Get the server socket channel and register using selector
ServerSocketChannel SS = ServerSocketChannel.open();
InetSocketAddress hostAddress = new InetSocketAddress("localhost", 8080);
SS.bind(hostAddress);
SS.configureBlocking(false);
int ops = SS.validOps();
SelectionKey selectKy = SS.register(selector, ops, null);
for (;;) {
System.out.println("Waiting for the select operation...");
int noOfKeys = selector.select();
System.out.println("The Number of selected keys are: " + noOfKeys);
Set selectedKeys = selector.selectedKeys();
Iterator itr = selectedKeys.iterator();
while (itr.hasNext()) {
SelectionKey ky = (SelectionKey) itr.next();
if (ky.isAcceptable()) {
// The new client connection is accepted
SocketChannel client = SS.accept();
client.configureBlocking(false);
// The new connection is added to a selector
client.register(selector, SelectionKey.OP_READ);
System.out.println("The new connection is accepted from the client: " + client);
} else if (ky.isReadable()) {
// Data is read from the client
SocketChannel client = (SocketChannel) ky.channel();
ByteBuffer buffer = ByteBuffer.allocate(256);
client.read(buffer);
String output = new String(buffer.array()).trim();
System.out.println("Message read from client: " + output);
if (output.equals("Bye Bye")) {
client.close();
System.out.println("The Client messages are complete; close the session.");
}
}
itr.remove();
} // end of while loop
} // end of for loop
}
}
客户端程序:
执行上面示例程序,得到以下结果 -
主程序的输出是:
Selector is open for making connection: true
Waiting for the select operation...
The Number of selected keys are: 1
The new connection is accepted from the client: java.nio.channels.SocketChannel[connected local=/127.0.0.1:8080 remote=/127.0.0.1:53823]
Waiting for the select operation...
The Number of selected keys are: 1
Message read from client: Time goes fast.
Waiting for the select operation...
The Number of selected keys are: 1
Message read from client: What next?
Waiting for the select operation...
The Number of selected keys are: 1
Message read from client: Bye Bye
The Client messages are complete; close the session.
客户端程序的输出是:
The Client is sending messages to server...
Time goes fast.
What next?
Bye Bye
易百教程移动端:请扫描本页面底部(右侧)二维码并关注微信公众号,回复:"教程" 选择相关教程阅读或直接访问:http://m.yiibai.com 。
上一篇:Java NIO通道之间的数据传输下一篇:Java NIO SocketChannel
Java NIO SocketChannel - Java NIO教程™
Java NIO SocketChannel用于将通道与TCP(传输控制协议)网络套接字连接。它相当于网络编程中使用的Java网络套接字(Socket)。
Java NIO中有两种可用于创建SocketChannel的方法:
- 当传入连接到达ServerSocketChannel时,可以创建它。
- 打开一个SocketChannel,并在网络上与服务器连接。
我们来看看使用选择器的SocketChannel客户端 - 服务器通信的框图:
打开套接字通道 - SocketChannel
可以通过调用SocketChannel.Open()方法打开一个SocketChannel。
打开套接字通道(SocketChannel)的语法是:
SocketChannel sc = SocketChannel.open();
sc.connect(new InetSocketAddress("localhost", 9099));
关闭套接字通道 - SocketChannel
通过调用SocketChannel.close()方法执行所有操作后,可以关闭SocketChannel。
关闭套接字通道(SocketChannel)的语法是:
SocketChannel.close();
从SocketChannel读取
要从SocketChannel读取数据,调用read()方法之一。
下面来看如何从SocketChannel读取数据的例子:
ByteBuffer bb = ByteBuffer.allocate(84);
int bytesRead = SocketChannel.read(bb);
首先分配缓冲区。 从SocketChannel读取的数据存储在缓冲区中。
其次,调用SocketChannel.read()方法,并将数据从SocketChannel读入缓冲区。 read()方法返回写入缓冲区字节数的整数值。
写入套接字通道-SocketChannel
要将数据写入SocketChannel,可使用SocketChannel.write()方法并将缓冲(buffer)作为参数。
下面来看看一下将数据写入SocketChannel的例子:
String newData = "The new String is writing in a file ..." + System.currentTimeMillis();
ByteBuffer bb= ByteBuffer.allocate(48);
bb.clear();
bb.put(newData.getBytes());
bb.flip();
while(bb.hasRemaining()) {
SocketChannel.write(bb);
}
SocketChannel.write()方法在while循环中使用,因为write()方法写入SocketChannel的字节数目是未知的,因此需要重复使用write()方法,直到Buffer没有可用的字节写入。
易百教程移动端:请扫描本页面底部(右侧)二维码并关注微信公众号,回复:"教程" 选择相关教程阅读或直接访问:http://m.yiibai.com 。
上一篇:Java NIO选择器下一篇:Java NIO ServerSocketChannel
Java NIO ServerSocketChannel - Java NIO教程™
Java NIO ServerSocketChannel还可以用来将通道与TCP(传输控制协议)网络套接字连接起来。它相当于网络编程中使用的Java网络套接字。ServerSocketChannel类位于java.nio.channels包中。
下面我们来看看ServerSocketChannel的例子:
ServerSocketChannel ssc = ServerSocketChannel.open();
ssc.socket().bind(new InetSocketAddress(8085));
while(true){
SocketChannel socketChannel = ssc.accept();
}
关闭ServerSocketChannel
通过调用ServerSocketChannel.close()方法执行所有操作后,可以关闭ServerSocketChannel。
下面是关闭ServerSocketChannel的语法是:
ServerSocketChannel.close();
打开ServerSocketChannel
要打开ServerSocketChannel,可通过调用ServerSocketChannel.open()方法打开一个ServerSocketChannel。
用于打开ServerSocketChannel的语法是:
ServerSocketChannel sc = ServerSocketChannel.open();
sc.connect(new InetSocketAddress("localhost", 9099));
监听连接
监听客户商连接,可通过调用ServerSocketChannel.accept()方法完成。accept()方法用于返回带有传入连接的SocketChannel。
下面是监听连接的例子:
while(true){
SocketChannel sc = serverSocketChannel.accept();
}
在while循环中调用accept()方法,因为这里要监听所有传入的连接。
从ServerSocketChannel读取数据
要从ServerSocketChannel读取数据,可调用read()方法之一。
下面是从ServerSocketChannel读取数据的例子:
ByteBuffer bb = ByteBuffer.allocate(84);
int bytesRead = ServerSocketChannel.read(bb);
首先分配缓冲区。从ServerSocketChannel读取的数据存储在缓冲区中。
其次,调用ServerSocketChannel.read()方法,并将数据从ServerSocketChannel读入缓冲区。read()方法的整数值返回写入缓冲区的字节数。
将数据写入ServerSocketChannel
要将数据写入ServerSocketChannel,可使用ServerSocketChannel.write()方法,它将缓冲区(buffer)作为参数。
下面是将数据写入ServerSocketChannel的例子:
String newData = "The new String is writing in a file ..." + System.currentTimeMillis();
ByteBuffer bb= ByteBuffer.allocate(48);
bb.clear();
bb.put(newData.getBytes());
bb.flip();
while(bb.hasRemaining()) {
ServerSocketChannel.write(bb);
}
ServerSocketChannel.write()方法在while循环中使用,因为write()方法写入ServerSocketChannel的字节数目是未知的,因此需要重复使用write()方法,直到Buffer不再有可用的字节。
易百教程移动端:请扫描本页面底部(右侧)二维码并关注微信公众号,回复:"教程" 选择相关教程阅读或直接访问:http://m.yiibai.com 。
上一篇:Java NIO SocketChannel下一篇:Java NIO管道
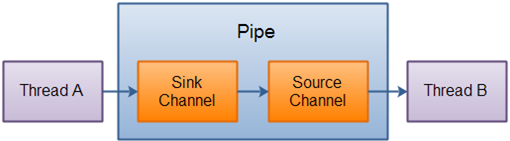
Java NIO管道 - Java NIO教程™
Java NIO管道用于在两个线程之间建立单向数据连接。它有一个槽通道和源通道。数据正在写入槽通道,然后可以从源通道读取该数据。
在Java NIO中,包java.nio.channel.pipe用于按顺序读取和写入数据。管道用于确保数据必须以写入管道的相同顺序读取。
下面来看看管道工作原理的示意图说明:
创建管道
要创建一个管道,可通过调用Pipe.open()方法打开管道。
打开或创建管道的语法是:
Pipe pp = Pipe.open();
从管道读取数据
要从管道读取数据,需要先访问源通道。 因此,用于访问源通道的语法是:
Pipe.SourceChannel sc= pipe.source();
要从SourceChannel读取数据,可调用read()方法,如下所示:
ByteBuffer bb= ByteBuffer.allocate(512);
int bytesRead = inChannel.read(bb);
read()方法返回的整数值用于确定读入缓冲区的字节数。
写入管道
要将数据写入管道,需要访问接收器通道。访问宿通道的语法是:
Pipe.SinkChannel sc= pipe.sink();
要将数据写入SinkChannel,可调用write()方法,如下所示:
String newData = "The new String is writing in a Pipe..." + System.currentTimeMillis();
ByteBuffer bb= ByteBuffer.allocate(512);
bb.clear();
bb.put(newData.getBytes());
bb.flip();
while(bb.hasRemaining()) {
SinkChannel.write(bb);
}
基本管道示例:
package com.yiibai;
import java.io.IOException;
import java.nio.ByteBuffer;
import java.nio.channels.Pipe;
public class PipeExample {
public static void main(String[] args) throws IOException {
// The Pipe is created
Pipe pipe = Pipe.open();
// For accessing the pipe sink channel
Pipe.SinkChannel skChannel = pipe.sink();
String td = "Data is successfully sent for checking the java NIO Channel Pipe.";
ByteBuffer bb = ByteBuffer.allocate(512);
bb.clear();
bb.put(td.getBytes());
bb.flip();
// write the data into a sink channel.
while (bb.hasRemaining()) {
skChannel.write(bb);
}
// For accessing the pipe source channel
Pipe.SourceChannel sourceChannel = pipe.source();
bb = ByteBuffer.allocate(512);
// The data is write to the console
while (sourceChannel.read(bb) > 0) {
bb.flip();
while (bb.hasRemaining()) {
char TestData = (char) bb.get();
System.out.print(TestData);
}
bb.clear();
}
}
}
执行上面示例代码,得到以下结果 -
Data is successfully sent for checking the java NIO Channel Pipe.
易百教程移动端:请扫描本页面底部(右侧)二维码并关注微信公众号,回复:"教程" 选择相关教程阅读或直接访问:http://m.yiibai.com 。
上一篇:Java NIO ServerSocketChannel下一篇:Java NIO字符集
Java NIO字符集 - Java NIO教程™
java.nio.charset.Charset包使用的是在JDK 1.4中引入了字符集的概念。它在给定的字符集和UNICODE之间的编码和解码中起着重要的作用。
字符集的名称必须遵循某些规则。它必须以数字或字母开头。Charset类方法在多线程环境中也是安全的。
标准字符集
Java支持的字符集列表如下:
- UTF-8:8位UCS转换格式。
- US-ASCII:7位ASCII字符。
- UTF-16LE:16位UCS转换,小字节顺序。
- ISO-8859-1:ISO拉丁字母
- UTF-16:16位UCS转换格式。
- UTF-16BE:大字节顺序的16位UCS变换格式
- Charset.displayName() - 在Java NIO中用于返回规范名称的字符集。
- Charset.encode() - 在Java NIO中用于将UNICODE字符集的charbuffer编码为给定字符集的CharBuffer。
- Charset.decode() - 在Java NIO中用于将给定字符集的字符串解码为Unicode字符集的CharBuffer。
基本字符串示例
package com.yiibai;
import java.nio.ByteBuffer;
import java.nio.CharBuffer;
import java.nio.charset.Charset;
public class CharsetExample {
public static void main(String[] args) {
Charset cs = Charset.forName("UTF-8");
System.out.println(cs.displayName());
System.out.println(cs.canEncode());
String st = "Welcome to yiibai.com, it is Charset test Example.";
// The conversion of byte buffer from given charset to char buffer in
// unicode
ByteBuffer bytebuffer = ByteBuffer.wrap(st.getBytes());
CharBuffer charbuffer = cs.decode(bytebuffer);
// The converesion of char buffer from unicode to byte buffer in given
// charset
ByteBuffer newbytebuffer = cs.encode(charbuffer);
while (newbytebuffer.hasRemaining()) {
char ca = (char) newbytebuffer.get();
System.out.print(ca);
}
newbytebuffer.clear();
}
}
执行上面示例代码,得到以下结果 -
UTF-8
true
Welcome to yiibai.com, it is Charset test Example.
易百教程移动端:请扫描本页面底部(右侧)二维码并关注微信公众号,回复:"教程" 选择相关教程阅读或直接访问:http://m.yiibai.com 。
上一篇:Java NIO管道下一篇:Java NIO编码和解码
Java NIO编码和解码 - Java NIO教程™
使用Java NIO API编码和解码操作可以从一个字符串执行到另一个字符集。两个类:CharsetEncoder和CharsetDecoder在ByteBuffer和CharBuffer之间的编码和解码中起着重要的作用。
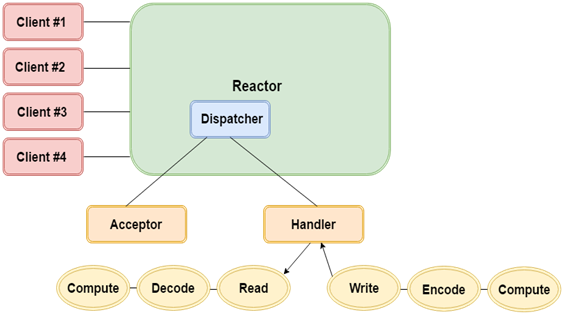
只有当处理程序可用时,反应堆(Reactor)保持到达事件的跟踪和调度。我们来看看反应堆中执行的编码和解码操作的架构:
Java NIO中的CharsetEncoder
CharsetEncoder用于将Unicode字符编码为字节序列。它还返回一个提供任何错误信息的CoderResult对象。
Java NIO中的CharsetDecoder
CharsetDecoder用于将数组或字节序列解码为Unicode字符。在从ByteBuffer到CharBuffer的解码过程中,获得CoderResult对象。
Java NIO中的Charset.newEncoder()
在CharsetEncoder中,Charset.newEncoder()用于创建Charset对象,然后通过newEncoder()方法,可以获取CharsetEncoder对象。
Java NIO Charset.newDecoder()
在CharsetDecoder中,Charset.newDecoder()用于创建Charset对象,然后通过newDecoder()方法,可以获取一个CharsetDecoder对象。
基本编码和解码示例
package com.yiibai;
import java.nio.ByteBuffer;
import java.nio.CharBuffer;
import java.nio.charset.Charset;
import java.nio.charset.CharacterCodingException;
import java.nio.charset.CharsetDecoder;
import java.nio.charset.CharsetEncoder;
public class CharsetExam {
public static void main(String[] args) throws CharacterCodingException {
Charset cs = Charset.forName("UTF-8");
CharsetDecoder csdecoder = cs.newDecoder();
CharsetEncoder csencoder = cs.newEncoder();
String st = "Example of Encode and Decode in Java NIO.";
ByteBuffer bb = ByteBuffer.wrap(st.getBytes());
CharBuffer cb = csdecoder.decode(bb);
ByteBuffer newbb = csencoder.encode(cb);
while (newbb.hasRemaining()) {
char ca = (char) newbb.get();
System.out.print(ca);
}
newbb.clear();
}
}
执行上面示例代码,得到以下结果 -
Example of Encode and Decode in Java NIO.
易百教程移动端:请扫描本页面底部(右侧)二维码并关注微信公众号,回复:"教程" 选择相关教程阅读或直接访问:http://m.yiibai.com 。
上一篇:Java NIO字符集下一篇:Java NIO通道FileLock
Java NIO通道FileLock - Java NIO教程™
FileLock锁定或尝试锁定文件的给定部分。它属于java.nio.channels包,该功能在JDK 1.4以上版本可用。
FileLock用于在共享模式或非共享模式下锁定文件。它有两个重要的方法如下:
- FileLock.lock(long position, long size, boolean shared)
- FileLock.tryLock(long position, long size, boolean shared)
上述方法使用参数作为初始位置,文件大小锁定和一个参数来决定是否共享锁定。
创建文件锁
当使用FileChannel或AsynchronousFileChannel的lock()或tryLock()方法之一获取文件锁时,将创建文件锁定对象。
基本FileLock示例
下面来看看使用专用锁定的通道在文件中写入(附加)的程序(FileLockExample.java):
package com.yiibai;
import java.io.IOException;
import java.nio.channels.FileChannel;
import java.nio.channels.FileLock;
import java.nio.ByteBuffer;
import java.nio.file.Paths;
import java.nio.file.Path;
import java.nio.file.StandardOpenOption;
public class FileLockExample {
public static void main (String [] args)
throws IOException {
String input = "* end of the file.";
System.out.println("Input string to the test file is: " + input);
ByteBuffer buf = ByteBuffer.wrap(input.getBytes());
String fp = "testout-file.txt";
Path pt = Paths.get(fp);
FileChannel fc = FileChannel.open(pt, StandardOpenOption.WRITE,
StandardOpenOption.APPEND);
System.out.println("File channel is open for write and Acquiring lock...");
fc.position(fc.size() - 1); // position of a cursor at the end of file
FileLock lock = fc.lock();
System.out.println("The Lock is shared: " + lock.isShared());
fc.write(buf);
fc.close(); // Releases the Lock
System.out.println("Content Writing is complete. Therefore close the channel and release the lock.");
PrintFile.print(fp);
}
}
PrintFile.java文件的内容如下 -
package com.yiibai;
import java.io.IOException;
import java.io.FileReader;
import java.io.BufferedReader;
public class PrintFile {
public static void print(String path) throws IOException {
FileReader filereader = new FileReader(path);
BufferedReader bufferedreader = new BufferedReader(filereader);
String tr = bufferedreader.readLine();
System.out.println("The Content of testout-file.txt file is: ");
while (tr != null) {
System.out.println(" " + tr);
tr = bufferedreader.readLine();
}
filereader.close();
bufferedreader.close();
}
}
注意:在运行代码之前,需要创建一个名称为“testout-file.txt”的文本文件,文本文件的内容如下:
Welcome to yiibai.com
This is the example of FileLock in Java NIO channel.
执行上面示例代码,得到以下结果 -
Input string to the test file is: * end of the file.
File channel is open for write and Acquiring lock...
The Lock is shared: false
Content Writing is complete. Therefore close the channel and release the lock.
The Content of testout-file.txt file is:
Welcome to yiibai.com
This is the example of FileLock in Java NIO channel.* end of the file.
易百教程移动端:请扫描本页面底部(右侧)二维码并关注微信公众号,回复:"教程" 选择相关教程阅读或直接访问:http://m.yiibai.com 。
上一篇:Java NIO编码和解码下一篇:Java NIO时间服务器示例
Java NIO时间服务器示例 - Java NIO教程™
在本示例中,实现时间服务器。服务器监听连接,并向连接的客户端发送当前服务器的时间。这是一个简单的阻塞程序,演示NIO套接字通道(接受和写入),缓冲区处理,字符集和正则表达式。
在本示例中共有两个Java程序文件,它们分别为:TimeServer.java和TimeQuery.java,如下所示 -
TimeServer.java充当服务器端,代码如下所示 -
package com.yiibai;
import java.io.*;
import java.net.*;
import java.nio.*;
import java.nio.channels.*;
import java.nio.charset.*;
import java.text.SimpleDateFormat;
import java.util.*;
import java.util.regex.*;
/* Listen for connections and tell callers what time it is.
* Demonstrates NIO socket channels (accepting and writing),
* buffer handling, charsets, and regular expressions.
*/
public class TimeServer {
// The port we'll actually use
private static int port = 8125;
// Charset and encoder for US-ASCII
private static Charset charset = Charset.forName("US-ASCII");
private static CharsetEncoder encoder = charset.newEncoder();
// Direct byte buffer for writing
private static ByteBuffer dbuf = ByteBuffer.allocateDirect(1024);
// Open and bind the server-socket channel
//
private static ServerSocketChannel setup() throws IOException {
ServerSocketChannel ssc = ServerSocketChannel.open();
String host = InetAddress.getLocalHost().getHostAddress();
System.out.println("Listen at Host:" + host + ", port:" + port);
InetSocketAddress isa = new InetSocketAddress(host, port);
ssc.socket().bind(isa);
return ssc;
}
// Service the next request to come in on the given channel
//
private static void serve(ServerSocketChannel ssc) throws IOException {
SocketChannel sc = ssc.accept();
try {
String now = new Date().toString();
sc.write(encoder.encode(CharBuffer.wrap(now + "\r\n")));
System.out.println(sc.socket().getInetAddress() + " : " + now);
sc.close();
} finally {
// Make sure we close the channel (and hence the socket)
sc.close();
}
}
public static void main(String[] args) throws IOException {
if (args.length > 1) {
System.err.println("Usage: java TimeServer [port]");
return;
}
// If the first argument is a string of digits then we take that
// to be the port number
if ((args.length == 1) && Pattern.matches("[0-9]+", args[0]))
port = Integer.parseInt(args[0]);
ServerSocketChannel ssc = setup();
for (;;)
serve(ssc);
}
}
TimeQuery.java充当客户端,代码如下所示 -
package com.yiibai;
import java.io.*;
import java.net.*;
import java.nio.*;
import java.nio.channels.*;
import java.nio.charset.*;
import java.util.regex.*;
/* Ask a list of hosts what time it is. Demonstrates NIO socket channels
* (connection and reading), buffer handling, charsets, and regular
* expressions.
*/
public class TimeQuery {
// The port we'll actually use
private static int port = 8125;
// Charset and decoder for US-ASCII
private static Charset charset = Charset.forName("US-ASCII");
private static CharsetDecoder decoder = charset.newDecoder();
// Direct byte buffer for reading
private static ByteBuffer dbuf = ByteBuffer.allocateDirect(1024);
// Ask the given host what time it is
//
private static void query(String host) throws IOException {
InetSocketAddress isa = new InetSocketAddress(InetAddress.getByName(host), port);
SocketChannel sc = null;
try {
// Connect
sc = SocketChannel.open();
sc.connect(isa);
// Read the time from the remote host. For simplicity we assume
// that the time comes back to us in a single packet, so that we
// only need to read once.
dbuf.clear();
sc.read(dbuf);
// Print the remote address and the received time
dbuf.flip();
CharBuffer cb = decoder.decode(dbuf);
System.out.print(isa + " : " + cb);
} finally {
// Make sure we close the channel (and hence the socket)
if (sc != null)
sc.close();
}
}
public static void main(String[] args) throws UnknownHostException {
/**
* if (args.length < 1) { System.err.println("Usage: java TimeQuery
* [port] host..."); return; }
*/
String host = InetAddress.getLocalHost().getHostAddress();
System.out.println("Connect to Host:" + host + ", port:" + port);
try {
query(host);
} catch (IOException x) {
System.err.println(host + ": " + x);
}
}
}
首先运行TimeServer.java,得到以下输出结果 -
Listen at Host:192.168.0.5, port:8125
然后运行TimeQuery.java从服务器端获取当前时间,得到以下输出结果 -
/192.168.0.5:8125 : Fri Sep 29 23:46:55 BOT 2017
易百教程移动端:请扫描本页面底部(右侧)二维码并关注微信公众号,回复:"教程" 选择相关教程阅读或直接访问:http://m.yiibai.com 。
上一篇:Java NIO通道FileLock下一篇:哥,这回真没有了
