


在昨天(4月1日)得知openGauss 5.0版本发布了,按捺不住兴奋的心情,利用今天风和日丽的下午,成功的安装了openGauss 5.0企业版(1主+1从)。
以下是安装过程的简要记录:
一、安装前先看一下官方文档:

二、官方文档的参考安装流程:
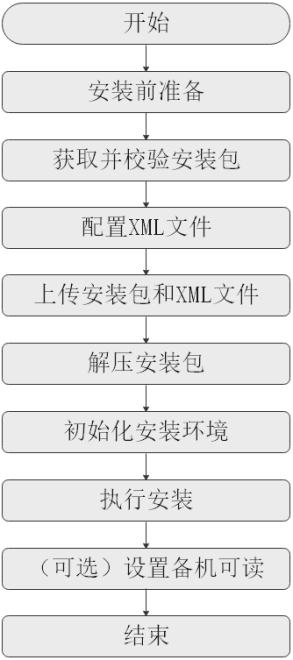
三、安装前的准备
1、创建两台vmware虚机:
(1)每台虚机分配资源:2CPU + 4GB
(2)每台虚机均最小安装CentOS 7.6
(3)两台虚机配置如下:
主机名 | 主机IP | CPU | 内存 | OS |
opengauss5-1 | 192.168.20.51 | 2核 | 4GB | CentOS 7.6 |
opengauss5-2 | 192.168.20.52 | 同上 | 同上 | 同上 |
2、安装系统依赖包:
所需软件 | 建议版本 |
libaio-devel | 建议版本:0.3.109-13 |
flex | 要求版本:2.5.31 以上 |
bison | 建议版本:2.7-4 |
ncurses-devel | 建议版本:5.9-13.20130511 |
glibc-devel | 建议版本:2.17-111 |
patch | 建议版本:2.7.1-10 |
redhat-lsb-core | 建议版本:4.1 |
readline-devel | 建议版本:7.0-13 |
libnsl(openEuler+x86环境中) | 建议版本:2.28-36 |
expect | |
net-tools | |
python | 支持python 3.6.x |
3、关闭SeLinux
sed -i ‘s/^SELINUX=enforcing/SELINUX=disabled/g’ /etc/selinux/config
setenforce 0
4、关闭防火墙:
systemctl stop firewalld
systemctl disable firewalld
5、关闭RemoveIPC
vi /etc/systemd/logind.conf
RemoveIPC=no
systemctl daemon-reload
systemctl restart systemd-logind
6、设置网卡MTU值(Maximum Transmission Unit,最大传输单元)
要求数据库各节点的网卡MTU值设置为相同大小。MTU值推荐8192,要求不小于1500。
7、设置root用户远程登录:
vi /etc/ssh/sshd_config
PermitRootLogin yes
注释掉“Banner”所在的行。
systemctl restart sshd.service
8、创建存放安装包的目录:
mkdir -p /opt/software/openGauss
chmod 755 -R /opt/software
9、创建数据库软件相关目录:
mkdir -p /opt/openGauss
chmod -R 755 /opt/openGauss
10、下载安装包并上传到第一台虚机:
(1)安装包下载地址: https://opengauss.org/zh/download/
(2)上传的目录:/opt/software/openGauss
11、解压安装包:
cd /opt/software/openGauss
tar -zxvf openGauss-5.0.0-CentOS-64bit-all.tar.gz
tar -zxvf openGauss-5.0.0-CentOS-64bit-om.tar.gz
12、创建XML配置文件:
配置文件模板:在script/gspylib/etc/conf/cluster_config_template.xml
参照此配置文件模板,编辑配置XML文件:
vi /opt/software/openGauss/cluster_config.xml
<?xml version="1.0" encoding="utf-8"?> <ROOT> <CLUSTER> <PARAM name="clusterName" value="opengauss" /> <PARAM name="nodeNames" value="opengauss5-1,opengauss5-2"/> <PARAM name="gaussdbAppPath" value="/opt/openGauss/app" /> <PARAM name="gaussdbLogPath" value="/opt/openGauss/log/omm" /> <PARAM name="tmpMppdbPath" value="/opt/openGauss/tmp"/> <PARAM name="gaussdbToolPath" value="/opt/openGauss/om" /> <PARAM name="corePath" value="/opt/openGauss/corefile"/> <PARAM name="backIp1s" value="192.168.20.51,192.168.20.52"/> </CLUSTER> <DEVICELIST> <DEVICE sn="opengauss5-1"> <PARAM name="name" value="opengauss5-1"/> <PARAM name="azName" value="AZ1"/> <PARAM name="azPriority" value="1"/> <PARAM name="backIp1" value="192.168.20.51"/> <PARAM name="sshIp1" value="192.168.20.51"/> <!-- dn --> <PARAM name="dataNum" value="1"/> <PARAM name="dataPortBase" value="15400"/> <PARAM name="dataNode1" value="/opt/openGauss/data/dn,opengauss5-2,/opt/openGauss/data/dn"/> <PARAM name="dataNode1_syncNum" value="0"/> </DEVICE> <DEVICE sn="opengauss5-2"> <PARAM name="name" value="opengauss5-2"/> <PARAM name="azName" value="AZ1"/> <PARAM name="azPriority" value="1"/> <PARAM name="backIp1" value="192.168.20.52"/> <PARAM name="sshIp1" value="192.168.20.52"/> </DEVICE> </DEVICELIST> </ROOT> |
四、预安装(初始化安装环境):
以root登录第一台虚机,执行如下:
cd /opt/software/openGauss/script
./gs_preinstall -U omm -G dbgrp -X /opt/software/openGauss/cluster_config.xml
以下是成功预安装的过程记录:
[root@opengauss5-1 script]# ./gs_preinstall -U omm -G dbgrp -X /opt/software/openGauss/cluster_config.xml Parsing the configuration file. Successfully parsed the configuration file. Installing the tools on the local node. Successfully installed the tools on the local node. Are you sure you want to create trust for root (yes/no)?yes Please enter password for root Password: Successfully created SSH trust for the root permission user. Setting host ip env Successfully set host ip env. Distributing package. Begin to distribute package to tool path. Successfully distribute package to tool path. Begin to distribute package to package path. Successfully distribute package to package path. Successfully distributed package. Are you sure you want to create the user[omm] and create trust for it (yes/no)? yes Preparing SSH service. Successfully prepared SSH service. Installing the tools in the cluster. Successfully installed the tools in the cluster. Checking hostname mapping. Successfully checked hostname mapping. Creating SSH trust for [omm] user. Please enter password for current user[omm]. Password: Checking network information. All nodes in the network are Normal. Successfully checked network information. Creating SSH trust. Creating the local key file. Successfully created the local key files. Appending local ID to authorized_keys. Successfully appended local ID to authorized_keys. Updating the known_hosts file. Successfully updated the known_hosts file. Appending authorized_key on the remote node. Successfully appended authorized_key on all remote node. Checking common authentication file content. Successfully checked common authentication content. Distributing SSH trust file to all node. Distributing trust keys file to all node successfully. Successfully distributed SSH trust file to all node. Verifying SSH trust on all hosts. Successfully verified SSH trust on all hosts. Successfully created SSH trust. Successfully created SSH trust for [omm] user. Checking OS software. Successfully check os software. Checking OS version. Successfully checked OS version. Creating cluster's path. Successfully created cluster's path. Set and check OS parameter. Setting OS parameters. Successfully set OS parameters. Warning: Installation environment contains some warning messages. Please get more details by "/opt/software/openGauss/script/gs_checkos -i A -h opengauss5-1,opengauss5-2 --detail". Set and check OS parameter completed. Preparing CRON service. Successfully prepared CRON service. Setting user environmental variables. Successfully set user environmental variables. Setting the dynamic link library. Successfully set the dynamic link library. Setting Core file Successfully set core path. Setting pssh path Successfully set pssh path. Setting Cgroup. Successfully set Cgroup. Set ARM Optimization. No need to set ARM Optimization. Fixing server package owner. Setting finish flag. Successfully set finish flag. Preinstallation succeeded. |
五、安装:
登录第一台虚机,执行如下:
su - omm
gs_install -X /opt/software/openGauss/cluster_config.xml
以下是成功安装的过程记录:
[omm@opengauss5-1 ~]$ gs_install -X /opt/software/openGauss/cluster_config.xml Parsing the configuration file. Check preinstall on every node. Successfully checked preinstall on every node. Creating the backup directory. Successfully created the backup directory. begin deploy.. Installing the cluster. begin prepare Install Cluster.. Checking the installation environment on all nodes. begin install Cluster.. Installing applications on all nodes. Successfully installed APP. begin init Instance.. encrypt cipher and rand files for database. Please enter password for database:此处输入数据库的口令 Please repeat for database: begin to create CA cert files The sslcert will be generated in /opt/openGauss/app/share/sslcert/om NO cm_server instance, no need to create CA for CM. Non-dss_ssl_enable, no need to create CA for DSS Cluster installation is completed. Configuring. Deleting instances from all nodes. Successfully deleted instances from all nodes. Checking node configuration on all nodes. Initializing instances on all nodes. Updating instance configuration on all nodes. Check consistence of memCheck and coresCheck on database nodes. Successful check consistence of memCheck and coresCheck on all nodes. Configuring pg_hba on all nodes. Configuration is completed. The cluster status is Normal. Successfully started cluster. Successfully installed application. end deploy.. |
六、安装验证:
安装后,可以执行如下命令,验证是否成功安装:
[omm@opengauss5-1 ~]$ gs_om -t status --detail [ Cluster State ] cluster_state : Normal redistributing : No current_az : AZ_ALL [ Datanode State ] node node_ip port instance state -------------------------------------------------------------------------------------------- 1 opengauss5-1 192.168.20.51 15400 6001 /opt/openGauss/data/dn P Primary Normal 2 opengauss5-2 192.168.20.52 15400 6002 /opt/openGauss/data/dn S Standby Normal |
七、登录数据库:
[omm@opengauss5-1 ~]$ gsql -d postgres -p 15400 gsql ((openGauss 5.0.0 build a07d57c3) compiled at 2023-03-29 03:07:56 commit 0 last mr ) Non-SSL connection (SSL connection is recommended when requiring high-security) Type "help" for help. openGauss=# select version(); version -------------------------------------------------------------------------------------------- (openGauss 5.0.0 build a07d57c3) compiled at 2023-03-29 03:07:56 commit 0 last mr on x86_64-unknown-linux-gnu, compiled by g++ (GCC) 7.3.0, 6 4-bit (1 row) |
八、对OpenGauss5.0企业版数据库集群(1主+1从)的性能测试
1、通过Sysbench工具测试:
(1)测试工具版本:sysbench 1.0.20
(2)分别对相同配置虚机上的OpenGauss3.0和5.0集群(1主+1从)进行了压测。
每台虚机配置均为2CPU + 4GB,对每套集群进行五次4并发的压测,取最佳结果。
经对比,
TPS指标值,OpenGauss5.0集群比OpenGauss3.0集群提升17.5%
QPS指标值,OpenGauss5.0集群比OpenGauss3.0集群提升17.7%
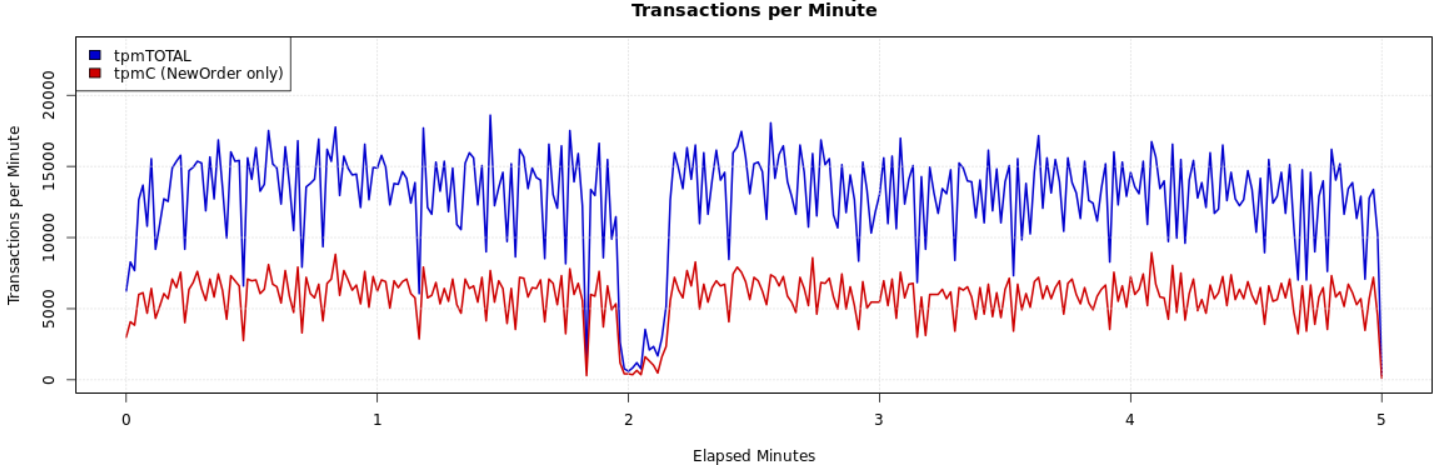
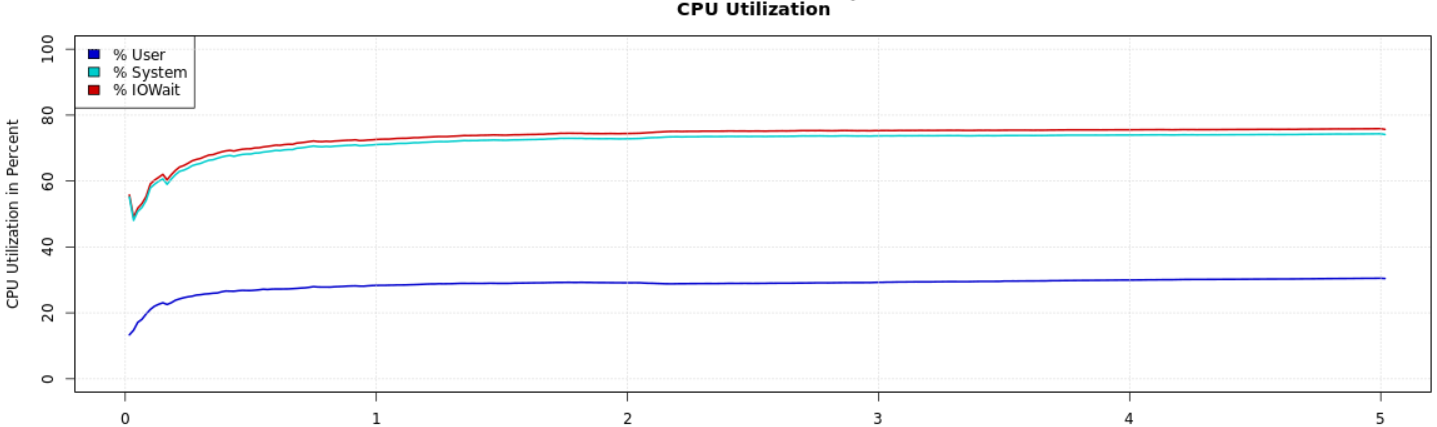
2、通过BenchmarkSQL工具测试:
(1)测试工具版本:benchmarksql-5.0
(2)对OpenGauss5.0集群(1主+1从)进行了压测。
每台虚机配置均为2CPU + 4GB
配置1数仓、4并发的5分钟压测结果如下:

九、启停数据库集群:
1、启动集群
gs_om -t start
2、停止集群
gs_om -t stop
