作者:马顺华
从事运维管理工作多年,目前就职于某科技有限公司,熟悉运维自动化、OceanBase部署运维、MySQL 运维以及各种云平台技术和产品。并已获得OceanBase认证OBCA、OBCP 证书、OpenGauss社区认证结业证书。OceanBase & 墨天轮第二、三、四、五届技术征文大赛,多次获得 一、二、三 等奖,时常在墨天轮发布原创技术文章,并多次被首页推荐。

如何通过 OBD 黑屏命令行方式部署 OceanBase 数据库生产环境。
OBD 除了支持通过命令行方式部署 OceanBase 数据库生产环境外,也支持通过白屏部署 OceanBase 集群环境。OBD 黑屏部署需要设置的项还是很多的,初学者不建议使用。现在 OB 推出了 web 白屏部署 OB,简单明了实用,推荐您通过 OBD 白屏方式进行部署,详细操作步骤请参考 通过 OBD 白屏部署 OceanBase 集群。 快速体验 OceanBase 4.1 数据库 web 白屏部署集群环境
说明
中控机器

存储 OceanBase 数据库安装包和集群配置信息的机器。

目标机器

安装 OceanBase 数据库的机器。

OBD

OceanBase Deployer,OceanBase 集群安装部署工具,简称为 OBD。详细信息请参考 OBD 文档。

ODP

OceanBase Database Proxy,OceanBase 高性能反向代理服务器,简称为 ODP(又称为 OBProxy)。详细信息请参考 ODP 文档。

OCP Express

基于 Web 的 OceanBase 数据库 4.x 管理工具,融合在 OceanBase 数据库集群中,支持对数据库集群关键性能及基本数据库管理功能。详细信息请参考 OceanBase 云平台 Express (OCP Express)。
部署模式
本文采用三副本部署模式,推荐使用四台机器,您可以根据自己实际情况选择合适的部署方案。本文中四台机器的使用情况如下:
| 角色 | 机器 | 备注 |
|---|---|---|
| OBD | 172.19.33.5 | 中控机,自动化部署软件 |
| OBServer 节点 | 172.19.33.2 | OceanBase 数据库 Zone1 |
| OBServer 节点 | 172.19.33.3 | OceanBase 数据库 Zone2 |
| OBServer 节点 | 172.19.33.4 | OceanBase 数据库 Zone3 |
| OBAgent | 172.19.33.2 172.19.33.3 172.19.33.4 | OceanBase 监控工具 |
| ODP | 172.19.33.4 | OceanBase 访问反向代理 |
| OCP Express | 172.19.33.4 | 基于 Web 的 OceanBase 数据库 4.x 管理工具 |
部署环境
以下内容以 x86 架构的 CentOS Linux 7.4 镜像作为环境,其他环境可能略有不同。
[root@CAIP131 soft]# cat /etc/redhat-release
CentOS Linux release 7.4.1708 (Core)
[root@CAIP131 soft]#
步骤一:(可选)下载并安装 all-in-one 安装包
从 V4.0.0 开始,OceanBase 提供统一的安装包 all-in-one package。您可以通过这个统一的安装包一次性完成 OBD、OceanBase 数据库、ODP、OBAgent 等组件的安装。
您也可根据实际需求从 OceanBase 软件下载中心 选择部分组件下载安装或者指定组件的版本。
1、离线安装 all-in-one
若您的机器无法连接网络,可参考如下步骤离线安装。
下载最新的 all-in-one 安装包
从 OceanBase 软件下载中心 下载最新的 all-in-one 安装包,并将其复制到中控机任意目录下。
官方下载地址:https://www.oceanbase.com/softwarecenter
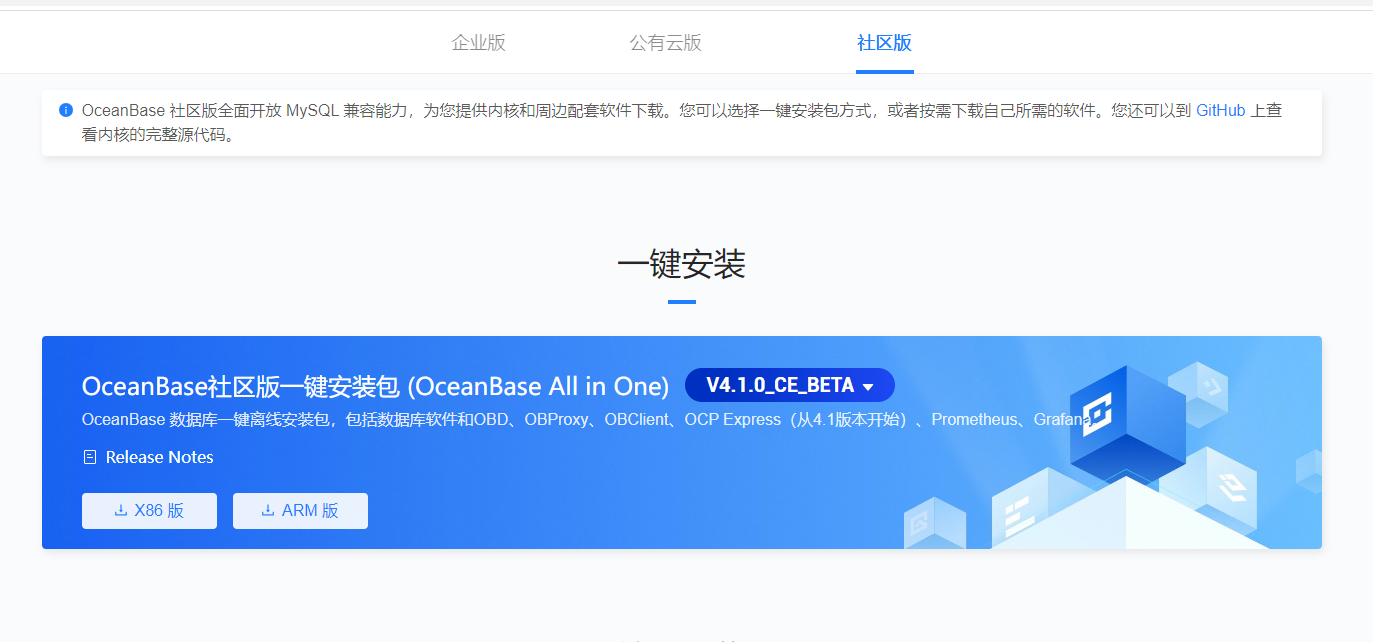
all-in-one package,oceanbase-all-in-one-4.xx.xx-xxx.tar.gz。

2、在安装包所在目录下执行如下命令解压安装包并安装。
[root@CAIP131 soft]# ls
obce-3zones.yaml  obce-3zones.yamlbak  oceanbase-all-in-one-4.1.0.0-100120230323143519.el7.x86_64.tar.gz  Python-3.9.5  tsar
[root@CAIP131 soft]# tar -xzf oceanbase-all-in-one-4.1.0.0-100120230323143519.el7.x86_64.tar.gz
[root@CAIP131 soft]#

3、安装 all-in-one
[root@CAIP131 soft]# cd oceanbase-all-in-one/bin/
[root@CAIP131 bin]# ls
env.sh  install.sh  uninstall.sh
[root@CAIP131 bin]# ./install.sh
name: grafana
version: 7.5.17
release:1
arch: x86_64
md5: 1bf1f338d3a3445d8599dc6902e7aeed4de4e0d6
add /root/soft/oceanbase-all-in-one/rpms/grafana-7.5.17-1.el7.x86_64.rpm to local mirror
name: obagent
version: 1.3.0
release:22.el7
arch: x86_64
md5: d57fbb4962b2fbecb6282358c59295fdfba4d6ac
add /root/soft/oceanbase-all-in-one/rpms/obagent-1.3.0-22.el7.x86_64.rpm to local mirror
name: obproxy-ce
version: 4.1.0.0
release:7.el7
arch: x86_64
md5: 2a9d9bf67f179dcca2a8c9e7c77373d94e7e2abe
add /root/soft/oceanbase-all-in-one/rpms/obproxy-ce-4.1.0.0-7.el7.x86_64.rpm to local mirror
name: oceanbase-ce
version: 4.1.0.0
release:100000192023032010.el7
arch: x86_64
md5: 8439ecf8db5e0649bd49671b41ea9e8c85756b63
add /root/soft/oceanbase-all-in-one/rpms/oceanbase-ce-4.1.0.0-100000192023032010.el7.x86_64.rpm to local mirror
name: oceanbase-ce-libs
version: 4.1.0.0
release:100000192023032010.el7
arch: x86_64
md5: a83b1dd1cab44d3f610d439931322be7a08555f2
add /root/soft/oceanbase-all-in-one/rpms/oceanbase-ce-libs-4.1.0.0-100000192023032010.el7.x86_64.rpm to local mirror
name: ocp-express
version: 1.0.0
release:100000432023032015.el7
arch: x86_64
md5: 42c6fc921063f24f9e1072d75bfa7f21f42146e3
add /root/soft/oceanbase-all-in-one/rpms/ocp-express-1.0.0-100000432023032015.el7.x86_64.rpm to local mirror
name: prometheus
version: 2.37.1
release:10000102022110211.el7
arch: x86_64
md5: 58913c7606f05feb01bc1c6410346e5fc31cf263
add /root/soft/oceanbase-all-in-one/rpms/prometheus-2.37.1-10000102022110211.el7.x86_64.rpm to local mirror
Trace ID: 2828d740-e0ef-11ed-87dd-0050568197df
If you want to view detailed obd logs, please run: obd display-trace 2828d740-e0ef-11ed-87dd-0050568197df
Disable remote ok
Trace ID: 28bb5502-e0ef-11ed-bec9-0050568197df
If you want to view detailed obd logs, please run: obd display-trace 28bb5502-e0ef-11ed-bec9-0050568197df

add auto set env logic to profile: /root/.bash_profile

#####################################################################
 Install Finished
=====================================================================
Setup Environment:     source ~/.oceanbase-all-in-one/bin/env.sh
Start Web Service:     obd web
Quick Start:           obd demo
More Details:          obd -h
=====================================================================
[root@CAIP131 bin]#
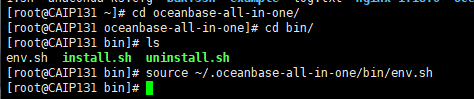
[root@CAIP131 ~]# cd oceanbase-all-in-one/
[root@CAIP131 oceanbase-all-in-one]# cd bin/
[root@CAIP131 bin]# ls
env.sh  install.sh  uninstall.sh
[root@CAIP131 bin]# source ~/.oceanbase-all-in-one/bin/env.sh
[root@CAIP131 bin]#
4、 执行 which obd 和 which obclient 检测是否安装成功
如果可以找到 oceanbase-all-in-one 下的 obd 和 obclient 路径,则表示安装成功。
[root@CAIP131 bin]# which obd
/root/.oceanbase-all-in-one/obd/usr/bin/obd
[root@CAIP131 bin]# which obclient
/root/.oceanbase-all-in-one/obclient/u01/obclient/bin/obclient
[root@CAIP131 bin]#

步骤二:配置 OBD
部署 OceanBase 集群之前,为了数据安全,建议您切换到非 root 用户。
如果是离线部署 OceanBase 集群,可参考 步骤一 在中控机上下载并安装 all-in-one 安装包。
如果对部署所需组件版本有特别要求,可从 OceanBase 软件下载中心 自行下载组件对应版本安装包,复制到中控机任一目录,在该目录下参考以下步骤配置 OBD。
1、通过 all-in-one 安装包部署 OceanBase 集群
1.1 选择 OBD 方式配置文件
若您机器中的 OBD 是通过直接下载的方式安装,则可在 /usr/obd/example 目录下查看 OBD 提供的配置文件示例。
[root@CAIP131 oceanbase-all-in-one]# cd /usr/obd/example/
[root@CAIP131 example]# ls
all-components-min.yaml                local-example.yaml                          obproxy
all-components.yaml                    mini-distributed-example.yaml               oceanbase-3.x
autodeploy                             mini-distributed-with-obproxy-example.yaml  prometheus
distributed-example.yaml               mini-local-example.yaml                     single-example.yaml
distributed-with-obproxy-example.yaml  mini-single-example.yaml                    single-with-obproxy-example.yaml
example                                mini-single-with-obproxy-example.yaml
grafana                                obagent
[root@CAIP131 example]#

1.2 选择 all-in-one 方式配置文件
若您机器中的 OBD 是通过解压 all-in-one 安装包的方式安装,则可在 ~/.oceanbase-all-in-one/conf 目录下查看 OBD 提供的配置文件示例。请根据您的资源条件选择相应的配置文件。
[root@CAIP131 ~]# cd soft/oceanbase-all-in-one/conf/
[root@CAIP131 conf]# ls
all-components-min.yaml                mini-distributed-example.yaml               oceanbase-3.x
all-components.yaml                    mini-distributed-with-obproxy-example.yaml  ocp-express
autodeploy                             mini-local-example.yaml                     prometheus
distributed-example.yaml               mini-single-example.yaml                    single-example.yaml
distributed-with-obproxy-example.yaml  mini-single-with-obproxy-example.yaml       single-with-obproxy-example.yaml
grafana                                obagent
local-example.yaml                     obproxy
[root@CAIP131 conf]#

配置文件分为小规格开发和专业开发两种模式,两种模式的配置文件中配置项基本相同,配置的规格略有不同,您可根据实际资源条件进行选择。
小规格开发模式:适用于个人设备(内存不低于 8 GB),配置文件名中带有 mini 或 min 标识。
专业开发模式:适用于高配置 ECS 或物理服务器(可用资源不低于 16 核 64 GB)。
2.修改配置文件。
此处以使用 all-components.yaml 部署分布式 OceanBase 集群为例,介绍如何修改配置文件。
您需根据您环境的真实情况修改下述参数。
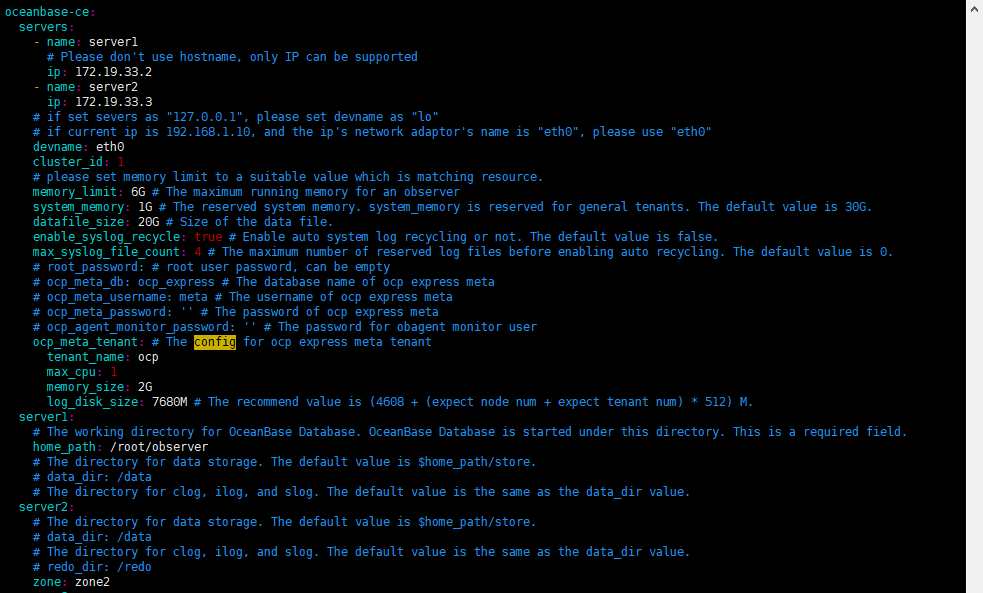
2.1 修改机器的 IP、端口和相关目录,并配置内存相关参数及密码。
## Only need to configure when remote login is required
# user:
#   timeout: ssh connection timeout (second), default 30
oceanbase-ce:
  servers:
    - name: server1
      # Please don't use hostname, only IP can be supported
      ip: 172.19.33.2
    - name: server2
      ip: 172.19.33.3
    - name: server3
      ip: 172.19.33.4
    # if set severs as "127.0.0.1", please set devname as "lo"
    # if current ip is 192.168.1.10, and the ip's network adaptor's name is "eth0", please use "eth0"
    devname: eth0
    cluster_id: 1
    # please set memory limit to a suitable value which is matching resource.
    memory_limit: 6G # The maximum running memory for an observer
    system_memory: 1G # The reserved system memory. system_memory is reserved for general tenants. The default value is 30G.
    datafile_size: 20G # Size of the data file.
    enable_syslog_recycle: true # Enable auto system log recycling or not. The default value is false.
    max_syslog_file_count: 4 # The maximum number of reserved log files before enabling auto recycling. The default value is 0.
    # root_password: # root user password, can be empty
    # ocp_meta_db: ocp_express # The database name of ocp express meta
    # ocp_meta_username: meta # The username of ocp express meta
    # ocp_meta_password: '' # The password of ocp express meta
    # ocp_agent_monitor_password: '' # The password for obagent monitor user
    ocp_meta_tenant: # The config for ocp express meta tenant
      tenant_name: ocp
      max_cpu: 1
      memory_size: 2G
      log_disk_size: 7680M # The recommend value is (4608 + (expect node num + expect tenant num) * 512) M.
  server1:
    # The working directory for OceanBase Database. OceanBase Database is started under this directory. This is a required field.
    home_path: /root/observer
    # The directory for data storage. The default value is $home_path/store.
    # data_dir: /data
    # The directory for clog, ilog, and slog. The default value is the same as the data_dir value.
  server2:
    # The directory for data storage. The default value is $home_path/store.
    # data_dir: /data
    # The directory for clog, ilog, and slog. The default value is the same as the data_dir value.
    # redo_dir: /redo
    zone: zone2
  server3:
    #  The working directory for OceanBase Database. OceanBase Database is started under this directory. This is a required field.
    home_path: /root/observer
    # The directory for data storage. The default value is $home_path/store.
    # data_dir: /data
    # The directory for clog, ilog, and slog. The default value is the same as the data_dir value.
    # redo_dir: /redo
    zone: zone3
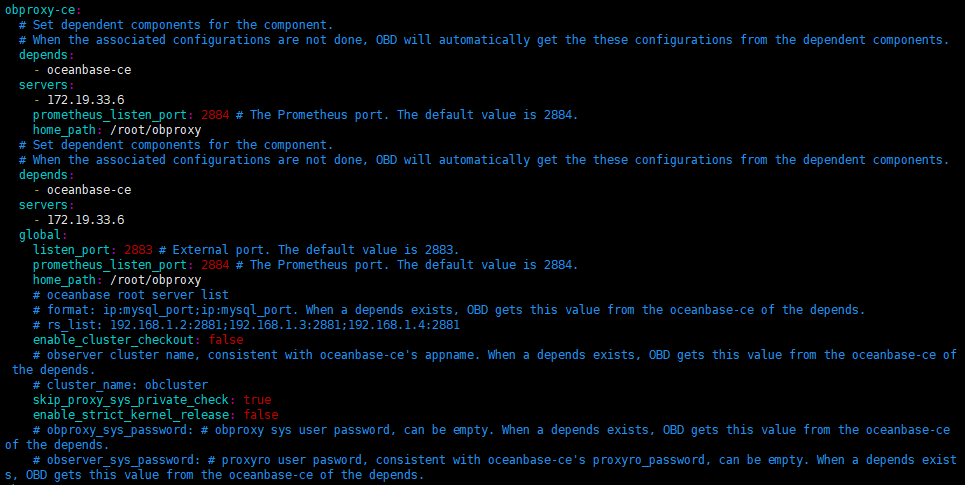
2.2 配置 obproxy-ce 组件并修改 IP 和 home_path。
obproxy-ce:
  # Set dependent components for the component.
  # When the associated configurations are not done, OBD will automatically get the these configurations from the dependent components.
  depends:
    - oceanbase-ce
  servers:
    - 172.19.33.6
    prometheus_listen_port: 2884 # The Prometheus port. The default value is 2884.
    home_path: /root/obproxy
  # Set dependent components for the component.
  # When the associated configurations are not done, OBD will automatically get the these configurations from the dependent components.
  depends:
    - oceanbase-ce
  servers:
    - 172.19.33.6
  global:
    listen_port: 2883 # External port. The default value is 2883.
    prometheus_listen_port: 2884 # The Prometheus port. The default value is 2884.
    home_path: /root/obproxy
    # oceanbase root server list
    # format: ip:mysql_port;ip:mysql_port. When a depends exists, OBD gets this value from the oceanbase-ce of the depends.
    # rs_list: 192.168.1.2:2881;192.168.1.3:2881;192.168.1.4:2881
    enable_cluster_checkout: false
    # observer cluster name, consistent with oceanbase-ce's appname. When a depends exists, OBD gets this value from the oceanbase-ce of the depends.
    # cluster_name: obcluster
    skip_proxy_sys_private_check: true
    enable_strict_kernel_release: false
    # obproxy_sys_password: # obproxy sys user password, can be empty. When a depends exists, OBD gets this value from the oceanbase-ce of the depends.
    # observer_sys_password: # proxyro user pasword, consistent with oceanbase-ce's proxyro_password, can be empty. When a depends exists, OBD gets this value from the oceanbase-ce of the depends.
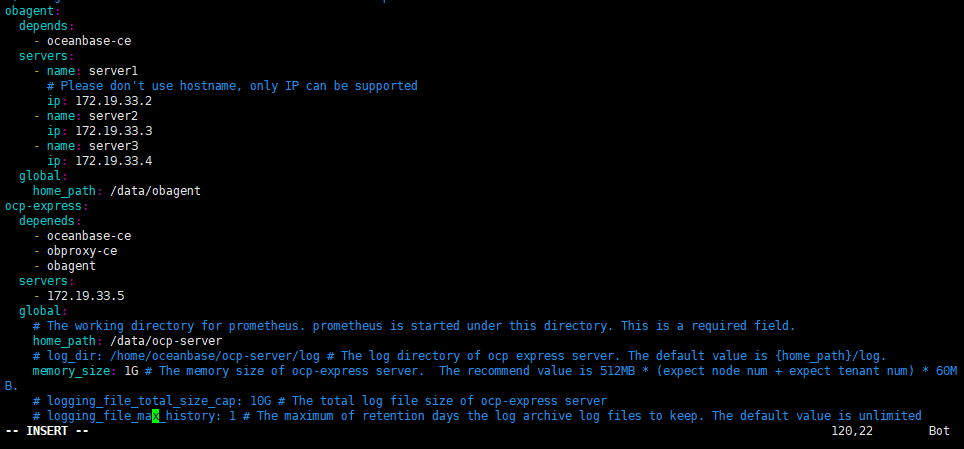
2.3 修改 obagent 和 ocp-express 组件的 IP 和 home_path。
obagent:
depends:
- oceanbase-ce
servers:
- name: server1
# Please don't use hostname, only IP can be supported
ip: 172.19.33.2
- name: server2
ip: 172.19.33.3
- name: server3
ip: 172.19.33.4
global:
home_path: /root/obagent
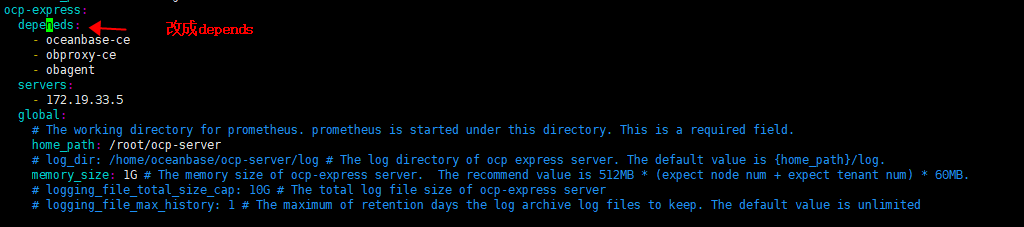
ocp-express:
depeneds:
- oceanbase-ce
- obproxy-ce
- obagent
servers:
- 172.19.33.5
global:
# The working directory for prometheus. prometheus is started under this directory. This is a required field.
home_path: /root/ocp-server
# log_dir: /home/oceanbase/ocp-server/log # The log directory of ocp express server. The default value is {home_path}/log.
memory_size: 1G # The memory size of ocp-express server. The recommend value is 512MB * (expect node num + expect tenant num) * 60MB.
# logging_file_total_size_cap: 10G # The total log file size of ocp-express server
# logging_file_max_history: 1 # The maximum of retention days the log archive log files to keep. The default value is unlimited
步骤三:部署 OceanBase 集群
1、部署 OceanBase 数据库
[root@CAIP131 soft]# obd cluster deploy ob41test -c all-components-min.yaml
Package ocp-express-1.0.0-100000432023032015.el7 is available.
install ocp-express-1.0.0 for local ok
+--------------------------------------------------------------------------------------------+
|                                          Packages                                          |
+--------------+---------+------------------------+------------------------------------------+
| Repository   | Version | Release                | Md5                                      |
+--------------+---------+------------------------+------------------------------------------+
| oceanbase-ce | 4.1.0.0 | 100000192023032010.el7 | 8439ecf8db5e0649bd49671b41ea9e8c85756b63 |
| obproxy-ce   | 4.1.0.0 | 7.el7                  | 2a9d9bf67f179dcca2a8c9e7c77373d94e7e2abe |
| obagent      | 1.3.0   | 22.el7                 | d57fbb4962b2fbecb6282358c59295fdfba4d6ac |
| ocp-express  | 1.0.0   | 100000432023032015.el7 | 42c6fc921063f24f9e1072d75bfa7f21f42146e3 |
+--------------+---------+------------------------+------------------------------------------+
Repository integrity check ok
Parameter check ok
Open ssh connection ok
Cluster status check ok
Initializes observer work home ok
Initializes obproxy work home ok
Initializes obagent work home ok
Initializes ocp-express work home ok
Remote oceanbase-ce-4.1.0.0-100000192023032010.el7-8439ecf8db5e0649bd49671b41ea9e8c85756b63 repository install ok
Remote oceanbase-ce-4.1.0.0-100000192023032010.el7-8439ecf8db5e0649bd49671b41ea9e8c85756b63 repository lib check !!
Remote obproxy-ce-4.1.0.0-7.el7-2a9d9bf67f179dcca2a8c9e7c77373d94e7e2abe repository install ok
Remote obproxy-ce-4.1.0.0-7.el7-2a9d9bf67f179dcca2a8c9e7c77373d94e7e2abe repository lib check ok
Remote obagent-1.3.0-22.el7-d57fbb4962b2fbecb6282358c59295fdfba4d6ac repository install ok
Remote obagent-1.3.0-22.el7-d57fbb4962b2fbecb6282358c59295fdfba4d6ac repository lib check ok
Remote ocp-express-1.0.0-100000432023032015.el7-42c6fc921063f24f9e1072d75bfa7f21f42146e3 repository install ok
Remote ocp-express-1.0.0-100000432023032015.el7-42c6fc921063f24f9e1072d75bfa7f21f42146e3 repository lib check ok
Try to get lib-repository
Remote oceanbase-ce-libs-4.1.0.0-100000192023032010.el7-a83b1dd1cab44d3f610d439931322be7a08555f2 repository install ok
Remote oceanbase-ce-4.1.0.0-100000192023032010.el7-8439ecf8db5e0649bd49671b41ea9e8c85756b63 repository lib check ok
ob41test deployed
Trace ID: ed09399c-f47c-11ed-ac06-0050568197df
If you want to view detailed obd logs, please run: obd display-trace ed09399c-f47c-11ed-ac06-0050568197df
[root@CAIP131 soft]#
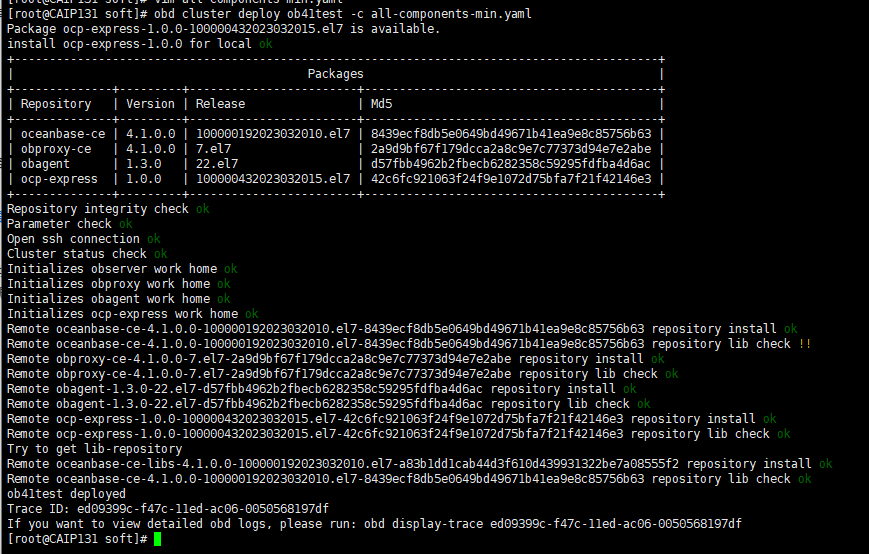
联网情况下,在您执行了 obd cluster deploy 命令之后,OBD 将检查您的目标机器是否有部署所需安装包。如果没有安装包,OBD 将自动从 YUM 源获取。
2、 查看 obtest 集群状态
[root@CAIP131 soft]# obd cluster list
+----------------------------------------------------------+
|                       Cluster List                       |
+----------+-----------------------------+-----------------+
| Name     | Configuration Path          | Status (Cached) |
+----------+-----------------------------+-----------------+
| ob41test | /root/.obd/cluster/ob41test | deployed        |
+----------+-----------------------------+-----------------+
Trace ID: 4dedcee4-f47d-11ed-854c-0050568197df
If you want to view detailed obd logs, please run: obd display-trace 4dedcee4-f47d-11ed-854c-0050568197df
[root@CAIP131 soft]#
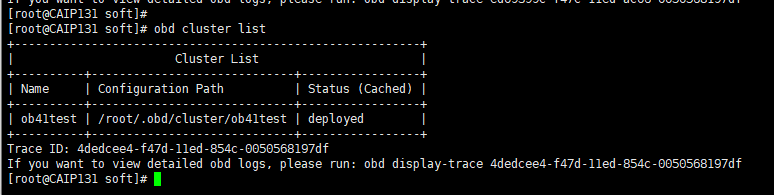
显示 deployed 已经部署,等待启动
3、启动 OceanBase 数据库
[admin@test001 ~]$ obd cluster start obtest
[root@CAIP131 soft]# obd cluster start ob41test
Get local repositories ok
Search plugins ok
Open ssh connection ok
Load cluster param plugin ok
Check before start observer ok
[WARN] OBD-1011: (172.19.33.2) The recommended value of fs.aio-max-nr is 1048576 (Current value: 65536)
[WARN] OBD-1011: (172.19.33.3) The recommended value of fs.aio-max-nr is 1048576 (Current value: 65536)
[WARN] OBD-1011: (172.19.33.4) The recommended value of fs.aio-max-nr is 1048576 (Current value: 65536)

Check before start obproxy ok
Check before start obagent ok
Check before start ocp-express ok
Start observer ok
observer program health check ok
Connect to observer ok
Initialize oceanbase-ce ok
Create tenant ocp ok
Start obproxy ok
obproxy program health check ok
Connect to obproxy ok
Initialize obproxy-ce ok
Start obagent ok
obagent program health check ok
Connect to Obagent ok
Start ocp-express ok
ocp-express program health check ok
Connect to ocp-express ok
Initialize ocp-express ok
Wait for observer init ok
+------------------------------------------------+
|                    observer                    |
+--------------+---------+------+-------+--------+
| ip           | version | port | zone  | status |
+--------------+---------+------+-------+--------+
| 172.19.33.2 | 4.1.0.0 | 2881 | zone1 | ACTIVE |
| 172.19.33.3 | 4.1.0.0 | 2881 | zone2 | ACTIVE |
| 172.19.33.4 | 4.1.0.0 | 2881 | zone3 | ACTIVE |
+--------------+---------+------+-------+--------+
obclient -h172.19.33.2 -P2881 -uroot -p'Caip@2022#' -Doceanbase -A

+------------------------------------------------+
|                    obproxy                     |
+--------------+------+-----------------+--------+
| ip           | port | prometheus_port | status |
+--------------+------+-----------------+--------+
| 172.19.33.5 | 2883 | 2884            | active |
+--------------+------+-----------------+--------+
obclient -h172.19.33.5 -P2883 -uroot -p'Caip@2022#' -Doceanbase -A
+-----------------------------------------------------------------+
|                             obagent                             |
+--------------+--------------------+--------------------+--------+
| ip           | mgragent_http_port | monagent_http_port | status |
+--------------+--------------------+--------------------+--------+
| 172.19.33.2 | 8089               | 8088               | active |
| 172.19.33.3 | 8089               | 8088               | active |
| 172.19.33.4 | 8089               | 8088               | active |
+--------------+--------------------+--------------------+--------+
+-----------------------------------------------------------------+
|                           ocp-express                           |
+--------------------------+----------+------------------+--------+
| url                      | username | default_password | status |
+--------------------------+----------+------------------+--------+
| http://172.19.33.5:8180 | admin    | oceanbase        | active |
+--------------------------+----------+------------------+--------+
ob41test running
Trace ID: ca83b676-f554-11ed-9445-0050568197df
If you want to view detailed obd logs, please run: obd display-trace ca83b676-f554-11ed-9445-0050568197df
[root@CAIP131 soft]#

当安装了 OCP Express 时,会输出 OCP Express 的访问地址。在阿里云或其他云环境下,安装程序可能因无法获取公网 IP 而输出内网地址,此 IP 非公网地址,您需要使用正确的地址。
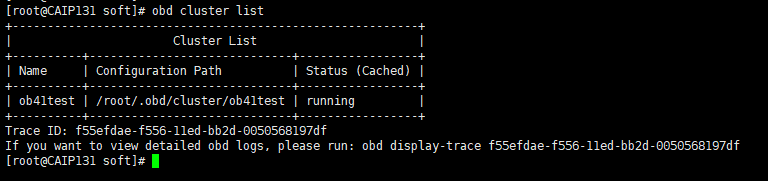
4、再次查看 OceanBase 集群状态
4.1 查看 OBD 管理的集群列表
[root@CAIP131 soft]# obd cluster list
+----------------------------------------------------------+
|                       Cluster List                       |
+----------+-----------------------------+-----------------+
| Name     | Configuration Path          | Status (Cached) |
+----------+-----------------------------+-----------------+
| ob41test | /root/.obd/cluster/ob41test | running         |
+----------+-----------------------------+-----------------+
Trace ID: f55efdae-f556-11ed-bb2d-0050568197df
If you want to view detailed obd logs, please run: obd display-trace f55efdae-f556-11ed-bb2d-0050568197df
[root@CAIP131 soft]#
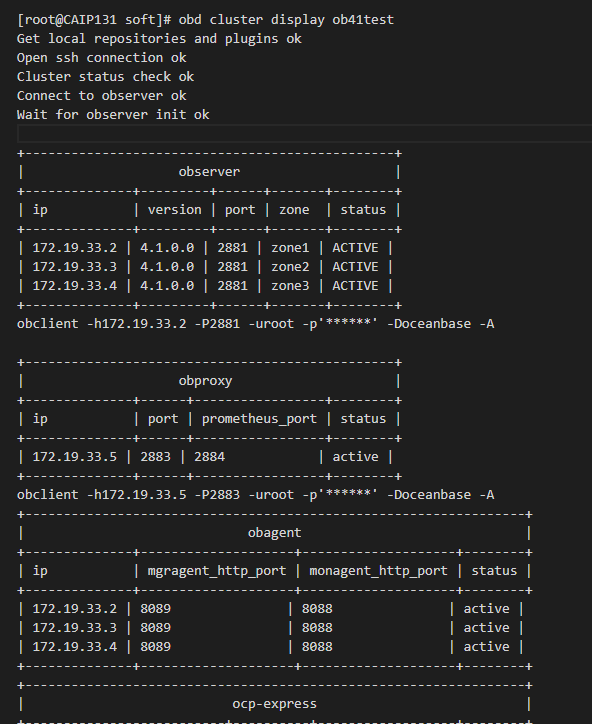
4.2 查看 ob41test 集群状态
[root@CAIP131 soft]# obd cluster display ob41test
Get local repositories and plugins ok
Open ssh connection ok
Cluster status check ok
Connect to observer ok
Wait for observer init ok

+------------------------------------------------+
|                    observer                    |
+--------------+---------+------+-------+--------+
| ip           | version | port | zone  | status |
+--------------+---------+------+-------+--------+
| 172.19.33.2 | 4.1.0.0 | 2881 | zone1 | ACTIVE |
| 172.19.33.3 | 4.1.0.0 | 2881 | zone2 | ACTIVE |
| 172.19.33.4 | 4.1.0.0 | 2881 | zone3 | ACTIVE |
+--------------+---------+------+-------+--------+
obclient -h172.19.33.2 -P2881 -uroot -p'******' -Doceanbase -A

+------------------------------------------------+
|                    obproxy                     |
+--------------+------+-----------------+--------+
| ip           | port | prometheus_port | status |
+--------------+------+-----------------+--------+
| 172.19.33.5 | 2883 | 2884            | active |
+--------------+------+-----------------+--------+
obclient -h172.19.33.5 -P2883 -uroot -p'******' -Doceanbase -A
+-----------------------------------------------------------------+
|                             obagent                             |
+--------------+--------------------+--------------------+--------+
| ip           | mgragent_http_port | monagent_http_port | status |
+--------------+--------------------+--------------------+--------+
| 172.19.33.2 | 8089               | 8088               | active |
| 172.19.33.3 | 8089               | 8088               | active |
| 172.19.33.4 | 8089               | 8088               | active |
+--------------+--------------------+--------------------+--------+
+-----------------------------------------------------------------+
|                           ocp-express                           |
+--------------------------+----------+------------------+--------+
| url                      | username | default_password | status |
+--------------------------+----------+------------------+--------+
| http://172.19.33.5:8180 | admin    | oceanbase        | active |
+--------------------------+----------+------------------+--------+
ob41test running
步骤四:连接 OceanBase 数据库
1、使用 OBClient 客户端连接 OceanBase 数据库:
obclient -h
[root@CAIP131 soft]# obclient -h172.19.33.2 -P2881 -uroot@sys -p
Enter password:
Welcome to the OceanBase.  Commands end with ; or \g.
Your OceanBase connection id is 3221728727
Server version: OceanBase_CE 4.1.0.0 (r100000192023032010-0265dfc6d00ff4f0ff4ad2710504a18962abaef6) (Built Mar 20 2023 10:12:57)

Copyright (c) 2000, 2018, OceanBase and/or its affiliates. All rights reserved.

Type 'help;' or '\h' for help. Type '\c' to clear the current input statement.

obclient [(none)]>
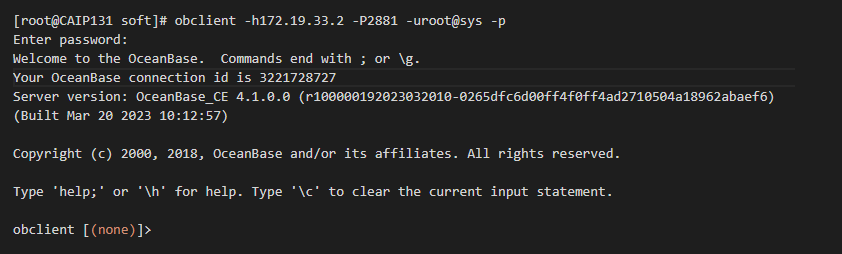
其中,IP 为 OBServer 节点的 IP 地址;PORT 为连接 OceanBase 数据库的的端口,直连时为 mysql_port 配置项的值,通过 ODP 连接时为 listen_port 配置项的值。
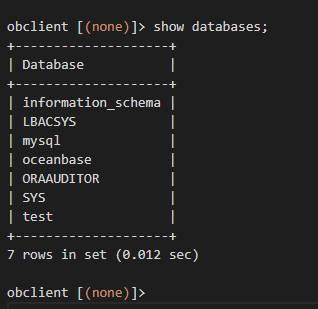
obclient [(none)]> show databases;
+--------------------+
| Database           |
+--------------------+
| information_schema |
| LBACSYS            |
| mysql              |
| oceanbase          |
| ORAAUDITOR         |
| SYS                |
| test               |
+--------------------+
7 rows in set (0.012 sec)

obclient [(none)]>
当通过 ODP 连接并且 OBClient 使用版本为 V2.2.1 时,上述连接命令需要加上 --proxy-mode 参数。
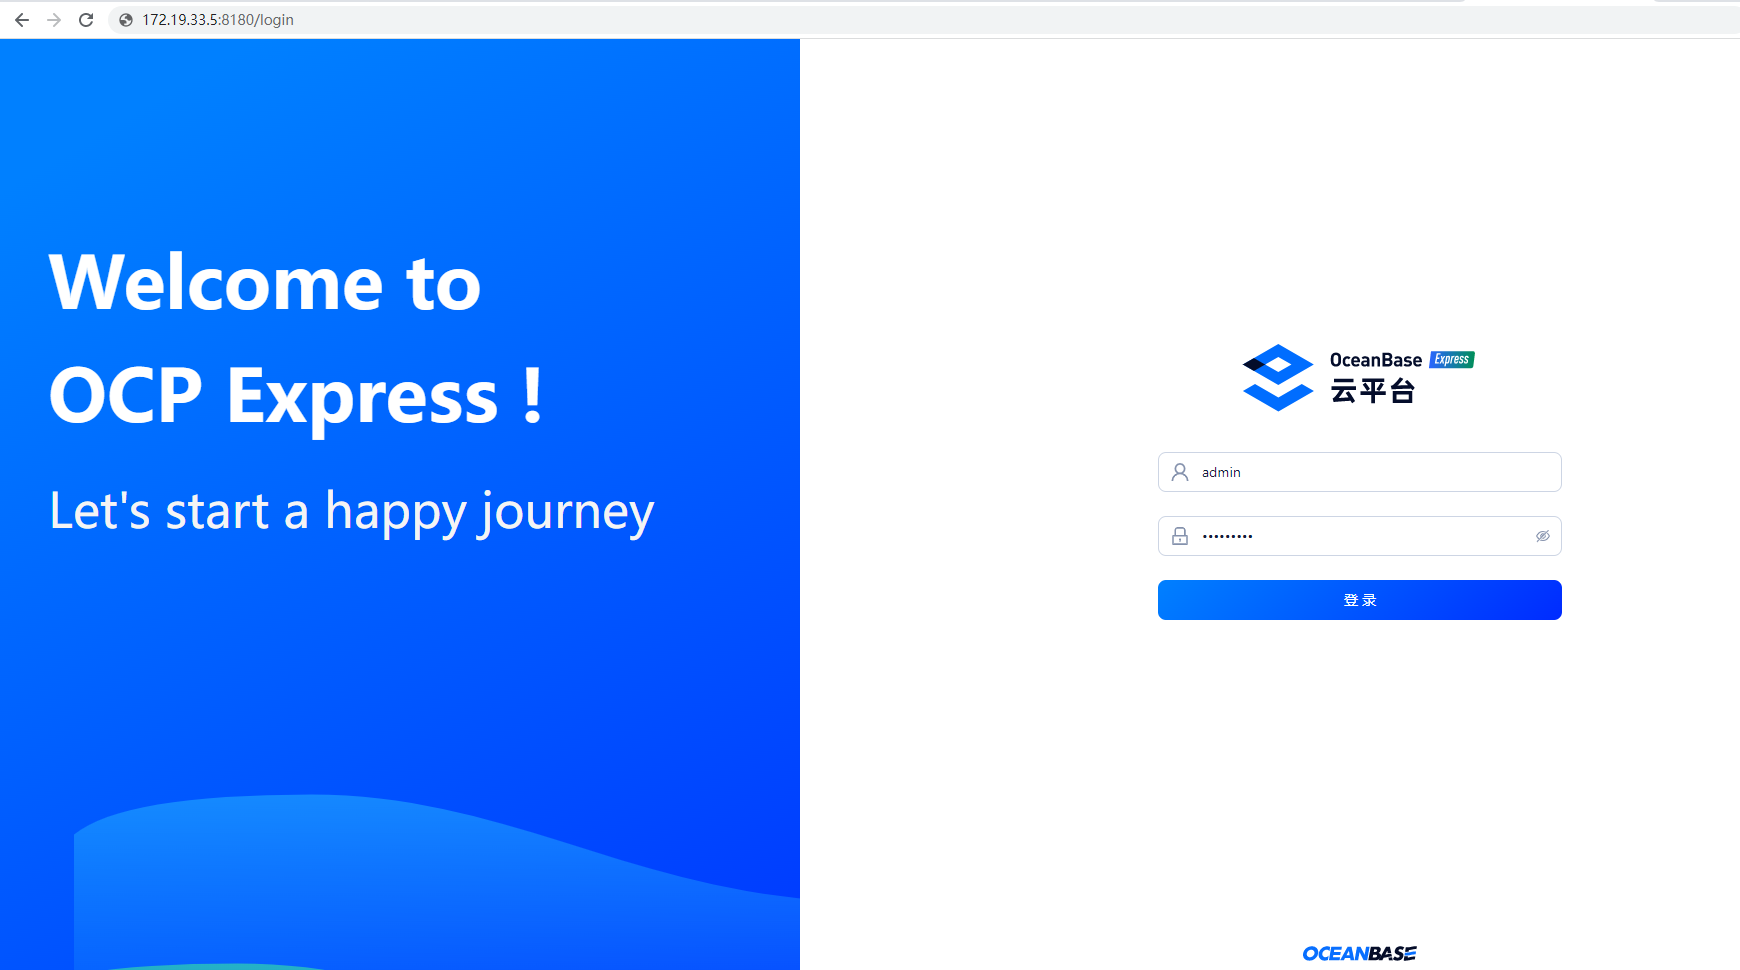
2、使用 ocp-express 客户端连接 OceanBase 数据库:
步骤五:创建用户租户
部署 OceanBase 集群之后,建议创建用户租户进行业务操作。sys 租户仅做集群管理使用,不适合在业务场景中使用。
您可以使用如下两种方法创建用户租户:
1、使用 OBD 黑屏创建用户租户。
obd cluster tenant create
[root@CAIP131 soft]# obd cluster tenant create ob41test 41tenant
Get local repositories and plugins ok
Open ssh connection ok
Connect to observer ok
Create tenant test ok
Trace ID: 4ab1c236-f558-11ed-9ed4-0050568197df
If you want to view detailed obd logs, please run: obd display-trace 4ab1c236-f558-11ed-9ed4-0050568197df
[root@CAIP131 soft]#

命令详细使用方法请参考 OBD 手册 集群命令组 中 obd cluster tenant create 命令。
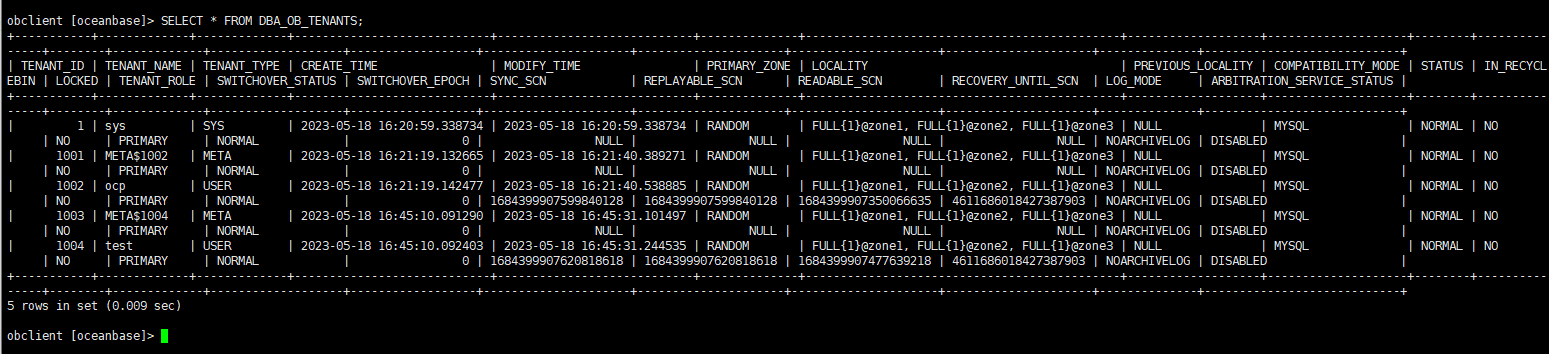
2、obclient 黑屏查看所有租户
obclient [oceanbase]> SELECT * FROM DBA_OB_TENANTS;
+-----------+-------------+-------------+----------------------------+----------------------------+--------------+---------------------------------------------+-------------------+--------------------+--------+---------------+--------+-------------+-------------------+------------------+---------------------+---------------------+---------------------+---------------------+--------------+----------------------------+
| TENANT_ID | TENANT_NAME | TENANT_TYPE | CREATE_TIME                | MODIFY_TIME                | PRIMARY_ZONE | LOCALITY                                    | PREVIOUS_LOCALITY | COMPATIBILITY_MODE | STATUS | IN_RECYCLEBIN | LOCKED | TENANT_ROLE | SWITCHOVER_STATUS | SWITCHOVER_EPOCH | SYNC_SCN            | REPLAYABLE_SCN      | READABLE_SCN        | RECOVERY_UNTIL_SCN  | LOG_MODE     | ARBITRATION_SERVICE_STATUS |
+-----------+-------------+-------------+----------------------------+----------------------------+--------------+---------------------------------------------+-------------------+--------------------+--------+---------------+--------+-------------+-------------------+------------------+---------------------+---------------------+---------------------+---------------------+--------------+----------------------------+
|         1 | sys         | SYS         | 2023-05-18 16:20:59.338734 | 2023-05-18 16:20:59.338734 | RANDOM       | FULL{1}@zone1, FULL{1}@zone2, FULL{1}@zone3 | NULL              | MYSQL              | NORMAL | NO            | NO     | PRIMARY     | NORMAL            |                0 |                NULL |                NULL |                NULL |                NULL | NOARCHIVELOG | DISABLED                   |
|      1001 | META$1002   | META        | 2023-05-18 16:21:19.132665 | 2023-05-18 16:21:40.389271 | RANDOM       | FULL{1}@zone1, FULL{1}@zone2, FULL{1}@zone3 | NULL              | MYSQL              | NORMAL | NO            | NO     | PRIMARY     | NORMAL            |                0 |                NULL |                NULL |                NULL |                NULL | NOARCHIVELOG | DISABLED                   |
|      1002 | ocp         | USER        | 2023-05-18 16:21:19.142477 | 2023-05-18 16:21:40.538885 | RANDOM       | FULL{1}@zone1, FULL{1}@zone2, FULL{1}@zone3 | NULL              | MYSQL              | NORMAL | NO            | NO     | PRIMARY     | NORMAL            |                0 | 1684399907599840128 | 1684399907599840128 | 1684399907350066635 | 4611686018427387903 | NOARCHIVELOG | DISABLED                   |
|      1003 | META$1004   | META        | 2023-05-18 16:45:10.091290 | 2023-05-18 16:45:31.101497 | RANDOM       | FULL{1}@zone1, FULL{1}@zone2, FULL{1}@zone3 | NULL              | MYSQL              | NORMAL | NO            | NO     | PRIMARY     | NORMAL            |                0 |                NULL |                NULL |                NULL |                NULL | NOARCHIVELOG | DISABLED                   |
|      1004 | test        | USER        | 2023-05-18 16:45:10.092403 | 2023-05-18 16:45:31.244535 | RANDOM       | FULL{1}@zone1, FULL{1}@zone2, FULL{1}@zone3 | NULL              | MYSQL              | NORMAL | NO            | NO     | PRIMARY     | NORMAL            |                0 | 1684399907620818618 | 1684399907620818618 | 1684399907477639218 | 4611686018427387903 | NOARCHIVELOG | DISABLED                   |
+-----------+-------------+-------------+----------------------------+----------------------------+--------------+---------------------------------------------+-------------------+--------------------+--------+---------------+--------+-------------+-------------------+------------------+---------------------+---------------------+---------------------+---------------------+--------------+----------------------------+
5 rows in set (0.009 sec)

obclient [oceanbase]>
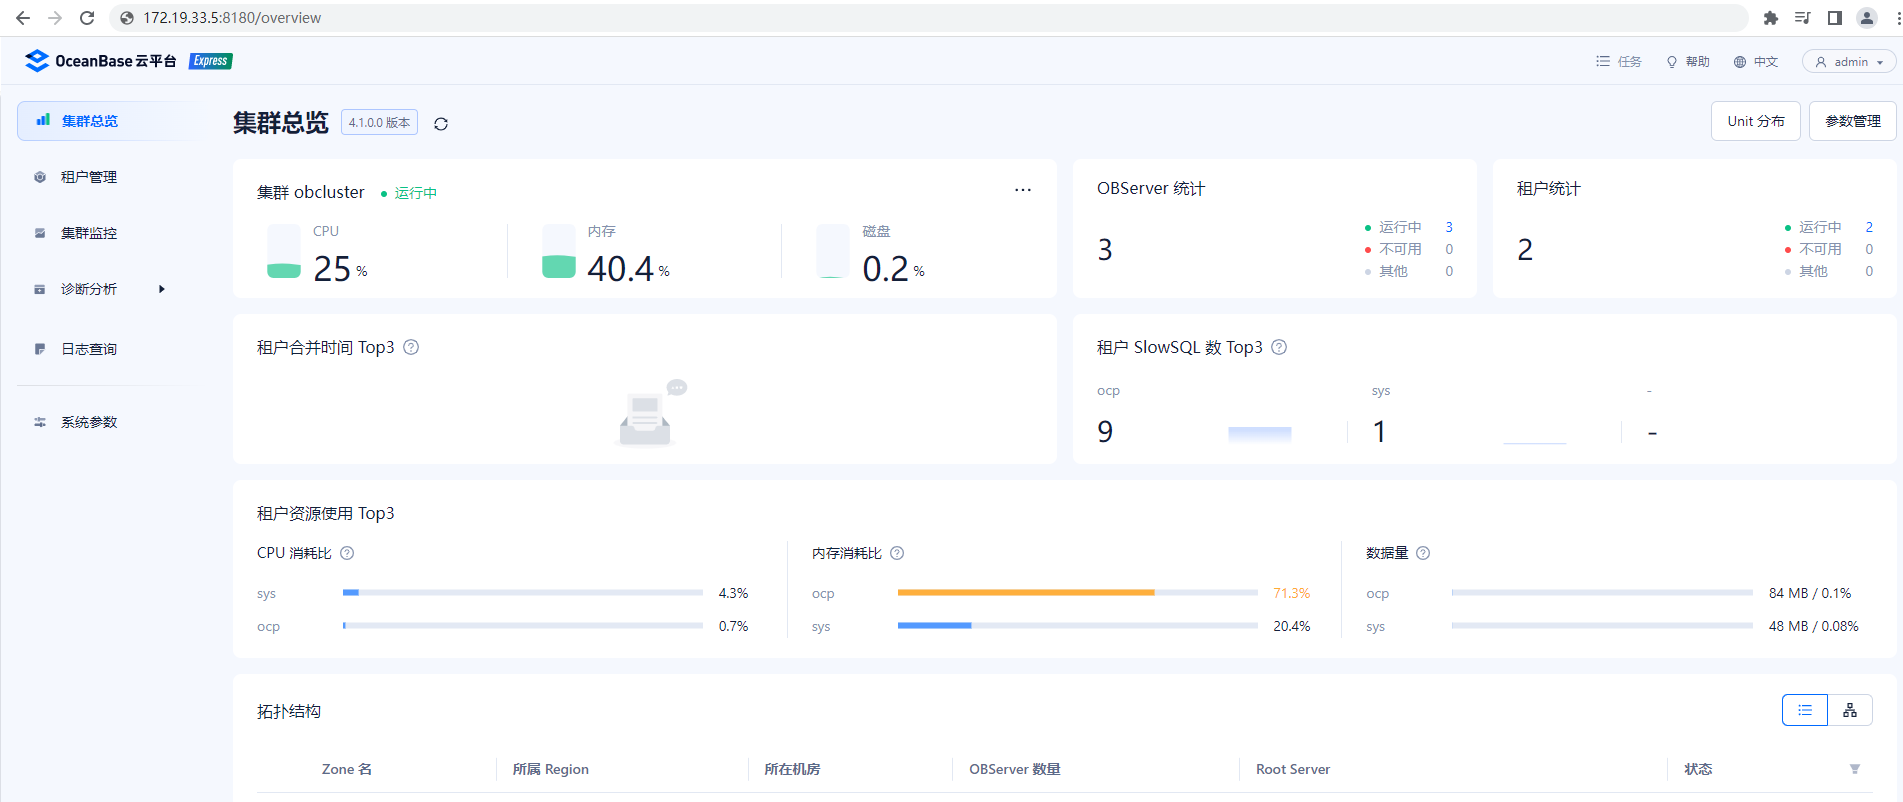
3、OCP Express 白屏查看所有租户
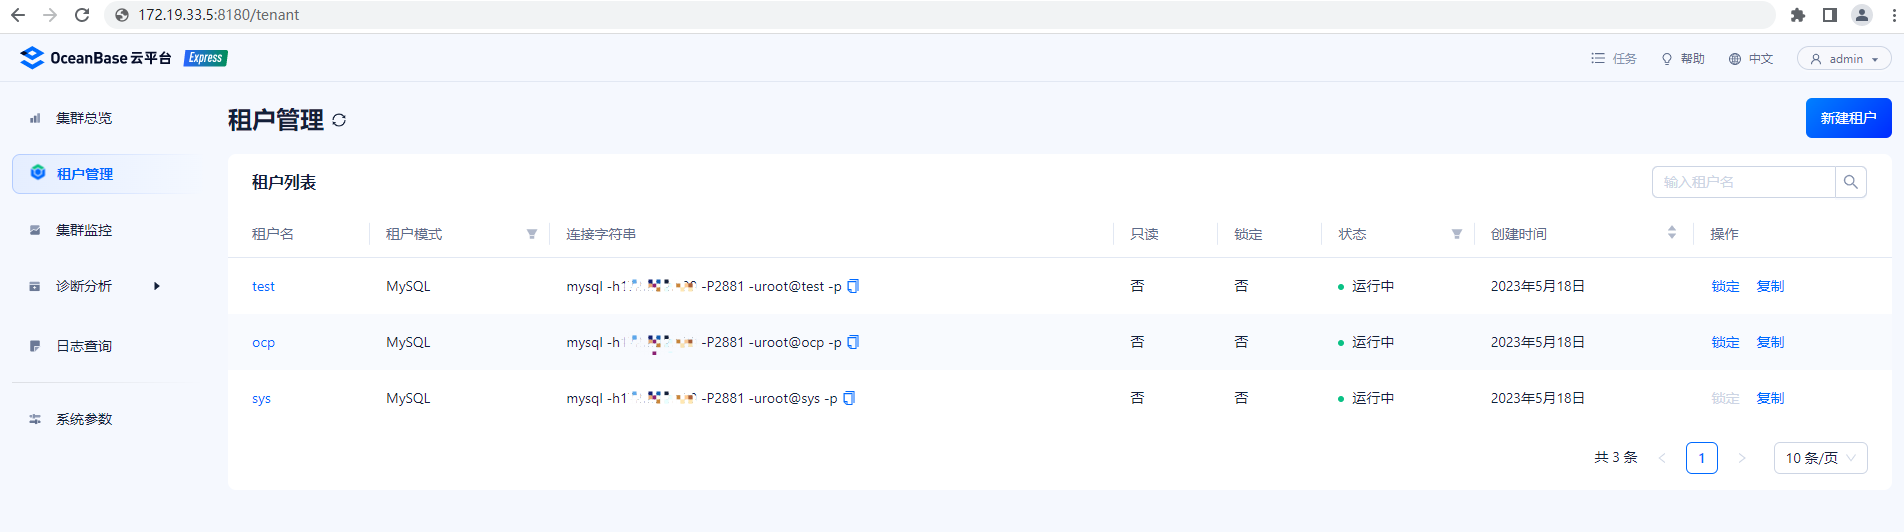
遇到的报错问题处理
1、端口重复,8089 port is already used
[root@CAIP131 soft]# obd cluster start ob41test
Get local repositories ok
Search plugins ok
Open ssh connection ok
Load cluster param plugin ok
Check before start observer ok
[WARN] OBD-1011: (172.19.33.2) The recommended value of fs.aio-max-nr is 1048576 (Current value: 65536)
[WARN] OBD-1012: (172.19.33.2) clog and data use the same disk (/data)
[WARN] OBD-1011: (172.19.33.3) The recommended value of fs.aio-max-nr is 1048576 (Current value: 65536)
[WARN] OBD-1012: (172.19.33.3) clog and data use the same disk (/data)
[WARN] OBD-1011: (172.19.33.4) The recommended value of fs.aio-max-nr is 1048576 (Current value: 65536)
[WARN] OBD-1012: (172.19.33.4) clog and data use the same disk (/data)

Check before start obproxy ok
Check before start obagent x
[ERROR] OBD-1001: 172.19.33.3:8089 port is already used

修改或更换端口就可以了
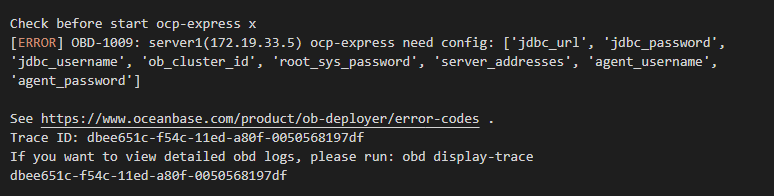
2、报错没有正确配置ocp
Check before start ocp-express x
[ERROR] OBD-1009: server1(172.19.33.5) ocp-express need config: ['jdbc_url', 'jdbc_password', 'jdbc_username', 'ob_cluster_id', 'root_sys_password', 'server_addresses', 'agent_username', 'agent_password']

See https://www.oceanbase.com/product/ob-deployer/error-codes .
Trace ID: dbee651c-f54c-11ed-a80f-0050568197df
If you want to view detailed obd logs, please run: obd display-trace dbee651c-f54c-11ed-a80f-0050568197df
解决,配置文件未开启,开启配置文件
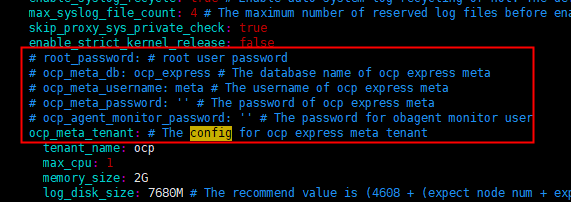
还是报错 ocp-express 脚本项错 depeneds
解决,应该写成depends,这个官方文档有误,部署产生的配置文件也有误,大家部署时记得修改