


大家好,我是小寒。
加载数据集
import pandas as pd
real_news=pd.read_csv('True.csv')
fake_news=pd.read_csv('Fake.csv')
real_news

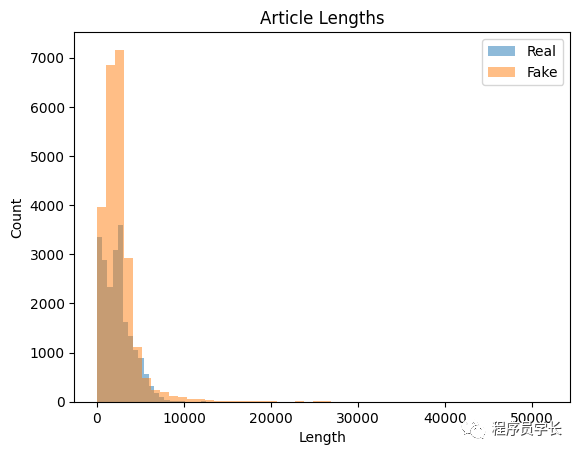
在开始训练模型之前,我们需要进行一些「探索性数据分析」以了解数据。
import matplotlib.pyplot as plt
real_lengths = real_news['text'].apply(len)
fake_lengths = fake_news['text'].apply(len)

plt.hist(real_lengths, bins=50, alpha=0.5, label='Real')
plt.hist(fake_lengths, bins=50, alpha=0.5, label='Fake')
plt.title('Article Lengths')
plt.xlabel('Length')
plt.ylabel('Count')
plt.legend()
plt.show()
from collections import Counter
import nltk
#downloading stopwords and punkt
nltk.download('stopwords')
nltk.download('punkt')

def get_most_common_words(texts, num_words=10):
    all_words = []
    for text in texts:
        all_words.extend(nltk.word_tokenize(text.lower()))
    stop_words = set(nltk.corpus.stopwords.words('english'))
    words = [word for word in all_words if word.isalpha() and word not in stop_words]
    word_counts = Counter(words)
    return word_counts.most_common(num_words)

real_words = get_most_common_words(real_news['text'])
fake_words = get_most_common_words(fake_news['text'])

print('Real News:', real_words)
print('Fake News:', fake_words)
Real News: [('said', 99036), ('trump', 54249), ('would', 31526), ('reuters', 28412), ('president', 26397), ('state', 19728), ('government', 18288), ('new', 16784), ('house', 16519), ('states', 16515)]
Fake News: [('trump', 74240), ('said', 31149), ('people', 26012), ('president', 25770), ('would', 23461), ('one', 22994), ('clinton', 18085), ('obama', 17920), ('like', 17660), ('donald', 17235)]
文本预处理
1、小写文本
2、删除标点符号和数字
3、删除停用词
4、对文本进行词干化或词形还原
词干提取和词形还原是将单词简化为基本形式的常用技术。
「词干提取和词形还原都可以降低文本数据的维度,使模型更容易分析。」
from nltk.corpus import stopwords
from nltk.tokenize import word_tokenize
from nltk.stem import PorterStemmer, WordNetLemmatizer
import string

nltk.download('wordnet')

stop_words = set(stopwords.words('english'))
stemmer = PorterStemmer()
lemmatizer = WordNetLemmatizer()

def preprocess_text(text):
    # Lowercase the text
    text = text.lower()

    # Remove punctuation and digits
    text = text.translate(str.maketrans('', '', string.punctuation + string.digits))

    # Tokenize the text
    words = word_tokenize(text)

    # Remove stop words
    words = [word for word in words if word not in stop_words]

    # Stem or lemmatize the words
    words = [stemmer.stem(word) for word in words]

        # Join the words back into a string
    text = ' '.join(words)

    return text
我们现在可以将此预处理函数应用于我们数据集中的每篇文章:
real_news['text'] = real_news['text'].apply(preprocess_text)
fake_news['text'] = fake_news['text'].apply(preprocess_text)
模型训练
既然我们已经预处理了文本数据,就可以训练我们的模型了。
GloVe 是另一种学习单词向量表示的方法,它结合了 TF-IDF 和 Word2Vec 的优点。
每种方法都有其优点和缺点,方法的选择取决于手头的问题和数据集。
from sklearn.feature_extraction.text import CountVectorizer
import scipy.sparse as sp
import numpy as np

vectorizer = CountVectorizer()
X_real = vectorizer.fit_transform(real_news['text'])
X_fake = vectorizer.transform(fake_news['text'])

X = sp.vstack([X_real, X_fake])
y = np.concatenate([np.ones(X_real.shape[0]), np.zeros(X_fake.shape[0])])
在这里,我们首先创建一个 「CountVectorizer」 对象并将其拟合到真实新闻数据集中的预处理文本。然后我们使用相同的向量化器来转换假新闻数据集中的预处理文本。然后,我们垂直堆叠两个数据集的特征矩阵,并创建相应的标签向量 y。
from sklearn.model_selection import train_test_split

X_train, X_test, y_train, y_test = train_test_split(X, y, test_size=0.2, random_state=42)
我们现在可以使用逻辑回归分类器训练我们的模型:
from sklearn.linear_model import LogisticRegression

clf = LogisticRegression(random_state=42)
clf.fit(X_train, y_train)
模型评估
from sklearn.metrics import accuracy_score, precision_score, recall_score, f1_score

y_pred = clf.predict(X_test)

accuracy = accuracy_score(y_test, y_pred)
precision = precision_score(y_test, y_pred)
recall = recall_score(y_test, y_pred)
f1 = f1_score(y_test, y_pred)

print('Accuracy:', accuracy)
print('Precision:', precision)
print('Recall:', recall)
print('F1 Score:', f1)
输出:
Accuracy: 0.994988864142539
Precision: 0.9935498733010827
Recall: 0.9960739030023095
F1 Score: 0.9948102871641102
我们的数据集达到了 99% 以上的测试准确率,表明该模型可以准确地将新闻文章分类为真假。
改进模型
特征工程:我们可以使用更高级的文本表示,例如词嵌入或主题模型,而不是使用词袋方法,这可能会捕获词之间更细微的关系。 超参数调整:我们可以使用网格搜索或随机搜索等方法调整逻辑回归模型的超参数,以找到数据集的最佳参数集。
from sklearn.naive_bayes import MultinomialNB
from sklearn.linear_model import LogisticRegression
from sklearn.svm import SVC
# Define a function to train and evaluate a model
def train_and_evaluate_model(model, X_train, y_train, X_test, y_test):
    # Train the model on the training data
    model.fit(X_train, y_train)

    # Predict the labels for the testing data
    y_pred = model.predict(X_test)

    # Evaluate the model
    accuracy = accuracy_score(y_test, y_pred)
    precision = precision_score(y_test, y_pred, average='weighted')
    recall = recall_score(y_test, y_pred, average='weighted')
    f1 = f1_score(y_test, y_pred, average='weighted')

    # Print the evaluation metrics
    print(f"Accuracy: {accuracy:.4f}")
    print(f"Precision: {precision:.4f}")
    print(f"Recall: {recall:.4f}")
    print(f"F1-score: {f1:.4f}")
# Train and evaluate a Multinomial Naive Bayes model
print("Training and evaluating Multinomial Naive Bayes model...")
nb = MultinomialNB()
train_and_evaluate_model(nb, X_train, y_train, X_test, y_test)
print()

# Train and evaluate a Support Vector Machine model
print("Training and evaluating Support Vector Machine model...")
svm = SVC()
train_and_evaluate_model(svm,  X_train, y_train, X_test, y_test)
输出:
Training and evaluating Multinomial Naive Bayes model...
Accuracy: 0.9422
Precision: 0.9422
Recall: 0.9422
F1-score: 0.9422

Training and evaluating Support Vector Machine model...
Accuracy: 0.9919
Precision: 0.9919
Recall: 0.9919
F1-score: 0.9919
下面使用 GridSearchCV 调整超参数。
from sklearn.model_selection import GridSearchCV

# Define a list of hyperparameters to search over
hyperparameters = {
    'penalty': ['l1', 'l2'],
    'C': [0.1, 1]
}

# Perform grid search to find the best hyperparameters
grid_search = GridSearchCV(LogisticRegression(), hyperparameters, cv=5)
grid_search.fit(X_train, y_train)

# Print the best hyperparameters and test accuracy
print('Best hyperparameters:', grid_search.best_params_)
print('Test accuracy:', grid_search.score(X_test, y_test))
输出:
Best hyperparameters: {'C': 1, 'penalty': 'l2'}
Test accuracy: 0.994988864142539
保存我们的模型:
from joblib import dump
dump(clf, 'model.joblib')
dump(vectorizer, 'vectorizer.joblib')
模型部署
最后,我们可以使用 Flask 框架将我们的模型部署为 Web 应用程序。
from flask import Flask, request, render_template
from joblib import load
from nltk.corpus import stopwords
from nltk.tokenize import word_tokenize
from nltk.stem import PorterStemmer, WordNetLemmatizer
import string

stop_words = set(stopwords.words('english'))
stemmer = PorterStemmer()
lemmatizer = WordNetLemmatizer()

clf = load('model.joblib')
vectorizer = load('vectorizer.joblib')

def preprocess_text(text):
    # Lowercase the text
    text = text.lower()

    # Remove punctuation and digits
    text = text.translate(str.maketrans('', '', string.punctuation + string.digits))

    # Tokenize the text
    words = word_tokenize(text)

    # Remove stop words
    words = [word for word in words if word not in stop_words]

    # Stem or lemmatize the words
    words = [stemmer.stem(word) for word in words]

        # Join the words back into a string
    text = ' '.join(words)

    return text


app = Flask(__name__)

@app.route('/')
def home():
    return render_template('home.html')

@app.route('/predict', methods=['POST'])
def predict():
    text = request.form['text']
    preprocessed_text = preprocess_text(text)
    X = vectorizer.transform([preprocessed_text])
    y_pred = clf.predict(X)
    if y_pred[0]== 1:
        result = 'real'
    else:
        result = 'fake'
    return render_template('result.html', result=result, text=text)

if __name__ == '__main__':
    app.run(debug=True)
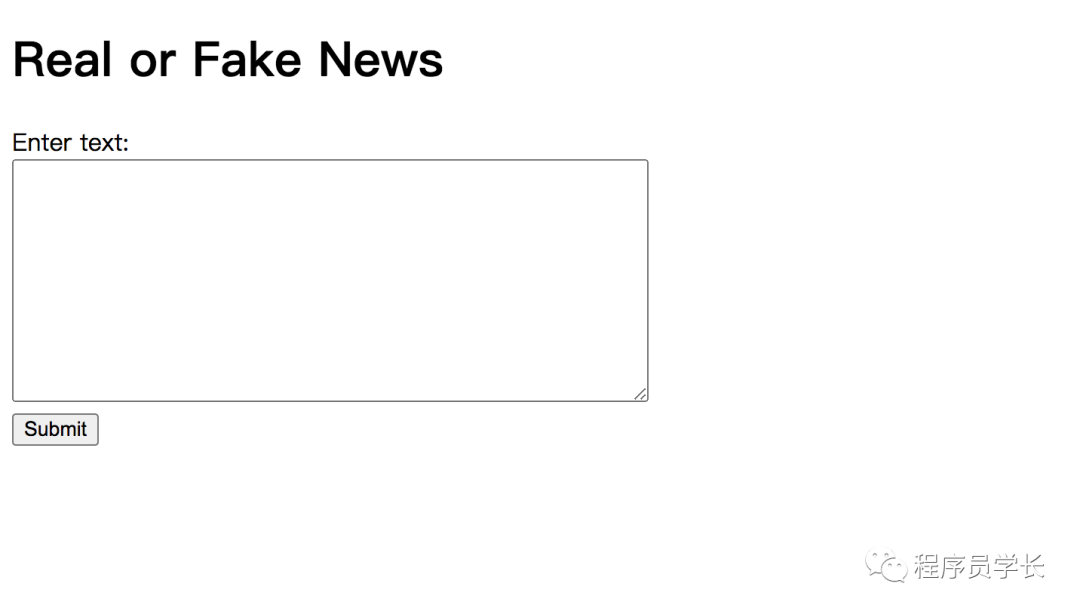
我们可以将上面的代码保存在名为 “app.py” 的文件中。我们还需要创建两个 HTML 模板,“home.html” 和 “result.html”。
「home.html」
<!DOCTYPE html>
<html>
<head>
    <title>Real or Fake News</title>
</head>
<body>
    <h1>Real or Fake News</h1>
    <form action="/predict" method="post">
        <label for="text">Enter text:</label><br>
        <textarea name="text" rows="10" cols="50"></textarea><br>
        <input type="submit" value="Submit">
    </form>
</body>
</html>
「result.html」
<!DOCTYPE html>
<html>
<head>
    <title>Real or Fake News</title>
</head>
<body>
    <h1>Real or Fake News</h1>
    <p>The text you entered:</p>
    <p>{{ text }}</p>
    <p>The model predicts that this text is:</p>
    <p>{{ result }}</p>
</body>
</html>
该应用程序应该可以通过 http://127.0.0.1:5000/ 访问。
最后
—
「进群方式:加我微信,备注 “python”」

往期回顾

如果对本文有疑问可以加作者微信直接交流。进技术交流群的可以拉你进群。

文章转载自程序员学长,如果涉嫌侵权,请发送邮件至:contact@modb.pro进行举报,并提供相关证据,一经查实,墨天轮将立刻删除相关内容。
