大家好,我是小寒。
自从 OpenAI 推出 ChatGPT 以来,互联网一直没有停止对技术或人类未来的猜测。
ChatGPT 已成为一种革命性产品,有可能影响人类工作的几乎所有领域。
对于开发人员来说,集成这些 API 代表着创新的新前沿。
Gradio 基础介绍
Gradio 是一个用 Python 编写的开源工具。
Gradio 为机器学习开发人员提供了一种方便的方式来共享他们的模型。
为了构建 Web 应用程序,你需要熟悉 Gradio 的基本构建块。
「Gradio 允许你以两种方式设计 Web 应用程序:Interface 和 Block。」
Interface
它是一个高级类,可让你使用几行代码构建组件。
你可以为文本、图像、音频和视频构建输入/输出组件。
这具有较低的设计灵活性。
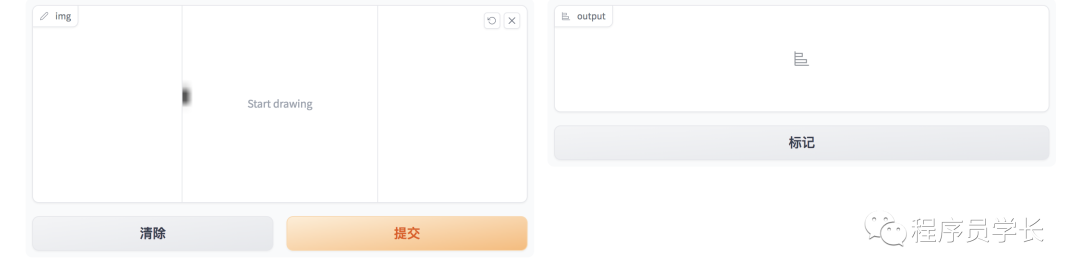
「Gradio 界面的一个简单示例。」
import gradio as gr
def sketch_recognition(img):
    pass# Implement your sketch recognition model here...

gr.Interface(fn=sketch_recognition, inputs="sketchpad", outputs="label").launch()
Block
Gradio Block 提供了一种更底层的构建界面的方法。
「随着灵活性的提高,这使开发人员可以更深入地构建复杂的 Web 界面。」
Block 具有高级功能,「可让你将组件灵活地放置在屏幕上的任何位置、改进的数据流控制以及用于交互式用户体验的事件处理程序。」
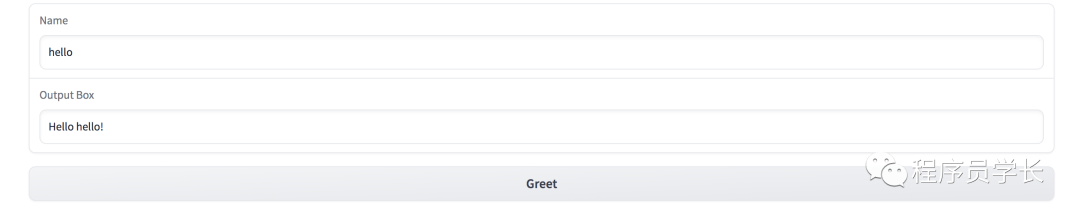
import gradio as gr

def greet(name):
    return"Hello " + name + "!"

with gr.Blocks() as demo:
    name = gr.Textbox(label="Name")
    output = gr.Textbox(label="Output Box")
    greet_btn = gr.Button("Greet")
    greet_btn.click(fn=greet, inputs=name, outputs=output, api_name="greet")

demo.launch()
获取 OpenAI 的 api key
在构建聊天界面之前,我们需要访问 OpenAI API .
让我们看一下 OpenAI API 的请求和响应结构。
import openai
openai.ChatCompletion.create(
  model="gpt-3.5-turbo",
  messages=[
        {"role": "system", "content": "You are a helpful assistant."},
        {"role": "user", "content": "Who won the world series in 2020?"},
        {"role": "assistant", "content": "The Los Angeles Dodgers won the World Series in 2020."},
        {"role": "user", "content": "Where was it played?"}
    ]
)
预先配置系统角色为模型以特定方式运行提供一些上下文。 用户角色存储用户提示 助理角色保存来自模型的响应。
而这个消息列表负责维护对话的上下文。
{
 'id': 'chatcmpl-6p9XYPYSTTRi0xEviKjjilqrWU2Ve',
 'object': 'chat.completion',
 'created': 1677649420,
 'model': 'gpt-3.5-turbo',
 'usage': {'prompt_tokens': 56, 'completion_tokens': 31, 'total_tokens': 87},
 'choices': [
   {
    'message': {
      'role': 'assistant',
      'content': 'The 2020 World Series was played in Arlington, Texas at the Globe Life Field.'},
    'finish_reason': 'stop',
    'index': 0
   }
  ]
}
构建 ChatGPT 聊天机器人
应用前端
with gr.Blocks() as demo:
    chatbot = gr.Chatbot(value=[], elem_id="chatbot").style(height=650)

现在,我们需要一个文本框以便传递提示。
Gradio 具有 Row 和 Column 类,可让您垂直和水平添加组件。
with gr.Row():
      with gr.Column(scale=0.85):
          txt = gr.Textbox(
                show_label=False,
                placeholder="Enter text and press enter",
                ).style(container=False)

使用 gr.Row() 容器,我们创建了一个布局块。这会为其他组件创建一行,使其水平放置在一行中。
在第 2 行中,我们使用 gr.Column() 在前一个容器中创建了另一个布局块。与 Row 不同的是,它垂直堆叠其他组件或块。
在列容器内,我们定义了一个文本框组件。这将接受用户的任何文本输入。我们可以配置一些参数以使其更加用户友好。
列容器内的 scale 参数对里面的组件进行缩放。值为 0.85 表示它将在单行中占据屏幕的 85%。
如果你希望添加任何其他组件,你可以使用 Row 和 Column 容器的组合来添加它们。
with gr.Blocks() as demo:
    radio = gr.Radio(value='gpt-3.5-turbo', choices=['gpt-3.5-turbo','gpt-4'], label='models')
    chatbot = gr.Chatbot(value=[], elem_id="chatbot").style(height=650)
    with gr.Row():
        with gr.Column(scale=0.70):
            txt = gr.Textbox(
                show_label=False,
                placeholder="Enter text and press enter, or upload an image",
            ).style(container=False)

到目前为止,我们已经创建好了应用的前端。
应用后端
这样,我们就成功地构建了 Web 应用程序的前端。
现在,剩下的部分就是让它运行起来。
我们需要做的第一件事是处理输入。
def add_text(history, text):
    global messages  #message[list] is defined globally
    history = history + [(text,'')]
    messages = messages + [{"role":'user', 'content': text}]
    return history, ""
def generate_response(history, model):
        global messages

        response = openai.ChatCompletion.create(
            model = model,
            messages=messages,
            temperature=0.2,
        )

        response_msg = response.choices[0].message.content
        messages = messages + [{"role":'assistant', 'content': response_msg}]

        for char in response_msg:
            history[-1][1] += char
            #time.sleep(0.05)
            yield history
我们收到响应。最后的循环负责在接收到文本时按顺序呈现文本,以改善用户体验。
该循环负责在接收到文本时按顺序呈现文本,以改善用户体验。
with gr.Blocks() as demo:
    radio = gr.Radio(value='gpt-3.5-turbo', choices=['gpt-3.5-turbo','gpt-4'], label='models')
    chatbot = gr.Chatbot(value=[],elem_id="chatbot").style(height=550)
    with gr.Row():
        with gr.Column(scale=0.90):
            txt = gr.Textbox(
                show_label=False,
                placeholder="Enter text and press enter",
            ).style(container=False)

    txt.submit(add_text, [chatbot, txt], [chatbot, txt], queue=False).then(
            generate_response, inputs =[chatbot,radio],outputs = chatbot,)

demo.queue()
当用户提交文本时,它需要一个聊天机器人对象和提示作为输入。然后将其输出发送到聊天机器人组件。之后,将触发 generate_response 函数。这将在聊天机器人中按顺序呈现响应。
现在,聊天 Web 应用程序已准备就绪。
下面我们来看一下最终效果吧。
最后
—
「进群方式:加我微信,备注 “python”」

往期回顾

如果对本文有疑问可以加作者微信直接交流。进技术交流群的可以拉你进群。