


本来不太想写这篇文章的,毕竟pyansys的bug实在是不少,不可能一个个的去费老劲解决,最简单的方式是找其他的替代工具,等这货成熟了再用。
昨天的文章中提到了pyansys代码中的一个bug,但没有写解决方法。后台有不少道友询问如何解决,想了想还是写篇文章一起说了吧,毕竟管杀不管埋不是我的风格。
问题解决起来很简单。既然方法参数中没有plotter,那直接加进去就是了。
先分析代码。在plotting.py(路径C:\ProgramData\anaconda3\Lib\site-packages\ansys\mapdl\core\plotting.py)文件中,存在两个general_plotter方法,其中一个名为_general_plotter
,另一个为general_plotter
,这里要对这两个方法进行修改。
先修改 _general_plotter
方法。
找到文件第124行,进入函数_general_plotter
的定义,将参数部分修改为:
# Using * to force all the following arguments to be keyword only.
def _general_plotter(
        meshes,
        points,
        labels,
        *,
        cpos=None,
        show_bounds=False,
        show_axes=True,
        background=None,
        off_screen=None,
        notebook=None,
        # add_mesh kwargs:
        style=None,
        color="w",
        show_edges=None,
        edge_color=None,
        point_size=5.0,
        line_width=None,
        opacity=1.0,
        flip_scalars=False,
        lighting=None,
        n_colors=256,
        interpolate_before_map=True,
        cmap=None,
        render_points_as_spheres=False,
        render_lines_as_tubes=False,
        scalar_bar_args={},
        smooth_shading=None,
        feature_angle=30.0,
        show_scalar_bar=None,
        split_sharp_edges=None,
        # labels kwargs
        font_size=None,
        font_family=None,
        text_color=None,
        theme=None,
        # 下面增加一个参数plotter
        plotter=None,
):
进入函数体定义,将原来的语句(第324行):
pl = pv.Plotter(off_screen=off_screen, notebook=notebook, theme=theme)
修改为:
if plotter is None:
    pl = pv.Plotter(off_screen=off_screen, notebook=notebook, theme=theme)
else:
    pl = plotter
修改 general_plotter
方法
将函数general_plotter
的参数修改为:
def general_plotter(
        meshes,
        points,
        labels,
        *,
        title="",
        cpos=None,
        show_bounds=False,
        show_axes=True,
        background=None,
        off_screen=None,
        savefig=None,
        window_size=None,
        notebook=None,
        # add_mesh kwargs:
        style=None,
        color="w",
        show_edges=None,
        edge_color=None,
        point_size=5.0,
        line_width=None,
        opacity=1.0,
        flip_scalars=False,
        lighting=None,
        n_colors=256,
        interpolate_before_map=True,
        cmap=None,
        render_points_as_spheres=False,
        render_lines_as_tubes=False,
        scalar_bar_args={},
        smooth_shading=None,
        show_scalar_bar=None,
        split_sharp_edges=None,
        # labels kwargs
        font_size=None,
        font_family=None,
        text_color=None,
        theme=None,
        return_plotter=False,
        return_cpos=False,
        mapdl=None,
        plot_bc=False,
        plot_bc_legend=None,
        plot_bc_labels=None,
        bc_labels=None,
        bc_target=None,
        bc_glyph_size=None,
        bc_labels_font_size=16,
        # 增加plotter参数
        plotter=None,
):
修改内容:
# Getting the plotter
    pl = _general_plotter(
        meshes,
        points,
        labels,
        cpos=cpos,
        show_bounds=show_bounds,
        show_axes=show_axes,
        background=background,
        off_screen=off_screen,
        notebook=notebook,
        # add_mesh kwargs:
        style=style,
        color=color,
        show_edges=show_edges,
        edge_color=edge_color,
        point_size=point_size,
        line_width=line_width,
        opacity=opacity,
        flip_scalars=flip_scalars,
        lighting=lighting,
        n_colors=n_colors,
        interpolate_before_map=interpolate_before_map,
        cmap=cmap,
        render_points_as_spheres=render_points_as_spheres,
        render_lines_as_tubes=render_lines_as_tubes,
        scalar_bar_args=scalar_bar_args,
        smooth_shading=smooth_shading,
        show_scalar_bar=show_scalar_bar,
        split_sharp_edges=split_sharp_edges,
        # labels kwargs
        font_size=font_size,
        font_family=font_family,
        text_color=text_color,
        theme=theme,
        # 增加下面这句
        plotter=plotter,
    )
由于QtInteractor对象没有title属性,这里还要修改一下内容。
将原744行的代码:
if title:  # Added here to avoid labels overlapping title
    pl.add_title(title, color=text_color)
修改为:
import pyvista
if title:  # Added here to avoid labels overlapping title
    if type(pl) is pyvista.Plotter:
        pl.add_title(title, color=text_color)
    else:
        pl.add_text(title, color=text_color)
这样修改的目的是在使用title
参数时能够正常显示,QtInteractor没有add_title方法,这里使用add_text替代。
至此代码修改完毕,测试一波。
在要显示几何或网格的位置,编写代码为:
def geom(self):
    """显示几何模型"""
    self.widget_vista.clear()
    self.mapdl.vplot(title='geometry', plotter=self.widget_vista)

def mesh(self):
    """显示网格"""
    self.widget_vista.clear()
    self.mapdl.eplot(title='element', plotter=self.widget_vista)
运行结果如下:
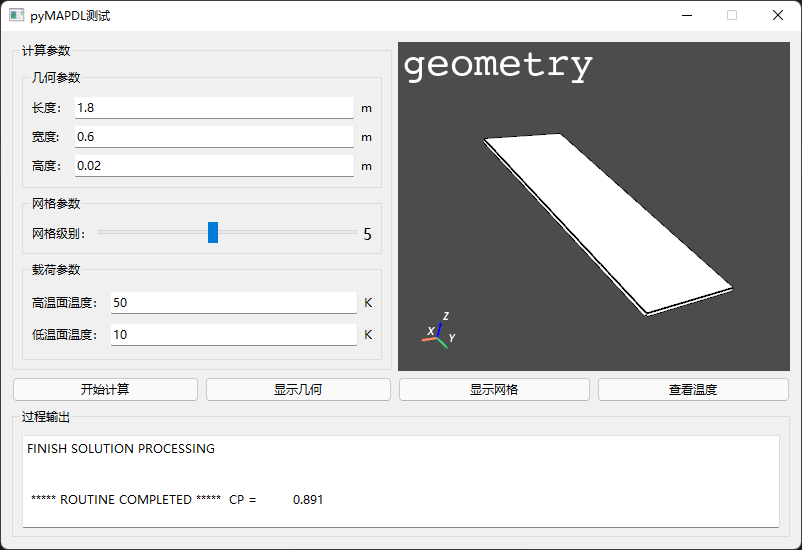
几何能够显示在指定的控件中。
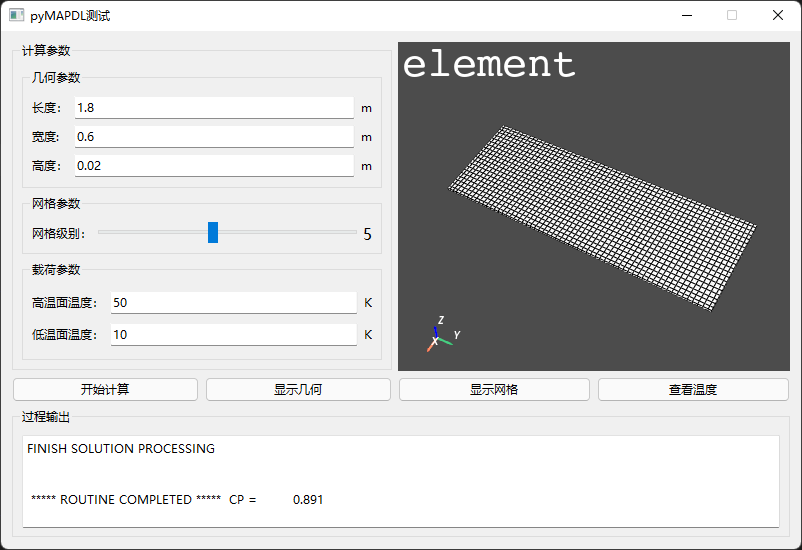
网格也能显示在指定的控件中。
现在可以收工了。
(完毕)

文章转载自CFD之道,如果涉嫌侵权,请发送邮件至:contact@modb.pro进行举报,并提供相关证据,一经查实,墨天轮将立刻删除相关内容。
