


本文将以 Stable Diffusion Quick Kit 在 Amazon SageMaker 上的部署实践来介绍 Stable Diffusion 模型基础知识,HuggingFace Diffusers 接口,以及如何使用 Quick Kit 在 SageMaker Endpoint 上快速部署推理服务。
Stable Diffusion 模型
2022年由 StabilityAI、Runway、慕尼黑大学 CompVis 团队联合发布了 Stable Diffusion 模型,模型的代码和权重已经开源,目前主流的版本为 v1.5 (runwayml/stable-diffusion-v1-5)、v2、v2.1(stabilityai/stable-diffusion-2, stabilityai/stable-diffusion-2-1) 。Stable Diffusion 模型支持通过使用提示词来产生新的图像,描述要包含或省略的元素,以及重新绘制现有的图像,其中包含提示词中描述的新元素,该模型还允许通过提示词在现有的图中进行内补绘制和外补绘制来部分更改。
Stable Diffusion 是一个基于 Latent Diffusion Models(潜在扩散模型,LDMs)的文图生成(text-to-image)模型。Stable Diffusion 由3个部分组成:变分自编码器(Variational Auto Encoder, VAE)、U-Net和一个文本编码器。Stable Diffusion 在 LAION-5B 的一个子集上训练了一个 Latent Diffusion Models,该模型专门用于文图生成。模型通过在一个潜在表示空间中迭代“去噪”数据来生成图像,然后将表示结果解码为完整的图像,能够在 GPU 上不超过10秒时间完成图片生成,大大降低了落地门槛,也带来了文图生成领域的大火。


Stable Diffusion 模型
常见格式和存储方式
目前社区里的各类 Stable Diffusion 衍生模型有不同的文件格式和存储方式,这些不同的文件格式和存储方式需要用户使用不同的代码来进行加载、推理。Stable Diffusion 模型的主流文件格式主要有2种,分别是 ckpt 和 safetensors;存储方式上可以区分为单个文件和 diffusers 结构。
下面我们就来介绍一下各自的区别。
文件格式:
● ckpt 是 pytoch 使用 pickle 序列化存储的格式,简单易用,但是会可能序列化某些 python 执行代码。

● safetensors 是 HuggingFace 推出的新的模型存储格式,不会包含执行代码,不需要反序列化,加载更快,目前已经是主流的 Stable Diffusion 模型存储格式。
存储方式:
● 单一文件。不管是 ckpt 还是 safetensors 都是单一文件通过原生代码(参考 CompVis script 代码)加载。
● Diffusers 目录结构。为了方便和统一地进行模型加载,HuggingFace 创建了 diffusers 包,通过类似 from_pretrained 的 pipeline 来进行模型加载,它需要特定的目录结构,我们以“runwayml/stable-diffusion-v1-5”为例来查看 diffusers 的模型架构,它需要 model_index.json,并且按照 Stable Diffusion 的结构创建不同的目录(unet、vate、text_encoder 等等),可以在各个组件使用不同的模型。同时 Diffusers 官方也提供了单一文件到 Diffusers 的转换脚本。

● runwayml/stable-diffusion-v1-5 模型存储结构
Stable Diffusion 模型常见推理方式
Stable Diffusion 模型常见的使用方式:
● 原生 pytorch 代码,CompVis 在 Stable Diffusion stable-diffusion-v1-4 提供了 txt2img.py 和 img2img.py,是通过 pytorch 进行模型加载完成图片生成的。
● GUI,包括 Stable-Diffusion-WebUI、InvokAI、ComfyUI 通常这些工具都是 UI 和推理服务一起工作,在本地显卡进行部署。
● HuggingFace Diffusers 接口,通过 StableDiffusionPipeline,StableDiffusionImg2ImgPipeline 可以快速加载第三方模型或者本地模型,Stable Diffusion Quick Kit 正是采用 Diffusers 方式进行调用。
在推理过程中我们还会选择对应的采样器(Sampler,Diffusers 中称为 Scheduler),常见的采样器有 Euler Discrete、Euler Ancestral Discrete、DDIM、 KDPM2 Discrete、LMSD 等,我们将会在后续篇中持续介绍。
使用 Quick Kit 在 SageMaker 上
快速部署 Stable Diffusion 推理服务
sagemaker-stablediffusion-quick-kit:
https://github.com/aws-samples/sagemaker-stablediffusion-quick-kit.git
是由亚马逊云架构师团队专为在云上部署 Stable Diffusion 模型的推理、训练而打造的工程化代码,通过 sagemaker-stablediffusion-quick-kit 我们可以快速的将 diffusers 目录结构的模型部署到 SageMaker 中,并生成 Http 协议的 API 接口和前后端分离的界面。以便于亚马逊云用户可以快速将 Stable Diffusion 运用到业务和产品中。
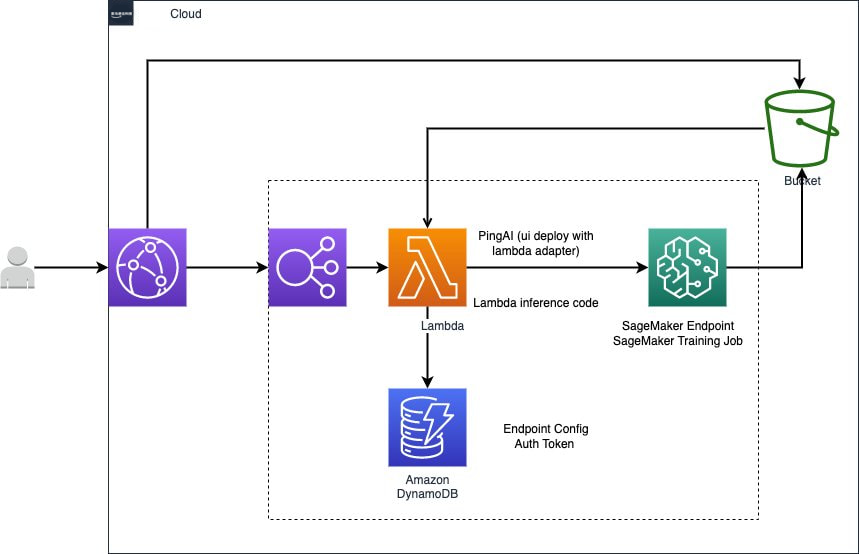
在 SageMaker 中部署 Stable Diffusion Quick Kit 我们需要以下前提条件:
● 在 https://aws.amazon.com/cn/ 中登录 Amazon Web Service 账号;
● 进入 SageMaker 服务,在左侧菜单栏选择 笔记本→ 笔记本实例,创建一个拥有 SageMaker, S3, Lambda, Cloudfront, DynamoDB, ECR 权限的笔记本实例,点击打开 JupyterLab。
我们启动一个 Terminal,将 sagemaker-stablediffusion-quick-kit 代码下载到 notebook 中。

#终端里面输入cd SageMaker/git clone https://github.com/aws-samples/sagemaker-stablediffusion-quick-kit.git
左滑查看更多

下载代码之后,左侧文件目录中,我们导航到 sagemaker-stablediffusion-quick-kit→inference→sagemaker→byos 目录中,双击 stablediffusion_sagemaker_byos.zh.ipynb 文件,我们依次执行文件中的代码即可完成部署。
1、执行命令升级 boto3 sagemaker 的 SDK,动态获取 account_id、region_name、默认的 bucket,以及 SageMaker 的执行角色 role 等变量。
!pip install --upgrade boto3 sagemakerimport timeimport boto3import sagemakeraccount_id = boto3.client('sts').get_caller_identity().get('Account')region_name = boto3.session.Session().region_namesagemaker_session = sagemaker.Session()bucket = sagemaker_session.default_bucket()role = sagemaker.get_execution_role()print(role)
左滑查看更多
2、部署 AIGC 推理服务
配置模型参数
● model_name: 支持 HuggingFace diffusers models 结构,可以直接配置 HuggingFace 中模型的名字,如 andite/anything-v4.0,在 endpoint 中,我们将通过 StableDiffusionPipeline.from_pretrained 的方式从 Huggingface 中加载模型,具体逻辑可以参考 sagemaker-stablediffusion-quick-kit/inference/ sagemaker/byos/code/inference.py 文件中的 init_pipeline 方法。
● s3_bucket: 用于保存推理后的结果的默认地址,如果没有指定 output_s3uri,我们会将推理后的图片上传到 s3://{bucket}/stablediffusion/asyncinvoke/images/ 目录中,具体逻辑可以参考 sagemaker-stablediffusion-quick-kit/inference/sagemaker/byos/code/inference.py 文件中的 predict_fn 方法。
model_name = 'andite/anything-v4.0' # 默认的,高品质、高细节的动漫风格#model_name = 'Envvi/Inkpunk-Diffusion' # 温克朋克风格,提示词 nvinkpunk#model_name = 'nousr/robo-diffusion-2-base' # 看起来很酷的机器人,提示词 nousr robot#model_name = 'prompthero/openjourney' # openjorney 风格,提示词 mdjrny-v4 style#model_name = 'dreamlike-art/dreamlike-photoreal-2.0' #写实,真实风格,提示词 photoframework_version = '1.10'py_version = 'py38'model_environment = {'SAGEMAKER_MODEL_SERVER_TIMEOUT':'600','SAGEMAKER_MODEL_SERVER_WORKERS': '1','model_name':model_name,'s3_bucket':bucket}
左滑查看更多
▌为 SageMaker Endpoint 创建 PyTorchModel,并部署异步推理的 SageMaker endpoint。
下面的代码中,我们将创建 dummy model_data 文件(只是为了启动 SageMaker endpoint,真正的模型使用 infernece.py 进行加载),使用 PyTorchModel 将 code/inference.py 文件加载到 SageMaker 中,并通过 AsyncInferenceConfig 创建异步推理的配置,通过 instance_type 和 instance_count 我们可以指定 SageMaker endpoint 后面用于推理的节点大小和数量,我们执行 model.deploy 方法将部署一个 SageMaker 的异步推理的 Endpoint,这一步将需要大约十五分钟左右的时间。
!touch dummy!tar czvf model.tar.gz dummy sagemaker-logo-small.pngassets_dir = 's3://{0}/{1}/assets/'.format(bucket, 'stablediffusion')model_data = 's3://{0}/{1}/assets/model.tar.gz'.format(bucket, 'stablediffusion')!aws s3 cp model.tar.gz $assets_from sagemaker.pytorch.model import PyTorchModelmodel = PyTorchModel(name = None,model_data = model_data,entry_point = 'inference.py',source_dir = "./code/",role = role,framework_version = framework_version,py_version = py_version,env = model_environment)from sagemaker.async_inference import AsyncInferenceConfigimport uuidendpoint_name = f'AIGC-Quick-Kit-{str(uuid.uuid4())}'instance_type = 'ml.g4dn.xlarge'instance_count = 1async_config = AsyncInferenceConfig(output_path='s3://{0}/{1}/asyncinvoke/out/'.format(bucket, 'stablediffusion'))print(f'endpoint_name: {endpoint_name}')from sagemaker.serializers import JSONSerializerfrom sagemaker.deserializers import JSONDeserializerasync_predictor = model.deploy(endpoint_name = endpoint_name,instance_type = instance_type,initial_instance_count = instance_count,async_inference_config = async_config,serializer = JSONSerializer(),deserializer = JSONDeserializer())
左滑查看更多
为了方便调用 SageMaker 的 endpoint 进行推理,并展示推理结果,我们创建以下方法:
import jsonimport iofrom PIL import Imageimport tracebackimport timefrom sagemaker.async_inference.waiter_config import WaiterConfigs3_resource = boto3.resource('s3')def get_bucket_and_key(s3uri):pos = s3uri.find('/', 5)bucket = s3uri[5 : pos]key = s3uri[pos + 1 : ]return bucket, keydef draw_image(response):try:bucket, key = get_bucket_and_key(response.output_path)obj = s3_resource.Object(bucket, key)body = obj.get()['Body'].read().decode('utf-8')predictions = json.loads(body)['result']print(predictions)for prediction in predictions:bucket, key = get_bucket_and_key(prediction)obj = s3_resource.Object(bucket, key)bytes = obj.get()['Body'].read()image = Image.open(io.BytesIO(bytes))image.show()except Exception as e:traceback.print_exc()print(e)def async_predict_fn(predictor,inputs):response = predictor.predict_async(inputs)print(f"Response object: {response}")print(f"Response output path: {response.output_path}")print("Start Polling to get response:")start = time.time()config = WaiterConfig(max_attempts=100, # number of attemptsdelay=10 # time in seconds to wait between attempts)response.get_result(config)draw_image(response)print(f"Time taken: {time.time() - start}s")
左滑查看更多
▌测试 SageMaker 的异步推理
我们将模型参数统一包装到 inputs_txt2img 对象中,测试文本生成图片,修改 prompt 等参数可以生成不同效果的图片。
#AIGC Quick Kit txt2imginputs_txt2img = {"prompt": "a photo of an astronaut riding a horse on mars","negative_prompt":"","steps":20,"sampler":"euler_a","seed": 52362,"height": 512,"width": 512,"count":2}start=time.time()async_predict_fn(async_predictor,inputs_txt2img)print(f"Time taken: {time.time() - start}s")
左滑查看更多
最终效果如下:


通过下面的方法我们可以测试图像生成图像的效果,通过 input_image 参数我们可以指定想要输入的图片地址,如下测试中我们将使用:
https://raw.githubusercontent.com/CompVis/stable-diffusion/main/assets/stable-samples/img2img/sketch-mountains-input.jpg
作为输入,配合提示词 “A fantasy landscape, trending on artstation” 来生成图片。
#AIGC Quick Kit img2imginputs_img2img = {"prompt": "A fantasy landscape, trending on artstation","negative_prompt":"","steps":20,"sampler":"euler_a","seed":43768,"height": 512,"width": 512,"count":2,"input_image":"https://raw.githubusercontent.com/CompVis/stable-diffusion/main/assets/stable-samples/img2img/sketch-mountains-input.jpg"}async_predict_fn(async_predictor,inputs_img2img)
左滑查看更多
最终效果如下:


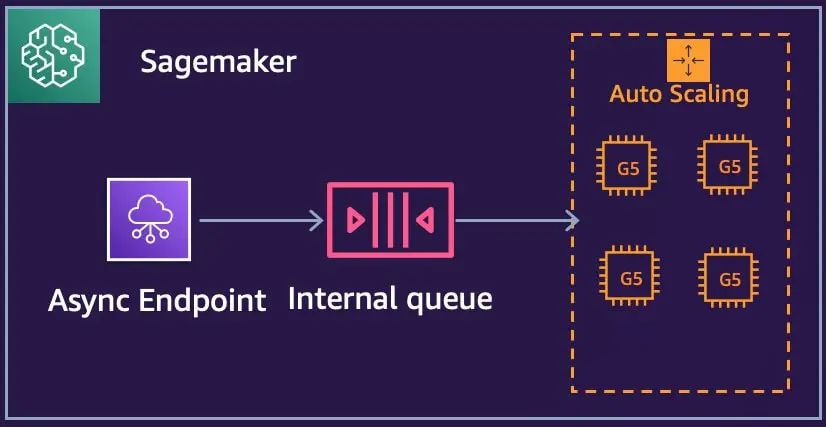
▌配置 SageMaker 的异步推理的 Auto Scaling
在实际的生产环境中,我们调用推理服务的请求数量可能会呈现周期性的峰值和低谷,为了在高峰期保障服务的可靠性,满足性能要求,在低峰期降低资源的成本,我们需要为 SageMaker endpoint 设置自动的扩容策略,如下代码,我们将根据 SageMaker 的内部队列长度,自动扩容推理节点的数量。其中 ApproximateBacklogSizePerInstance 指标表示队列中的项目数除以终端节点后面的实例数。
# application-autoscaling clientasg_client = boto3.client("application-autoscaling")# This is the format in which application autoscaling references the endpointresource_id = f"endpoint/{async_predictor.endpoint_name}/variant/AllTraffic"# Configure Autoscaling on asynchronous endpoint down to zero instancesresponse = asg_client.register_scalable_target(ServiceNamespace="sagemaker",ResourceId=resource_id,ScalableDimension="sagemaker:variant:DesiredInstanceCount",MinCapacity=1,MaxCapacity=2,)response = asg_client.put_scaling_policy(PolicyName=f'Request-ScalingPolicy-{async_predictor.endpoint_name}',ServiceNamespace="sagemaker",ResourceId=resource_id,ScalableDimension="sagemaker:variant:DesiredInstanceCount",PolicyType="TargetTrackingScaling",TargetTrackingScalingPolicyConfiguration={"TargetValue": 2.0,"CustomizedMetricSpecification": {"MetricName": "ApproximateBacklogSizePerInstance","Namespace": "AWS/SageMaker","Dimensions": [{"Name": "EndpointName", "Value": async_predictor.endpoint_name}],"Statistic": "Average",},"ScaleInCooldown": 600, # duration until scale in begins (down to zero)"ScaleOutCooldown": 300 # duration between scale out attempts},)
左滑查看更多
结论
综上所述,本文介绍了 Stable Diffusion 模型的基本知识,也展示了如何通过 Stable Diffusion Quick Kit 在 SageMaker 上部署 Stable Diffusion 推理服务。Stable Diffusion 的推理是一个相对比较耗时的服务,在面向用户端提供服务时,我们必须要考虑到多并发请求下服务的可用性和扩展性,然而相对于普通的应用服务,AI 推理需要用到成本比较高的 GPU 资源,保障服务可靠前提下如何有效控制成本也是我们需要考虑的重要因素。
SageMaker 的异步推理可以轻松地帮我们达成以上目标,其内部队列可以将前端请求和后端推理进行解耦合,在流量高峰时可以实现缓冲,保障服务的可用性,通过 SageMaker 异步推理的 AutoScaling,我们可以自动的扩展推理节点,在流量低峰期实现资源回收,节省成本。相对于 v100 专用显卡和 3090 等民用显卡,我们利用 SageMaker 提供的 ml.g4dn 和 ml.g5 等更具性价比的机型实现推理,在保障性能的前提下可以进一步控制资源成本。SageMaker 和 Stable Diffusion Quick Kit 的结合可以帮助我们快速完成扩散模型在亚马逊云上的工程化部署,为用户的 AIGC 产品化上提供了坚实可靠的基础。
在下一节中,我们将继续探讨如何使用 Amazon Serverless 的服务为 Stable Diffusion 部署前后端分离的界面和 API 服务。
附录
● Stable Diffusion Quick Kit github:
https://github.com/aws-samples/sagemaker-stablediffusion-quick-kit
● Stable Diffusion Quick Kit 动手实验文档:
https://catalog.us-east-1.prod.workshops.aws/workshops/1ac668b1-dbd3-4b45-bf0a-5bc36138fcf1/
● CompVis github:
https://github.com/CompVis/stable-diffusion
● runway stable-diffusion-v-5:
https://huggingface.co/runwayml/stable-diffusion-v1-5
● StabilityAI stable-diffusion-2-1:
https://huggingface.co/stabilityai/stable-diffusion-2-1
● HuggingFace diffusers 格式转换工具:
https://github.com/huggingface/diffusers/tree/main/scripts
本篇作者

粟伟
亚马逊云科技资深解决方案架构师,专注游戏行业, 开源项目爱好者,致力于云原生应用推广、落地。具有15年以上的信息技术行业专业经验,担任过高级软件工程师,系统架构师等职位,在加入 亚马逊云科技 之前曾就职于 Bea、Oracle、IBM 等公司。

严军
亚马逊云科技解决方案架构师,目前主要负责帮客户进行云架构设计和技术咨询,对容器化等技术方向有深入的了解,在云迁移方案设计和实施方面有丰富的经验。
2023亚马逊云科技中国峰会即将开启!
👇👇👇点击下方图片即刻注册👇👇👇


听说,点完下面4个按钮
就不会碰到bug了!
