


1 前言
1.1 编写目的
本文是针对GBase 8a MPP Cluster分布式数据库(开发、测试、生产)环境下集群安装部署实施方案,为项目安装实施部署提供指导性建议。
本次部署采用三台服务器做集群,操作系统版本为RHEL 7(含Centos 7),实际部署可参照本文内容进行调整。
1.2 预期读者
本文章主要适用GBase 8a MPP Cluster数据库产品安装实施人员、数据库运维及开发人员。
1.3 文档说明
1.3.1 产品信息
产品版本:GBase8a_MPP_Cluster
操作系统版本:RHEL 7 x86_64 (操作系统不建议低于RHEL 7.3)
安装介质:https://www.gbase.cn/download/gbase-8a?category=INSTALL_PACKAGE
下载 GBase8a_MPP_Cluster 软件
– 从官网下载 RHEL 7 x86_64 对应GBase8a_MPP_Cluster 软件
– 截止 2023年5月,x86_64位GBase8a_MPP_Cluster 软件最新版本为9.5.3.14
– 下载软件之后,应验证所下载软件的完整性
软件下载:
登陆GBase官网,打开https://www.gbase.cn/download/gbase-8a?category=INSTALL_PACKAGE网址,如下图所示,根据官网提示下载和操作系统对应的GBase 8a MPP Cluster V9 安装软件。
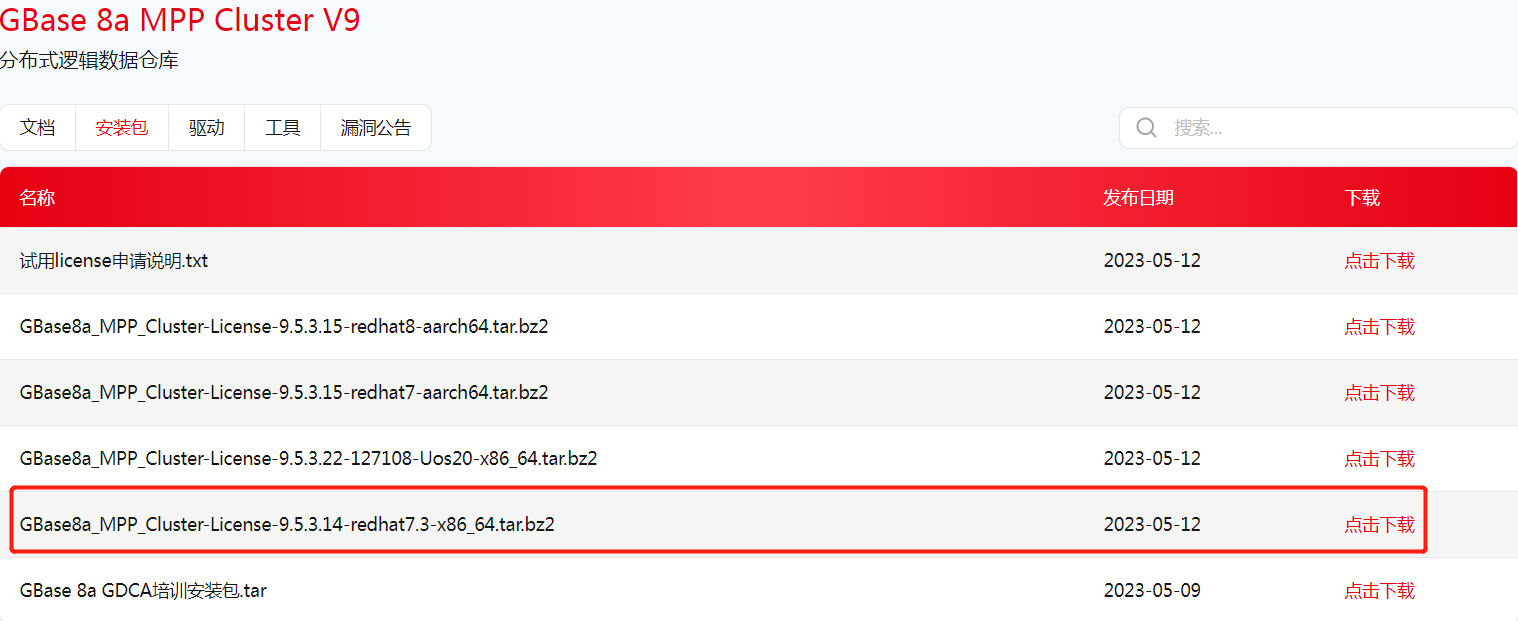
安装前需准备以下安装介质,并放置目录/home/soft中
GBase8a_MPP_Cluster 安装介质:
GBase8a_MPP_Cluster-License-9.5.3.14-redhat7.3-x86_64.tar.bz2
验证介质包完整性:
md5sum /home/soft/GBase8a_MPP_Cluster-License-9.5.3.14-redhat7.3-x86_64.tar.bz2
2 安装部署环境要求
2.1 操作系统
集群环境,各节点操作系统版本要保持一致,操作系统版本建议不低于RHEL 7.3。
检查命令:
# uname -a
# cat /etc/redhat-release
2.1 硬件环境
2.1.1 物理内存
物理内存:要求至少不低于2GB,生产建议更高配置
检查命令:grep MemTotal /proc/meminfo
2.1.2 CPU配置
不低于1*2核 2.0GHz,生产建议更高配置
检查命令:
查看物理CPU个数:cat /proc/cpuinfo| grep “physical id”| sort| uniq| wc -l
查看CPU型号:grep ‘model name’ /proc/cpuinfo
查看 siblings 数量:grep “siblings” /proc/cpuinfo|uniq
查看 core id 数量:grep ‘core id’ /proc/cpuinfo
生产建议关闭超线程,操作命令:echo off > /sys/devices/system/cpu/smt/control
2.1.3 SWAP分区
SWAP区大小需按照如下表格进行设置:
| 物理内存 | Swap区 |
|---|---|
| 1GB~2GB | 1.5倍实际物理内存 |
| 2GB~16GB | 等于实际物理内存 |
| 超过16GB以上 | 16GB或以上 |
检查命令:grep SwapTotal /proc/meminfo
2.1.4 /tmp目录
/tmp:临时目录空间大于1G,生产建议10G以上
检查命令:df -Th /tmp
2.1.5 数据目录
存放数据目录,如/opt/gbase,开发测试建议不低于10G,生产建议更高配置,建议划分单独逻辑卷作为安装目录并做Raid 5
分区文件格式:XFS文件格式
检查命令:df -Th /opt/gbase
2.2 软件环境
2.2.1 配置主机名
为保证集群安装规范,集群内部各节点主机名设置应保持一致,主机名要和网卡文件主机名相同,参考如下:
(1)修改主机名
使用 hostnamectl set-hostname hostname 修改各节点主机名
# hostnamectl set-hostname gba01   -- 节点一
# hostnamectl set-hostname gba02   -- 节点二
# hostnamectl set-hostname gba03   -- 节点三
(2)修改各节点/etc/hosts文件,增加集群各节点信息
# vi /etc/hosts
192.168.10.10 gba01
192.168.10.11 gba02
192.168.10.12 gba03
2.2.2 数据库依赖包
GBase8a MPP Cluster 运行RHEL 7 所需操作系统依赖包如下:
pcre
krb5-libs
libdb
glibc
keyutils-libs
libidn
libuuid
ncurses-libs
libgpg-error
libgomp
libstdc++
libcom_err
libgcc
python-libs
libselinux
libgcrypt
nss-softokn-freebl
bzip2
libcgroup
libcgroup-tools
如无法联网配置yum源,可参照附录问题与解决方案配置本地yum源。
(6)安装软件包
# yum install -y pcre \
krb5-libs \
libdb \
glibc \
keyutils-libs \
libidn \
libuuid \
ncurses-libs \
libgpg-error \
libgomp \
libstdc++ \
libcom_err \
libgcc \
python-libs \
libselinux \
libgcrypt \
nss-softokn-freebl \
bzip2 \
libcgroup  \
libcgroup-tools
2.3 网络配置规范
| IP地址 | 主机名 | 网卡名 | 用途说明 |
|---|---|---|---|
| 192.168.10.10 | gba01 | team0(聚合) | 聚合网卡,PUBIC-IP |
| 192.168.10.11 | gba02 | team0(聚合) | 聚合网卡,PUBIC-IP |
| 192.168.10.12 | gba03 | team0(聚合) | 聚合网卡,PUBIC-IP |
- 开发测试环境PUBLIC-IP可以使用单网卡,生产环境建议采用网卡绑定做聚合,并且网络带宽要求千兆以上,生产建议使用万兆网络,并且放在交换机上,且交换机也要做冗余
- 网卡绑定模式可以使用HA或者负载均衡模式,根据带宽要求与机器性能调整
- 各节点网络在同一网段
- 验证配置 cat /etc/hosts
3 产品安装
3.1 操作系统配置
3.1.1 操作系统参数
操作系统参数的修改已集成到安装脚本中, 安装集群软件执行配置环境变量脚本SetSysEnv.py时会自动内核参数并生效,根据GBase 官方文档,系统调整的参数及相关描述如下:
| 配置参数 | 信息描述 |
|---|---|
| kernel.core_uses_pid | 控制核心转储是否附加 PID 的核心文 件。用于调试多线程应用程序 |
| net.ipv4.tcp_syncookies | 控制 TCPsyncookies 的使用 |
| net.ipv4.ip_local_reserved_ports | 防止数据库需要使用的端口被其他程 序强行占用。需要根据实际修改的端 口号进行配置 |
| vm.vfs_cache_pressure | 表示内核回收用于 directory 和 inodecache 内存的倾向;缺省值 100 表示内核将根据 pagecache 和 swapcache,把 directory 和 inodecache 保持在一个合理的百分 比;降低该值低于 100,将导致内核 倾向于保留 directory 和 inodecache;增加该值超过 100,将 导致内核倾向于回收 directory 和 inodecache |
| vm.min_free_kbytes | 表示强制 LinuxVM 最低保留多少空闲 内存(Kbytes)。建议设为物理内存的 1/10 的大小。不超过 4G |
| vm.swappiness | 设置为 1(缺省是 60),代表在有空闲 物理内存的情况下尽量不要使用 swap。 |
| vm.overcommit_memory | 表示检查是否有足够的内存可用,如 果是,允许分配;如果内存不够,拒绝该请求,并返回一个错误给应用程序 |
| vm.zone_reclaim_mode | 当某个 NUMA 节点可用内存不足时:如 果为 0 的话,系统会倾向于从其他节 点分配内存 |
| net.core.netdev_max_bac klog | 每个网络接口接收数据包的速率比内 核处理这些包的速率快时,允许送到 队列的数据包的最大数目 |
| net.core.rmem_default | 接收套接字缓冲区大小的默认值(以 字节为单位) |
| net.core.rmem_max | 接收套接字缓冲区大小的最大值(以 字节为单位) |
| net.core.somaxconn | 用来限制监听(LISTEN)队列最大数据 包的数量,超过这个数量就会导致链 接超时或者触发重传机制 |
| net.core.wmem_default | 发送套接字缓冲区大小的默认值(以 字节为单位) |
| net.core.wmem_max | 发送套接字缓冲区大小的最大值(以 字节为单位) |
| net.ipv4.tcp_fin_timeout | 如果套接字由本端要求关闭,这个 参数决定了它保持在 FIN-WAIT-2 状 态的时间。对端可以出错并永远不关 闭连接,甚至意外当机。缺省值是 60 秒 |
| net.ipv4.tcp_max_orphans | 系统中最多有多少个 TCP 套接字不被 关联到任何一个用户文件句柄上。如 果超过这个数字,孤儿连接将即刻被 复位并打印出警告信息。这个限制仅 仅是为了防止简单的 DoS 攻击,不能 过分依靠它或者人为地减小这个值, 更应该增加这个值(如果增加了内存 之后) |
| net.ipv4.tcp_max_syn_backlog | 表示那些尚未收到客户端确认信息的 连接(SYN 消息)队列的长度,默认 为 1024,加大队列长度为 262144,可 以容纳更多等待连接的网络连接数 |
| net.ipv4.tcp_max_tw_buc kets | 系统在同时所处理的最大 timewait sockets 数目。如果超过此数的话, time-wait socket 会被立即砍除并 且显示警告信息。之所以要设定这个 限制,纯粹为了抵御那些简单的 DoS 攻击,千万不要人为的降低这个限制, 不过,如果网络条件需要比默认值更 多,则可以提高它(或许还要增加内 存) |
| net.ipv4.tcp_mem | 第一个值是内存使用的下限。第二个 值是内存压力模式开始对缓冲区使用 应用压力的上限。第三个值是内存上 限。在这个层次上可以将报文丢弃, 从而减少对内存的使用 |
| net.ipv4.tcp_rmem | TCP 接收缓冲区,3 个字段分别是 min,default,max。Min:为 TCP socket 预留用于接收缓冲的内存数量,即使 在内存出现紧张情况下 TCP socket 都 至少会有这么多数量的内存用于接收 缓冲 |
| net.ipv4.tcp_timestamps | 时间戳可以避免序列号的卷绕。一个 1Gbps 的链路肯定会遇到以前用过的 序列号。时间戳能够让内核接受这种 “异常”的数据包 |
| net.ipv4.tcp_tw_recycle | 开启 TCP 连接中 TIME-WAIT sockets 的快速回收,默认为 0,表示关闭 |
| net.ipv4.tcp_wmem | TCP 发送缓冲区,3 个字段分别是 min, default,max。Min:为 TCP socket 预留用于发送缓冲的内存最小值。每 个 TCP socket 都可以使用它 |
| net.ipv4.tcp_tw_reuses | 表示是否允许重新应用处于 TIME-WAIT 状态的 socket 用于新的 TCP 连接 |
| net.ipv4.tcp_sack | 表示是否启用有选择的应答 (Selective Acknowledgment),这可 以通过有选择地应答乱序接收到的报 文来提高性能(这样可以让发送者只发送丢失的报文段);(对于广域网通 信来说)这个选项应该启用,但是这 会增加对 CPU 的占用 |
| net.ipv4.tcp_window_scaling | 支持更大的 TCP 窗口. 如果 TCP 窗口 最大超过 65535(64KB), 必须设置该 数值为 1 |
验证:
- cat /etc/sysctl.conf
- cat /etc/security/limits.conf
3.1.2 关闭透明大页
为更高效运行数据库,需关闭操作系统transparent_hugepage(透明大页) 参数,可采用如下方式关闭透明大页。
-- 所有操作使用root用户执行
-- 创建disable-thp系统服务
sudo tee /etc/systemd/system/disable-thp.service <<-'EOF'
[Unit]
Description=Disable Transparent Huge Pages (THP)

[Service]
Type=simple
ExecStart=/bin/sh -c "echo 'never' > /sys/kernel/mm/transparent_hugepage/enabled && echo 'never' > /sys/kernel/mm/transparent_hugepage/defrag"

[Install]
WantedBy=multi-user.target
EOF

-- 命令daemon重新加载配置
# sudo systemctl daemon-reload

-- 启动服务
# sudo systemctl start disable-thp

-- 设置开机自启动
# sudo systemctl enable disable-thp
3.1.3 防火墙设置
集群数据库安装前,建议关闭防火墙,如安全需要,需和网络管理员联系设置防火墙规则。
以root用户身份在所有集群主机节点上执行如下命令
-- 所有主机root用户执行
# systemctl stop firewared.service
# systemctl disable firewared.service
# service iptables stop
# chkconfig --level 2345 iptables off
注:如生产环境有安全要求,需和网络管理员联系设置防火墙规则。
3.1.4 检查selinux
以root用户身份在所有集群主机节点上执行如下命令
-- 所有主机root用户执行
# sed -i  "s/SELINUX=enforcing/SELINUX=disabled/"  /etc/selinux/config
检查:
cat /etc/selinux/config 状态为disabled
3.1.5 创建用户和组
集群数据库各节点创建用户和组,建议各节点用户和组相同ID,为用户设置相同密码。
配置规范
组:gbase
用户:gbase
-- 所有操作使用root用户执行
# groupadd -g 800 gbase
# useradd -u 800 -g gbase gbase
# echo gbase | passwd --stdin gbase
3.1.6 检查sshd服务状态
-- 设置 sshd 服务每次开机后自动加载运行
#systemctl enable sshd.service
-- 检查 sshd 服务是否开启
# systemctl status sshd.service
3.1.7 检查各节点系统时间
为保证集群运行正常,要求集群各节点系统时间保持一致,推荐使用ntp自动同步各节点时间。
请参阅配置ntp服务资料或与系统管理员联系配置集群ntp时间同步。
查看ntp同步,可参照如下命令
# timedatectl
# date -R
3.1.8 检查节点端口号
集群安装,默认会使用系统一些端口号,检查各节点、各服务使用的默认端口是否被占用,检查端口号是否被占用命令如下。
# lsof -i:5258
GBase 8a MPP Cluster 各服务使用的默认端口说明如下表:
| 组件名称 | 默认端口号 | 端口协议类型 | 端口含义说明 |
|---|---|---|---|
| Gcluster | 5258 | TCP | Coordinator 集群节点对外提 供服务的端口 |
| Gnode | 5050 | TCP | Data 集群节点对外提供服务 的端口 |
| Gcware | 5918 | TCP/UDP | gcware 节点间通讯端口 |
| gcware | 5919 | TCP | 外部连接 gcware 节点端口 |
| Recover_monit_port | 6268 | TCP | 监控收集信息端口 |
| syncServer | 5288 | TCP | syncServer 服务端口 |
| GcrecoverMonit | 6268 | TCP | Gcrecover 服务端口 |
| 数据远程导出端口 | 16066-16166 | TCP | 数据远程导出端口 |
- 所有集群节点端口要一致
3.1.9 创建软件安装目录
系统安装时,需将划分的逻辑卷mount到/opt目录,GBase 8a MPP Cluster 默认会安装在此目录下,集群数据库所有节点均需操作。
-- 所有操作使用root用户执行
# mkdir -p /opt/gbase
# chown gbase:gbase /opt/gbase
注意:/opt的mount配置要写入/etc/fstab,放置重启后无法mount集群启动失败。
3.1.10 修改虚拟内存配置
集群数据库安装前,修改virtual memory 设置为 unlimited,有如下两种方式修改。
(1)方式一
修改/etc/security/limits.conf文件,添加如下两行内容,修改后重启操作系统生效
-- 所有操作使用root用户执行
* soft as unlimited
* hard as unlimited
-- 重启操作系统生效
# shutdown -r 0
(2)方式二
通过命令修改,修改当前系统配置,修改后重启操作系统生效
-- 所有操作使用root用户执行
# ulimit -H -v unlimited
# ulimit -S -v unlimited
-- 重启操作系统生效
# shutdown -r 0
参数含义:
- -H 设定资源的硬性限制,也就是管理员所设下的限制
- -S 设定资源的弹性限制
- -v <虚拟内存大小> 指定可使用的虚拟内存上限,单位为 KB
3.1.11 设置磁盘调度策略算法
对于使用disk的场景,磁盘调度策略算法建议设置为 deadline(适用于 disk)或者 loop(适用于 SSD),可通过如下方式设置。
-- 所有操作使用root用户执行
echo deadline > /sys/block/sda/queue/scheduler
3.1.12 设置操作系统允许最大进程数
集群数据库安装前,所有节点修改操作系统允许的最大进程数,方式如下。
-- 所有操作使用root用户执行
cat > /etc/systemd/system.conf <<EOF
DefaultTasksMax=infinity
EOF
3.2 产品安装
3.2.1 解压软件安装包
将集群软件GBase8a_MPP_Cluster-License-9.5.3.14-redhat7.3-x86_64.tar.bz2上传至主节点/home/soft目录,并解压至/opt目录。
# -- 使用root用户操作
# cd /home/soft
# tar -xjvf GBase8a_MPP_Cluster-License-9.5.2.39-redhat7.3-x86_64.tar.bz2 -C /opt/
- 解压后,/opt目录下会生成gcinstall目录
3.2.2 分发执行配置文件
在主节点,使用root用户将修改各节点环境变量的部署脚本SetSysEnv.py分发到各个集群节点/opt目录下
-- 主节点操作
# cp /opt/gcinstall/SetSysEnv.py /opt
# scp /opt/gcinstall/SetSysEnv.py 192.168.10.11:/opt
# scp /opt/gcinstall/SetSysEnv.py 192.168.10.12:/opt
以root用户身份在所有集群节点执行如下命令
# cd /opt
# python SetSysEnv.py --dbaUser=gbase --installPrefix=/opt/gbase --cgroup
验证:
- 可查看/tmp/SetSysEnv.log日志,查看SetSysEnv.py脚本执行过程及结果
SetSysEnv.py 语法说明:
| 参数名称 | 参数描述 |
|---|---|
| –installPrefix=INSTALLPREFIX | 用户可配安装目录,必须为 demo.options 中 installPrefix。集群日志按归档功能使用该参 数 |
| –dbaUser=DBAUSER | 必须为 demo.options 中的 dbaUser。 |
| –cgroup | 使用资源管理功能时,主要用于修改资源管理配置文件,在使用资源管理前必须执行 |
3.2.3 修改配置文件
登录主节点,修改/opt/gcinstall/demo.options配置文件。
# vim demo.options -- 按照集群规划修改对应参数信息
installPrefix= /opt/gbase
coordinateHost = 192.168.10.10,192.168.10.11,192.168.10.12
coordinateHostNodeID = 1000,1001,1002
dataHost = 192.168.10.10,192.168.10.11,192.168.10.12
#existCoordinateHost =
#existDataHost =
dbaUser = gbase
dbaGroup = gbase
dbaPwd = 'gbase'
rootPwd = 'root'
demo.options文件各参数说明如下:
| 参数名称 | 参数描述 |
|---|---|
| installPrefix | 指定安装目录 |
| oordinateHost | 所有集群调度节点列表,可以是 IPV4、IPV6、主机名,但不 建议使用 IPV4 和 IPV6 混合方式部署集群,地址之间用“,” 分隔 |
| coordinateHostNodeID | 每个 Coordinator 节点的 nodeid,在 IPV6 和域名安装时,必 须指定,IPV4 安装时可不指定,与 coordinateHost 中列出的 节点列表一一对应, 之间用“,”分隔 |
| dataHost | 所有集群 Data 节点列表,可以是 IPV4、IPV6、主机名,但 不建议使用 IPV4 和 IPV6 混合方式部署集群,节点地址之间 用“,”分隔 |
| existCoordinateHost | 所有已存在的 Coordinator 节点列表,IP 地址之间用“,”分 隔, 在集群扩容安装新节点时使用 |
| existDataHost | 所有已存在的 Data 节点 IP 列表,IP 地址之间用“,”分隔, 在集群扩容安装新节点时使用 |
| dbaUser | 集群安装和运行时使用的操作系统用户名。在安装/扩展/替换 节点前,需要创建该用户 |
| dbaGroup | 集群安装和运行时使用的操作系统用户所属的组名 |
| dbaPwd | 集群安装和运行时使用的操作系统用户的密码 |
| rootPwd | 安装集群节点机器中 linux 操作系统中 root 用户的统一密码。 因旧版集群 GCWare 版本依然需要 root 权限,所以升级时, 仍然需要提供用户 root 密码,其它情况不需要使用 |
| rootPwdFile | 该参数支持 root 用户在多节点不同密码方式,与参数 rootPwd 不能同时使用,否则报错。默认密码 111111。因旧版集群 gcware 版本依然需要 root 权限,所以升级时,仍然需要提供 用户 root 密码,其它情况不需要使用 |
| characterSet | 系统支持指定字符集安装,默认不在 demo.options 文件中显 示。952 的默认字符集是 utf8mb4(4 字节),可选值为[utf8, gbk,gb18030,utf8mb4] |
| sshPort | 用于指定安装集群的机器的 ssh port,要求所有节点 ssh port 一致。默认不在 demo.options 中显示。默认值为 22 |
- 以上参数可根据实际环境进行修改
3.2.4 初始安装
在主节点,为/opt/gcinstall目录及子目录所有文件更改属主为 DBA 用户 gbase。
# cd /opt
# chown -R gbase:gbase ./gcinstall
然后,切换到gbase用户,执行初始安装。
# su - gbase
$ cd /opt/gcinstall
$ ./gcinstall.py --silent=demo.options
*********************************************************************************
Thank you for choosing GBase product!


Please read carefully the following licencing agreement before installing GBase product:
TIANJIN GENERAL DATA TECHNOLOGY CO., LTD. LICENSE AGREEMENT

READ THE TERMS OF THIS AGREEMENT AND ANY PROVIDED SUPPLEMENTAL LICENSETERMS (COLLECTIVELY "AGREEMENT") CAREFULLY BEFORE OPENING THE SOFTWAREMEDIA PACKAGE.  BY OPENING THE SOFTWARE MEDIA PACKAGE, YOU AGREE TO THE TERMS OF THIS AGREEMENT.  IF YOU ARE ACCESSING THE SOFTWARE ELECTRONICALLY, INDICATE YOUR ACCEPTANCE OF THESE TERMS.  IF YOU DO NOT AGREE TO ALL THESE TERMS, PROMPTLY RETURN THE UNUSED SOFTWARE TO YOUR PLACE OF PURCHASE FOR A REFUND.


1.  LICENSE TO USE.  GeneralData grants you a non-exclusive and non-transferable license for the internal use only of the accompanying software and documentation and any error corrections provided by GeneralData(collectively "Software"), by the number of users and the class of computer hardware for which the corresponding fee has been paid.

2.  RESTRICTIONS.  Software is confidential and copyrighted. Title to Software and all associated intellectual property rights is retained by GeneralData and/or its licensors.  Except as specifically authorized in any Supplemental License Terms, you may not make copies of Software, other than a single copy of Software for archival purposes.  Unless enforcement is prohibited by applicable law, you may not modify,decompile, or reverse engineer Software.  You acknowledge that Software is not designed, licensed or intended for use in the design,construction, operation or maintenance of any nuclear facility.  GeneralData disclaims any express or implied warranty of fitness for such uses.No right, title or interest in or to any trademark, service mark, logo or trade name of GeneralData or its licensors is granted under this Agreement.

3.  DISCLAIMER OF WARRANTY.  Unless specified in this agreement, all express of implied conditions, representations and warranties, including any implied warranty of merchantability, fitness for aparticular purpose or non-infringement are disclaimed, except to theextent that these disclaimers are held to be legally invalid.

4.  LIMITATION OF LIABILITY.  To the extent not prohibited by law, in no event will GeneralData or its licensors be liable for any lost revenue, profit or data, or for special, indirect, consequential,incidental orpunitive damages, however caused regardless of the theory of liability, arising out of or related to the use of or inability to use software, even if GeneralData has been advised of the possibility of such damages.In no event will GeneralData's libility to you, whether incontract, tort (including negligence), or otherwise, exceed the amount paid by you for Software under this Agreement.  The foregoing limitations will apply even if the above stated warranty fails of itsessential purpose.

5.  TERMINATION.  This Agreement is effective until terminated.  You may terminate this Agreement at any time by destroying all copies of Software.  This Agreement will terminate immediately without noticefrom GeneralData if you fail to comply with any provision of this Agreement.Upon Termination, you must destroy all copies of Software.

6.  EXPORT REGULATIONS.  All Software and technical data delivered under this Agreement are subject to US export control laws and may be subject to export or import regulations in other countries.  You agree to comply strictly with all such laws and regulations and acknowledge that you have the responsibility to obtain such licenses to export,re-export, or import as may be required after delivery to you.

7.  CHINESE GOVERNMENT RESTRICTED.  If Software is being acquired by or on behalf of the Chinese Government , then the Government's rights in Software and accompanying documentation will be only as set forth in this Agreement.

8.  GOVERNING LAW.  Any action related to this Agreement will be governed by Chinese law: "COPYRIGHT LAW OF THE PEOPLE'S REPUBLIC OF CHINA","PATENT LAW OF THE PEOPLE'S REPUBLIC OF CHINA","TRADEMARK LAW OF THE PEOPLE'S REPUBLIC OF CHINA","COMPUTER SOFTWARE PROTECTION REGULATIONS OF THE PEOPLE'S REPUBLIC OF CHINA".  No choice of law rules of any jurisdiction will apply."

9.  SEVERABILITY.  If any provision of this Agreement is held to be unenforceable, this Agreement will remain in effect with the provision omitted, unless omission would frustrate the intent of the parties, inwhich case this Agreement will immediately terminate.

10. INTEGRATION.  This Agreement is the entire agreement between you and GeneralData relating to its subject matter.  It supersedes all prior or contemporaneous oral or written communications, proposals,representations and warranties and prevails over any conflicting or additional terms of any quote, order, acknowledgment, or other communication between the parties relating to its subject matter during the term of this Agreement.  No modification of this Agreement will be binding, unless in writing and signed by an authorize depresentative of each party. When the translation document has the different meaning or has the conflicting views with Chinese original text conflict, should take the laws and regulations promulgation unit as well as the Generaldata issue Chinese original text as the standard.

*********************************************************************************
Do you accept the above licence agreement ([Y,y]/[N,n])?   --输入Y或y,按回车

-- 安装执行过程,输出如下信息
                     Welcome to install GBase products
*********************************************************************************
Environmental Checking on gcluster nodes.
CoordinateHost:
192.168.10.10    192.168.10.11    192.168.10.12
DataHost:
192.168.10.10    192.168.10.11    192.168.10.12
Are you sure to install GCluster on these nodes ([Y,y]/[N,n])? y
192.168.10.12            start install on host 192.168.10.12
192.168.10.10            start install on host 192.168.10.10
192.168.10.11            start install on host 192.168.10.11
192.168.10.11            mkdir /opt/gbase/cluster_prepare on host 192.168.10.11.
192.168.10.11            Copying InstallFuns.py to host 192.168.10.11:/opt/gbase/cluster_prepare
192.168.10.12            Copying rmt.py to host 192.168.10.12:/opt/gbase/cluster_prepare
192.168.10.11            Copying rmt.py to host 192.168.10.11:/opt/gbase/cluster_prepare
192.168.10.12            Copying SSHThread.py to host 192.168.10.12:/opt/gbase/cluster_prepare
192.168.10.10            Copying bundle.tar.bz2 to host 192.168.10.10:/opt/gbase/cluster_prepare
192.168.10.11            Copying bundle.tar.bz2 to host 192.168.10.11:/opt/gbase/cluster_prepare
192.168.10.11            Copying bundle_data.tar.bz2 to host 192.168.10.11:/opt/gbase/cluster_prepare
192.168.10.12            Installing gcluster.
192.168.10.10            Installing gcluster.
192.168.10.11            Installing gcluster.
192.168.10.12            install cluster on host 192.168.10.12 successfully.
192.168.10.10            Installing gcluster.
192.168.10.11            Installing gcluster.
192.168.10.12            install cluster on host 192.168.10.12 successfully.
192.168.10.10            install cluster on host 192.168.10.10 successfully.
192.168.10.11            install cluster on host 192.168.10.11 successfully.
----详略部分内容
Starting all gcluster nodes...
start service failed on host 192.168.10.12.
start service failed on host 192.168.10.11.
start service failed on host 192.168.10.10.
adding new datanodes to gcware...
InstallCluster Successfully.
# 出现如上信息表示安装成功
3.2.5 申请授权
3.2.5.1 导出集群节点指纹信息
登录主节点,使用gbase用户,进入/opt/gcinstall目录,采用如下命令,执行导出指纹信息。
$ cd /opt/gcinstall
./gethostsid -n 192.168.10.10,192.168.10.11,192.168.10.12 -u root -p root -f /tmp/finger.txt
======================================================================
Successful node nums:  3
======================================================================
--导出的指纹信息/tmp/finger.txt内容如下
{"HWADDR":"00:xxx:xxx:xxx:xxx:67","SOCKETS":4,"ARCHITECTURE":"x86_64","BYTE ORDER":"Little Endian","MODEL":"63","THREADS":4,"CPUS":4,"NNNODES":1,"CONFUSE DATA":"Wvk.w$V$.szdaF8"}
{"HWADDR":"00:xxx:xxx:xxx:xxx:A8,02:xxx:BF:xxx:7E:C3,6A:xxx:xxx:69:93:74","SOCKETS":4,"ARCHITECTURE":"x86_64","BYTE ORDER":"Little Endian","MODEL":"63","THREADS":4,"CPUS":4,"NNNODES":1,"CONFUSE DATA":"Wvk.w$V$.szdaF8"}
{"HWADDR":"00:xxx:xxx:xxx:xxx:4D","SOCKETS":4,"ARCHITECTURE":"x86_64","BYTE ORDER":"Little Endian","MODEL":"63","THREADS":4,"CPUS":4,"NNNODES":1,"CONFUSE DATA":"Wvk.w$V$.szdaF8"}
3.2.5.2 邮件申请授权
下载导出的指纹信息文件/tmp/finger.txt,邮件发送给license@gbase.cn,按照收到的excel填写相关信息重新提交申请。
3.2.5.3 导入授权文件
收到授权文件后,登录主节点操作,使用gbase用户,进入/opt/gcinstall目录,采用如下命令导入授权文件
$ cd /opt/gcinstall
$ ./License -n 192.168.10.10,192.168.10.11,192.168.10.12 -f /home/soft/20230526-01.lic -u gbase -p gbase
======================================================================
Successful node nums:   3
======================================================================
-- 出现如上提示,表名授权成功
3.2.5.4 检查授权信息
登录主节点操作,使用gbase用户,进入/opt/gcinstall目录,采用如下命令可查看授权信息。
[gbase@node-db1 gcinstall]$ ./chkLicense -n 192.168.10.10,192.168.10.11,192.168.10.12 -u gbase -p gbase
======================================================================
192.168.10.10
is_exist:yes
version:trial
expire_time:20230826
is_valid:yes
======================================================================
192.168.10.11
is_exist:yes
version:trial
expire_time:20230826
is_valid:yes
======================================================================
192.168.10.12
is_exist:yes
version:trial
expire_time:20230826
is_valid:yes
授权信息说明:
- is_exist标识 license 文件是否存在: yes 表示存在,no 表示不存在;
- version标识 license 类型: trial为试用版, business 为商用版;
- expire_time标识 license 的到期日期
- is_valid标识 license 是否有效: yes表示有效,no表示失效;
3.2.6 启动集群
使用gbase用户登录所有集群节点并执行如下命令,启动集群服务。
-- gbase用户执行,节点一、二、三均需执行
$ gcluster_services all start
Starting gcware :                                          [  OK  ]
Starting gcluster :                                        [  OK  ]
Starting gcrecover :                                       [  OK  ]
Starting gbase :                                           [  OK  ]
Starting syncserver :                                      [  OK  ]
Starting GCMonit success!
使用gbase用户执行如下命令查看集群状态。
$ gcadmin
CLUSTER STATE:         ACTIVE

===============================================================
|            GBASE COORDINATOR CLUSTER INFORMATION            |
===============================================================
|   NodeName   |  IpAddress   | gcware | gcluster | DataState |
---------------------------------------------------------------
| coordinator1 | 192.168.10.10 |  OPEN  |   OPEN   |     0     |
---------------------------------------------------------------
| coordinator2 | 192.168.10.11 |  OPEN  |  CLOSE   |     0     |
---------------------------------------------------------------
| coordinator3 | 192.168.10.12 |  OPEN  |  CLOSE   |     0     |
---------------------------------------------------------------
=============================================================
|         GBASE CLUSTER FREE DATA NODE INFORMATION          |
=============================================================
| NodeName  |  IpAddress   | gnode | syncserver | DataState |
-------------------------------------------------------------
| FreeNode1 | 192.168.10.10 | OPEN  |    OPEN    |     0     |
-------------------------------------------------------------
| FreeNode2 | 192.168.10.11 | CLOSE |    OPEN    |     0     |
-------------------------------------------------------------
| FreeNode3 | 192.168.10.12 | CLOSE |    OPEN    |     0     |
-------------------------------------------------------------

0 virtual cluster
3 coordinator node
3 free data node
当所有状态均为OPEN,表明集群运行状态正常。
4 问题与解决方案
4.1 配置本地yum源
某些生产环境因安全需要无法连接外网,可使用操作系统安装iso文件作为安装源配置本地YUM源:
(1)建立/media目录
(2)将操作系统安装盘的ISO文件复制至目录 /software 中。
(3)配置本地yum源
mount -o loop /software/Oracle-Enterprise-R7XXX-Server-x86_64-dvd.iso /media
(4) 配置local.repo文
powershell # cat > /etc/yum.repos.d/local.repo <<EOF [base] name=RHEL7 baseurl=file:///media enabled=1 gpgcheck=0 EOF
(5)清除yum 原有信息并载入新缓存
# yum clean all
# yum groups list
4.2 bzip2: Cannot exec: No such file or directory问题处理
集群初始化如未检测到bzip2系统依赖包,会出现如下报错信息:
Fail to Install. Reason: tar (child): bzip2: Cannot exec: No such file or directory
tar (child): Error is not recoverable: exiting now
tar: Child returned status 2
tar: Error is not recoverable: exiting now
. Please refer to 192.168.10.11:/tmp/InstallTar_2023_05_26.log
192.168.10.11            Installing gcluster.
192.168.10.12            []
Fail to Install. Reason: tar (child): bzip2: Cannot exec: No such file or directory
tar (child): Error is not recoverable: exiting now
tar: Child returned status 2
tar: Error is not recoverable: exiting now
. Please refer to 192.168.10.12:/tmp/InstallTar_2023_05_26.log
4.3 gcluster状态显示CLOSE问题处理
如只在主节点执行gcluster_services all start,使用gcadmin则会显示集群状态异常。
$ gcadmin
CLUSTER STATE:         ACTIVE
VIRTUAL CLUSTER MODE:  NORMAL

===============================================================
|            GBASE COORDINATOR CLUSTER INFORMATION            |
===============================================================
|   NodeName   |  IpAddress   | gcware | gcluster | DataState |
---------------------------------------------------------------
| coordinator1 | 192.168.10.10 |  OPEN  |   OPEN   |     0     |
---------------------------------------------------------------
| coordinator2 | 192.168.10.11 |  OPEN  |  CLOSE   |     0     |
---------------------------------------------------------------
| coordinator3 | 192.168.10.12 |  OPEN  |  CLOSE   |     0     |
---------------------------------------------------------------
=========================================================================================================
|                                    GBASE DATA CLUSTER INFORMATION                                     |
=========================================================================================================
| NodeName |                IpAddress                 | DistributionId | gnode | syncserver | DataState |
---------------------------------------------------------------------------------------------------------
|  node1   |               192.168.10.10               |       1        | OPEN  |    OPEN    |     0     |
---------------------------------------------------------------------------------------------------------
|  node2   |               192.168.10.11              |       1        | CLOSE |    OPEN    |     0     |
---------------------------------------------------------------------------------------------------------
|  node3   |               192.168.10.12               |       1        | CLOSE |    OPEN    |     0     |
---------------------------------------------------------------------------------------------------------
4.4 Cgconfig service is not exist on host问题处理
集群安装过程中,遇到如下报错:
                     Welcome to install GBase products
*********************************************************************************
Error: gcinstall.py(line 2598) -- Dir '/opt/gbase',dbaUser 'gbase' doesn't have write and privilege to this dirctory '/opt/gbase'


Cgconfig service is not exist on host ['192.168.10.10', '192.168.10.11', '192.168.10.12'], resource manangement can not be used, continue ([Y,y]/[N,n])?
原因是缺少依赖包,需安装libcgroup和libcgroup-tools
-- 使用root用户操作,各节点安装依赖包
# yum install -y libcgroup
# yum install -y libcgroup-tools

-- 设置cgroup服务开机启动
systemctl enable cgconfig.service

-- 启动cgconfig服务
systemctl start cgconfig.service
4.5 非root用户执行SetSysEnv.py报错问题处理
执行SetSysEnv.py文件设置环境变量时,需使用root用户,否则会报如下错误:
$ python SetSysEnv.py --dbaUser=gbase --installPrefix=/opt/gbase --cgroup
Fail to modify system parameters. Reason: please exec SetSysEnv.py by root.. Please refer to /tmp/SetSysEnv.log
4.6 设置分片
可使用gbase用户在主节点设置分片,可参照如下命令。
$ gcadmin distribution gcChangeInfo.xml p 2 d 1 pattern 1
-- 该命令执行后,会在/opt/gcinstall目录下生成gcChangeInfo.xml分片文件

-- 通过如下命令查看分片信息
$ gcadmin showdistribution node
                  Distribution ID: 1 | State: new | Total segment num: 6

==========================================================================================
|  nodes   |    192.168.10.10         |     192.168.10.11     |       192.168.10.12      |
------------------------------------------------------------------------------------------
| primary  |         1                |          2            |            3             |
| segments |         4                |          5            |            6             |
------------------------------------------------------------------------------------------
|duplicate |         3                |          1            |            2             |
|segments 1|         5                |          6            |            4             |
==========================================================================================
4.7 初始化数据库
使用gbase用户登录主节点,执行如下命令初始化数据库。
$ gccli -u root -p
Enter password:   # 输入密码,按回车

GBase client 9.5.3.39.126761. Copyright (c) 2004-2023, GBase.  All Rights Reserved.

gbase> initnodedatamap;
Query OK, 0 rows affected (Elapsed: 00:00:00.64)

gbase> create database gbasedb;
Query OK, 1 row affected (Elapsed: 00:00:00.03)

gbase> show databases;
+--------------------+
| Database           |
+--------------------+
| information_schema |
| performance_schema |
| gbase              |
| gctmpdb            |
| gbasedb            |
| gclusterdb         |
+--------------------+
6 rows in set (Elapsed: 00:00:00.00)

gbase> use gclusterdb;
Query OK, 0 rows affected (Elapsed: 00:00:00.00)

gbase> create table tb_gb(id int ,name varchar2(20));
ERROR 1064 (42000): You have an error in your SQL syntax; check the manual that corresponds to your GBase server version for the right syntax to use near 'varchar2(20))' at line 1
gbase>
gbase> create table tb_gb(id int ,name varchar(30));

Query OK, 0 rows affected (Elapsed: 00:00:00.07)

gbase>
gbase> show tables;
+----------------------+
| Tables_in_gclusterdb |
+----------------------+
| dual                 |
| rebalancing_status   |
| tb_gb                |
+----------------------+
3 rows in set (Elapsed: 00:00:00.00)
gbase> insert into tb_gb values(1,'test');
Query OK, 1 row affected (Elapsed: 00:00:00.05)
gbase>
gbase> commit;
Query OK, 0 rows affected (Elapsed: 00:00:00.00)
4.8 客户端连接Gbase数据库
可通过gccli命令行工具连接数据库。
$ gccli

GBase client 9.5.2.39.126761. Copyright (c) 2004-2023, GBase.  All Rights Reserved.

gbase> show databases;
+--------------------+
| Database           |
+--------------------+
| information_schema |
| performance_schema |
| gbase              |
| gctmpdb            |
| gbasedb            |
| gclusterdb         |
+--------------------+
6 rows in set (Elapsed: 00:00:00.00)

gbase> use gbase;
Query OK, 0 rows affected (Elapsed: 00:00:00.00)
如果为数据库设置了密码,还可通过如下方式连接远程数据库:
gccli –no-defaults -uUSERNAME -pPASSWORD -hREMOTE_HOST_IP -PPORT_NUMBER
链接命令各参数含义如下:
gccli -h主机 ip -P端口号 -u用户名 -D数据库名
5 附录
5.1 参考文档
5.1.1 软件安装参考文档地址
参考文档地址:https://www.gbase.cn/download/gbase-8a?category=DOCUMENT
参考文档:
GBase 8a MPP Cluster产品手册_V95.pdf
GBase 8a MPP Cluster产品手册.pdf
GBase 8a MPP Cluster技术白皮书_V9.pdf
GBase 8a MPP Cluster Technical White Paper_V953.pdf
5.1.2 程序员手册参考文档
GBase 8a 程序员手册PYTHON篇.pdf
GBase 8a 程序员手册ODBC篇.pdf
GBase 8a 程序员手册JDBC篇.pdf
GBase 8a 程序员手册C-API篇.pdf
GBase 8a 程序员手册ADO.NET篇.pdf
5.2 GBase 8a MPP Cluster 架构原理
如下是GBase官方给的GBase 8a MPP Cluster架构示意图:
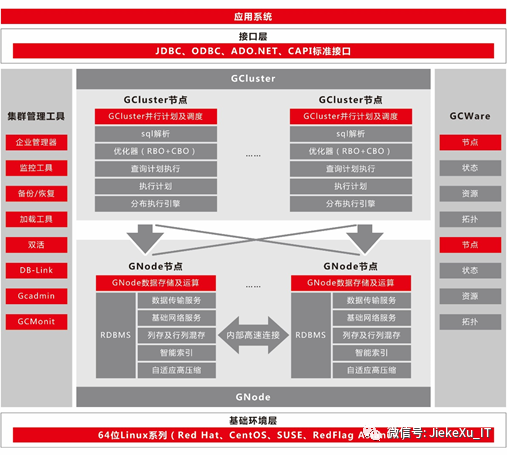
该架构相关组件及功能介绍如下:
三大核心组件:
(1) 布式管理集群 GCWare
(2) 分布式调度集群 GCluster
(3) 分布式存储计算集群 GNode
三大组件功能介绍:
(1) 布式管理集群 GCWare: GCluster实例间共享信息,包括集群结构、节点状态和资源状态等,同时也控制多副本数据操作,确保数据一致性。
(2) 分布式调度集群 GCluster: 负责解析和优化SQL,生成分布式执行计划,并进行执行调度。
(3) 分布式存储计算集群 GNode: 负责实际存储集群数据和执行SQL计划。它从集群加载服务获取数据并将其写入本地存储空间。使用虚拟集群部署策略时,可以根据业务特点将节点进行物理隔离,形成不同的VC。
