


Redis中的Sentinel架构
1.1
Sentinel介绍
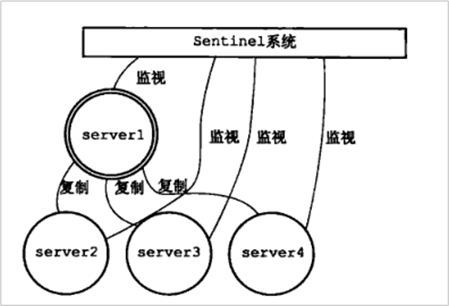
Sentinel(哨兵)是Redis的高可用性解决方案:由一个或多个Sentinel实例 组成的Sentinel系统可以监视任意多个主服务器,以及这些主服务器属下的所有从服务器,并在被监视的主服务器进入下线状态时,自动将下线主服务器属下的某个从服务器升级为新的主服务器。
例如:
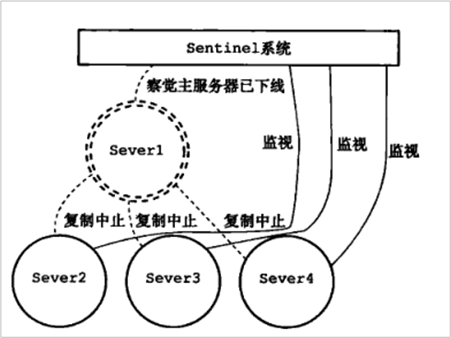
在Server1 掉线后:
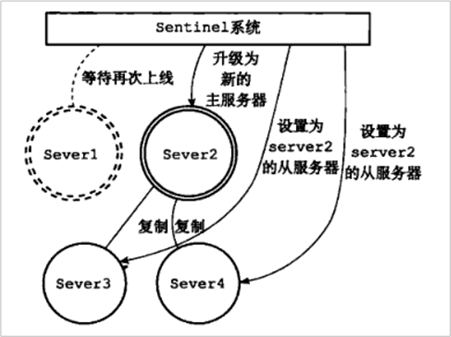
升级Server2 为新的主服务器:
1.2
配置哨兵
1.2.1 三台机器修改哨兵配置文件
三台机器执行以下命令修改redis的哨兵配置文件
|
cd
/export/server/redis-3.2.8 vi sentinel.conf |
配置监听的主服务器
1. 修改node1.itcast.cn的sentinel.conf文件
|
#修改第15行, bind配置,每台机器修改为自己对应的主机名 bind node1.itcast.cn #
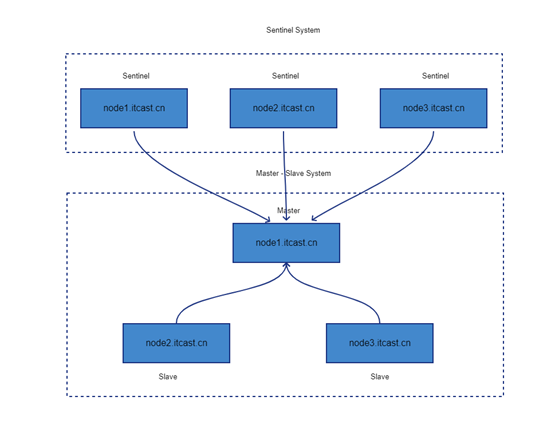
在下方添加配置,让sentinel服务后台运行 daemonize yes #修改第71行,三台机器监控的主节点,现在主节点是node1.itcast.cn服务器 sentinel monitor mymaster node1.itcast.cn
6379 2 |
参数说明
l
sentinel monitor代表监控
l
mymaster代表服务器的名称,可以自定义
l
node1.itcast.cn代表监控的主服务器,6379代表端口
l
2代表只有两个或两个以上的哨兵认为主服务器不可用的时候,才会进行failover操作。
如果Redis是有密码的,需要指定密码
|
#
sentinel author-pass定义服务的密码,mymaster是服务名称,123456是Redis服务器密码 #
sentinel auth-pass <master-name> <password> |
2. 分发到node2.itcast.cn和node3.itcast.cn
|
scp
sentinel.conf node2.itcast.cn:$PWD scp
sentinel.conf node3.itcast.cn:$PWD |
3. 分别修改配置中bind的服务器主机名
node2.itcast.cn
|
cd
/export/server/redis-3.2.8 vim
sentinel.conf #
修改第18行 bind node2.itcast.cn |
node3.itcast.cn
|
cd
/export/server/redis-3.2.8 vim
sentinel.conf #
修改第18行 bind node3.itcast.cn |
1.2.2 三台机器启动哨兵服务
|
cd
/export/server/redis-3.2.8 bin/redis-sentinel
sentinel.conf |
三台服务器的进程信息:
|
node1.itcast.cn [root@node1
redis-3.2.8]# ps aux | grep redis root 18911
0.0 0.0 136920 2456 ? Ssl
08:58 0:04 bin/redis-server
node1.itcast.cn:6379 root 19112
0.0 0.0 149232 5152 pts/1 S+
09:16 0:00 vim redis.conf root 20544
0.1 0.0 135728 2328 ? Ssl
10:48 0:00 bin/redis-sentinel node1.itcast.cn:26379
[sentinel] root 20548
0.0 0.0 112712 960 pts/3 S+
10:48 0:00 grep --color=auto
redis node2.itcast.cn [root@node2
redis-3.2.8]# ps aux | grep redis root 26260
0.0 0.1 139200 4456 ? Ssl
10:34 0:00 bin/redis-server
node2.itcast.cn:6379 root 26421
0.1 0.0 139204 2440 ? Ssl
10:48 0:00 bin/redis-sentinel node2.itcast.cn:26379
[sentinel] root 26438
0.0 0.0 112812 972 pts/1 S+
10:49 0:00 grep --color=auto
redis node3.itcast.cn [root@node3
redis-3.2.8]# ps aux | grep redis root 22325
0.0 0.0 135992 2376 ? Ssl
10:34 0:00 bin/redis-server
node3.itcast.cn:6379 root 22463
0.1 0.0 135836 2384 ? Ssl
10:48 0:00 bin/redis-sentinel node3.itcast.cn:26379
[sentinel] root 22475
0.0 0.0 112812 972 pts/1 S+
10:49 0:00 grep --color=auto
redis |
1.2.3 node1服务器杀死redis服务进程
|
查看Sentinel master的状态 bin/redis-cli
-h node2.itcast.cn -p 26379 使用ping命令检查哨兵是否工作,如果正常会返回PONG node2.itcast.cn:26379>
ping PONG node2.itcast.cn:26379>
info ...
... ... #
Sentinel sentinel_masters:1 sentinel_tilt:0 sentinel_running_scripts:0 sentinel_scripts_queue_length:0 sentinel_simulate_failure_flags:0 master0:name=mymaster,status=ok,address=192.168.88.100:6379,slaves=2,sentinels=3 |
使用kill -9命令杀死redis服务进程,模拟redis故障宕机情况
过一段时间之后,就会在node2.itcast.cn与node3.itcast.cn服务器选择一台服务器来切换为主节点
|
node2.itcast.cn:26379>
info ...
... ... #
Sentinel sentinel_masters:1 sentinel_tilt:0 sentinel_running_scripts:0 sentinel_scripts_queue_length:0 sentinel_simulate_failure_flags:0 master0:name=mymaster,status=ok,address=192.168.88.102:6379,slaves=2,sentinels=3 |
1.3
Redis的sentinel模式代码开发连接
通过哨兵连接,要指定哨兵的地址,并使用JedisSentinelPool来创建连接池。
实现步骤:
1. 在 cn.itcast.redis.api_test 包下创建一个新的类 ReidsSentinelTest
2. 构建JedisPoolConfig配置对象
3. 创建一个HashSet,用来保存哨兵节点配置信息(记得一定要写端口号)
4. 构建JedisSentinelPool连接池
5. 使用sentinelPool连接池获取连接
|
public class ReidsSentinelTest
{ |
