作者:宇的季节 原文:https://www.cnblogs.com/chenkeyu/p/8028781.html
缓存可以说是加速服务响应速度的一种非常有效并且简单的方式。在缓存领域,有很多知名的框架,如EhCache 、Guava、HazelCast等。
Redis作为key-value型数据库,由于他的这一特性,Redis也成为一种流行的数据缓存工具。
在传统方式下对于缓存的处理代码是非常臃肿的。
例如:我们要把一个查询函数加入缓存功能,大致需要三步。
在函数执行前,我们需要先检查缓存中是否存在数据,如果存在则返回缓存数据 如果不存在,就需要在数据库的数据查询出来。 最后把数据存放在缓存中,当下次调用此函数时,就可以直接使用缓存数据,减轻了数据库压力。
那么实现上面的三步需要多少代码呢?下面是一个示例:
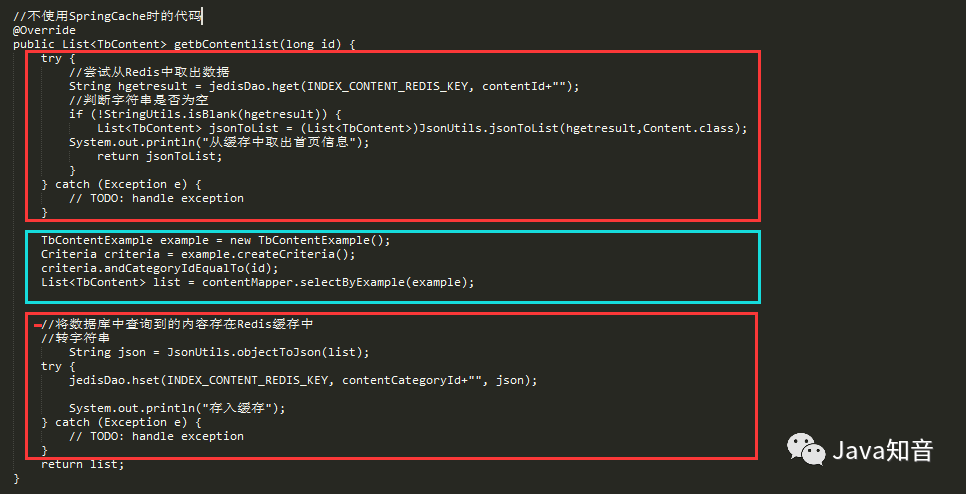
上图中的红色部分都是模板代码,真正与这个函数有关的代码却只占了1/5,对于所有需要实现缓存功能的函数,都需要加上臃肿的模板代码。可谓是一种极不优雅的解决方案。
那么如何让臃肿的代码重回清新的当初呢?
AOP不就是专门解决这种模板式代码的最佳方案吗,幸运的是我们不需要再自己实现切面了,SpringCache已经为我们提供好了切面,我们只需要进行简单的配置,就可以重回当初了,像下面这样:
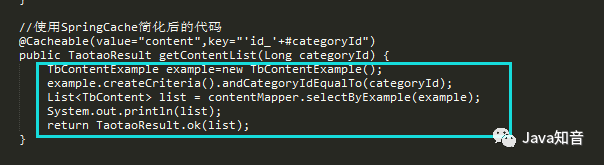
只需要加一个注解就可以了,对于原来的代码连改都不需要改,是不是已经跃跃欲试了?
对于配置SpringCache只需要三步:
第一步:加入相关依赖:
<dependency><groupId>redis.clients</groupId><artifactId>jedis</artifactId><version>2.9.0</version></dependency><dependency><groupId>org.springframework.data</groupId><artifactId>spring-data-redis</artifactId><version>1.6.0.RELEASE</version></dependency><dependency><groupId>org.apache.commons</groupId><artifactId>commons-lang3</artifactId><version>3.3.2</version></dependency>
第二步:配置SpringCache,Redis连接等信息
applicationContext-redis.xml
<?xml version="1.0" encoding="UTF-8"?><beans xmlns="http://www.springframework.org/schema/beans"xmlns:xsi="http://www.w3.org/2001/XMLSchema-instance" xmlns:p="http://www.springframework.org/schema/p"xmlns:context="http://www.springframework.org/schema/context"xmlns:mvc="http://www.springframework.org/schema/mvc"xmlns:cache="http://www.springframework.org/schema/cache"xsi:schemaLocation="http://www.springframework.org/schema/beanshttp://www.springframework.org/schema/beans/spring-beans-4.2.xsdhttp://www.springframework.org/schema/contexthttp://www.springframework.org/schema/context/spring-context-4.2.xsdhttp://www.springframework.org/schema/mvchttp://www.springframework.org/schema/mvc/spring-mvc-4.2.xsdhttp://www.springframework.org/schema/cachehttp://www.springframework.org/schema/cache/spring-cache-4.2.xsd"><!-- 配置文件加载 --><context:property-placeholder location="classpath:*.properties"/><cache:annotation-driven cache-manager="cacheManager"/><!-- redis连接池 --><bean id="poolConfig" class="redis.clients.jedis.JedisPoolConfig"><property name="maxIdle" value="${redis.maxIdle}" ><property name="maxWaitMillis" value="${redis.maxWait}" ><property name="testOnBorrow" value="${redis.testOnBorrow}" ></bean><!-- 连接工厂 --><bean id="JedisConnectionFactory" class="org.springframework.data.redis.connection.jedis.JedisConnectionFactory"p:host-name="${redis.host}" p:port="${redis.port}" p:password="${redis.pass}" p:pool-config-ref="poolConfig"/><!-- redis模板 --><bean id="redisTemplate" class="org.springframework.data.redis.core.RedisTemplate"><property name="connectionFactory" ref="JedisConnectionFactory" ></bean><bean id="cacheManager" class="org.springframework.cache.support.SimpleCacheManager"><property name="caches"><set><!-- 这里可以配置多个redis --><bean class="com.cky.rest.utils.RedisCache"><property name="redisTemplate" ref="redisTemplate" ><property name="name" value="content"/><!-- name对应的名称要在类或方法的注解中使用 --></bean></set></property></bean></beans>
redis.properties文件:
# Redis settings# server IPredis.host=192.168.100.55# server portredis.port=6379# server passredis.pass=# use dbIndexredis.database=0#max idel instance of jedisredis.maxIdle=300#if wait too long ,throw JedisConnectionExceptionredis.maxWait=3000#if true,it will validate before borrow jedis instance,what you get instance is all usefullredis.testOnBorrow=true
第三步,编写Cache接口实现类
Spring对于缓存只是提供了抽象的接口,并且通过接口来调用功能,没有具体的实现类,所以需要我们自己实现具体的操作。搜索Java知音公众号,回复“后端面试”,送你一份Java面试题宝典
在上面配置中可知,每个实现类都会注入一个redisTemplate实例,我们就可以通过redisTemplate来操作redis
package com.cky.rest.utils;import java.io.Serializable;import org.apache.commons.lang3.SerializationUtils;import org.springframework.cache.Cache;import org.springframework.cache.support.SimpleValueWrapper;import org.springframework.dao.DataAccessException;import org.springframework.data.redis.connection.RedisConnection;import org.springframework.data.redis.core.RedisCallback;import org.springframework.data.redis.core.RedisTemplate;public class RedisCache implements Cache {private RedisTemplate<String, Object> redisTemplate;private String name;@Overridepublic void clear() {System.out.println("-------緩存清理------");redisTemplate.execute(new RedisCallback<String>() {@Overridepublic String doInRedis(RedisConnection connection) throws DataAccessException {connection.flushDb();return "ok";}});}@Overridepublic void evict(Object key) {System.out.println("-------緩存刪除------");final String keyf=key.toString();redisTemplate.execute(new RedisCallback<Long>() {@Overridepublic Long doInRedis(RedisConnection connection) throws DataAccessException {return connection.del(keyf.getBytes());}});}@Overridepublic ValueWrapper get(Object key) {System.out.println("------缓存获取-------"+key.toString());final String keyf = key.toString();Object object = null;object = redisTemplate.execute(new RedisCallback<Object>() {@Overridepublic Object doInRedis(RedisConnection connection) throws DataAccessException {byte[] key = keyf.getBytes();byte[] value = connection.get(key);if (value == null) {System.out.println("------缓存不存在-------");return null;}return SerializationUtils.deserialize(value);}});ValueWrapper obj=(object != null ? new SimpleValueWrapper(object) : null);System.out.println("------获取到内容-------"+obj);return obj;}@Overridepublic void put(Object key, Object value) {System.out.println("-------加入缓存------");System.out.println("key----:"+key);System.out.println("key----:"+value);final String keyString = key.toString();final Object valuef = value;final long liveTime = 86400;redisTemplate.execute(new RedisCallback<Long>() {@Overridepublic Long doInRedis(RedisConnection connection) throws DataAccessException {byte[] keyb = keyString.getBytes();byte[] valueb = SerializationUtils.serialize((Serializable) valuef);connection.set(keyb, valueb);if (liveTime > 0) {connection.expire(keyb, liveTime);}return 1L;}});}@Overridepublic <T> T get(Object arg0, Class<T> arg1) {// TODO Auto-generated method stubreturn null;}@Overridepublic String getName() {return this.name;}@Overridepublic Object getNativeCache() {return this.redisTemplate;}@Overridepublic ValueWrapper putIfAbsent(Object arg0, Object arg1) {// TODO Auto-generated method stubreturn null;}public RedisTemplate<String, Object> getRedisTemplate() {return redisTemplate;}public void setRedisTemplate(RedisTemplate<String, Object> redisTemplate) {this.redisTemplate = redisTemplate;}public void setName(String name) {this.name = name;}}
在配置过程中曾经出现过两次错误:
Xxxx.ClassNotFoundException 最后发现是jar下载不完整,把maven本地仓库的对应jar包文件夹删除完从新下载就好了
Xxxx.MethodNotFoundException 这种情况是版本不对,换成第一步中的版本就可以了
SpringCache中常见注解的使用:
@Cacheable注解
最常用的注解,会把被注解方法的返回值缓存。工作原理是:首先在缓存中查找,如果没有执行方法并缓存结果,然后返回数据。此注解的缓存名必须指定,和cacheManager中的caches中的某一个Cache的name值相对应。可以使用value或cacheNames指定。搜索Java知音公众号,回复“后端面试”,送你一份Java面试题宝典
如果没有指定key属性,spring会使用默认的主键生成器产生主键。也可以自定义主键,在key中可以使用SpEL表达式。如下:
@Cacheable(cacheNames=”content”,key=”#user.userId”)Public User getUser(User user){xxxxx}
可以使用condition属性,来给缓存添加条件,如下:
@Cacheable(cacheNames=”content”,key=”#user.userId”,condition=”#user.age<40”)Public User getUser(User user){xxxxx}
@CachePut注解
先执行方法,然后将返回值放回缓存。可以用作缓存的更新。
@CacheEvict注解
该注解负责从缓存中显式移除数据,通常缓存数据都有有效期,当过期时数据也会被移除。
此注解多了两个属性:
allEntries是否移除所有缓存条目。
beforeInvocation:在方法调用前还是调用后完成移除操作。true/false