


点击蓝字|关注我们
相同的账号、密码,
手动客户端连接可以成功,
通过MySQL Connectors却失败了,
这是为什么呢?
具体现象是这样的:
通过MySQL C API编写的一个程序,在进行用户登录操作的时候,程序报错,登录失败。
但是如果通过mysql客户端,手动登录成功后,再启动客户端程序,不再报错,程序运行成功。
#01
抓包分析问题
学会抓包,就超越了90%的程序员。
sudo tcpdump -i any tcp and port xxx -s 1500 -w filename -v
C程序登录失败时的包
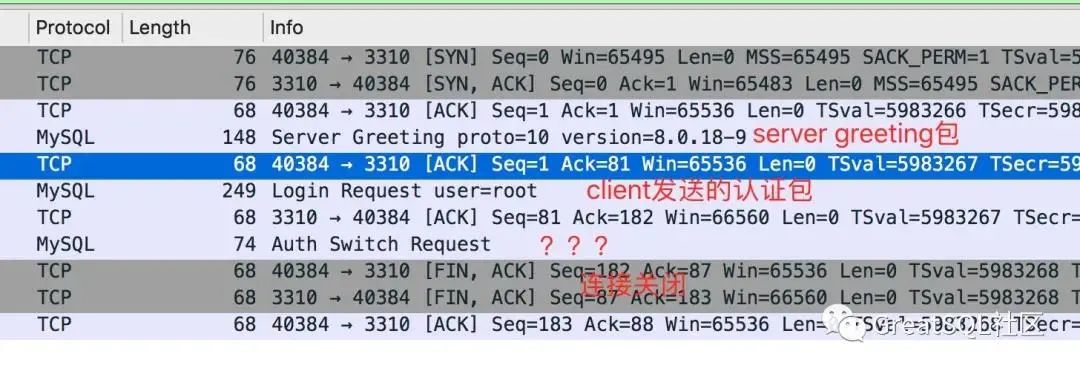
前两个包很正常,第三个包第一次见,wireshark解析的叫做 AuthSwitchRequest。
看下这个包的内容:
mysql客户端登录成功后,再执行C程序登录成功时的包
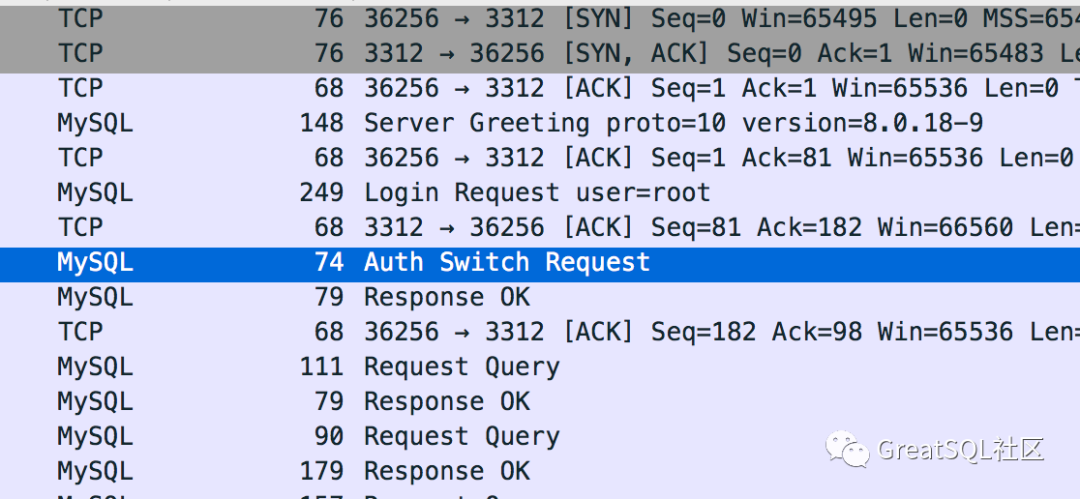
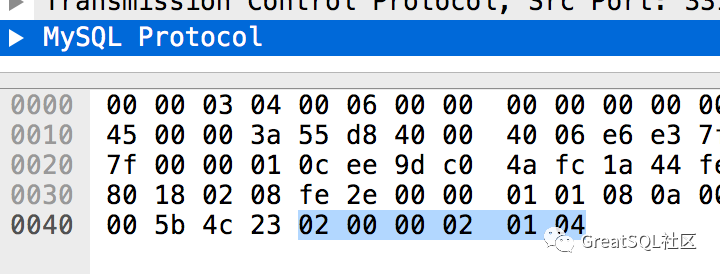
看下这个AuthSwithRequest包的内容:
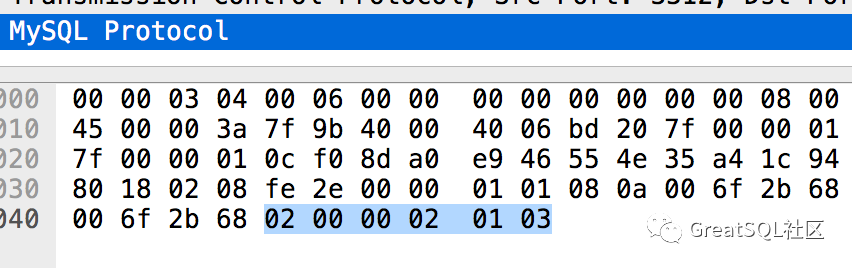
认证成功和失败的包,数据是不同的,分别是03和04。
#02
AuthSwitchRequest包
首先看下AuthSwitchRequest包的官方解释:
Protocol::AuthSwitchRequest:
Authentication Method Switch Request Packet. If both server and client support CLIENT_PLUGIN_AUTH
capability, server can send this packet to ask client to use another authentication method.
Payload
1              [fe]
string[NUL]    plugin name
string[EOF]    auth plugin data
可以看出,这个包payload的第一个字节是0xfe,与抓包中的01是不同的,而且AuthSwitchRequest后面跟的应该是plugin name,是个字符串,而抓包中,内容是04。
所以wireshard解包错误了。
在协议里面我们找下payload第一个字节是01的包,找到了AuthMoreData的包。
Protocol::AuthMoreData:
Payload
1              [01]
string[EOF]    plugin data
这个包的说明payload后面是string类型,和我们的抓包也是有些出入,先不管这个了。
跟到这里只能去代码里面找下这个包是什么。
#03
服务器认证
目前用户认证默认都走caching_sha2_password的plugin,之前版本都是mysql_native_password。
mysql > select user,host,plugin from mysql.user;+------------------+-----------+-----------------------+| user | host | plugin |+------------------+-----------+-----------------------+| mysql.infoschema | localhost | caching_sha2_password || mysql.session | localhost | caching_sha2_password || mysql.sys | localhost | caching_sha2_password || root | localhost | caching_sha2_password |+------------------+-----------+-----------------------+mysql > show variables like '%auth%';+-------------------------------+-----------------------+| Variable_name | Value |+-------------------------------+-----------------------+| default_authentication_plugin | caching_sha2_password |+-------------------------------+-----------------------+1 row in set (0.01 sec)
服务器端认证代码在sql/auth/sha2password.cc文件中的caching_sha2_password_authenticate函数。
在此函数中,找到了发包的代码,正好可以对应到我们抓包的AuthMoreData。
996 if (pkt_len != sha2_password::CACHING_SHA2_DIGEST_LENGTH) return CR_ERROR;997998 std::pair<bool, bool> fast_auth_result =999 g_caching_sha2_password->fast_authenticate(1000 authorization_id, reinterpret_cast<unsigned char *>(scramble),1001 SCRAMBLE_LENGTH, pkt,1002 info->additional_auth_string_length ? true : false);10031004 if (fast_auth_result.first) {1005 /*1006 We either failed to authenticate or did not find entry in the cache.1007 In either case, move to full authentication and ask the password1008 */1009 if (vio->write_packet(vio, (uchar *)&perform_full_authentication, 1))1010 return CR_AUTH_HANDSHAKE;1011 } else {1012 /* Send fast_auth_success packet followed by CR_OK */1013 if (vio->write_packet(vio, (uchar *)&fast_auth_success, 1))1014 return CR_AUTH_HANDSHAKE;1015 if (fast_auth_result.second) {1016 const char *username =1017 *info->authenticated_as ? info->authenticated_as : "";1018 LogPluginErr(INFORMATION_LEVEL,1019 ER_CACHING_SHA2_PASSWORD_SECOND_PASSWORD_USED_INFORMATION,1020 username, hostname ? hostname : "");1021 }10221023 return CR_OK;1024 }1025
首先进行了fast_authenticate,根据这个结果fast_auth_result.first,分别发送了不同的包perform_full_authentication和fast_auth_success。
791 static char request_public_key = '\2';792 static char fast_auth_success = '\3';793 static char perform_full_authentication = '\4';
可以看到我们C程序登录失败时,给我们发送的是perform_full_authentication,而认证成功发送的是fast_auth_success包。
什么情况下会出现perform_full_authentication包呢?代码中给出了说明,我们就不去看fast_authenticate的代码逻辑了,从说明就能了解到大概情况。
1006 We either failed to authenticate or did not find entry in the cache. 1007 In either case, move to full authentication and ask the password
也就是说,如果cache中没有记录,或者认证失败,会进入perform_full_authentication流程。我们从这个认证插件的名字caching_sha2_password就可以知道,这是个带cache的认证插件。
而这正好解释了为什么用mysql客户端手动登陆后,我们C程序就登录成功了,因为cache中已经有了记录。
那么:为什么手动客户端认证就能成功呢?而我们自己写的C程序就会失败呢?
且看客户端认证分析。
#04
客户端认证
客户端认证的代码逻辑在sql-common/client_authentication.cc中的caching_sha2_password_auth_client函数中。
514 if (pkt_len != 1 || *pkt != perform_full_authentication) {515 DBUG_PRINT("info", ("Unexpected reply from server."));516 return CR_ERROR;517 }518519 /* If connection isn't secure attempt to get the RSA public key file */520 if (!connection_is_secure) {521 public_key = rsa_init(mysql);......523 if (public_key == NULL && mysql->options.extension &&524 mysql->options.extension->get_server_public_key) {525 // If no public key; request one from the server.......540 }541542 if (public_key) {543 /*......584 } else {585 set_mysql_extended_error(mysql, CR_AUTH_PLUGIN_ERR, unknown_sqlstate,586 ER_CLIENT(CR_AUTH_PLUGIN_ERR),587 "caching_sha2_password",588 "Authentication requires secure connection.");589 return CR_ERROR;590 }591 } else {592 /* The vio is encrypted already; just send the plain text passwd */593 if (vio->write_packet(vio, (uchar *)mysql->passwd, passwd_len))594 return CR_ERROR;595 }
可以看到客户端收到perform_full_authentication包后,根据connection_is_secure进行了分支。
我们的客户端中的连接肯定是没有开启SSL的,所以会走进if (!connection_is_secure)流程。
mysql客户端登录默认是开启SSL认证的,故走了else流程。
我们使用mysql客户端登录时的命令如下,是开启了ssl的:
shell> bin/mysql -h127.0.0.1 -uroot -P3301 -ppassword
如果客户端想禁用ssl,需要加上–ssl-mode=disable选项。
所以,这就解释了为什么客户端能登录成功了。
现在我们看下if (!connection_is_secure)流程,发现没有进入下面的if流程,这样就不会生成public_key,导致public_key为空。
if (public_key == NULL && mysql->options.extension &&524 mysql->options.extension->get_server_public_key)
具体来说,是因为我们的连接选项没有设置mysql->options.extension->get_server_public_key。
#05
解决方法
在不开启ssl选项的时候,我们需要设置get_server_public_key选项。
+ bool get_server_public_key = true;+ mysql_options(m_client, MYSQL_OPT_GET_SERVER_PUBLIC_KEY,+ &get_server_public_key);
参考文档
1、connection-phase-packets:https://dev.mysql.com/doc/internals/en/connection-phase-packets.html
2、authentication method mismatch:https://dev.mysql.com/doc/internals/en/authentication-method-mismatch.html


扫码二维码
关注公众号
