


一、实验环境
1实验环境配置基本信息
节点1<->节点2 | DM8<-->DM8 |
| DMHS版本 | dmhs_V3.1.3_dm8_rev99813_rh6_64_veri_20210527_beta_20210527.zip |
| dm8_20210507_x86_rh7_64_ent_8.1.2.2_pack4.iso | |
| dm8_20210508_x86_rh6_64_ent_8.1.2.2_pack4_dmdci.zip | |
| 节点1 IP | 192.168.3.92 |
| 节点2 IP | 192.168.3.93 |
| 安装用户:root | |
| DMHS_HOME=/opt/dmhs | |
| 安装用户:root | |
| DMHS_HOME=/opt/dmhs | |
| 传输用户 | DMHS |
| 同步用户 | YUANZJ |
2.hsem和dem信息
| 元数据库IP | 192.168.3.93 |
| 元数据库模式 | hsem/dem |
| jdk版本 | jdk-8u291-linux-x64.tar.gz |
| tomcat版本 | apache-tomcat-9.0.46.tar.gz |
| tomcat路径 | /opt/apache-tomcat-9.0.46 |
3.开启归档和逻辑日志(节点1和节点2分别执行)
1.开启归档,执行以下sql
alter database mount;alter database archivelog;alter database add archivelog 'dest = dmarch, type = local, file_size =512, space_limit =51200';alter database open;
2.开启逻辑日志,执行以下sql
sp_set_para_value(2,'RLOG_APPEND_LOGIC',1);
4.新建dmhs用户(节点1和节点2分别执行)
SQL> create user dmhs identified by dmhs12345 default tablespace main default index tablespace main;操作已执行已用时间: 18.295(毫秒). 执行号:300.SQL> grant dba to dmhs;操作已执行已用时间: 1.318(毫秒). 执行号:301.
5.执行脚本,配置DMHS支持DDL(节点1和节点2分别执行)
使用管理登录SYSDBA用户,执行ddl_sql_dm8.sql脚本,过程略
验证是否成功
检查辅助表
select owner, table_name from dba_tables where owner = 'SYSDBA' and table_name like 'DMHS%' and status = 'VALID';行号 OWNER TABLE_NAME---------- ------ ---------------1 SYSDBA DMHS_DDL_COL2 SYSDBA DMHS_DDL_SQL3 SYSDBA DMHS_DDL_CONS4 SYSDBA DMHS_DDL_IDX5 SYSDBA DMHS_DDL_RENAME6 SYSDBA DMHS_DDL_SEQ7 SYSDBA DMHS_DDL_PART7 rows got已用时间: 197.302(毫秒). 执行号:7.
检查触发器
select owner, trigger_name from dba_triggers where owner = 'SYSDBA' and trigger_name like 'DMHS%' and status = 'Y';行号 OWNER TRIGGER_NAME---------- ------ -----------------------1 SYSDBA DMHS_DDL_TRIGGER_AFTER2 SYSDBA DMHS_DDL_TRIGGER_BEFORE3 SYSDBA DMHS_DDL_TRIGGER_GRANT4 SYSDBA DMHS_DDL_TRIGGER_REVOKE已用时间: 12.147(毫秒). 执行号:16.
6.创建测试用户和测试数据
1.创建测试用户(节点1和节点2分别执行)
SQL> create user yuanzj identified by yuanzj123 default tablespace main default index tablespace main;操作已执行已用时间: 18.295(毫秒). 执行号:300.SQL> grant dba to yuanzj;操作已执行已用时间: 1.318(毫秒). 执行号:301.
2.创建测试数据
1.节点1登录yuanzj用户,执行下面sql
--节点1--1、创建表test:create table test(id number(4) not null primary key,name varchar(25),age int);--2、创建序列sql_test:create sequence seq_testincrement by 2 --每次加几个start with 1 --从1开始计数nomaxvalue --不设置最大值nocycle --直累加,不循环cache 10 ;--3、创建触发器tri_test:create trigger tri_testbefore insert on test for each rowwhen (new.id is null)beginselect seq_test.nextval into :new.id from dual;end;/--4、像MSSQL中一样插入数据(不需要加ID)insert into test (name, age) Values ('yuanzj', 30);insert into test (name, age) Values ('yuanzj3', 30);--2、创建表example01:create table example01(id number(4) not null primary key,name varchar(25),age int);--2、创建序列sql_example01:create sequence seq_example01increment by 1 --每次加几个start with 1 --从1开始计数nomaxvalue --不设置最大值nocycle --直累加,不循环cache 10 ;--3、创建触发器tri_example01:create trigger tri_example01before insert on example01 for each rowwhen (new.id is null)beginselect seq_example01.nextval into :new.id from dual;end;/--4、像MSSQL中一样插入数据(不需要加ID)insert into example01 (name, age) Values ('yuanzj', 30);insert into example01 (name, age) Values ('yuanzj2', 30);
2.节点2登录yuanzj用户,执行下面sql
---1、创建表test:create table test(id number(4) not null primary key,name varchar(25),age int);--2、创建序列sql_test:create sequence seq_testincrement by 2 --每次加几个start with 2 --从1开始计数nomaxvalue --不设置最大值nocycle --直累加,不循环cache 10 ;--3、创建触发器tri_test:create trigger tri_testbefore insert on test for each rowwhen (new.id is null)beginselect seq_test.nextval into :new.id from dual;end;/--4、像MSSQL中一样插入数据(不需要加ID)insert into test (name, age) Values ('yuanzj2', 30);insert into test (name, age) Values ('yuanzj4', 30);--1、创建表example02:create table example02(id number(4) not null primary key,name varchar(25),age int);--2、创建序列sql_example02:create sequence seq_example02increment by 1 --每次加几个start with 1 --从1开始计数nomaxvalue --不设置最大值nocycle --直累加,不循环cache 10 ;--3、创建触发器tri_example02:create trigger tri_example02before insert on example02 for each rowwhen (new.id is null)beginselect seq_example02.nextval into :new.id from dual;end;/--4、像MSSQL中一样插入数据(不需要加ID)insert into example02 (name, age) Values ('yuanzj1', 30);insert into example02 (name, age) Values ('yuanzj2', 30);
二、部署dmhs
1.在源端和目的端分别建立$DMHS_HOME
mkdir -p opt/dmhs
2.在源端和目的端分别上传dmhs到/opt/dmhs
[root@yuanzjdm01 dmhs]# ls -lh总用量 8.0Kdrwxr-xr-x 4 root root 4.0K 6月 8 21:17 bindrwxr-xr-x 2 root root 4.0K 6月 8 21:16 hs_agent
源端和目的端都按照此目录规划
3.在源端和目的端分别上传DMHS服务脚本到$DMHS_HOME/bin目录下
[root@yuanzjdm01 bin]# ls -ld service_template/drwxr-xr-x 2 root root 4096 6月 8 21:17 service_template/
此目录文件包含服务启动脚本模板,模板含义见名知意(有此模板脚本,dmhs服务可以在hsem平台前台启动):
[root@yuanzjdm01 bin]# ls -l service_template/总用量 264-rw-r--r-- 1 root root 14563 6月 8 21:17 AgentDb2Service-rw-r--r-- 1 root root 14563 6月 8 21:17 AgentDm6Service-rw-r--r-- 1 root root 14563 6月 8 21:17 AgentDm7Service-rw-r--r-- 1 root root 14514 6月 8 21:17 AgentDm8Service-rw-r--r-- 1 root root 14573 6月 8 21:17 AgentKingbaseService-rw-r--r-- 1 root root 14567 6月 8 21:17 AgentMysqlService-rw-r--r-- 1 root root 14567 6月 8 21:17 AgentOraService-rw-r--r-- 1 root root 14575 6月 8 21:17 AgentPgService-rw-r--r-- 1 root root 14497 6月 8 21:17 DmhsAgentService-rw-r--r-- 1 root root 14546 6月 8 21:17 DmhsGuardService-rw-r--r-- 1 root root 14499 6月 8 21:17 DmhsService-rw-r--r-- 1 root root 14495 6月 8 21:17 DmhsStatService-rw-r--r-- 1 root root 23952 6月 8 21:17 DmhsWebService-rw-r--r-- 1 root root 12446 6月 8 21:17 DmService-rw-r--r-- 1 root root 12916 6月 8 21:17 TemplateDmhsAgentService-rw-r--r-- 1 root root 14583 6月 8 21:17 TemplateDmhsService
注意:源端和目的端都上传此脚本到$DMHS_HOME/bin目录下
4.在源端和目的端分别上传dmoci到$DMHS_HOME/hs_agent目录下:
过程略
5.创建dmhs环境,以源端为例:
[root@yuanzjdm01 ~]# vim .bash_profile# .bash_profile# Get the aliases and functionsif [ -f ~/.bashrc ]; then. ~/.bashrcfi# User specific environment and startup programsPATH=$PATH:$HOME/binexport PATHPS1=[`whoami`@`hostname`:'$PWD]$ '; export PS1export DMHS_HOME=/opt/dmhsexport LD_LIBRARY_PATH=$DMHS_HOME/bin:$DMHS_HOME/hs_agent:$LD_LIBRARY_PATH[root@yuanzjdm01 ~]# . .bash_profile[root@yuanzjdm01:/root]$
6.启动hs_agent服务
1.目的端新建dmhs_agent.xml文件
[root@yuanzjdm02:/opt/dmhs/hs_agent]$ vim dmhs_agent.xml<?xml version="1.0" encoding="GB2312"?><hs_agent><name>HsAgent</name><server_ip>192.168.3.93</server_ip><lsn_port>5456</lsn_port><status_interval>3</status_interval><status_server>192.168.3.93</status_server><status_port>5236</status_port><status_user>SYSDBA</status_user><status_pwd>SYSDBA123</status_pwd><dmhs_support>1</dmhs_support><veri_support>1</veri_support><lang>ch</lang></hs_agent>
2.启动agent服务
编辑启动脚本,添加环境,数据库字符集环境
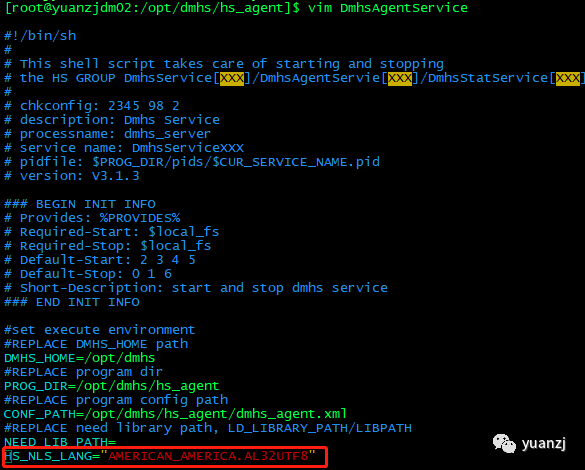
3.启动脚本
[root@yuanzjdm02:/opt/dmhs/hs_agent]$ ./DmhsAgentService startStarting DmhsAgentService: [ OK ]
4.源端新建dmhs_agent.xml文件
[root@yuanzjdm01:/opt/dmhs/hs_agent]$ vim dmhs_agent.xml<?xml version="1.0" encoding="GB2312"?><hs_agent><name>HsAgent</name><server_ip>192.168.3.92</server_ip><lsn_port>5456</lsn_port><status_interval>3</status_interval><status_server>192.168.3.93</status_server><status_port>5236</status_port><status_user>SYSDBA</status_user><status_pwd>SYSDBA123</status_pwd><dmhs_support>1</dmhs_support><veri_support>1</veri_support><lang>ch</lang></hs_agent>
5.启动agent服务
编辑启动脚本,添加环境,数据库字符集环境
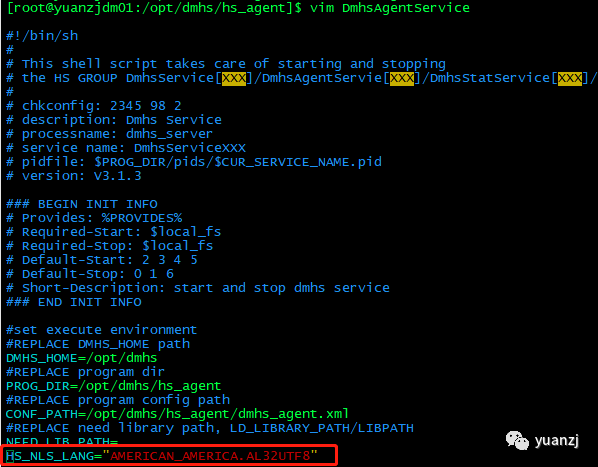
6.启动脚本
[root@yuanzjdm01:/opt/dmhs/hs_agent]$ ./DmhsAgentService startStarting DmhsAgentService: [ OK ]
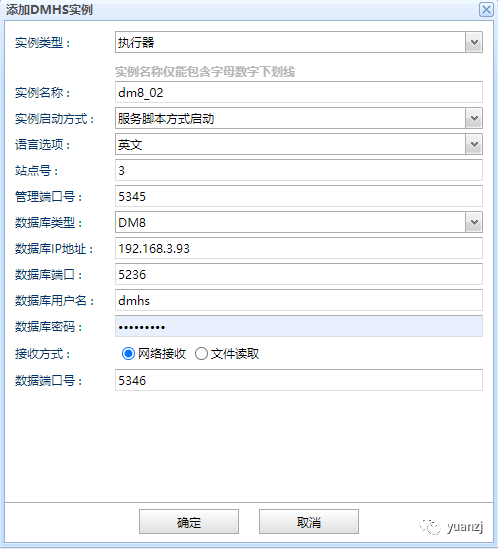
7.在hsem平台配置dmhs实例
1.新建节点2 dmhs实例,点击HsAgent(192.168.3.93),右键添加HS实例,点击确定
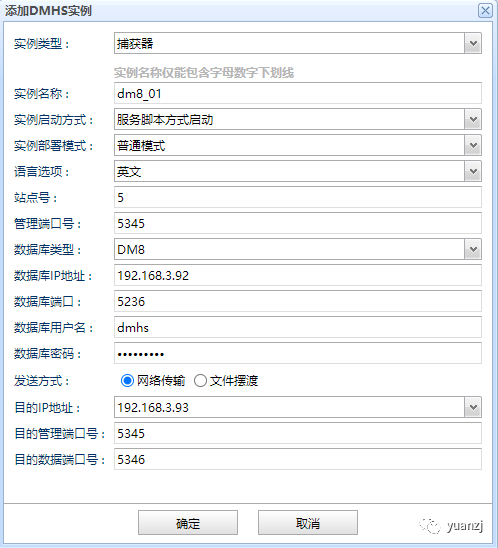
2.新建节点1 dmhs实例,点击HsAgent(192.168.3.92),右键添加HS实例,点击确定
3.修改节点1 dmhs配置
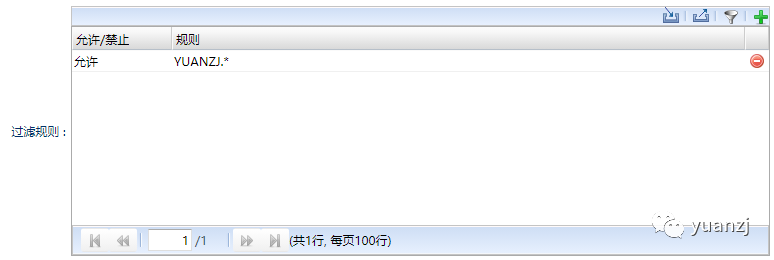
1.添加过滤规则
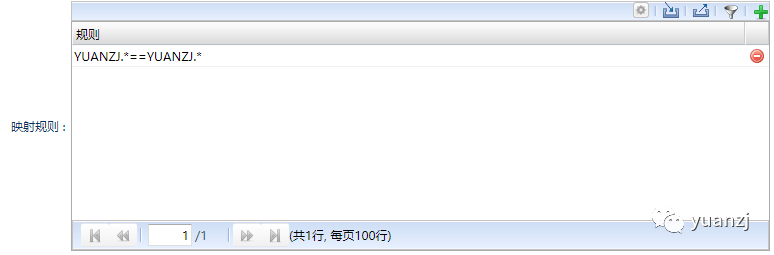
2.添加映射规则
4.后台修改节点1和节点2 dmhs.hs配置
1.节点1 dmhs.hs配置:
<?xml version="1.0" encoding="GB2312" standalone="no"?><dmhs><base><lang>en</lang><mgr_port>5345</mgr_port><name>dm8_01</name><ckpt_interval>60</ckpt_interval><siteid>5</siteid><version>2.0</version></base><exec><recv><mgr_port>5345</mgr_port><data_port>5346</data_port></recv><enable>1</enable><name>exec</name><db_type>DM8</db_type><db_server>192.168.3.92</db_server><db_user>dmhs</db_user><db_pwd>dmhs12345</db_pwd><char_code>PG_UTF8</char_code><db_port>5236</db_port><exec_policy>2</exec_policy><level>2</level></exec><cpt><enable>1</enable><name>cpt</name><db_type>DM8</db_type><db_server>192.168.3.92</db_server><db_user>dmhs</db_user><db_pwd>dmhs12345</db_pwd><char_code>PG_UTF8</char_code><db_port>5236</db_port><ddl_mask>TABLE:CREATE:DROP:TRUNCATE:ALTER</ddl_mask><cpt_mask/><send><ip>192.168.3.93</ip><mgr_port>5345</mgr_port><data_port>5346</data_port><filter><enable><item>YUANZJ.*</item></enable></filter><map><item>YUANZJ.*==YUANZJ.*</item></map></send></cpt></dmhs>
2.节点2 dmhs.hs配置
<?xml version="1.0" encoding="GB2312" standalone="no"?><dmhs><base><lang>en</lang><mgr_port>5345</mgr_port><name>dm8_02</name><ckpt_interval>60</ckpt_interval><siteid>3</siteid><version>2.0</version></base><exec><recv><mgr_port>5345</mgr_port><data_port>5346</data_port></recv><enable>1</enable><name>exec</name><db_type>DM8</db_type><db_server>192.168.3.93</db_server><db_user>dmhs</db_user><db_pwd>dmhs12345</db_pwd><char_code>PG_UTF8</char_code><db_port>5236</db_port><exec_policy>2</exec_policy><level>2</level></exec><cpt><enable>1</enable><name>cpt</name><db_type>DM8</db_type><db_server>192.168.3.93</db_server><db_user>dmhs</db_user><db_pwd>dmhs12345</db_pwd><char_code>PG_UTF8</char_code><db_port>5236</db_port><ddl_mask>TABLE:CREATE:DROP:TRUNCATE:ALTER</ddl_mask><cpt_mask/><send><ip>192.168.3.92</ip><mgr_port>5345</mgr_port><data_port>5346</data_port><filter><enable><item>YUANZJ.*</item></enable></filter><map><item>YUANZJ.*==YUANZJ.*</item></map></send></cpt></dmhs>
3.关键点
双向同步配置中,需注意以下两点:
1) DMHS A 及 DMHS B 执行模块参数 level 必须配置为 2。
2) DMHS A 中 cpt 发送 ip 及端口,需设置为 DMHS B 部署服务器 ip 及 DMHS B 的监听端口;
DMHS B 中 cpt 发送 ip 及端口,需设置为 DMHS A 部署服务器 ip 及DMHS A 的监听端口。
8.加载数据字典
1.启动节点1 dmhs实例
[root@yuanzjdm01:/opt/dmhs/INST_HS/dm8_01]$ ./DmhsServicedm8_01 startStarting DmhsServicedm8_01: [ OK ]
2.启动节点2 dmhs实例
[root@yuanzjdm02:/opt/dmhs/INST_HS/dm8_02]$ ./DmhsServicedm8_02 startStarting DmhsServicedm8_02: [ OK ]
3.分别在节点1和节点2控制台打开exec模块
[root@yuanzjdm01:/opt/dmhs/INST_HS/dm8_01]$ ./dmhs_consoleDMHS console tool: V4.1.1-Build(2021.05.27-99813_beta)_D64Copyright (c) 2020, DMHS. All rights reserved.Type ? or "help" for help, type "quit" to quit console.Connected to DMHS: 127.0.0.1:5345execute successDameng HS Server V4.1.1-Build(2021.05.27-99813_beta)_D64DMHS> start execexecute successDMHS>
[root@yuanzjdm02:/opt/dmhs/INST_HS/dm8_02]$ ./dmhs_consoleDMHS console tool: V4.1.1-Build(2021.05.27-99813_beta)_D64Copyright (c) 2020, DMHS. All rights reserved.Type ? or "help" for help, type "quit" to quit console.Connected to DMHS: 127.0.0.1:5345execute successDameng HS Server V4.1.1-Build(2021.05.27-99813_beta)_D64DMHS> start execexecute successDMHS>
4.先装载不同部分的表
a同步example01表,登录1节点控制台
[root@yuanzjdm01:/opt/dmhs/INST_HS/dm8_01]$ ./dmhs_consoleDMHS console tool: V4.1.1-Build(2021.05.27-99813_beta)_D64Copyright (c) 2020, DMHS. All rights reserved.Type ? or "help" for help, type "quit" to quit console.Connected to DMHS: 127.0.0.1:5345execute successDameng HS Server V4.1.1-Build(2021.05.27-99813_beta)_D64DMHS> clear exec lsnexecute successDMHS> load 0 "sch.name='YUANZJ' and tab.name='EXAMPLE01'" dict|create|insert|indexcopy mask is : |CREATE|INSERT|INDEX|TABLE|DICT|OBJID|REPexecute finish, please look up log file of exec module to check data load result
b同步example02表,登录2节点控制台
[root@yuanzjdm02:/opt/dmhs/INST_HS/dm8_02]$ ./dmhs_consoleDMHS console tool: V4.1.1-Build(2021.05.27-99813_beta)_D64Copyright (c) 2020, DMHS. All rights reserved.Type ? or "help" for help, type "quit" to quit console.Connected to DMHS: 127.0.0.1:5345execute successDameng HS Server V4.1.1-Build(2021.05.27-99813_beta)_D64DMHS> clear exec lsnexecute successDMHS> load 0 "sch.name='YUANZJ' and tab.name='EXAMPLE02'" dict|create|insert|indexcopy mask is : |CREATE|INSERT|INDEX|TABLE|DICT|OBJID|REPexecute finish, please look up log file of exec module to check data load result
3.同步test表,以节点1为test表为数据依据,节点1,节点2 先后在控制台执行如下命令
DMHS> load 0 "sch.name='YUANZJ' and tab.name='TEST'" dict|lsn|insert|indexCSL[WARN]: Detect the LSN mask, the mask will be ignored in the log is less than the current LSN all operations, please confirm whether to continue?(Y/N)Ycopy mask is : |INSERT|INDEX|TABLE|DICT|LSN|OBJID|REPexecute finish, please look up log file of exec module to check data load result
4分别在节点1和节点2开启cpt模块
DMHS> start cptexecute success
9.查看数据
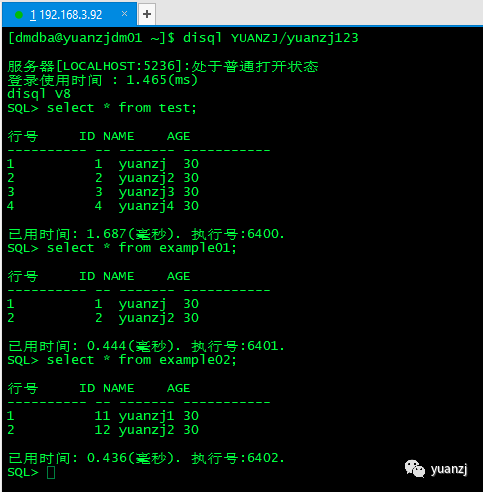
节点1查看数据:
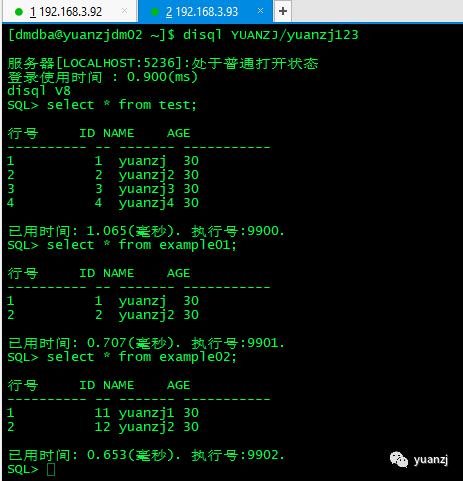
节点2查看数据:
10.测试ddl
1.节点1创建表test01
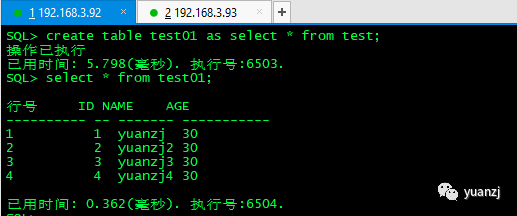
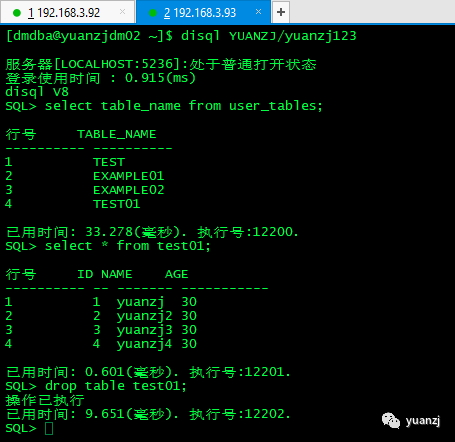
2.节点2查看表test02,并删除表test02
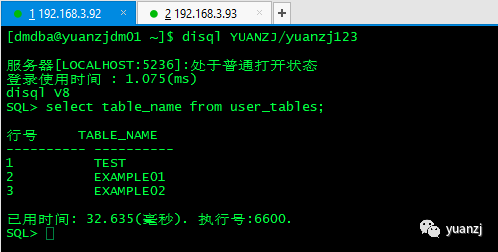
3.一节点查看表
四、总结
1.在创建dmhs实例时,一定要先创建目的端实例;
2.修改启动脚本字符集时,一定要与数据库字符集保持一致;
3.双向同步,两个节点数据必须都开启逻辑日志,并创建触发器和辅助表。
4.在加载数据字典时,相同表一定不能使用truncate,delete,drop等掩码。
