


本文首发于Ressmix个人站点:https://www.tpvlog.com
上一章,我讲解了Broker的启动原理,它的本质是内部启动了一个Broker控制器——BrokerController,由它来控制Broker的各种行为,BrokerController内部引用了很多组件,包括接收网络请求的Netty服务器,各种核心功能组件,负责处理请求的线程池,负责执行定时调度任务的后台线程等,如下图:
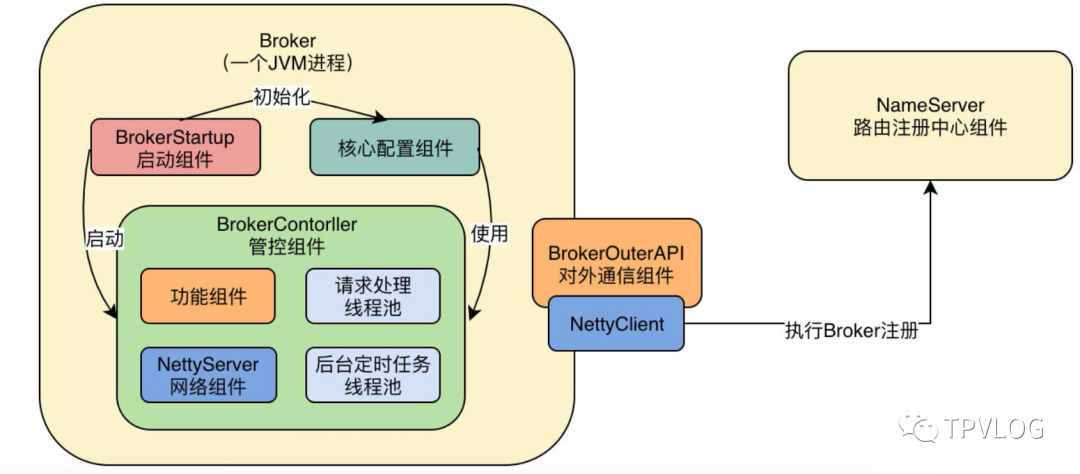
本章,我们就来看下BrokerController是如何将当前的Broker实例注册到NameServer中的:
1BrokerController.this.registerBrokerAll(true, false, brokerConfig.isForceRegister());
一、发送注册请求
我们进入BrokerController的registerBrokerAll()
方法中,一探究竟:
 1public synchronized void registerBrokerAll(final boolean checkOrderConfig, boolean oneway, boolean forceRegister) {
 2    // Topic配置相关操作,暂时忽略
 3    TopicConfigSerializeWrapper topicConfigWrapper = this.getTopicConfigManager().buildTopicConfigSerializeWrapper();
 4
 5    // TopicConfig相关操作,暂时忽略
 6    if (!PermName.isWriteable(this.getBrokerConfig().getBrokerPermission())
 7        || !PermName.isReadable(this.getBrokerConfig().getBrokerPermission())) {
 8        ConcurrentHashMap<String, TopicConfig> topicConfigTable = new ConcurrentHashMap<String, TopicConfig>();
 9        for (TopicConfig topicConfig : topicConfigWrapper.getTopicConfigTable().values()) {
10            TopicConfig tmp =
11                new TopicConfig(topicConfig.getTopicName(), topicConfig.getReadQueueNums(), topicConfig.getWriteQueueNums(),
12                    this.brokerConfig.getBrokerPermission());
13            topicConfigTable.put(topicConfig.getTopicName(), tmp);
14        }
15        topicConfigWrapper.setTopicConfigTable(topicConfigTable);
16    }
17
18    // 这里比较关键,注册Broker
19    if (forceRegister || needRegister(this.brokerConfig.getBrokerClusterName(),
20        this.getBrokerAddr(),
21        this.brokerConfig.getBrokerName(),
22        this.brokerConfig.getBrokerId(),
23        this.brokerConfig.getRegisterBrokerTimeoutMills())) {
24        doRegisterBrokerAll(checkOrderConfig, oneway, topicConfigWrapper);
25    }
26}
上述代码一开始都是对TopicConfig这个对象的相关操作,可以忽略,我们的目的是了解Broker的核心注册流程,最后一段代码才是关键:先判断是否要进行注册,如果需求则调用doRegisterBrokerAll
进行注册:
 1private void doRegisterBrokerAll(boolean checkOrderConfig, boolean oneway,
 2    TopicConfigSerializeWrapper topicConfigWrapper) {
 3
 4    // 调用brokerOuterAPI.registerBrokerAll发送请求到NameServer进行注册,返回注册结果
 5    List<RegisterBrokerResult> registerBrokerResultList = this.brokerOuterAPI.registerBrokerAll(
 6        this.brokerConfig.getBrokerClusterName(),
 7        this.getBrokerAddr(),
 8        this.brokerConfig.getBrokerName(),
 9        this.brokerConfig.getBrokerId(),
10        this.getHAServerAddr(),
11        topicConfigWrapper,
12        this.filterServerManager.buildNewFilterServerList(),
13        oneway,
14        this.brokerConfig.getRegisterBrokerTimeoutMills(),
15        this.brokerConfig.isCompressedRegister());
16
17    // 对注册结果进行处理
18    if (registerBrokerResultList.size() > 0) {
19        RegisterBrokerResult registerBrokerResult = registerBrokerResultList.get(0);
20        if (registerBrokerResult != null) {
21            // 涉及Master/Slave的一些机制,暂时忽略
22            if (this.updateMasterHAServerAddrPeriodically && registerBrokerResult.getHaServerAddr() != null) {
23                this.messageStore.updateHaMasterAddress(registerBrokerResult.getHaServerAddr());
24            }
25
26            this.slaveSynchronize.setMasterAddr(registerBrokerResult.getMasterAddr());
27
28            if (checkOrderConfig) {
29                this.getTopicConfigManager().updateOrderTopicConfig(registerBrokerResult.getKvTable());
30            }
31        }
32    }
33}
doRegisterBrokerAll方法最核心的地方,其实就是调用了brokerOuterAPI.registerBrokerAll()
发送请求给NameServer进行注册。
1.1 BrokerOuterAPI
registerBrokerAll
注册请求实际是委托给BrokerOuterAPI去操作的,BrokerOuterAPI我们在上一章提到过,其实就是个Netty客户端,我们看下这个对象的registerBrokerAll
方法内部到底做了些什么:
 1public List<RegisterBrokerResult> registerBrokerAll(
 2    final String clusterName,
 3    final String brokerAddr,
 4    final String brokerName,
 5    final long brokerId,
 6    final String haServerAddr,
 7    final TopicConfigSerializeWrapper topicConfigWrapper,
 8    final List<String> filterServerList,
 9    final boolean oneway,
10    final int timeoutMills,
11    final boolean compressed) {
12
13    // 存放注册结果
14    final List<RegisterBrokerResult> registerBrokerResultList = Lists.newArrayList();
15
16    // 获取NameServer集群地址
17    List<String> nameServerAddressList = this.remotingClient.getNameServerAddressList();
18    if (nameServerAddressList != null && nameServerAddressList.size() > 0) {
19
20        // 创建一个请求头,里面放当前Broker的各种信息
21        final RegisterBrokerRequestHeader requestHeader = new RegisterBrokerRequestHeader();
22        requestHeader.setBrokerAddr(brokerAddr);
23        requestHeader.setBrokerId(brokerId);
24        requestHeader.setBrokerName(brokerName);
25        requestHeader.setClusterName(clusterName);
26        requestHeader.setHaServerAddr(haServerAddr);
27        requestHeader.setCompressed(compressed);
28
29        // 创建一个请求体,里面放些Topic、Filter的配置
30        RegisterBrokerBody requestBody = new RegisterBrokerBody();
31        requestBody.setTopicConfigSerializeWrapper(topicConfigWrapper);
32        requestBody.setFilterServerList(filterServerList);
33        final byte[] body = requestBody.encode(compressed);
34        final int bodyCrc32 = UtilAll.crc32(body);
35        requestHeader.setBodyCrc32(bodyCrc32);
36
37        // 弄个CountDownLatch,目的是等主线程注册完所有NameServer后才往下走
38        final CountDownLatch countDownLatch = new CountDownLatch(nameServerAddressList.size());
39
40        // 遍历NameServer地址列表,每一个都去发送注册请求
41        for (final String namesrvAddr : nameServerAddressList) {
42            brokerOuterExecutor.execute(new Runnable() {
43                @Override
44                public void run() {
45                    try {
46                        // 真正执行注册的地方在这里
47                        RegisterBrokerResult result = registerBroker(namesrvAddr,oneway, timeoutMills,requestHeader,body);
48                        if (result != null) {
49                            // 保存注册结果
50                            registerBrokerResultList.add(result);
51                        }
52
53                        log.info("register broker[{}]to name server {} OK", brokerId, namesrvAddr);
54                    } catch (Exception e) {
55                        log.warn("registerBroker Exception, {}", namesrvAddr, e);
56                    } finally {
57                        countDownLatch.countDown();
58                    }
59                }
60            });
61        }
62
63        try {
64            countDownLatch.await(timeoutMills, TimeUnit.MILLISECONDS);
65        } catch (InterruptedException e) {
66        }
67    }
68
69    return registerBrokerResultList;
70}
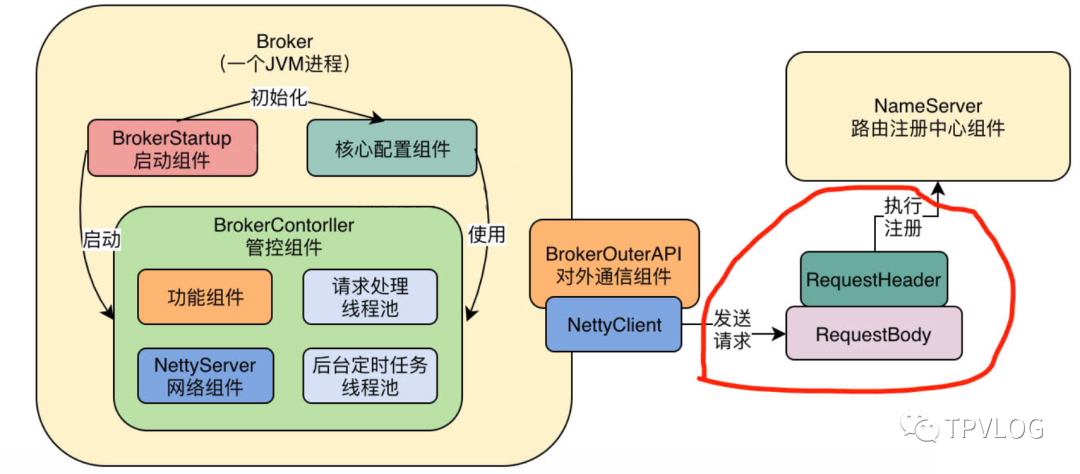
上述整个逻辑还是很清晰的:
创建请求头、请求体,里面保存了待会儿要发送注册请求的信息;
遍历NameServer地址列表,发送请求;
返回注册结果。
CountDownLatch是J.U.C包提供的一个同步器工具类,可以看成是一个倒数计时器,用来控制线程的行为,不了解的童鞋建议好好看看我写的透彻理解Java并发编程系列。
registerBroker
真正执行注册逻辑的是下面这一行,我们来看下registerBroker方法:
1RegisterBrokerResult result = registerBroker(namesrvAddr,oneway, timeoutMills,requestHeader,body);
registerBroker方法会通过底层的NettyClient
,把这个请求发送到NameServer进行注册:
 1private RegisterBrokerResult registerBroker(
 2    final String namesrvAddr,
 3    final boolean oneway,
 4    final int timeoutMills,
 5    final RegisterBrokerRequestHeader requestHeader,
 6    final byte[] body
 7) throws RemotingCommandException, MQBrokerException, RemotingConnectException, RemotingSendRequestException, RemotingTimeoutException,
 8    InterruptedException {
 9
10    // 将请求头和请求体封装成一个完整请求——RemotingCommand
11    RemotingCommand request = RemotingCommand.createRequestCommand(RequestCode.REGISTER_BROKER, requestHeader);
12    request.setBody(body);
13
14    // oneway表示不同等待注册结果
15    if (oneway) {
16        try {
17            this.remotingClient.invokeOneway(namesrvAddr, request, timeoutMills);
18        } catch (RemotingTooMuchRequestException e) {
19            // Ignore
20        }
21        return null;
22    }
23
24    // 利用RemotingClient发送注册请求,这个RemotingClient其实就是个Netty客户端
25    RemotingCommand response = this.remotingClient.invokeSync(namesrvAddr, request, timeoutMills);
26
27    // 下面是处理返回结果,封装成一个RegisterBrokerResult,暂时忽略
28    assert response != null;
29    switch (response.getCode()) {
30        case ResponseCode.SUCCESS: {
31            RegisterBrokerResponseHeader responseHeader =
32                (RegisterBrokerResponseHeader) response.decodeCommandCustomHeader(RegisterBrokerResponseHeader.class);
33            RegisterBrokerResult result = new RegisterBrokerResult();
34            result.setMasterAddr(responseHeader.getMasterAddr());
35            result.setHaServerAddr(responseHeader.getHaServerAddr());
36            if (response.getBody() != null) {
37                result.setKvTable(KVTable.decode(response.getBody(), KVTable.class));
38            }
39            return result;
40        }
41        default:
42            break;
43    }
44
45    throw new MQBrokerException(response.getCode(), response.getRemark());
46}
上述代码最核心的就是下面这行:
1RemotingCommand response = this.remotingClient.invokeSync(namesrvAddr, request, timeoutMills);
1.2 NettyRemotingClient
remotingClient其实就是一个Netty客户端,它的实现类是NettyRemotingClient
,底层封装了Netty的API调用。
invokeSync
我们看下NettyRemotingClient
的invokeSync
方法:
 1public RemotingCommand invokeSync(String addr, final RemotingCommand request, long timeoutMillis)
 2    throws InterruptedException, RemotingConnectException, RemotingSendRequestException, RemotingTimeoutException {
 3    long beginStartTime = System.currentTimeMillis();
 4
 5    // 创建一个Channel,这个Channel可以理解成跟NameServer之间建立的一个连接
 6    final Channel channel = this.getAndCreateChannel(addr);
 7    if (channel != null && channel.isActive()) {
 8        try {
 9            // 计算时间开销,忽略
10            doBeforeRpcHooks(addr, request);
11            long costTime = System.currentTimeMillis() - beginStartTime;
12            if (timeoutMillis < costTime) {
13                throw new RemotingTimeoutException("invokeSync call timeout");
14            }
15
16            // 这里是真正发送请求
17            RemotingCommand response = this.invokeSyncImpl(channel, request, timeoutMillis - costTime);
18
19            // 忽略
20            doAfterRpcHooks(RemotingHelper.parseChannelRemoteAddr(channel), request, response);
21            return response;
22        } catch (RemotingSendRequestException e) {
23            log.warn("invokeSync: send request exception, so close the channel[{}]", addr);
24            this.closeChannel(addr, channel);
25            throw e;
26        } catch (RemotingTimeoutException e) {
27            if (nettyClientConfig.isClientCloseSocketIfTimeout()) {
28                this.closeChannel(addr, channel);
29                log.warn("invokeSync: close socket because of timeout, {}ms, {}", timeoutMillis, addr);
30            }
31            log.warn("invokeSync: wait response timeout exception, the channel[{}]", addr);
32            throw e;
33        }
34    } else {
35        this.closeChannel(addr, channel);
36        throw new RemotingConnectException(addr);
37    }
38}
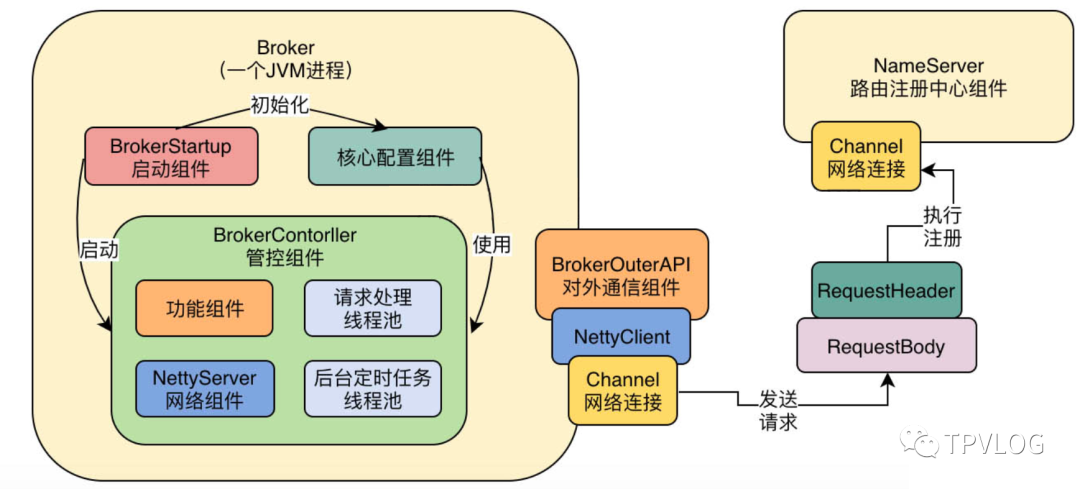
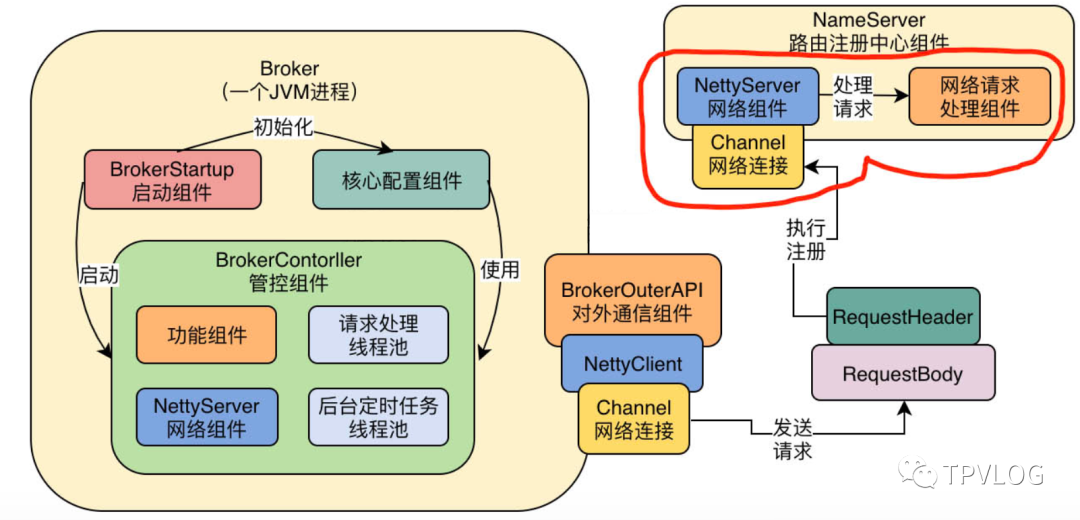
通过上面代码的分析,我们其实可以知道,Broker和NameServer之间通过Channel建立了一个网络连接,然后基于这个Channel就可以发送实际的网络请求了:
getAndCreateChannel
接着我们进入上面的this.getAndCreateChannel(addr)
这行代码看看,他是如何跟NameServer之间建立实际的网络连接的?
 1private Channel getAndCreateChannel(final String addr) throws RemotingConnectException, InterruptedException {
 2    // 先尝试从缓存中获取连接
 3    if (null == addr) {
 4        return getAndCreateNameserverChannel();
 5    }
 6
 7    ChannelWrapper cw = this.channelTables.get(addr);
 8    if (cw != null && cw.isOK()) {
 9        return cw.getChannel();
10    }
11
12    // 没有就创建一个
13    return this.createChannel(addr);
14}
 1/**
 2 * 通过一个NameServer的地址创建出一个网络连接
 3 */
 4private Channel createChannel(final String addr) throws InterruptedException {
 5    // 先尝试从缓存获取连接
 6    ChannelWrapper cw = this.channelTables.get(addr);
 7    if (cw != null && cw.isOK()) {
 8        return cw.getChannel();
 9    }
10
11    if (this.lockChannelTables.tryLock(LOCK_TIMEOUT_MILLIS, TimeUnit.MILLISECONDS)) {
12        try {
13            // 下面一堆代码都是尝试从缓存获取连接
14            boolean createNewConnection;
15            cw = this.channelTables.get(addr);
16            if (cw != null) {
17
18                if (cw.isOK()) {
19                    return cw.getChannel();
20                } else if (!cw.getChannelFuture().isDone()) {
21                    createNewConnection = false;
22                } else {
23                    this.channelTables.remove(addr);
24                    createNewConnection = true;
25                }
26            } else {
27                createNewConnection = true;
28            }
29
30            // 这里是真正创建连接的地方
31            if (createNewConnection) {
32                // 本质是基于Netty的Bootstrap类的connnect方法,创建一个连接
33                ChannelFuture channelFuture = this.bootstrap.connect(RemotingHelper.string2SocketAddress(addr));
34                log.info("createChannel: begin to connect remote host[{}] asynchronously", addr);
35                cw = new ChannelWrapper(channelFuture);
36                this.channelTables.put(addr, cw);
37            }
38        } catch (Exception e) {
39            log.error("createChannel: create channel exception", e);
40        } finally {
41            this.lockChannelTables.unlock();
42        }
43    } else {
44        log.warn("createChannel: try to lock channel table, but timeout, {}ms", LOCK_TIMEOUT_MILLIS);
45    }
46
47    // 返回连接的代码,忽略
48    if (cw != null) {
49        ChannelFuture channelFuture = cw.getChannelFuture();
50        if (channelFuture.awaitUninterruptibly(this.nettyClientConfig.getConnectTimeoutMillis())) {
51            if (cw.isOK()) {
52                log.info("createChannel: connect remote host[{}] success, {}", addr, channelFuture.toString());
53                return cw.getChannel();
54            } else {
55                log.warn("createChannel: connect remote host[" + addr + "] failed, " + channelFuture.toString(), channelFuture.cause());
56            }
57        } else {
58            log.warn("createChannel: connect remote host[{}] timeout {}ms, {}", addr, this.nettyClientConfig.getConnectTimeoutMillis(),
59                channelFuture.toString());
60        }
61    }
62
63    return null;
64}
真相大白了,核心就是基于Netty的Bootstrap
类的connnect
方法,创建了一个连接。那么连接建立完成后,如何发送请求呢?
我们回到NettyRemotingClient
的invokeSync
方法,看下面这行调用:
1RemotingCommand response = this.invokeSyncImpl(channel, request, timeoutMillis - costTime);
invokeSyncImpl
invokeSyncImpl方法,重点要知道的就是:NettyRemotingClient
底层是基于Netty的Channel API,把注册的请求给发送到了NameServer就可以了。
 1public RemotingCommand invokeSyncImpl(final Channel channel, final RemotingCommand request,
 2    final long timeoutMillis)
 3    throws InterruptedException, RemotingSendRequestException, RemotingTimeoutException {
 4    final int opaque = request.getOpaque();
 5
 6    try {
 7        final ResponseFuture responseFuture = new ResponseFuture(channel, opaque, timeoutMillis, null, null);
 8        this.responseTable.put(opaque, responseFuture);
 9        final SocketAddress addr = channel.remoteAddress();
10
11        // 基于Netty的Channel组件,将请求发送出去
12        channel.writeAndFlush(request).addListener(new ChannelFutureListener() {
13            @Override
14            public void operationComplete(ChannelFuture f) throws Exception {
15                if (f.isSuccess()) {
16                    responseFuture.setSendRequestOK(true);
17                    return;
18                } else {
19                    responseFuture.setSendRequestOK(false);
20                }
21
22                responseTable.remove(opaque);
23                responseFuture.setCause(f.cause());
24                responseFuture.putResponse(null);
25                log.warn("send a request command to channel <" + addr + "> failed.");
26            }
27        });
28
29        // 这里比较重要,等待请求响应结果
30        RemotingCommand responseCommand = responseFuture.waitResponse(timeoutMillis);
31        if (null == responseCommand) {
32            if (responseFuture.isSendRequestOK()) {
33                throw new RemotingTimeoutException(RemotingHelper.parseSocketAddressAddr(addr), timeoutMillis,
34                    responseFuture.getCause());
35            } else {
36                throw new RemotingSendRequestException(RemotingHelper.parseSocketAddressAddr(addr), responseFuture.getCause());
37            }
38        }
39
40        return responseCommand;
41    } finally {
42        this.responseTable.remove(opaque);
43    }
44}
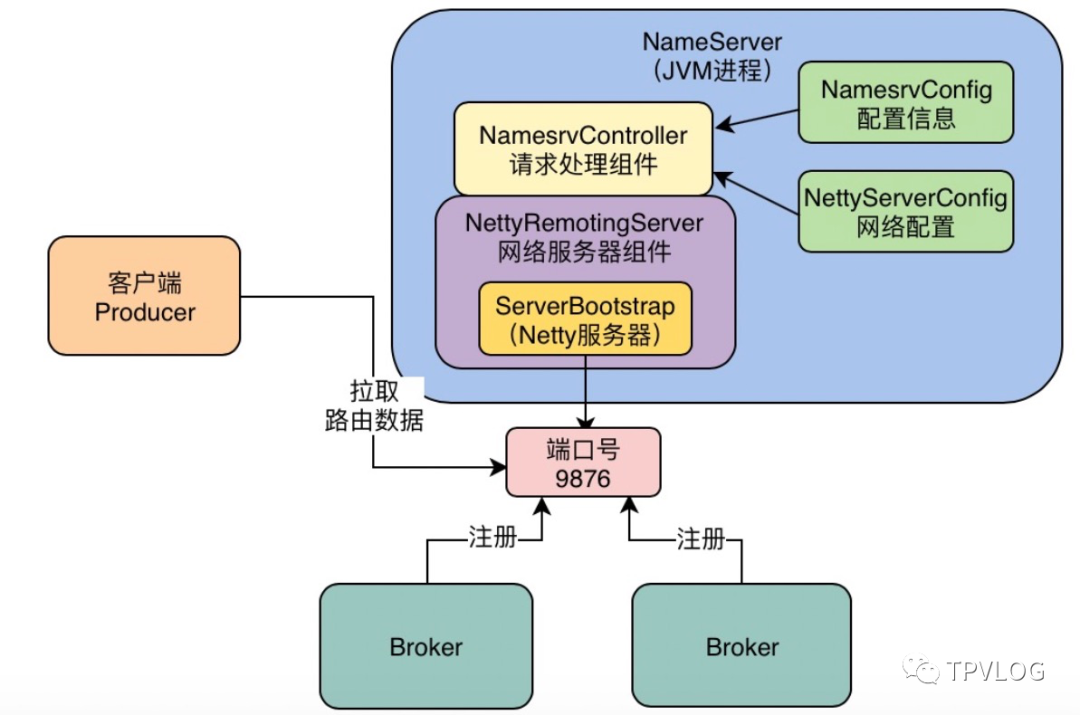
二、处理注册请求
了解了Broker是如何发送注册请求的之后,我们需要来看下NameServer是如何处理注册请求的。我在《NameServer启动流程》讲过,NameServer启动后,其实内部有个Netty服务器,监听着9876端口:
2.1 NamesrvController
我们回到NamesrvController.initialize()
,里面有个很关键的方法调用——registerProcessor:
 1public boolean initialize() {
 2
 3    this.kvConfigManager.load();
 4
 5    // 创建一个内部的Netty服务器
 6    this.remotingServer = new NettyRemotingServer(this.nettyServerConfig, this.brokerHousekeepingService);
 7
 8    this.remotingExecutor =
 9        Executors.newFixedThreadPool(nettyServerConfig.getServerWorkerThreads(), new ThreadFactoryImpl("RemotingExecutorThread_"));
10
11    // 关键就在这里,这个Processor其实就是一个请求处理器,是NameServer处理网络请求的组件
12    this.registerProcessor();
13
14    //...省略无关代码
15
16    return true;
17}
registerProcessor
 1private void registerProcessor() {
 2    // 测试集群的代码,忽略
 3    if (namesrvConfig.isClusterTest()) {
 4        this.remotingServer.registerDefaultProcessor(new ClusterTestRequestProcessor(this, namesrvConfig.getProductEnvName()),
 5            this.remotingExecutor);
 6    } else {
 7        // 核心是这里:在内部Netty服务器中注册了一个请求处理组件——DefaultRequestProcessor
 8        this.remotingServer.registerDefaultProcessor(new DefaultRequestProcessor(this), this.remotingExecutor);
 9    }
10}
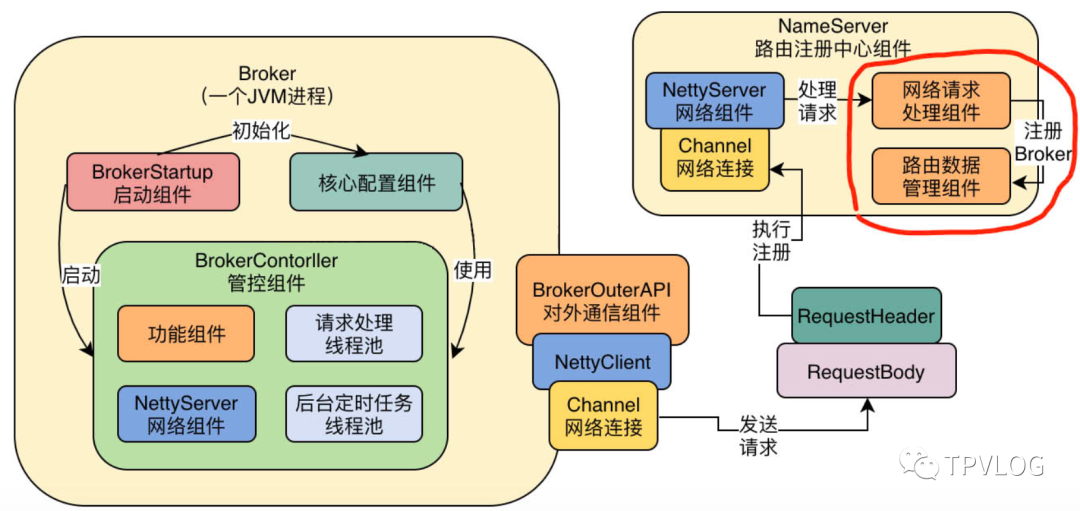
我们可以看到,上述代码将DefaultRequestProcessor
这个请求处理组件注册到了NameServer内部的Netty服务器中,也就是说Netty服务器会把接收到的网络请求交给DefaultRequestProcessor
去处理。也就是下面这个样子:
2.2 DefaultRequestProcessor
我们进入DefaultRequestProcessor类,看下它到底是怎么处理网络请求的。
processRequest
processRequest方法用于处理各类请求,它的主体逻辑就是根据请求报文里面的请求码判断如何处理,我们关心的是Broker的注册请求,所以直接看registerBroker
方法即可。
 1public RemotingCommand processRequest(ChannelHandlerContext ctx,
 2    RemotingCommand request) throws RemotingCommandException {
 3
 4    // 打印日志,忽略
 5    if (ctx != null) {
 6        log.debug("receive request, {} {} {}",
 7            request.getCode(),
 8            RemotingHelper.parseChannelRemoteAddr(ctx.channel()),
 9            request);
10    }
11
12    // 这里是核心逻辑,根据不同的请求类型分别处理
13    switch (request.getCode()) {
14        case RequestCode.PUT_KV_CONFIG:
15            return this.putKVConfig(ctx, request);
16        case RequestCode.GET_KV_CONFIG:
17            return this.getKVConfig(ctx, request);
18        case RequestCode.DELETE_KV_CONFIG:
19            return this.deleteKVConfig(ctx, request);
20        case RequestCode.QUERY_DATA_VERSION:
21            return queryBrokerTopicConfig(ctx, request);
22            // 我们关键看这里,这就是注册Broker的请求
23        case RequestCode.REGISTER_BROKER:
24            Version brokerVersion = MQVersion.value2Version(request.getVersion());
25            if (brokerVersion.ordinal() >= MQVersion.Version.V3_0_11.ordinal()) {
26                return this.registerBrokerWithFilterServer(ctx, request);
27            } else {
28                // 核心的处理Broker注册请求的逻辑
29                return this.registerBroker(ctx, request);
30            }
31
32            //...省略
33        default:
34            break;
35    }
36    return null;
37}
registerBroker
registerBroker方法主要就是:解析请求,然后调用RouteInfoManager这个核心组件去注册Broker,RouteInfoManager是NameServer中的路由信息管理器:
 1public RemotingCommand registerBroker(ChannelHandlerContext ctx,
 2    RemotingCommand request) throws RemotingCommandException {
 3
 4    // 下面这堆代码用于解析请求,创建一个响应对象
 5    final RemotingCommand response = RemotingCommand.createResponseCommand(RegisterBrokerResponseHeader.class);
 6    final RegisterBrokerResponseHeader responseHeader = (RegisterBrokerResponseHeader) response.readCustomHeader();
 7    final RegisterBrokerRequestHeader requestHeader =
 8        (RegisterBrokerRequestHeader) request.decodeCommandCustomHeader(RegisterBrokerRequestHeader.class);
 9
10    if (!checksum(ctx, request, requestHeader)) {
11        response.setCode(ResponseCode.SYSTEM_ERROR);
12        response.setRemark("crc32 not match");
13        return response;
14    }
15
16    // 忽略
17    TopicConfigSerializeWrapper topicConfigWrapper;
18    if (request.getBody() != null) {
19        topicConfigWrapper = TopicConfigSerializeWrapper.decode(request.getBody(), TopicConfigSerializeWrapper.class);
20    } else {
21        topicConfigWrapper = new TopicConfigSerializeWrapper();
22        topicConfigWrapper.getDataVersion().setCounter(new AtomicLong(0));
23        topicConfigWrapper.getDataVersion().setTimestamp(0);
24    }
25
26    // 关键是这里,利用RouteInfoManager这个核心组件来注册Broker
27    RegisterBrokerResult result = this.namesrvController.getRouteInfoManager().registerBroker(
28        requestHeader.getClusterName(),
29        requestHeader.getBrokerAddr(),
30        requestHeader.getBrokerName(),
31        requestHeader.getBrokerId(),
32        requestHeader.getHaServerAddr(),
33        topicConfigWrapper,
34        null,
35        ctx.channel()
36    );
37
38    // 下面的一堆都是构造响应信息,忽略
39    responseHeader.setHaServerAddr(result.getHaServerAddr());
40    responseHeader.setMasterAddr(result.getMasterAddr());
41
42    byte[] jsonValue = this.namesrvController.getKvConfigManager().getKVListByNamespace(NamesrvUtil.NAMESPACE_ORDER_TOPIC_CONFIG);
43    response.setBody(jsonValue);
44    response.setCode(ResponseCode.SUCCESS);
45    response.setRemark(null);
46    return response;
47}
2.3 RouteInfoManager
我们最后来看下RouteInfoManager这个路由信息管理组件,从构造函数就可以看出,它其实内部就是用了Map,去存放Broker的一些相关信息:
1public RouteInfoManager() {
2    this.topicQueueTable = new HashMap<String, List<QueueData>>(1024);
3    // Broker地址信息
4    this.brokerAddrTable = new HashMap<String, BrokerData>(128);
5    this.clusterAddrTable = new HashMap<String, Set<String>>(32);
6    // Broker存活信息
7    this.brokerLiveTable = new HashMap<String, BrokerLiveInfo>(256);
8    this.filterServerTable = new HashMap<String, List<String>>(256);
9}
registerBroker
从registerBroker方法内容,我们可以看到,待注册的Broker的相关信息,其实被拆解到了RouteInfoManager内部的各个Map中:
 1public RegisterBrokerResult registerBroker(
 2    final String clusterName,
 3    final String brokerAddr,
 4    final String brokerName,
 5    final long brokerId,
 6    final String haServerAddr,
 7    final TopicConfigSerializeWrapper topicConfigWrapper,
 8    final List<String> filterServerList,
 9    final Channel channel) {
10    RegisterBrokerResult result = new RegisterBrokerResult();
11    try {
12        try {
13            this.lock.writeLock().lockInterruptibly();
14
15            // 设置这个待注册的Broker的集群信息
16            Set<String> brokerNames = this.clusterAddrTable.get(clusterName);
17            if (null == brokerNames) {
18                brokerNames = new HashSet<String>();
19                this.clusterAddrTable.put(clusterName, brokerNames);
20            }
21            brokerNames.add(brokerName);
22
23            boolean registerFirst = false;
24
25            // Broker相关数据放在brokerAddrTable这个Map里
26            BrokerData brokerData = this.brokerAddrTable.get(brokerName);
27            if (null == brokerData) {
28                registerFirst = true;
29                brokerData = new BrokerData(clusterName, brokerName, new HashMap<Long, String>());
30                this.brokerAddrTable.put(brokerName, brokerData);
31            }
32
33            // 下面是主从相关的一些代码,暂时忽略
34            Map<Long, String> brokerAddrsMap = brokerData.getBrokerAddrs();
35            //Switch slave to master: first remove <1, IP:PORT> in namesrv, then add <0, IP:PORT>
36            //The same IP:PORT must only have one record in brokerAddrTable
37            Iterator<Entry<Long, String>> it = brokerAddrsMap.entrySet().iterator();
38            while (it.hasNext()) {
39                Entry<Long, String> item = it.next();
40                if (null != brokerAddr && brokerAddr.equals(item.getValue()) && brokerId != item.getKey()) {
41                    it.remove();
42                }
43            }
44
45            String oldAddr = brokerData.getBrokerAddrs().put(brokerId, brokerAddr);
46            registerFirst = registerFirst || (null == oldAddr);
47
48            //...忽略无关代码
49        } finally {
50            this.lock.writeLock().unlock();
51        }
52    } catch (Exception e) {
53        log.error("registerBroker Exception", e);
54    }
55
56    return result;
57}
上面代码还有一点比较关键,为了提升注册Broker时的性能,用了一个读写锁——ReadWriteLock,这样的更新操作只能有一个线程执行,保证了数据的一致性。关于读写锁,童鞋们可以参考我写的《透彻理解Java并发编程系列》,里面有对整个J.U.C包的详细讲解。
三、总结
本章,我讲解了Broker的注册原理,以及NameServer是如何处理Broker的注册请求的。
对于Broker来说,注册流程的核心点就是基于底层的Netty API与NameServer建立Channel,然后发送注册请求;
对于NameServer来说,也是基于内部的NettyServer服务器先接受请求,然后将请求转交给请求处理器组件处理,而请求处理器组件则是根据不同的请求类型,将请求转交给NameServer内部的其它组件处理。比如本章的注册请求,最终就是由RouteInfoManager这个组件来处理的。
