Linux服务器搭建-Redis与FastDFS
简单记录了配置过程,仅供个人学习用。实际上会用到多台服务器,配置更复杂。
起因(可忽略)
因为新型冠状病毒的影响,没有火车站的小县城在市际班车停运的情况下,无法回到工作岗位,然后就开始在家办公模式。因为有新任务,加上自己的电脑没有公司的开发环境,只好通过TeamViewer(公司没有VPN)远程公司电脑(公司有人,帮忙开机之类的)。用了不到一天就被逼疯了,效率太低。然后决定自己搭建开发环境。不过这个是我很不想干的事情,总会出幺蛾子,比如头疼的Maven,死活下不下来,远程复制公司的jar包到Maven仓库下,jar不出错了,但是还是编译不通过,最后删掉所有的私有仓库和插件库好了……公司的框架比较老,比较重(全面),和我电脑环境有点不兼容,比如MySQL的数据库。因为新任务比较简单,用不了太多的功能,主要搭建了Redis缓存和FastDFS文件服务器。
Redis安装
以前在Win7中装过-NoSQL数据库Redis从入门到没有然后,这次在Linux虚拟机中安装。先把VMware虚拟机的网络适配器改成桥接模式,以便于设置固定ip。
先从https://redis.io/download下载最新稳定版本5.0.7,解压,编译。
wget http://download.redis.io/releases/redis-5.0.7.tar.gz
tar xzf redis-5.0.7.tar.gz
cd cd redis-5.0.7/
make
make完后 redis-5.0.7目录src下会出现编译后的redis服务程序redis-server,执行 ./redis-server
就可以通过前端模式启动了,不过ssh命令窗口关闭,redis-server程序就结束了。
cd src
./redis-server
后端模式启动
修改redis.conf配置文件把
daemonizeno
改为线程守护yes
修改配置文件redis.conf,打开远程连接(把 protected-mode yes
改为 no
并注释掉(前加#) bing127.0.0.1
未设置密码 requirepass
)。
重启Redis,查找并关闭进程。并指定启动服务配置文件,不然按默认启动(这里坑了,修改了配置文件,一直提示我不能远程连接)。
ps -ef|grep redis
kill 相关进程
./redis-server redis.conf
你也可以建立redis服务,设置成开机启动,这里偷懒。
FastDFS安装
FastDFS是一个开源的轻量级分布式文件系统,这里主要用来保存图片和文件并访问。
1 先用git(没有git环境先执行 git apt-getinstall git
)克隆libfastcommon库(libfastcommon是从 FastDFS 和 FastDHT 中提取出来的公共 C 函数库,基础环境),进入目录编译并且安装。
git clone https://github.com/happyfish100/libfastcommon.git
cd libfastcommon/
./make.sh
./make.sh install
2 设置环境变量(注意32位系统没有64)和软连接
export LD_LIBRARY_PATH=/usr/lib64/
ln -s /usr/lib64/libfastcommon.so /usr/local/lib/libfastcommon.so
3 安装FastDFS 从https://github.com/happyfish100/fastdfs/releases获取最新版本6.06,解压编译安装。
wget wget https://github.com/happyfish100/fastdfs/archive/V6.06.tar.gz
tar xzf V6.06.tar.gz
cd fastdfs-6.06/
./make.sh
./make.sh install
4 修改配置文件 默认安装路径/etc/fdfs下的client.conf.sample,storage.conf.sample,tracker.conf.sample三个参考配置文件。配置跟踪器 tracker.conf,这里端口使用默认的22122,不建议修改。
cd /etc/fdfs
cp tracker.conf.sample tracker.conf
vim tracker.conf
修改下面两个参数 Tracker数据和日志目录地址(目录必须存在)
base_path=/home/xuchunlei/Desktop/linkstart/upload/tracker
HTTP 服务端口
http.server_port=80
配置存储 storage.conf,端口依旧使用默认的23000。
cd /etc/fdfs
cp storage.conf.sample storage.conf
vim storage.conf
Storage 数据和日志目录地址(目录必须存在)
base_path=/home/xuchunlei/Desktop/linkstart/upload/storage
逐一配置 storepathcount 个路径(索引号从0开始,不配置storepath0就和basepath路径一样)
store_path0=/home/xuchunlei/Desktop/linkstart/upload/file
tracker_server列表,这里只有一个,注释掉多余的,ip对应linux服务器的ip
tracker_server=192.168.1.111:22122
访问端口
http.server_port=80
5 启动服务 启动服务,22122和23000端口被监听说明启动成功。这里依然可以添加到服务,并开机启动。
/usr/bin/fdfs_trackerd /etc/fdfs/tracker.conf
/usr/bin/fdfs_storaged /etc/fdfs/storage.conf
netstat -unltp|grep fdfs
6 测试上传文件 修改客户端 client.conf
cd /etc/fdfs
cp client.conf.sample client.conf
vim client.conf
Client 的数据和日志目录
base_path=/home/xuchunlei/Desktop/linkstart/upload/log
Tracker端口
tracker_server=192.168.1.111:22122
文件上传
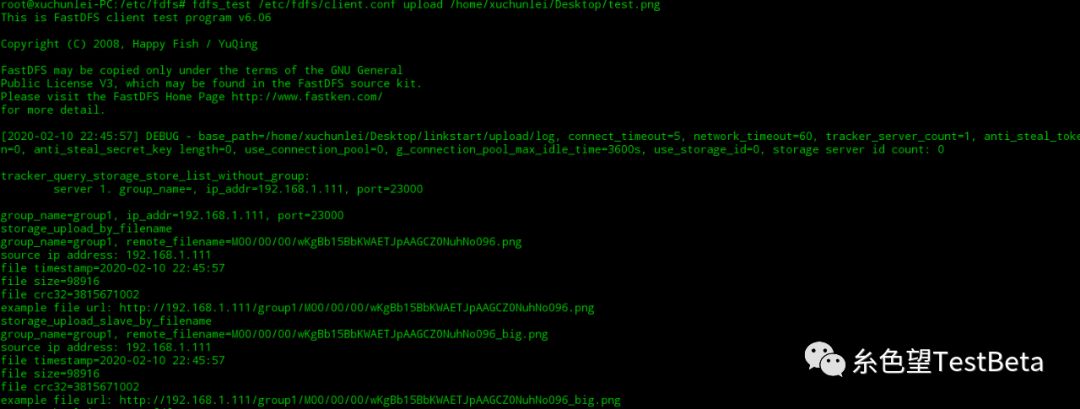
fdfs_test /etc/fdfs/client.conf upload /home/xuchunlei/Desktop/test.png
FastDFS http访问
虽然上传成功文件,但是这个时候是不能通过http来访问的,一般通过Nginx访问扩展模块来访问。
1 安装Nginx 从https://nginx.org/en/download.html选择最新版本1.17.8。使用默认配置编译安装启动。浏览器访问localhost,出现Nginx界面表示安装成功。
wget http://nginx.org/download/nginx-1.17.8.tar.gz
tar xzf nginx-1.17.8.tar.gz
cd nginx-1.17.8
./configure
make
make install
/usr/local/nginx/sbin/nginx
2 安装fastdfs-nginx-module模块 在Nginx中添加fastdfs-nginx处理模块。
git clone https://github.com/happyfish100/fastdfs-nginx-module.git
cd fastdfs-nginx-module/
./configure --add-module=/home/xuchunlei/Desktop/linkstart/fastdfs/fastdfs-nginx-module/src
make
make install
此时通过 /usr/local/nginx/sbin/nginx-V
来查看版本和模块信息。
3 配置nginx.conf
vim /usr/local/nginx/conf/nginx.conf
配置文件中加入新的location,root配置到Storage的store_path0路径加上data
location /group1/M00 {
    root /home/xuchunlei/Desktop/linkstart/upload/file/data;
    ngx_fastdfs_module;
}
创建/M00到data的软连接
ln -s /home/xuchunlei/Desktop/linkstart/upload/file/data/ home/xuchunlei/Desktop/linkstart/upload/file/data/group1/M00
4 配置mod_fastdfs.conf 复制fastdfs-nginx-module源码中的配置文件到/etc/fdfs目录并修改。
cp mod_fastdfs.conf /etc/fdfs/
trackerserver
tracker_server=192.168.1.111:22122
false时,即访问地址不使用分组名称,nginx中不需要分组
url_have_group_name=true
必须和storage.conf中配置的storepath0路径的一致
store_path0=/home/xuchunlei/Desktop/linkstart/upload/file
复制FastDFS的部分配置文件(解压文件conf文件夹中)到/etc/fdfs目录
cp http.conf /etc/fdfs/
cp mime.types /etc/fdfs/
重启Nginx
/usr/local/nginx/sbin/nginx -s stop
/usr/local/nginx/sbin/nginx
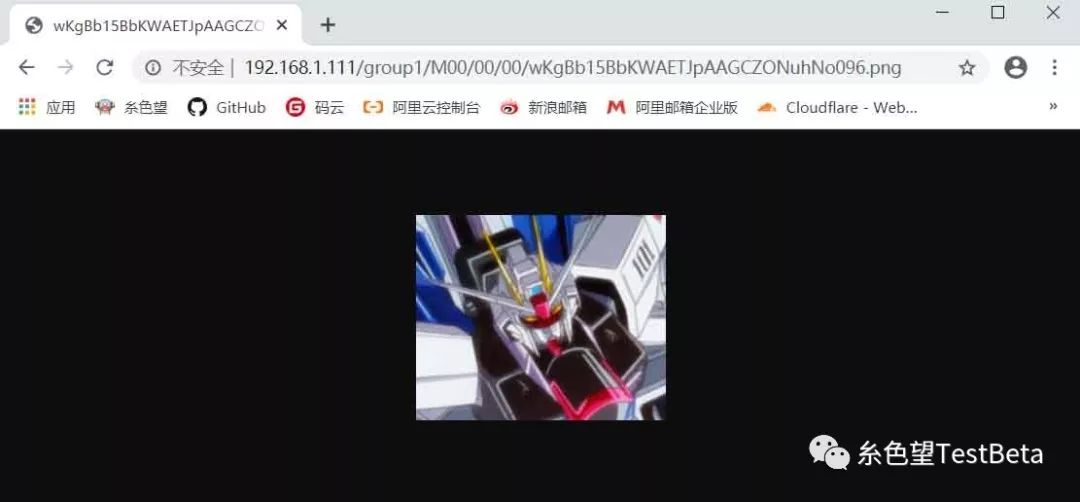
通过文件上传返回路径 http://192.168.1.111/group1/M00/00/00/wKgBb15BbKWAETJpAAGCZONuhNo096.png
来访问