


1、拉取 ubuntu 镜像
2、使用 Dockerfile 构建包含 jdk 的 ubuntu 镜像
3、进入映像
4、升级 apt-get
5、安装 vim
6、更新 apt-get 镜像源
7、重新升级 apt-get
8、安装 wget
9、创建并进入安装 hadoop 的文件目录
10、通过 wget 下载 hadoop 安装包
11、解压 hadoop
12、配置环境变量并重启配置文件
13、创建文件夹并修改配置文件
14、修改 hadoop 环境变量
15、安装 SSH
修改 ssh 配置
16、导出镜像
17、集群测试
修改 master 中 slaves 文件
启动 hadoop
18、使用 wordCount 测试集群
本人由于毕业设计选题,开始接触 Hadoop,预期搭建一个具有分布式存储与高性能处理数据的框架,技术选型初步采用 Docker 进行分布式集群搭建,并且使用 Docker 封装出一个灵活添加使用的算法层, 环境搭建中踩坑多次,特此记录分享,有需求的小伙伴可以参考一下。
操作系统:Ubuntu20.04 默认 Docker 环境已经搭建完成
制作镜像
1、拉取 ubuntu 镜像
首先拉取一个 ubuntu 最新的镜像作为基础映像docker pull ubuntu:latest
,我这里已经拉取过了,如果第一次 pull 会开始下载。下载后可以看一下docker images
已经有一个 ubuntu 版本号为 latest 的了。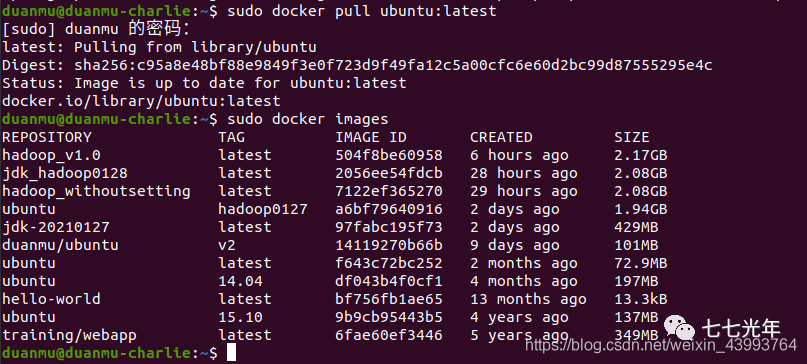
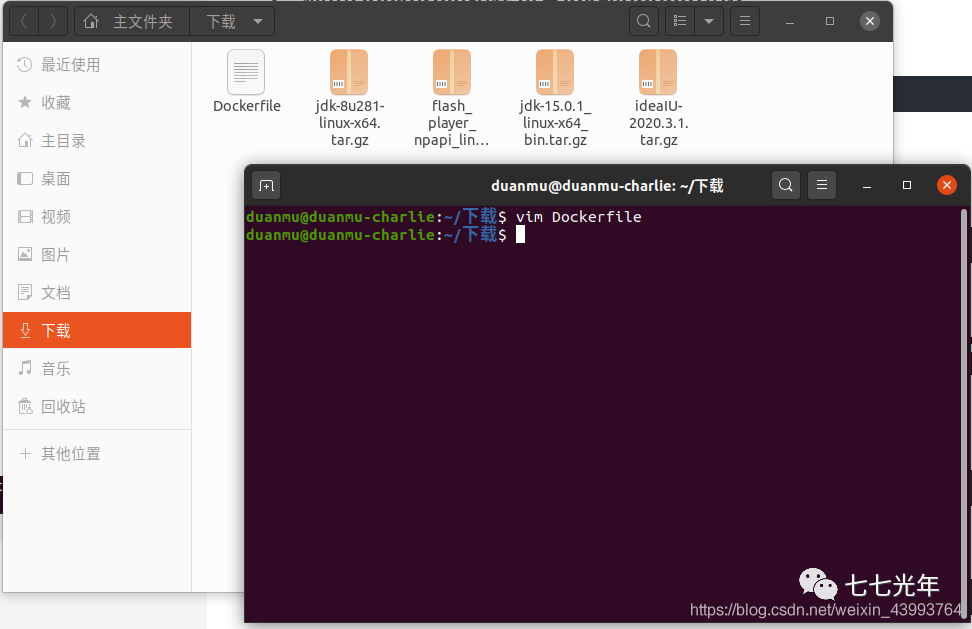
2、使用 Dockerfile 构建包含 jdk 的 ubuntu 镜像
去 jdk 官网下载 jdk 包。我下载的 jdk1.8 jdk-8u281-linux-x64.tar.gz,在下载好的 tar.gz 文件所在的目录,新建一个 Dockerfile 文件,并进入编辑状态
vim Dockerfile
 输入下面的文件内容,其中 jdk 的版本号要根据你下载的版本适当修改:
FROM ubuntu:latest
MAINTAINER duanmu
ADD jdk-8u281-linux-x64.tar.gz /usr/local/
ENV JAVA_HOME /usr/local/jdk1.8.0_281
ENV CLASSPATH $JAVA_HOME/lib/dt.jar:$JAVA_HOME/lib/tools.jar
ENV PATH $PATH:$JAVA_HOME/bin
编辑好后保存,开始 build 镜像
docker build -t jdk-20210127 .
构建一个包含 jdk 的 ubuntu 镜像命名为 jdk-20210127 ,注意最后的“.”
3、进入映像
新建一个以 jdk-20210127 为基础镜像的容器命名为ubuntu_hadoop并指定容器的 hostname 为 charlie,并进入容器。
docker run -it --name=ubuntu_hadoop -h charlie jdk-20210127
下图为进入容器后: 此时输入
此时输入
java -version
已经可以显示 jdk 的版本号了。

4、升级 apt-get
apt-get update
5、安装 vim
apt-get install vim
6、更新 apt-get 镜像源
默认的 apt-get 下载源速度太慢,更换下载源可以提升速度,进入下载源列表文件,按a进入 insert 模式
vim /etc/apt/sources.list
将其中内容全部替换为以下内容
deb-src http://archive.ubuntu.com/ubuntu focal main restricted #Added by software-properties
deb http://mirrors.aliyun.com/ubuntu/ focal main restricted
deb-src http://mirrors.aliyun.com/ubuntu/ focal main restricted multiverse universe #Added by software-properties
deb http://mirrors.aliyun.com/ubuntu/ focal-updates main restricted
deb-src http://mirrors.aliyun.com/ubuntu/ focal-updates main restricted multiverse universe #Added by software-properties
deb http://mirrors.aliyun.com/ubuntu/ focal universe
deb http://mirrors.aliyun.com/ubuntu/ focal-updates universe
deb http://mirrors.aliyun.com/ubuntu/ focal multiverse
deb http://mirrors.aliyun.com/ubuntu/ focal-updates multiverse
deb http://mirrors.aliyun.com/ubuntu/ focal-backports main restricted universe multiverse
deb-src http://mirrors.aliyun.com/ubuntu/ focal-backports main restricted universe multiverse #Added by software-properties
deb http://archive.canonical.com/ubuntu focal partner
deb-src http://archive.canonical.com/ubuntu focal partner
deb http://mirrors.aliyun.com/ubuntu/ focal-security main restricted
deb-src http://mirrors.aliyun.com/ubuntu/ focal-security main restricted multiverse universe #Added by software-properties
deb http://mirrors.aliyun.com/ubuntu/ focal-security universe
deb http://mirrors.aliyun.com/ubuntu/ focal-security multiverse
其中 focal 是 ubuntu20.04 的版本号,其他版本诸如 xenial 等修改版本号即可。
7、重新升级 apt-get
apt-get update
8、安装 wget
apt-get install wget
9、创建并进入安装 hadoop 的文件目录
mkdir -p soft/apache/hadoop/
cd soft/apache/hadoop
10、通过 wget 下载 hadoop 安装包
wget http://mirrors.ustc.edu.cn/apache/hadoop/common/hadoop-3.3.0/hadoop-3.3.0.tar.gz
本人使用的是比较新的 hadoop3.3.0 版本,其他版本也可以访问这个网站的目录树去找。(3.3.0 在后续配置中有一步骤略有差别,之后会提。)
11、解压 hadoop
tar -xvzf Hadoop-3.3.0.tar.gz
12、配置环境变量并重启配置文件
vim ~/.bashrc
新增以下环境变量:
export JAVA_HOME=/usr/local/jdk1.8.0_281
export HADOOP_HOME=/soft/apache/hadoop/hadoop-3.3.0
export HADOOP_CONFIG_HOME=$HADOOP_HOME/etc/hadoop
export PATH=$PATH:$HADOOP_HOME/bin
export PATH=$PATH:$HADOOP_HOME/sbin
并重启配置文件
source ~/.bashrc
13、创建文件夹并修改配置文件
cd $HADOOP_HOME
mkdir tmp
mkdir namenode
mkdir datanode
修改配置文件:
cd $HADOOP_CONFIG_HOME
vim core-site.xml
将下面内容替换:
<?xml-stylesheet type="text/xsl" href="configuration.xsl"?>
<!--
  Licensed under the Apache License, Version 2.0 (the "License");
  you may not use this file except in compliance with the License.
  You may obtain a copy of the License at

    http://www.apache.org/licenses/LICENSE-2.0

  Unless required by applicable law or agreed to in writing, software
  distributed under the License is distributed on an "AS IS" BASIS,
  WITHOUT WARRANTIES OR CONDITIONS OF ANY KIND, either express or implied.
  See the License for the specific language governing permissions and
  limitations under the License. See accompanying LICENSE file.
-->

<!-- Put site-specific property overrides in this file. -->
<configuration>
<property>
        <name>hadoop.tmp.dir</name>
        <value>/soft/apache/hadoop/hadoop-3.3.0/tmp</value>
</property>
<property>
        <name>fs.default.name</name>
        <value>hdfs://master:9000</value>
        <final>true</final>
</property>
</configuration>
更改 hdfs-site.xml
vim hdfs-site.xml
用下面配置替换:
<?xml-stylesheet type="text/xsl" href="configuration.xsl"?>
<!--
  Licensed under the Apache License, Version 2.0 (the "License");
  you may not use this file except in compliance with the License.
  You may obtain a copy of the License at

    http://www.apache.org/licenses/LICENSE-2.0

  Unless required by applicable law or agreed to in writing, software
  distributed under the License is distributed on an "AS IS" BASIS,
  WITHOUT WARRANTIES OR CONDITIONS OF ANY KIND, either express or implied.
  See the License for the specific language governing permissions and
  limitations under the License. See accompanying LICENSE file.
-->

<!-- Put site-specific property overrides in this file. -->

<configuration>
<property>
        <name>dfs.replication</name>
        <value>2</value>
        <final>true</final>
</property>
<property>
        <name>dfs.namenode.name.dir</name>
        <value>/soft/apache/hadoop/hadoop-3.3.0/namenode</value>
        <final>true</final>
</property>
<property>
        <name>dfs.datanode.name.dir</name>
        <value>/soft/apache/hadoop/hadoop-3.3.0/datanode</value>
        <final>true</final>
</property>
</configuration>
接下来
cp marred-site.xml.template marred-site.xml
vim mapred-site.xml
<?xml version="1.0"?>
<?xml-stylesheet type="text/xsl" href="configuration.xsl"?>
<!--
  Licensed under the Apache License, Version 2.0 (the "License");
  you may not use this file except in compliance with the License.
  You may obtain a copy of the License at

    http://www.apache.org/licenses/LICENSE-2.0

  Unless required by applicable law or agreed to in writing, software
  distributed under the License is distributed on an "AS IS" BASIS,
  WITHOUT WARRANTIES OR CONDITIONS OF ANY KIND, either express or implied.
  See the License for the specific language governing permissions and
  limitations under the License. See accompanying LICENSE file.
-->

<!-- Put site-specific property overrides in this file. -->

<configuration>
<property>
        <name>mapred.job.tarcker</name>
        <value>master:9001</value>
</property>
</configuration>
14、修改 hadoop 环境变量
在 hadoop 的安装目录下,找到 hadoop-env,sh 文件
vim hadoop-env.sh
在最后添加
export JAVA_HOME=/usr/local/jdk1.8.0_281
刷新
hadoop namenode -format
15、安装 SSH
hadoop 的环境必须满足 ssh 免密登陆,先安装 ssh
apt-get install net-tools
apt-get install ssh
创建 sshd 目录
mkdir -p ~/var/run/sshd
生成访问密钥
cd ~/
ssh-keygen -t rsa -P '' -f ~/.ssh/id_dsa
cd .ssh
cat id_dsa.pub >> authorized_keys
这一步骤提示安装路径与设置密码时全部直接按回车即可设置成免密。
修改 ssh 配置
vim /etc/ssh/ssh_config
添加,将下面这句话直接添加即可,也可以在文件中找到被注释的这句话去修改。
StrictHostKeyChecking no #将ask改为no
vim etc/ssh/sshd_config
在末尾添加:
#禁用密码验证
PasswordAuthentication no
#启用密钥验证
RSAAuthentication yes
PubkeyAuthentication yes
AuthorizedKeysFile .ssh/authorized_keys
最后使用下面语句测试是否免密登陆,
ssh localhost
出现下图即免密配置成功。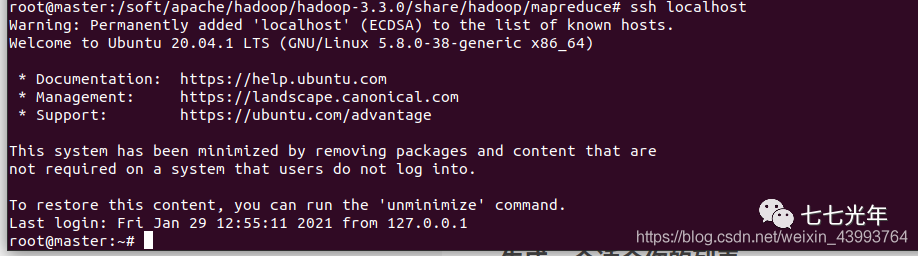 最后在在高版本 hadoop 配置过程中,最后启动时常常报如下的错:
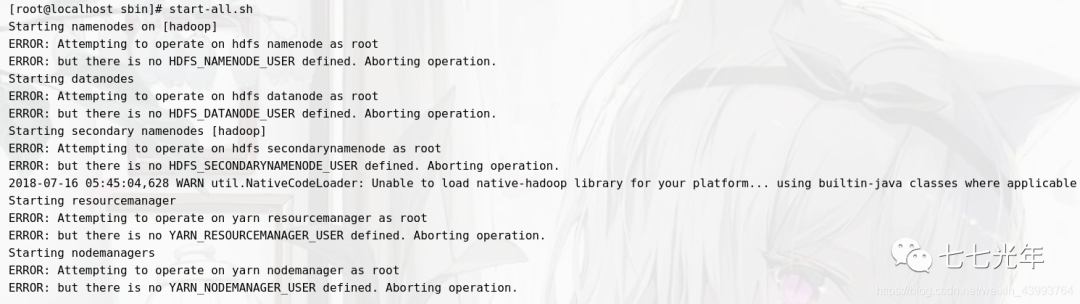 为了避免踩坑,先提前设置,进入环境变量
vim /etc/profile
增加如下内容并保存:
export HDFS_NAMENODE_USER=root
export HDFS_DATANODE_USER=root
export HDFS_SECONDARYNAMENODE_USER=root
export YARN_RESOURCEMANAGER_USER=root
export YARN_NODEMANAGER_USER=root
使配置生效
source /etc/profile
16、导出镜像
至此镜像已经配置完成,退出容器,将配置好的镜像保存,其中 xxxx 为刚刚操作的容器的 id,可以使用docker ps -a查看
docker commit xxxx ubuntu:hadoop
此时 ubuntu_hadoop 就是最终配置好的包含 hadoop 的镜像。
17、集群测试
依次构建并启动三个以刚刚生成的镜像为基本镜像的容器,依次命名为 master 、slave1、slave2,并将 master 做端口映射(提示:容器要处于运行状态,生成容器后使用 ctrl+P+Q 退出可以使容器保持后台运行。)
docker run -it  -h master --name=master -p 9870:9870 -p 8088:8088 ubuntu:hadoop
docker run -it  -h slave1 --name=slave1 ubuntu:hadoop
docker run -it  -h slave2 --name=slave2 ubuntu:hadoop
修改每个容器的 host 文件 对 matser、slave1、slave2 里的 host 文件,分别加入其他两个容器的 ip
vim /etc/hosts
127.0.0.1       localhost
::1     localhost ip6-localhost ip6-loopback
fe00::0 ip6-localnet
ff00::0 ip6-mcastprefix
ff02::1 ip6-allnodes
ff02::2 ip6-allrouters
172.17.0.2      master
172.17.0.3      slave1
172.17.0.4      slave2
修改 master 中 slaves 文件
注意,在 hadoop3.3.0 版本中并不是修改 slaves 文件,而是修改 workers 文件。此处为 3.3.0 版本的一些变化。老版本(自行查找 hadoop 版本中已存在文件是 slaves 还是 iworkers)
cd $HADOOP_CONFIG_HOME/
vim slaves
3.3.0
cd $HADOOP_CONFIG_HOME/
vim workers
将其他两个节点名称加入文件
slave1
slave2
启动 hadoop
start-all.sh
出现下图即为配置成功,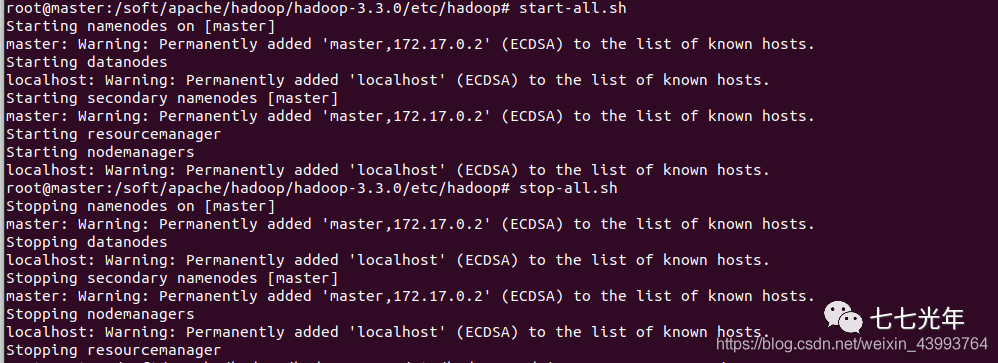 此时可以访问 localhost:9870 和 localhost:8088 ,去监控集群运行状态了,如下图
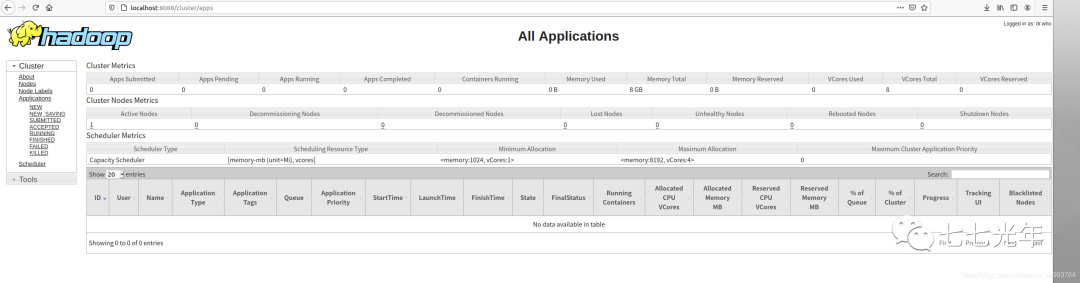

18、使用 wordCount 测试集群
进入 hadoop 目录,查看一下所有文件,以文件中的 LICENSE.txt 为输入文件,来统计其中单词出现频率作为测试。
cd $HADOOP_HOME
ll
首先在HDFS文件存储系统中新建一个inputs文件夹。
hadoop fs -mkdir /input
可以使用下面命令看到文件夹创建成功
hadoop fs -ls /
把 license.txt 放进 input 文件夹
hadoop fs -put LICENSE.txt /input
查看已经放入
hadoop fs -ls /input
使用示例程序进行统计(mapreduce 示例包不同版本路径不同需要自行查找,下面是 3.3.0 版本)
hadoop jar /soft/apache/hadoop/hadoop-3.3.0/share/hadoop/mapreduce/hadoop-mapreduce-examples-3.3.0.jar wordcount /input /output
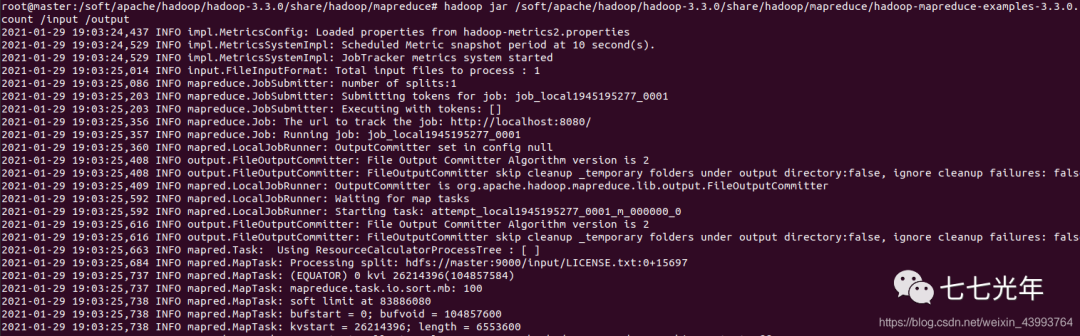
运行后查看文件夹,发现多了一个 output 文件夹,打开 output 文件夹,多了两个文件,_SUCCESS 和 part-r-00000,说明运行成功。
hadoop fs -ls /
hadoop fs -ls /output
 打开 part -r-00000
hadoop fs -cat /output/part-r-00000
词频已经统计完毕了: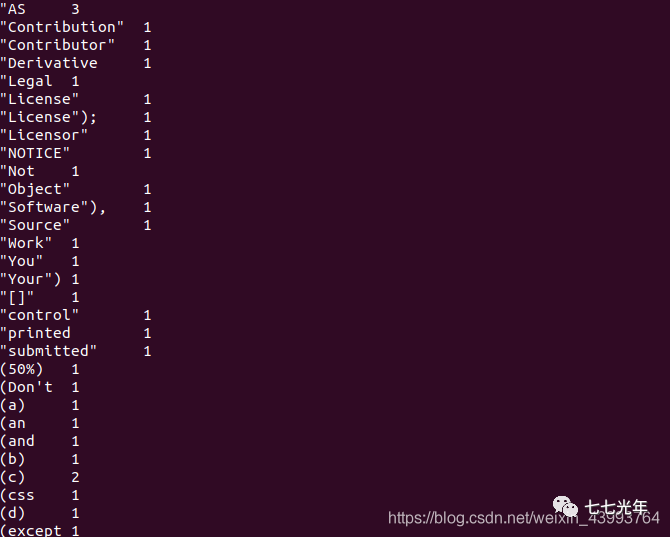
至此,已经完成了基本的 Docker 搭建 hadoop 分布式集群。并进行简单的测试,接下来我也会在学习过程中持续更新,兄弟萌觉得有用点个赞奥!!!
