


概述
Spring Boot 应用目前应该是 Java 中用得最多的框架了吧。其中 Spring Boot 最具特点之一就是自动配置,基于Spring Boot 的自动配置,我们可以很快集成某个模块,不用加 xml 之类的配置文件,大部分情况下甚至什么配置都不用写,直接引起 maven 包即可使用。
之前我也仅仅会用的,但是它怎么实现的是没有详细了解,都是通过看别人的文章大概知道了流程,但是这样好像总是记得不是很清楚,所以就打算也自己也输出一份,方便自己将来记忆另外也方便自己查看。因为之前搜索的这个知识点的时候,感觉其他文章总有一些讲的不是很全面。
思考一下?如果让要自己实现自动配置要怎么实现呢?🧐仅仅通过引入 maven 依赖包,即可尽量达到最大限度的默认配置?
自己猜想:有个机制自动扫描引入来的依赖的包,自动将包里的某些类进行实例化并注入到Spring Boot中并初始化好设置好的一些参数。
实际上 Spring Boot 的自动配置也是这样,不过它自定义了自己的一套的可拓展,具备通用性模块去扫描并进行初始化。
Spring Boot 启动源码中看自动配置
Spring Boot 自动配置是在应用启动的时候就会完成的,所以在项目启动的源码中包含着如何实现自动配置的原理。
一个简单的Spring Boot 应用的启动入口类可以这样定义,主要的依赖于@SpringBootApplication
这个注解,标记它是Spring Boot 的启动类。
@SpringBootApplication
public class App {
    public static void main(String[] args) {
        SpringApplication.run(App.class, args);
    }
}
我们跟踪进入这个注解可以看到它主要包含三个元注解 @SpringBootConfiguration
、@EnableAutoConfiguration
、@ComponentScan
,实际上也可以通过在启动类中只加上这三个注解就可以实现Spring Boot 的启动。
@Target(ElementType.TYPE)
@Retention(RetentionPolicy.RUNTIME)
@Documented
@Inherited
@SpringBootConfiguration
@EnableAutoConfiguration
@ComponentScan(excludeFilters = { @Filter(type = FilterType.CUSTOM, classes = TypeExcludeFilter.class),@Filter(type = FilterType.CUSTOM, classes = AutoConfigurationExcludeFilter.class) })
public @interface SpringBootApplication {
    。。。}
@SpringBootConfiguration
: 标记该类可以用来作为 Spring Boot 启动类的配置类,内部是 @Configuration 注解,可以用来加载 bean 到 Spring 上下文中@ComponentScan
:主要为配置组件扫描加载@Configuration
类的包路径,默认为当前目录下的所有包@EnableAutoConfiguration
:设置自动配置,会自动加载某些特定的配置类并进行初始化处理,自动配置的核心就在这个注解里
而 @Enabe*
这类的注解是都是启用什么功能的注解,里面包含了 @Import
注解,通过该注解定义某些类继承 ImportSelector 或 ImportBeanDefinitionRegistrar 接口,在实现类中将某些 bean 完整类名以列表返回即可将这些类注册到Spring 容器中和进行一些配置的初始化行为。详细可以参考:Spring Boot @Enable注解源码解析及自定义@Enable 这篇我自己之前写过的文章
@Import 注解支持导入普通 java 类,并将其声明成一个bean。主要用于将多个分散的 java config 配置类融合成一个更大的 config 类。在这里的作用可以将其他配置类导入到Spring Boot Application的自动配置类中。
而这里的@EnableAutoConfiguration
中 @Import
的value 为:AutoConfigurationImportSelector
类,从该类的类名(如果实现了接口,接口名在类名的后面),我们可以知道该类实现了 ImportSelector
接口。该类中最主要的方法是:getAutoConfigurationEntry
,主要通过该方法来返回类路径让Spring 实例化注入到容器中。
protected AutoConfigurationEntry getAutoConfigurationEntry(AutoConfigurationMetadata autoConfigurationMetadata,
   AnnotationMetadata annotationMetadata) {
  if (!isEnabled(annotationMetadata)) {
   return EMPTY_ENTRY;
  }
  // 获取到注解的属性,标记是哪些注解进入的
  AnnotationAttributes attributes = getAttributes(annotationMetadata);
  // 获取配置类列表的核心方法,跟踪进入可以发现是从 SpringFactoriesLoader#loadFactoryNames 中获取自动配置类的列表,传递的参数为:`EnableAutoConfiguration.class`信息和 ClassLoader
  List<String> configurations = getCandidateConfigurations(annotationMetadata, attributes);
  // 去除重复的配置类
  configurations = removeDuplicates(configurations);
  // 获取要排除的配置类,然后排除掉不进行加载
  Set<String> exclusions = getExclusions(annotationMetadata, attributes);
  checkExcludedClasses(configurations, exclusions);
  configurations.removeAll(exclusions);
  configurations = filter(configurations, autoConfigurationMetadata);
  fireAutoConfigurationImportEvents(configurations, exclusions);
  return new AutoConfigurationEntry(configurations, exclusions);
 }
该方法的核心逻辑是通过 SpringFactoriesLoader#loadFactoryNames
从 各个jar 包中的META-INF/spring.factories
配置文件中获取key 为org.springframework.boot.autoconfigure.EnableAutoConfiguratio
的配置类路径列表,然后进行去重等逻辑判断返回实际应该加载的配置类列表信息。(SpringFactoriesLoader
为Spring 定义的工具类,主要作用就是加载所有jar包中的META-INF/spring.factories
配置文件中定义的类信息)
基本每个定义的 **boot-starter
包都会包含 META-INF/spring.factories
文件,里面定义了自动配置应该加载配置类的路径。
META-INF/spring.factories 配置文件
META-INF/spring.factories
文件为key-value 文件格式的配置文件,配置了应该加载的类信息,在自动配置模板中会把要加载的自动配置类定义在该文件中。
打开spring-boot-autoconfigure包下的 spring.factories
文件我们可以清晰地看到该文件的结构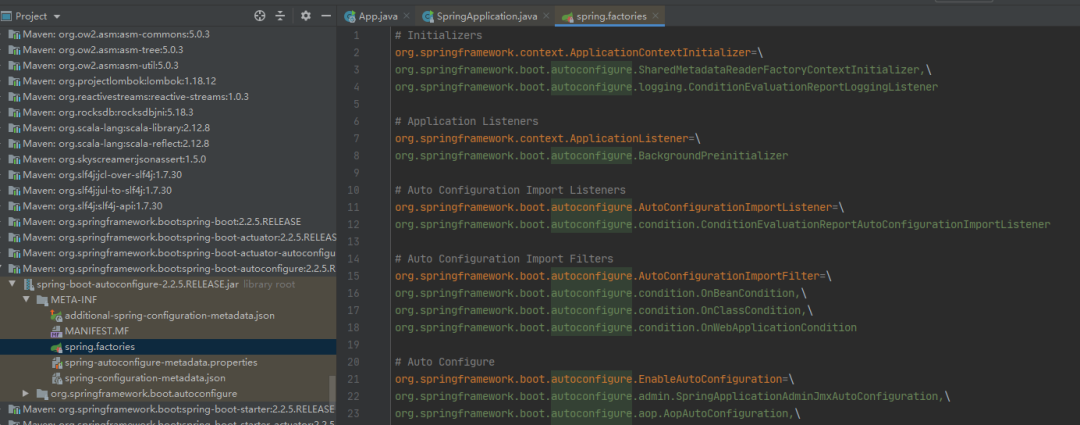
自动配置类定义在org.springframework.boot.autoconfigure.EnableAutoConfiguration
的key下面,Spring Boot在加载的时候会取这个 key 下面的类去加载到Spring Boot 中的自动配置模块,并自动实例化。
自动配置必须通过将自动配置类定义在spring.factories 中由 spring boot 去加载。参考:Creating your own auto-configuration,https://docs.spring.io/spring-boot/docs/2.0.0.M3/reference/html/boot-features-developing-auto-configuration.html
但是如果我定义了的类就加载,那样我要加载的类不就很多?或者我想某些类在满足某些条件下才进行加载?
Spring 为此定义了@Conditional
注解,该注解定义在自动配置类上,可以实现在某些条件下才加载该类,例如:@ConditionalOnPropert
注解可以根据你配置文件中的定义的配置来决定是否加载该类。
Spring Boot 启动流程
经过上面,我们知道了自动配置模块是在Spring Boot 启动的时候去加载配置类文件进行配置的,但是具体在什么时候会去加载呢?是在tomcat 启动前,还是启动后?
我们需要先知道Spring Boot 的启动流程,这样也方便我们更加了解Spring Boot 的自动配置流程。
首先创建 一个 SpringApplication
对象,在创建的过程中对资源进行获取:判断该应用应该是什么类型;使用SpringFactoriesLoader
查找并加载注册所有有用的ApplicationContextInitializer
和ApplicationListener
到Spring容器中;获取main 方法的对象类然后由创建出来的对象 SpringApplication
执行run
方法run
方法的开始会启动一个时间监视器,统计项目启动所用的时间初始化 ConfigurableApplicationContext
上下文和Spring Boot 启动异常收集类集合通过 SpringFactoriesLoader
从META-INF/Spring.factories
中获取并实例化SpringApplicationRunListener
类和调用他们的starting
方法,用于通知他们“Spring Boot开始启动了” (SpringApplicationRunListener
是只在Spring Boot 启动过程中接受不同时间点的事件的监听者,用于在Spring Boot 的run
方法执行不同过程中监听执行不同的方法)创建并配置Spring Boot的环境配置 (注意这里会重新执行一次 run
方法,如果是debug的时候,需要留意这次run 方法不同于第一次的run)打印Banner 创建Spring ApplicationContent
上下文类创建 SpringBootExceptionReporter
类,用于存放启动的时候错误信息遍历调用 SpringApplicationRunListener
的contextLoaded()
通知 所有SpringApplicationRunListener
,告诉它们ApringContext
加载完成。并加载ConfigurableEnvironment
和Configuration
类 到Springcontext
上下文中调用 ApplicationContext
的refresh()
方法,进行自动配置模块的加载,启动Tomcat容器,加载并初始化数据源,kafka 等中间件组件,执行 @Scheduled 注解 等计时器停止计时;通知 SpringApplicationRunListener
Spring Boot 的上下文刷新完成了查找实现了 ApplicationRunner
或CommandLineRunner
接口的类,并执行 它们的run
方法最后再遍历执行 SpringApplicationRunListener
的finished()
方法,通知 Spring Boot 启动完成。如果有报错会抛出报错信息。
基本一个Spring Boot 应用就启动完成了。
查看其执行步骤会发现比较复杂,但是有很多步骤是进行事件通知和进行监控的,如果事件监听和监控简化一下,可以得到如下图的简单的Spring Boot 启动流程图: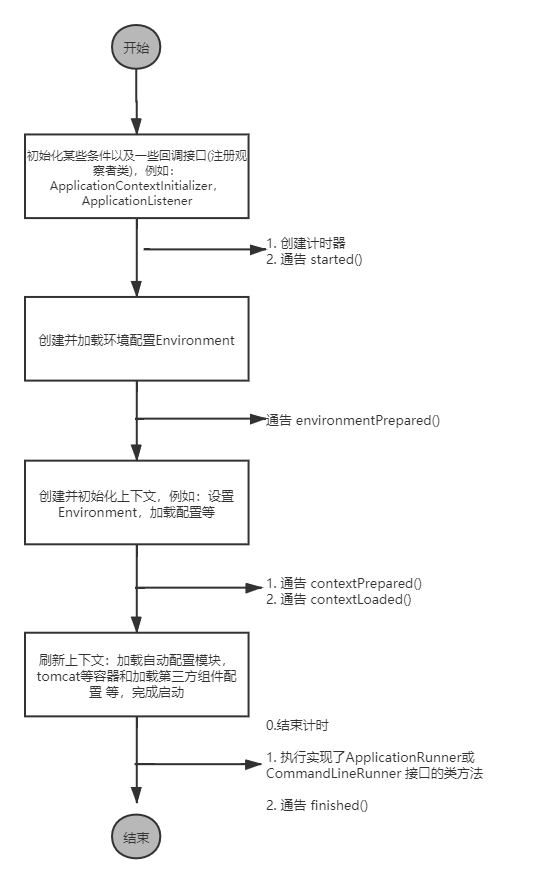
run的源码:
 public ConfigurableApplicationContext run(String... args) {
     // 启动时间监视器,统计执行时间
  StopWatch stopWatch = new StopWatch();
  stopWatch.start();
  ConfigurableApplicationContext context = null;
  Collection<SpringBootExceptionReporter> exceptionReporters = new ArrayList<>();
  configureHeadlessProperty();
  // 从META-INF/Spring.factories 配置中获取并通过BeanUtils 实例化 SpringApplicationRunListeners 和调用 starting方法
  SpringApplicationRunListeners listeners = getRunListeners(args);
  listeners.starting();
  try {
      // 封装传递过来的参数
   ApplicationArguments applicationArguments = new DefaultApplicationArguments(args);
   // 创建并配置SpringBoot 的环境配置(包含PropertySource和Profile),里面会再创建一个SpringApplication 并执行run方法
   ConfigurableEnvironment environment = prepareEnvironment(listeners, applicationArguments);
   configureIgnoreBeanInfo(environment);
   // 打印banner
   Banner printedBanner = printBanner(environment);
   // 创建Spring ApplicationContent 上下文
   context = createApplicationContext();
   // 创建SpringBootExceptionReporter类 用于捕捉报告失败的原因给用户
   exceptionReporters = getSpringFactoriesInstances(SpringBootExceptionReporter.class,
     new Class[] { ConfigurableApplicationContext.class }, context);
   // 在加载应用程序上下文但在刷新它  之前遍历调用 SpringApplicationRunListener 的 contextLoaded() 通知 所有SpringApplicationRunListener,告诉它们ApringContext 加载完成。并加载ConfigurableEnvironment和Configuration 类 进入到Springcontext上下文中
   prepareContext(context, environment, listeners, applicationArguments, printedBanner);
   // 实际调用的是AbstractApplicationContext#refresh() 方法,这里刷新上下文(加载或更新 持久化的配置),并且进行自动配置模块的加载,启动Tomcat容器,加载并初始化数据源,kafka 等中间件组件,执行 @Scheduled 注解 等
   refreshContext(context);
   // 在SpringContext 刷新后执行的操作,目前该方法没有执行任何操作,估计是为了后期扩展
   afterRefresh(context, applicationArguments);
   // 计时器停止计时
   stopWatch.stop();
   if (this.logStartupInfo) {
    new StartupInfoLogger(this.mainApplicationClass).logStarted(getApplicationLog(), stopWatch);
   }
   // 通知所有应用启动监听器 注册在应用启动事件里,注册进Spring Boot 的上下文中,并通知SpringBoot 已经刷新完上下文信息
   listeners.started(context);
   // 初始化实现了ApplicationRunner或CommandLineRunner 的接口并执行  run 方法(一般都是用于SpringBoot 启动后执行的方法,两者的区别为,后者接受的参数为原始的字符串格式,前者为 ApplicationArguments 类形式的参数)
   callRunners(context, applicationArguments);
  }
  catch (Throwable ex) {
   handleRunFailure(context, ex, exceptionReporters, listeners);
   throw new IllegalStateException(ex);
  }

  try {
   listeners.running(context);
  }
  catch (Throwable ex) {
   handleRunFailure(context, ex, exceptionReporters, null);
   throw new IllegalStateException(ex);
  }
  return context;
 }
org.springframework.context.support.AbstractApplicationContext#refresh()
源码 (源码注释写得很清楚😂,基本不用怎么看,我主要标注一下一些重要的)
    @Override
 public void refresh() throws BeansException, IllegalStateException {
  synchronized (this.startupShutdownMonitor) {
   // Prepare this context for refreshing.
   prepareRefresh();
   // Tell the subclass to refresh the internal bean factory.
   ConfigurableListableBeanFactory beanFactory = obtainFreshBeanFactory();
   // Prepare the bean factory for use in this context.
   prepareBeanFactory(beanFactory);
   try {
    // Allows post-processing of the bean factory in context subclasses.
    postProcessBeanFactory(beanFactory);
    // Invoke factory processors registered as beans in the context.  这里会进行自动配置类的加载和实例化,跟着源码debug就可以看到
    invokeBeanFactoryPostProcessors(beanFactory);
    // Register bean processors that intercept bean creation.
    registerBeanPostProcessors(beanFactory);
    // Initialize message source for this context.
    initMessageSource();
    // Initialize event multicaster for this context.
    initApplicationEventMulticaster();
    // Initialize other special beans in specific context subclasses.  主要创建启动  webService  一般为Tomcat 容器
    onRefresh();
    // Check for listener beans and register them.
    registerListeners();
    // Instantiate all remaining (non-lazy-init) singletons.  初始化所有剩余的单例bean。
    finishBeanFactoryInitialization(beanFactory);
    // Last step: publish corresponding event.  发布相应的事件
    finishRefresh();
   }
   catch (BeansException ex) {
                   。。。
            }

   finally {
    // Reset common introspection caches in Spring's core, since we
    // might not ever need metadata for singleton beans anymore...
    resetCommonCaches();
   }
  }
 }
对着这些解析来看,可以回答开头小节的问题了,自动加载模块是在Tomcat启动前执行的。
注意,根据源码的时候看起来run 方法执行了两次,但是是以第二次执行的流程为最终版的,第一次执行的只是加载环境等相关信息的时候执行 基于SpringBoot 版本 2.2.5.RELEASE。刚开始的时候,自己追源码的时候,发现比较难看懂的,看了好几次,每次都跟踪进入,只能大概看懂,后面我结合网上博客以及相关书籍的讲解来结合源码来分析就快很多了,也明白了很多。不过有些博客没有写上是参考那里来写的,当时也想着找最原始(权威一点)的出处,以免原来博客就解释错了,这个时候也耗费了挺多时间,最终找到了《SpringBoot揭秘 快速构建微服务体系》 这本书里面有比较详细和原始的Spring Boot 启动解析,挺多博客是参考了这本书的。可以在关注 公总号 “CurdBoys” 后回复“SpringBoot揭秘”获取到该本书的地址。
总结
工作两年多了,发现自己还没怎么看过SpringBoot 启动源码(只记得之前秋招的时候看过相关博客,背过相关面试题,没有自己手动debug过🙃),最近偶尔有时间来研究一下,还是学到了很多东西,如果自己没有跟着源码去debug估计对于SpringBoot的理解只能理解表面。自己去跟源码运行的时候,可以发现很多了信息是自己之前没有留意过的,也可以帮忙自己的深刻理解某些Spring框架组件的用法,以防踩坑😅。例如:继承了ApplicationRunner或CommandLineRunner接口的类的会在项目启动的时候运行,之前有些方法需要在项目启动后就立即运行的,网上搜索到是继承 CommandLineRunner 接口的就可以了,但是当时并没有在意它具体是怎么实现。看了源码才知道,原来是它是在run
方法中的最后一步去查找实现类并去执行的,就是说如果实现类执行的方法出错的话会导致SpringBoot 无法正常启动(这个当时并没有留意到这个问题☹,也会看了别人的文章联想到这个问题,感觉挺有意思的)。
另外,最后发现自己写这篇文章那么久,结果越写发现不懂的越多🙄,Spring Boot 启动过程涉及的东西太多了,感觉自己的只是简单写了些皮毛,如果自己要去的看的话,还是建议找一下《SpringBoot揭秘 快速构建微服务体系》书全面地看一下(这里面讲了很多知识点)和对照着源码手动debug一下会更加清楚点。
参考:
SpringBoot自动配置的原理详解 , https://zhuanlan.zhihu.com/p/136469945 Spring boot(二):启动原理解析 , https://www.cnblogs.com/xiaoxi/p/7999885.html 为什么我要写spring.factories文件?, https://blog.csdn.net/SkyeBeFreeman/article/details/96291283 Creating your own auto-configuration ,https://docs.spring.io/spring-boot/docs/2.0.0.M3/reference/html/boot-features-developing-auto-configuration.html 源码分析之Spring Boot如何利用Spring Factories机制进行自动注入 , https://blog.csdn.net/evasnowind/article/details/108647194?utm_medium=distribute.pc_relevant.none-task-blog-baidujs_title-0&spm=1001.2101.3001.4242 SpringApplication https://docs.spring.io/spring-boot/docs/2.1.6.RELEASE/reference/html/boot-features-spring-application.html Standard and Custom Events https://docs.spring.io/spring-framework/docs/current/reference/html/core.html#context-functionality-events 《SpringBoot揭秘 快速构建微服务体系 》 SpringBoot内置Tomcat启动时间 https://blog.csdn.net/luxiaoruo/article/details/106637335 Spring笔记——通过源码理解Spring 中事件发布 https://blog.csdn.net/qq_19865749/article/details/70186889
文章杂谈
好像很久没更新文章了,上次说要以快速过一个知识点方式写文章的,后面实际写的时候的发现的,自己还是陷入了想了解清楚的每一处的代码的含义的误区。导致写这篇文章的时候中间有个地方卡住了很久,也就拖更了很久,再加上最近心态不太好(有暂时不方便说的不可控因素😢),陷入了低迷期,心态爆炸啊。今天是5,1假期的最后一天了,这个5,1假期也没有大部分时间都在家躺平了🤐,最近两天才调整回来状态,好像最近的天气都让人很想睡觉。就这样吧,下篇文章再见!
