


前期准备
官方网站:http://www.lepus.cc/page/product
我的环境:
操作系统:Centos7.5x86_64
IP:192.168.22.222
安装了MySQL8.0
已关闭selinux
一、基本环境搭建
- 安装http和php,通过yum安装比较方便
yum install httpd php -y
- 设置httpd自启动
# centos7与6不同,此处命令视版本而定
systemctl enable httpd.service
- 安装lepus server需要的依赖包
yum install gcc python-devel mysql-devel net-snmp-devel curl-devel perl-DBI php-gd php-mysql php-bcmath php-mbstring php-xml -y
- 配置httpd并启动
#修改配置
[root@mysql ~]# grep 'ServerName' /etc/httpd/conf/httpd.conf
# ServerName gives the name and port that the server uses to identify itself.
#ServerName www.example.com:80
[root@mysql ~]# vi /etc/httpd/conf/httpd.conf
[root@mysql ~]# grep '^ServerName' /etc/httpd/conf/httpd.conf
ServerName 192.168.22.222:80
#启动
[root@mysql ~]# systemctl start httpd.service
- 配置PHP
[root@mysql ~]# sed -i "s/;date.timezone =/date.timezone = Asia\/Shanghai/g" /etc/php.ini
[root@mysql ~]# sed -i "s#max_execution_time = 30#max_execution_time = 300#g" /etc/php.ini
[root@mysql ~]# sed -i "s#post_max_size = 8M#post_max_size = 32M#g" /etc/php.ini
[root@mysql ~]# sed -i "s#max_input_time = 60#max_input_time = 300#g" /etc/php.ini
[root@mysql ~]# sed -i "s#memory_limit = 128M#memory_limit = 128M#g" /etc/php.ini
[root@mysql ~]# sed -i "/;mbstring.func_overload = 0/ambstring.func_overload = 2\n" /etc/php.ini
- 安装MySQLdb-python
[root@mysql ~]# cd /usr/local/src/
[root@mysql src]# wget https://pypi.python.org/packages/a5/e9/51b544da85a36a68debe7a7091f068d802fc515a3a202652828c73453cad/MySQL-python-1.2.5.zip
[root@mysql src]# unzip MySQL-python-1.2.5.zip
[root@mysql src]# cd MySQL-python-1.2.5/

# 编辑site.cfg,找到mysql_config,把#号去掉,并指定mysql_config的路径
[root@mysql MySQL-python-1.2.5]# whereis mysql_config
mysql_config: /usr/bin/mysql_config /usr/local/mysql/bin/mysql_config /usr/share/man/man1/mysql_config.1.gz
[root@mysql MySQL-python-1.2.5]# vi site.cfg
[root@mysql MySQL-python-1.2.5]# cat site.cfg | grep "mysql_config"
mysql_config = /usr/bin/mysql_config

[root@mysql MySQL-python-1.2.5]# python setup.py build
[root@mysql MySQL-python-1.2.5]# python setup.py install
- 安装redis驱动
[root@mysql lepus]# cd /usr/local/src/
[root@mysql src]# ls
MySQL-python-1.2.5  MySQL-python-1.2.5.zip
[root@mysql src]# wget https://pypi.python.org/packages/source/r/redis/redis-2.10.3.tar.gz
[root@mysql src]# tar xf redis-2.10.3.tar.gz
[root@mysql src]# cd redis-2.10.3
[root@mysql src]# python setup.py install
[root@mysql src]#
二、安装Lepus采集器
- 下载Lepus软件包,然后登录数据库创建lepus数据库和MySQL用户
[root@mysql src]# pwd
/usr/local/src
[root@mysql src]# wget https://www.lepus.cc/down/3147/lepus_v3.7.zip
[root@mysql src]# ls
lepus_v3.7.zip  MySQL-python-1.2.5  MySQL-python-1.2.5.zip
[root@mysql src]# unzip lepus_v3.7.zip

# #创建lepus库并授权
[root@mysql src]# mysql -uroot -p123qwe -e "create database lepus default character set utf8;"
[root@mysql src]# mysql -uroot -p123qwe -e "create user  'lepus'@'localhost' identified with mysql_native_password by 'lepus';"
[root@mysql src]# mysql -uroot -p123qwe -e "create user  'lepus'@'127.0.0.1' identified with mysql_native_password by 'lepus';"
[root@mysql src]# mysql -uroot -p123qwe -e "grant select,insert,update,delete,create on lepus.* to  'lepus'@'localhost';"
[root@mysql src]# mysql -uroot -p123qwe -e "grant select,insert,update,delete,create on lepus.* to  'lepus'@'127.0.0.1';"
[root@mysql src]# mysql -uroot -p123qwe -e "flush privileges;"
- 导入lepus数据库初始化数据
[root@mysql src]# cd lepus_v3.7/sql/
[root@mysql sql]# mysql -uroot -p123qwe lepus < lepus_table.sql
[root@mysql sql]# mysql -uroot -p123qwe lepus < lepus_data.sql
- 安装lepus并,运行脚本install.sh
[root@mysql sql]# cd /usr/local/src/lepus_v3.7/python/
[root@mysql python]# sh install.sh
[note] lepus will be install on basedir: /usr/local/lepus
[note] /usr/local/lepus directory does not exist,will be created.
[note] /usr/local/lepus directory created success.
[note] wait copy files.......
[note] change script permission.
[note] create links.
[note] install complete.
[root@mysql python]# cd /usr/local/lepus/
[root@mysql lepus]# chmod +x *.sh
[root@mysql lepus]# chmod +x *.py
[root@mysql lepus]# vi etc/config.ini
###监控机MySQL数据库连接地址###
[monitor_server]
host="127.0.0.1"
port=3306
user="lepus"
passwd=lepus""
dbname="lepus"
4)启动lepus服务
[root@mysql lepus]# lepus --help
lepus help:
support-site:  www.lepus.cc
====================================================================
start        Start lepus monitor server; Command: #lepus start
stop         Stop lepus monitor server; Command: #lepus stop
status       Check lepus monitor run status; Command: #lepus status

[root@mysql lepus]# lepus start
nohup: 把输出追加到"nohup.out"
lepus server start success!
启动成功,如果启动有问题,可以查看nohup.out日志的信息排查问题。经常遇到的问题如下:
[root lepus]$ lepus start
nohup: appending output to `nohup.out'
lepus server start fail!
[root lepus]$ cat nohup.out
Traceback (most recent call last):
  File "lepus.py", line 8, in <module>
    import MySQLdb
  File "/usr/lib64/python2.6/site-packages/MySQL_python-1.2.4-py2.6-linux-x86_64.egg/MySQLdb/__init__.py", line 19, in <module>
    import _mysql
ImportError: libmysqlclient.so.18: cannot open shared object file: No such file or directory

解决方法:
[root lepus]$ ln -sf /usr/local/mysql/lib/libmysqlclient.so.18 /usr/lib/
[root lepus]$ ln -sf /usr/local/mysql/lib/libmysqlclient.so.18 /usr/lib64/
[root lepus]$ lepus start
nohup: appending output to `nohup.out'
lepus server start success!
三、安装WEB管理台
- 去到lepus的解压目录下把php文件夹下的所有文件拷贝/var/www/html下,然后编辑文件/var/www/html/application/config/database.php
[root@mysql lepus]# cp -rf /usr/local/src/lepus_v3.7/php/* /var/www/html/
[root@mysql lepus]# vim /var/www/html/application/config/database.php
- 修改这三个即可
- 重启httpd
[root@mysql lepus]# systemctl restart httpd.service
- 防火墙开启http 80端口
[root@mysql lepus]# firewall-cmd --zone=public --permanent --add-port=80/tcp
[root@mysql lepus]#  firewall-cmd --reload
- 访问lepus,在浏览器输入http://192.168.10.128,默认管理员账号密码admin/Lepusadmin
四、常规的配置
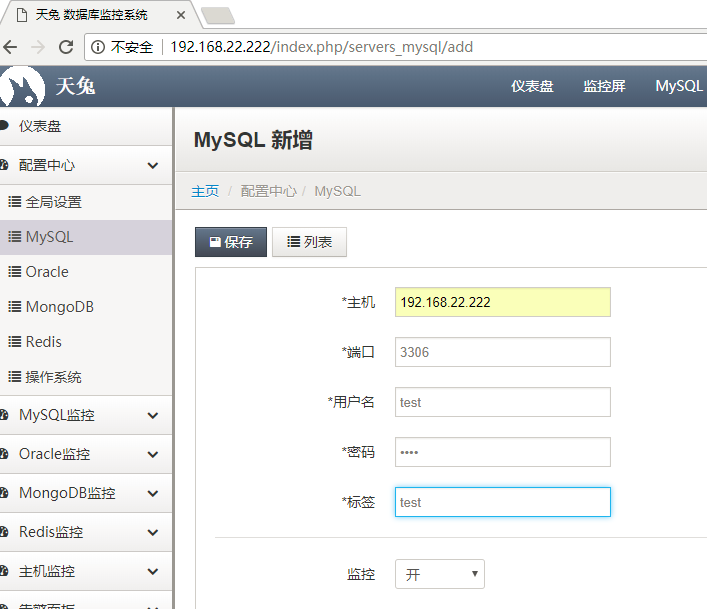
- 添加一个MySQL server,在添加被监控端的服务器时,在数据库里都要授权监控用户
> create user test@'192.168.22.%' identified by 'test';
> grant all privileges on *.* to test@'192.168.22.%';
> flush privileges;

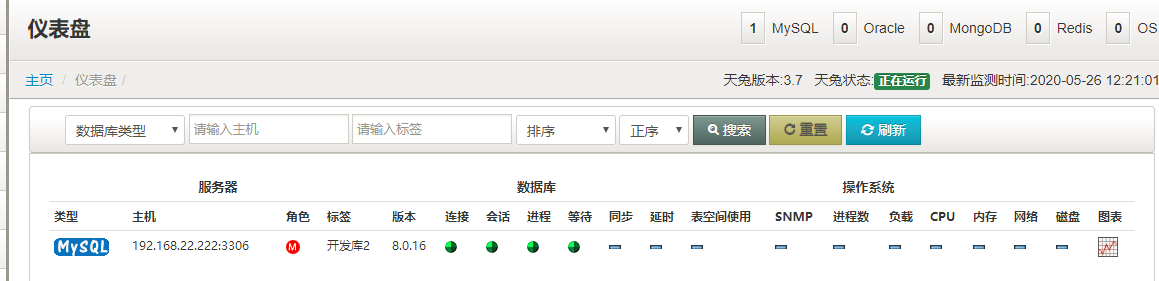
- 添加完比后,点击仪表盘可以看到监控的信息
- 安装snmp服务
[root@mysql lepus]# yum install -y net-snmp net-snmp-utils
[root@mysql lepus]#  vim /etc/snmp/snmpd.conf
- 修改配置文件如下:
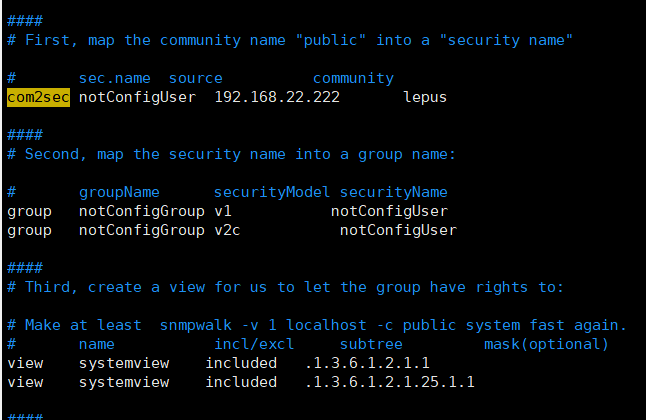
- 把#号去掉,开启下面这行
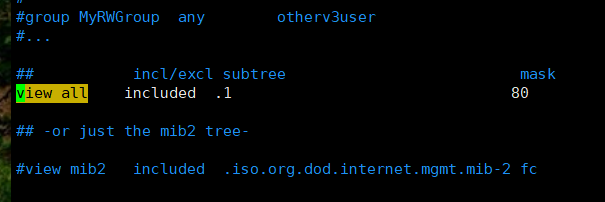
- 修改下面的为all

- 启动服务:
[root@mysql lepus]# systemctl start snmpd.service
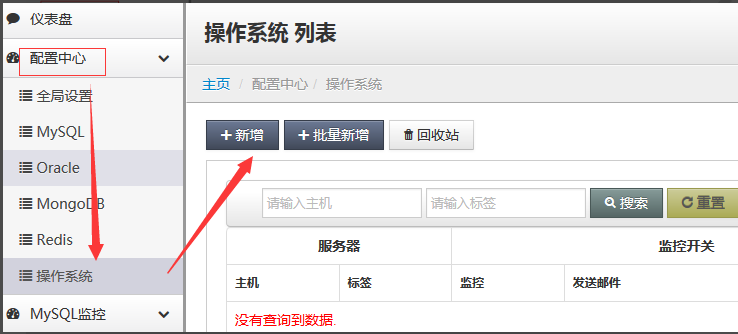
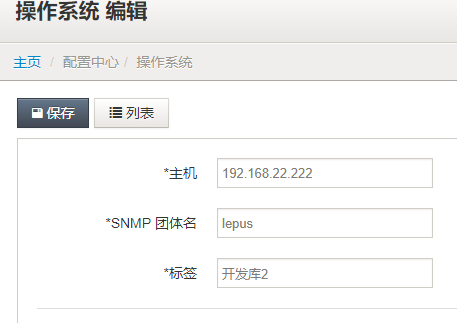
- web端添加os服务器
- 点击最后的图形,可以看监控的具体情况
五、监控redis
- 查看服务器开了哪些redis
[root@localhost ~]# netstat -nltp |grep redis
tcp        0      0 0.0.0.0:6390                0.0.0.0:*                   LISTEN      2694/redis-server *
tcp        0      0 0.0.0.0:6391                0.0.0.0:*                   LISTEN      2690/redis-server *
tcp        0      0 0.0.0.0:6379                0.0.0.0:*                   LISTEN      2682/redis-server *
tcp        0      0 0.0.0.0:6380                0.0.0.0:*                   LISTEN      2686/redis-server *
tcp        0      0 :::6390                     :::*                        LISTEN      2694/redis-server *
tcp        0      0 :::6391                     :::*                        LISTEN      2690/redis-server *
tcp        0      0 :::6379                     :::*                        LISTEN      2682/redis-server *
tcp        0      0 :::6380                     :::*                        LISTEN      2686/redis-server *
[root@localhost ~]#
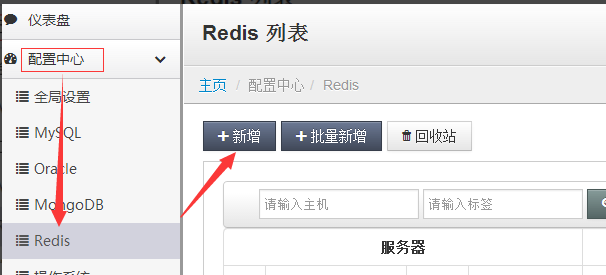
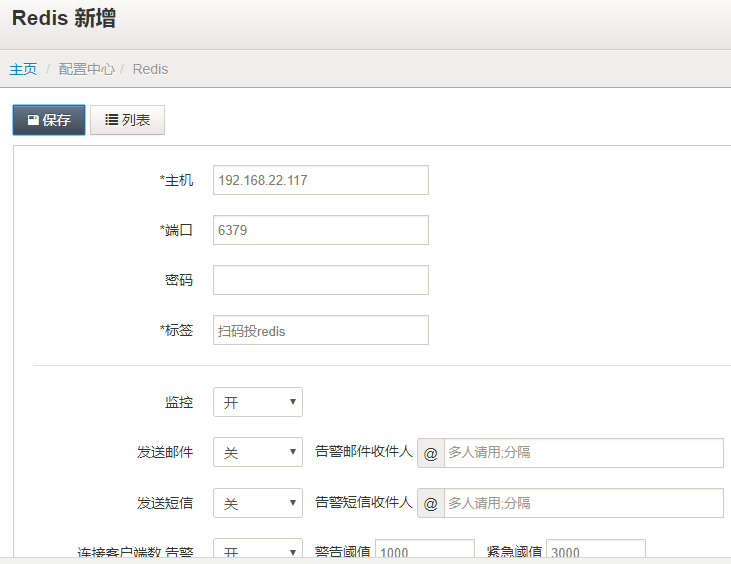
- 在配置中心找到Redis,新增

最后修改时间:2021-08-30 11:10:33
「喜欢这篇文章,您的关注和赞赏是给作者最好的鼓励」
关注作者
【版权声明】本文为墨天轮用户原创内容,转载时必须标注文章的来源(墨天轮),文章链接,文章作者等基本信息,否则作者和墨天轮有权追究责任。如果您发现墨天轮中有涉嫌抄袭或者侵权的内容,欢迎发送邮件至:contact@modb.pro进行举报,并提供相关证据,一经查实,墨天轮将立刻删除相关内容。
