


Cabling the Interconnect and Storage for Oracle Database Appliance X7-2-HA.pdf
免费下载
1
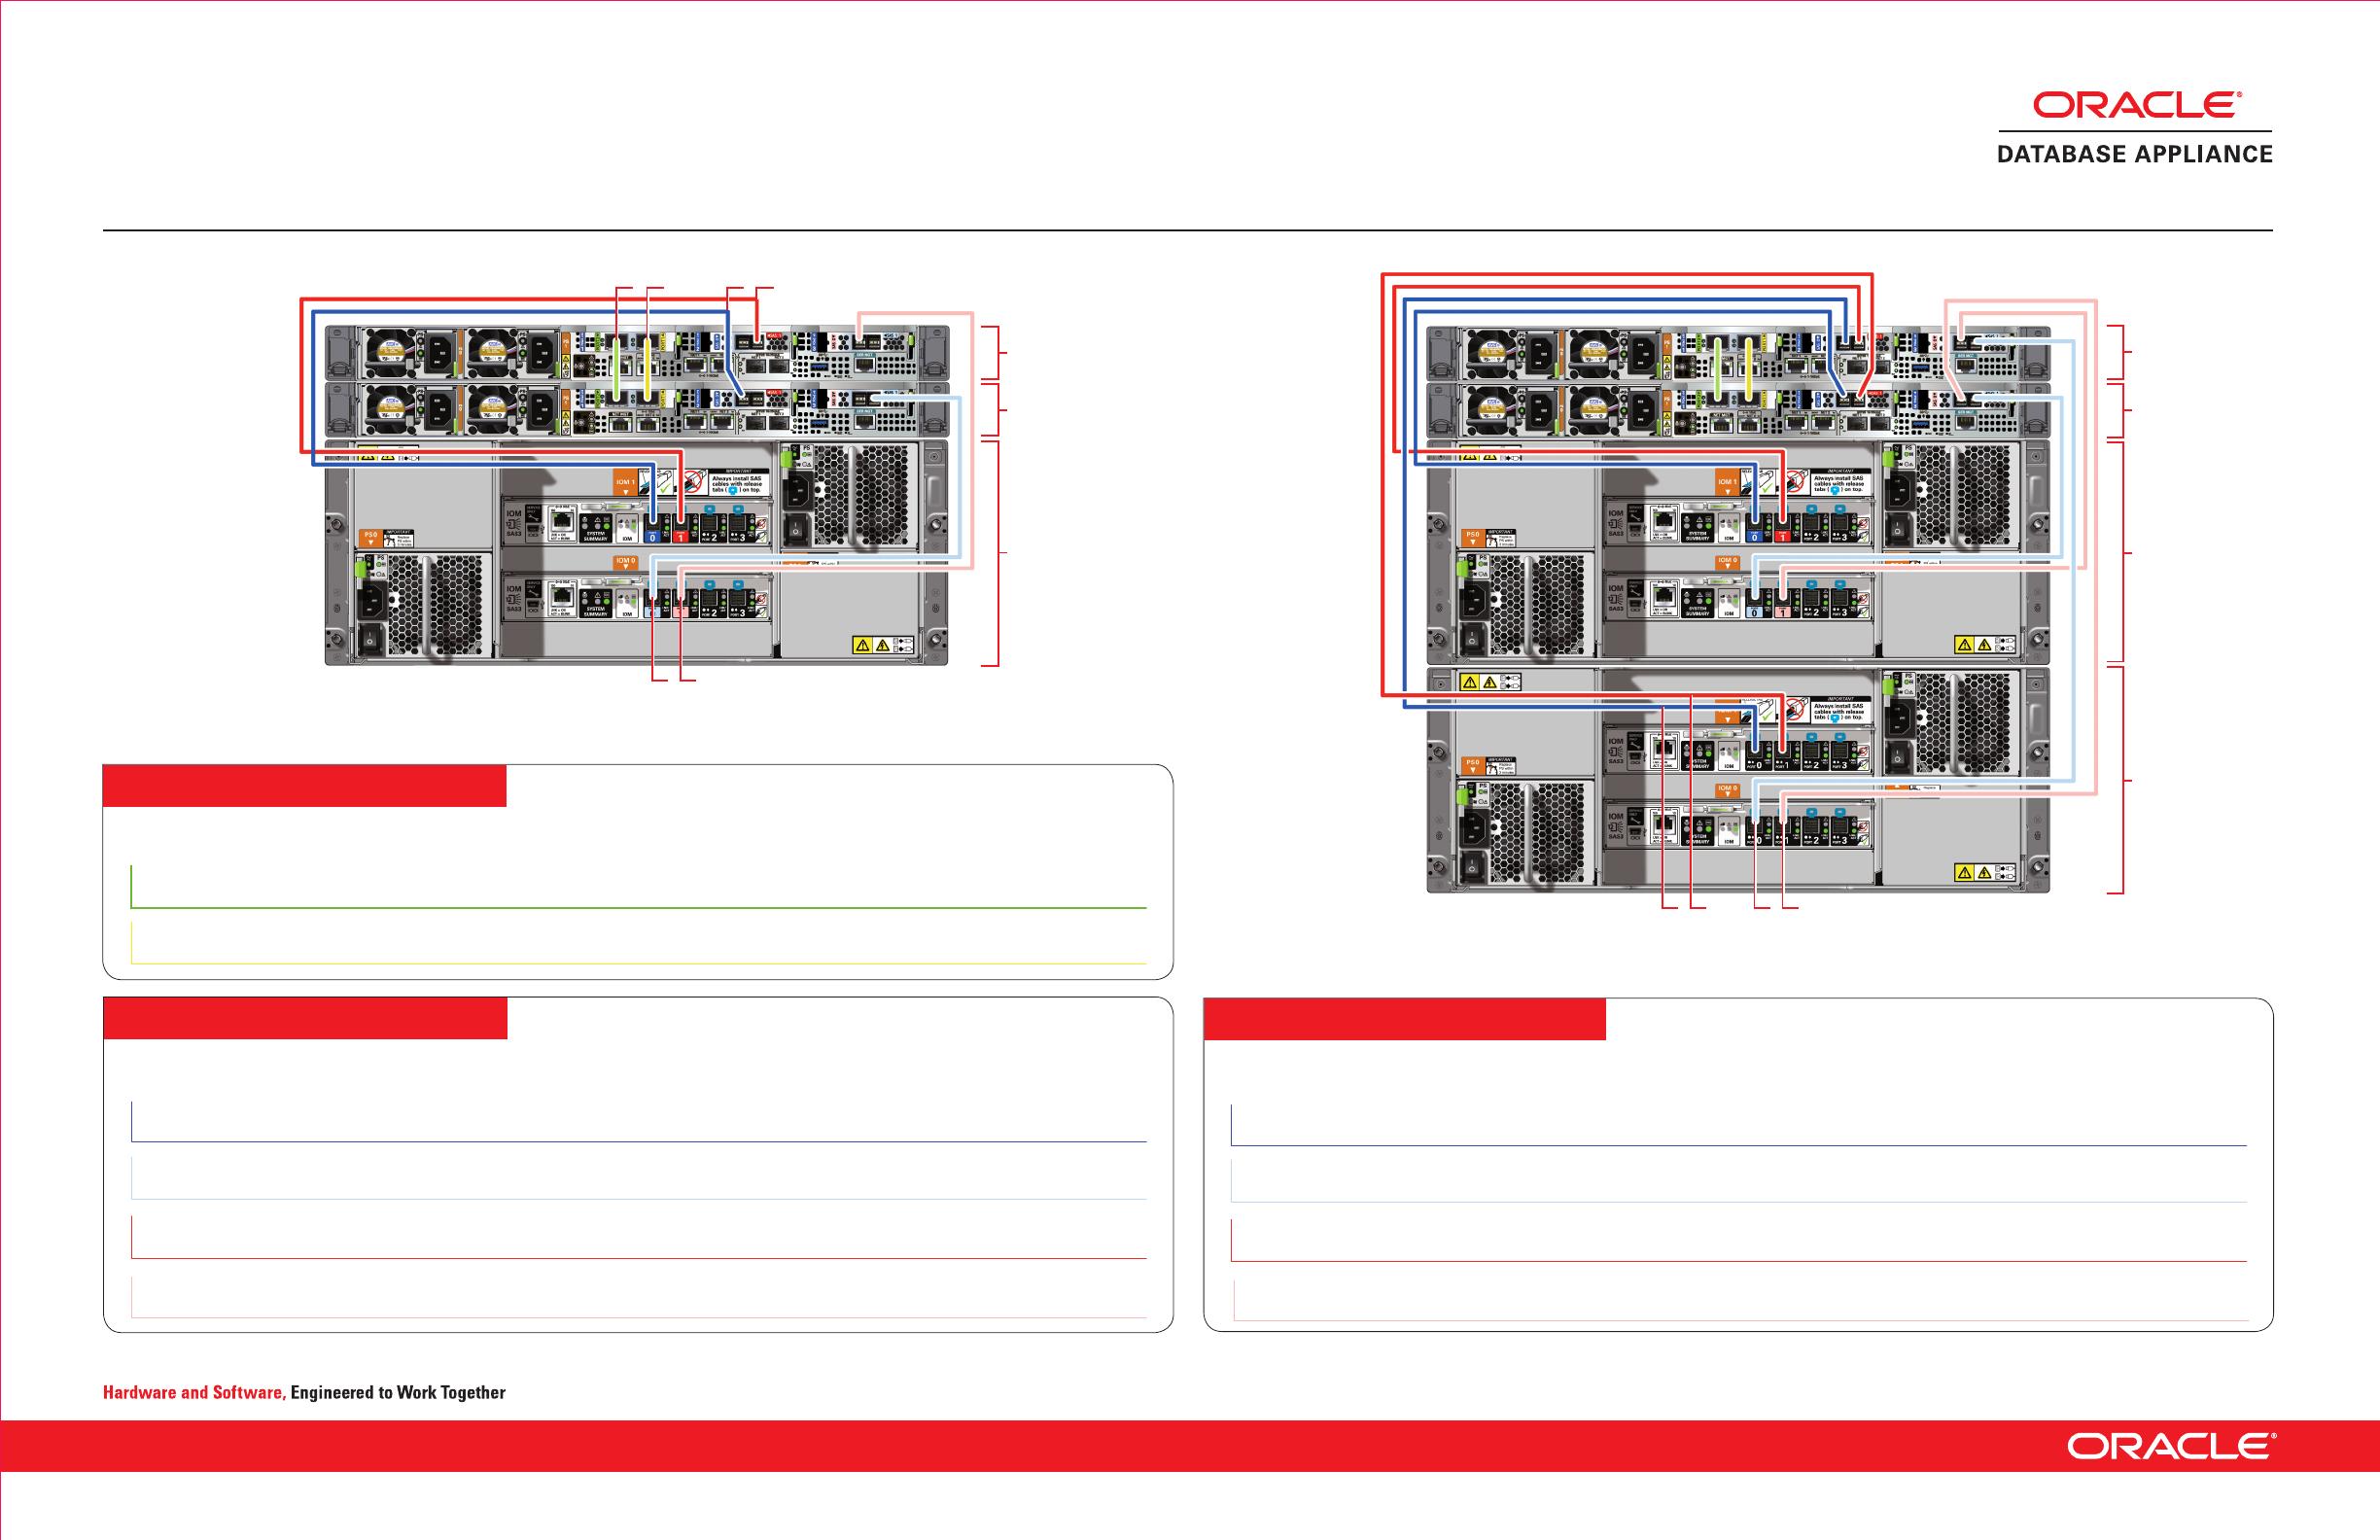
3. Connect dark blue SAS cable Connect into dark blue port
(SAS0) in PCIe slot 2 in Node0
Connect into dark blue port in
top IO Module (PORT 0)
4. Connect light blue SAS cable
Connect into light blue port
(SAS1) in PCIe slot 3 in Node0
Connect into light blue port in
bottom IO Module (PORT 0)
5. Connect dark red SAS cable
Connect into dark red port
(SAS1) in PCIe slot 2 in Node1
Connect into dark red port in
top IO Module (PORT 1)
6. Connect light red SAS cable
Connect into light red port
(SAS0) in PCIe slot 3 in Node1
Connect into light red port in
bottom IO Module (PORT 1)
Purpose
Start - Compute Nodes End - Storage Shelf
Purpose Start - Compute Node0 End - Compute Node1
7. Connect dark blue SAS cable Connect into dark blue port
(SAS0) in PCIe slot 2 in Node1
Connect into dark blue port in
top IO Module (PORT 0)
8. Connect light blue SAS cable
Connect into light blue port
(SAS1) in PCIe slot 3 in Node1
Connect into light blue port in
bottom IO Module (PORT 0)
9. Connect dark red SAS cable
Connect into dark red port
(SAS1) in PCIe slot 2 in Node0
Connect into dark red port in
top IO Module (PORT 1)
10
. Connect light red SAS cable
Connect into light red port
(SAS0) in PCIe slot 3 in Node0
Connect into light red port in
bottom IO Module (PORT 1)
Purpose Start - Compute Nodes
End - Expansion Shelf
Connect interconnect and
storage to Oracle Database
Appliance X7-2-HA.
Note: The following cables are included as part of the
Oracle Database Appliance shipment.
Storage Shelf
Storage Expansion Shelf
Network
Cabling the Interconnect and Storage for Oracle Database Appliance X7-2-HA
1
1. Connect green SFP+ cable
Connect into green port (PORT 2) in
PCIe slot 1
Connect into green port (PORT 2) in
PCIe slot 1
2. Connect yellow SFP+ cable
Connect into yellow port (PORT 1) in
PCIe slot 1
Connect into yellow port (PORT 1) in
PCIe slot 1
Node1
Node0
Storage
Shelf
3 51 2
64
Storage
Expansion
Shelf
Node1
Node0
Storage
Shelf
8 1097
Connect optional storage
expansion shelf to Oracle
Database Appliance X7-2-HA.
Note: The following cables are included as part of the
Oracle Database Appliance shipment.
Copyright © 2017, Oracle and/or its affiliates. All rights reserved. Oracle and Java are registered trademarks of Oracle and/or its affiliates. Other names may be trademarks of their respective owners. E88371-02; Mfg no 7357592
Preparing to Deploy Oracle Database Appliance X7-2-HA
1
Set Up the Hardware and Register with My Oracle Support
A Ensure that the system hardware is set up and mounted properly as specified in the
instructions in the Oracle Database Appliance Owner’s Guide, found on:
http://www.oracle.com/goto/oda/docs
B Verify that your shipment contains the correct power cables for your location.
C Oracle Database Appliance includes the network cables for the interconnect between the
two servers. Public network cables are not included in Oracle Database
Appliance shipments.
D Obtain your hardware Support Identifier (SI) from your hardware vendor.
E Add the hardware SI and new software licenses that you received with Oracle
Database Appliance to your My Oracle Support profile. Each SI registration may take up to
24 hours.
Note: You cannot obtain software or support from Oracle without registered hardware and software SIs.
3
Plan the Network Configuration, Continued
B Collect the following cluster node information from your network administrator:
• Node0 network information
° Public name and address (for example, hrsys0 and 192.0.2.18)
° VIP name and address (for example, hrsys0-vip and 192.0.2.19)
° (Optional) VLAN ID
• Node1 network information
° Public name and address (for example, hrsys1 and 192.0.2.20)
° VIP name and address (for example, hrsys1-vip and 192.0.2.21)
° Gateway for public network (for example, 192.0.2.1)
° (Optional) VLAN ID
Note: Public, VIP, and SCAN IP addresses must be on the same subnet.
Note: For Oracle Database Appliance Virtualized Platform, your network administrator must provide extra
IP addresses for dom0, ODA_BASE, and the virtual machines.
2
Planning the Network Configuration
A Collect the following network and cluster information from your
network administrator:
• Generic network information
° Domain name (for example, example.com)
° Domain name server addresses
° (Optional) Network Time Protocol server addresses
• Cluster network information
° Single Client Access Name (SCAN) and two addresses (for example, hrsys-scan and
192.0.2.16, 192.0.2.17)
° Netmask for public network (for example, 255.255.252.0)
° Gateway for public network (for example, 192.0.2.1)
7
Determine the Deployment Type
A A Bare Metal Platform
• Proceed to step 9
B Virtualized Platform
(Recommended) Download Oracle Appliance Manager Configurator:
http://www.oracle.com/technetwork/database/database-appliance/overview/index.html
(i) Run the Configurator, preferably on a computer that is on a network that is local to
where you plan to install Oracle Database Appliance.
(ii) Enter and validate your configuration choices with the Configurator. This creates a
configuration file that you can use during actual deployment. You can also run Oracle
Appliance Manager Configurator directly from Oracle Database Appliance
during deployment.
9
Review Oracle Database Appliance Information
• Review the most recent version of this poster in the Oracle Database Appliance online
documentation library:
http://www.oracle.com/goto/oda/docs
• For more information about where to get the patches, known issues, and how to update
the Server components, see the Oracle Database Appliance Release Notes and the
Oracle Database Appliance X7-2 Deployment and User's Guide.
http://www.oracle.com/goto/oda/docs
and select the latest version.
• Review the Oracle Database Appliance white papers on Oracle Technology Network:
www.oracle.com/technetwork/server-storage/engineered-systems
/database-appliance/index.html
• Review the Oracle Database Appliance Information Center, which is contained in
My Oracle Support Note 888888.1:
support.oracle.com/CSP/main/article?cmd=show&
type=NOT&id=888888.1
• Review the latest information about Oracle software and hardware products:
www.oracle.com
8
Prepare for a Virtualized Platform
From a browser on an external client, download the latest Oracle Database Appliance
virtualization software.
A Download the Virtualization Template (ODA_BASE template)
B Download Virtualized OS ISO Image
C Install the Virtualized OS ISO image
To locate the latest software, go to http://www.oracle.com/goto/oda/docs, select the latest
version, then see the Oracle Database Appliance Release Notes, and the Oracle Database
Appliance X7-2 Deployment and User's Guide.
Note: Refer to the patch file README for the zip file names and commands.
4
Set Up Oracle ILOM Configuration
A Configure Oracle Integrated Lights Out Manager (Oracle ILOM) for managing Oracle
Database Appliance independently of the operating system.
Collect the following information for your Oracle ILOM network:
• Oracle ILOM name and address for Node0 (for example, hrsysilom1 and 10.0.0.3)
• Oracle ILOM name and address for Node1 (for example, hrsysilom2 and 10.0.0.4)
• Netmask for management network (for example, 255.255.255.0)
• Gateway for management network (for example, 10.0.0.1)
6
Plan for Oracle ASR and Oracle Cloud File System Size
A (Optional) To configure Oracle Auto Service Request (Oracle ASR) provide the following:
• Oracle online account user name and password
• SNMP version
• (Optional) Proxy server name and port to use for your deployment
• (Optional) Proxy user name and password
B (Optional) Configure External Oracle ASR Manager
• Oracle ASR Manager IP, host name, and port
• Your My Oracle Support account user name and password
C To change the default name and size of Oracle Cloud File System, provide the following:
• Name of file system (default name is /cloudfs)
• Size of file system (default size is 50GB)
For more information about ASR, see:
www.oracle.com/technetwork/systems/asr/overview/index.html
5
Plan the Software and Database Configuration Choices
A Plan your software installation choices as follows:
• System name (for example, hrsys)
• Region (for example, America) and Time Zone (for example, America/Los_Angeles)
• Deployment type (for example, Oracle Real Application Clusters)
• Disk group redundancy: High (triple-mirrored) or Normal (double-mirrored)
• Data storage percentage (for example, 80)
B Prepare to enter information for the following Database fields:
• Name (for example, hrdb)
• Unique Name
• Deployment type (for example,
Oracle Real Application Clusters)
• Shape (for example, odb-02)
• DB Edition (for example, Enterprise Edition)
2
Copyright © 2017, Oracle and/or its affiliates. All rights reserved. Oracle and Java are registered trademarks of Oracle and/or its affiliates. Other names may be trademarks of their respective owners. E88371-02; Mfg no 7357592
You can also scan the Quick Response
Code with your mobile device to read
the documentation.
• Class (for example, OLTP)
• Storage (for example, ASM)
• Language (for example, English)
• Character Set (for example, AL32UTF8)
• Territory (for example, America)
of 4
免费下载
【版权声明】本文为墨天轮用户原创内容,转载时必须标注文档的来源(墨天轮),文档链接,文档作者等基本信息,否则作者和墨天轮有权追究责任。如果您发现墨天轮中有涉嫌抄袭或者侵权的内容,欢迎发送邮件至:contact@modb.pro进行举报,并提供相关证据,一经查实,墨天轮将立刻删除相关内容。
下载排行榜

评论